How to work with Markdown and HTML in Byword and Ulysses
Writing for the web can be a pain. The default language of the web (HTML) isn’t necessarily difficult to learn, but it is cumbersome to use when all you want to do is get your words published. Fortunately, John Gruber created a text-to-HTML conversion tool specifically for web writers called Markdown that “allows you write using an easy-to-read, easy-to-write plain text format,” which can then be translated easily into HTML for publishing on the web.
Markdown has become a popular writing format and is supported by many writing applications, including Byword (our favorite Markdown writing app for both Mac and iOS) and Ulysses (our favorite pro writing app for the Mac). In this post, we’ll show you how to export Markdown-formatted text from these applications into HTML for publishing on the web.
Byword
Once you have your document ready to export from Byword, you have three options available to you:
- You can copy the Markdown-formatted text as HTML, which you can then paste into your web editor.
- You can save the Markdown-formatted text as a separate HTML-formatted text file.
- You can publish directly to supported web services straight from Byword.
To copy the text as HTML without saving it as a separate file first (useful when you want to just get your text into your CMS, like WordPress), go to the File menu and select Export → Copy HTML. (You can also do this by using the Keyboard shortcut ⌥ ⌘ C.)
If you want to export your text as an HTML file (useful if you need to upload it to a separate server or want to manipulate it inside of a code editor), the process is very similar. Go to the File menu and select Export → HTML (or press ⌥ ⌘ E).
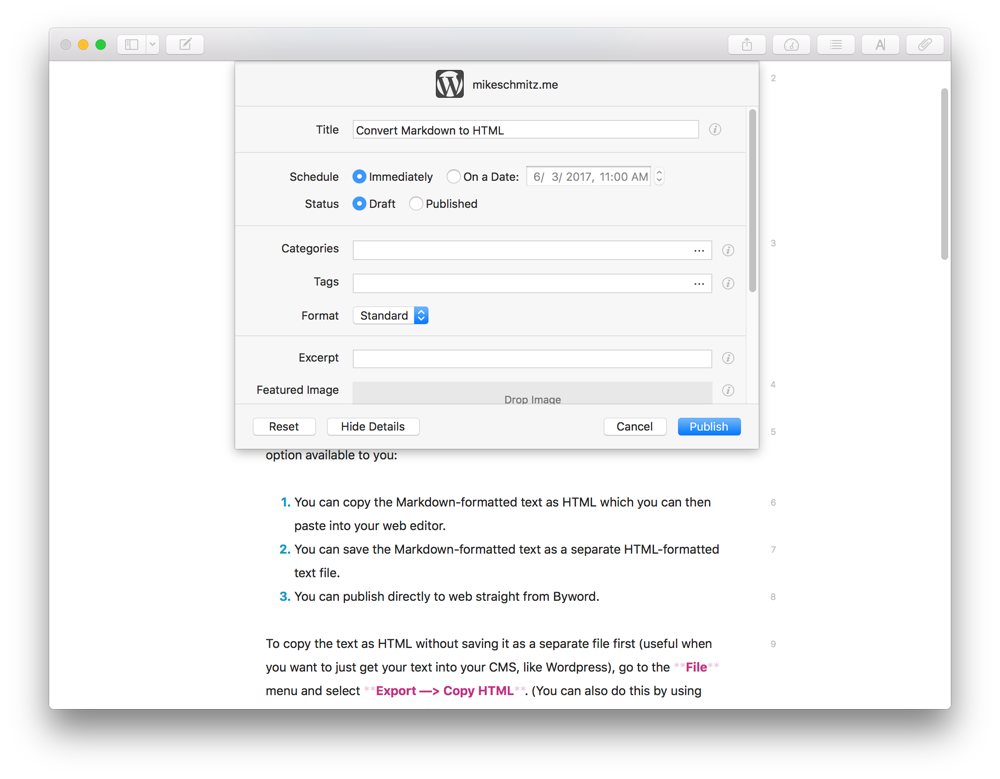
You can also save a step and publish straight to the web. Byword allows you to publish to selected services — Medium, WordPress, Tumblr, Blogger, and Evernote are all supported. To publish straight from Byword, go to the File menu and click Publish (or press ⌃ ⌥ ⌘ P).
If you haven’t connected your web account yet, you’ll be taken to the Publishing Preferences screen. From there, select which web service you want to connect to Byword by selecting one of the options on the right.

Once you provide your credentials and have your account connected, you’ll be able to publish straight to the web.

Depending on the service, you’ll be able to customize some of the options before publishing. For example, in the above example, I’m able to select the post title, what state I want the post in (for WordPress I prefer to publish as a Draft and then apply the finishing touches in WordPress itself), and what tags I want to apply to the post. You can also select the category and even a custom URL for the post.
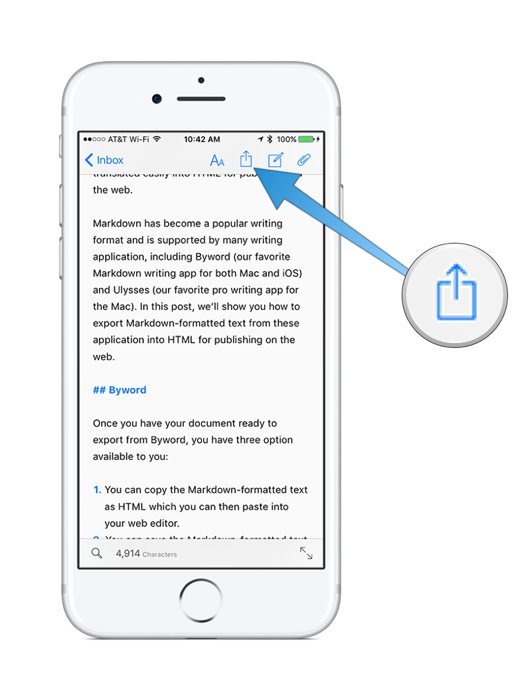
You can use the same three export options (copy HTML, save to HTML, and publish) from Byword for iOS as well. To access the export or publish options, just tap the ellipsis menu in the upper right corner and select the option you want.

Ulysses
You can also copy HTML, save to HTML, and publish directly from Ulysses. All three options can be triggered by clicking Quick Export on the toolbar in the upper-right.

This will open a menu that offers several options for exporting your text out of Ulysses. You can preview your text, copy it to the clipboard, save it to a file, open it in another application, or send it somewhere using a service like email or Messages. You can also choose the format of the text you want to export. You can select plain text, HTML, ePub, PDF, even DOCX. If you want to copy the text as HTML and paste it directly into your web editor, simply set the text format as HTML and click Copy to Clipboard.

If you want to save the text to HTML, just select Save to instead.

If you want to publish straight to Medium or WordPress (the two services Ulysses supports), click the text format drop-down menu and select Publishing. If you’ve never connected your account, you’ll see a big blue button to add your account.

Click this and you’ll be able to choose the type of account you want to add (Medium, WordPress.com, or custom WordPress). Select the service and you’ll be taken to the Accounts tab in the Preferences menu where you can enter your account credentials.

Enter your credentials and click log in to connect your account. Once your account is connected, you can close the Preferences window. Now, when you click the Quick Export button and select Publishing, you’ll see your connected account with an option to publish.

Once you click Publish, you’ll be able to enter the additional information associated with your post. In the case of WordPress, this once again includes the post title, whether it’s a draft or actually published, and any tags you want to apply to the post. Ulysses also gives you a lot more granular control of your published post, allowing you to schedule the post if you’d like, include an excerpt, and even select a featured image.
Just like Byword, all of the same exporting and publishing options also exist on Ulysses for iOS. Tap the Quick Export icon in the toolbar on your iOS device to access the different export options.
You’ll see a preview of your Markdown-formatted text and you can select either HTML or Publishing by tapping the drop-down menu in the middle of the toolbar on the post preview.
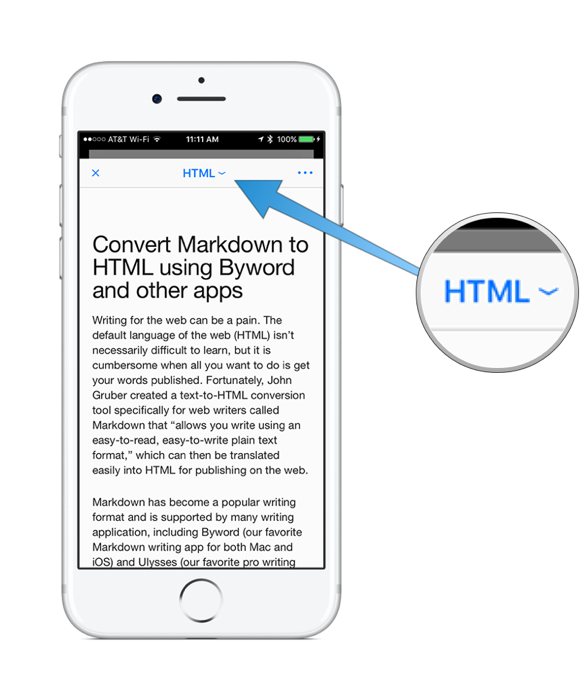
In this case, I have HTML selected, but as you can see, the icons are not available on iOS because of the limited space in the user interface. To access the different export options on iOS, just tap the ellipsis menu in the upper right of the preview toolbar.
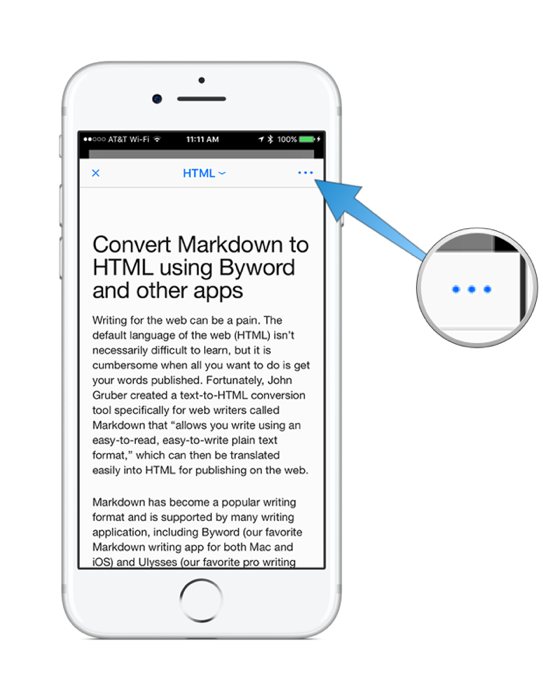
These options are slightly different on iOS. You can tap Send to and select where you want to send the text by using the iOS share sheet, Open in Another App, Copy to Clipboard if you want to paste it somewhere like a web editor, Send as Mail, and Upload if you want to save the file directly to iCloud Drive.
We have more useful workflow examples right here.
Stop losing your ideas and notes to multiple apps…
An online course to help you save time, organize your notes, and master the best writing app for Mac and iOS: Ulysses.