A Beginner’s Guide to Notion
Notion is one of the fastest-growing productivity tools in recent memory. Power users have become so enamored with Notion that it’s reached Fight Club meme status.

The blank slate nature of Notion means it can be really easy to start using, but it can also mean users struggle to understand the most effective use cases for such a powerful tool. Here’s what Matt Birchler, The Sweet Setup contributor and prolific Notion user, loves about it:
My favorite thing about Notion is how I can use it to create exactly the interface I need for keeping up with important things in my life. The fact I can then share these interfaces with others with a click is what puts it over the top for me.
As we will discuss, there are many different ways to use Notion. If you don’t know where to start, it can be intimidating.
In this article, we are going to share some common and easy ways to get started and understanding the fundamentals of using the Notion app. Let’s jump in.
Building (with) Blocks
The core element of Notion is the block, from which all content springs forth. There are roughly 90 potential blocks as of this writing along with 500+ embeddable services, with more being added. You will quickly see that you can create any kind of written content with blocks. Little fun fact: Notion will recognize Markdown commands automatically, (although we at The Sweet Setup tend to use other apps for writing. You can easily embed any type of media such as images, PDFs, or YouTube videos inside of blocks.
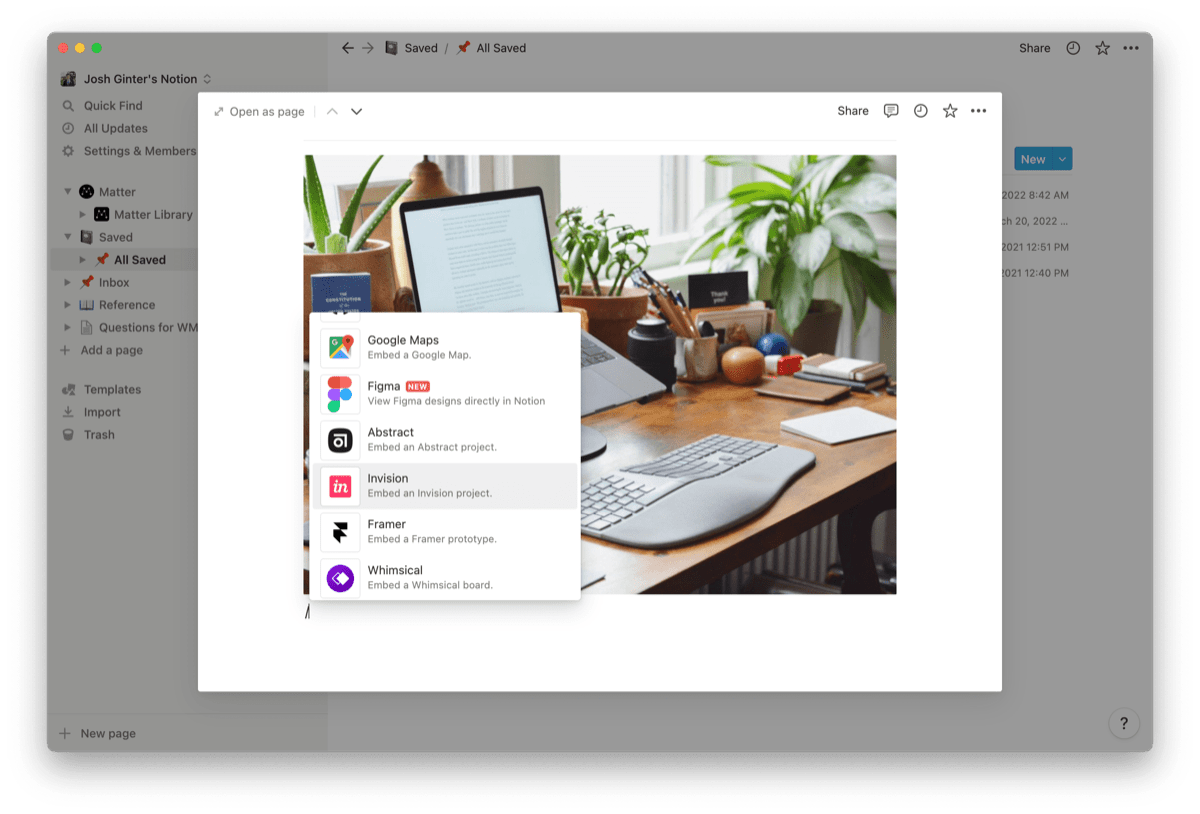
Block capabilities are expanding all the time. Recently, blocks were expanded to allow users to insert Figma files, Google Calendars, and Asana tasks directly in Notion. You can insert Framer prototypes, a Google Map, and even embed files stored on OneDrive right within a block. The basic block in Notion has evolved tremendously since Notion’s earliest days and has now unlocked new ways of working with files.
Yes Yes Notion Workshop 💥 Create your simple, uncomplicated Notion setup for productivity and creativity.
If you are just getting started with with Notion — or you’ve been frustrated with your Notion setup — then you are in the right spot. This workshop series will walk you through everything you need to know to get set up for maximum creativity and productivity.
👉 Build a simple, uncomplicated Notion setup
👉 Collect and organize your ideas and notes
👉 Get hands-on, done-with-you support from our Notion expert
Creating Pages for Blocks
If the core element of Notion is the block, the next step up is a page. You can create pages in a variety of ways in Notion — you can click the + button beside your workspace in the left sidebar or you can click any of the + buttons across all of Notion to quickly create a page, or simply type /new. You can also create a page within a page — formally known as a subpage.
You can insert all sorts of blocks in a page. You can write in a page, upload files, save URLs, create databases, link to other databases, and more. There are no folders in Notion, so creating pages and subpages is likely the best way to organize all your files, written work, and saved digital tidbits.
Organizing Pages with Databases
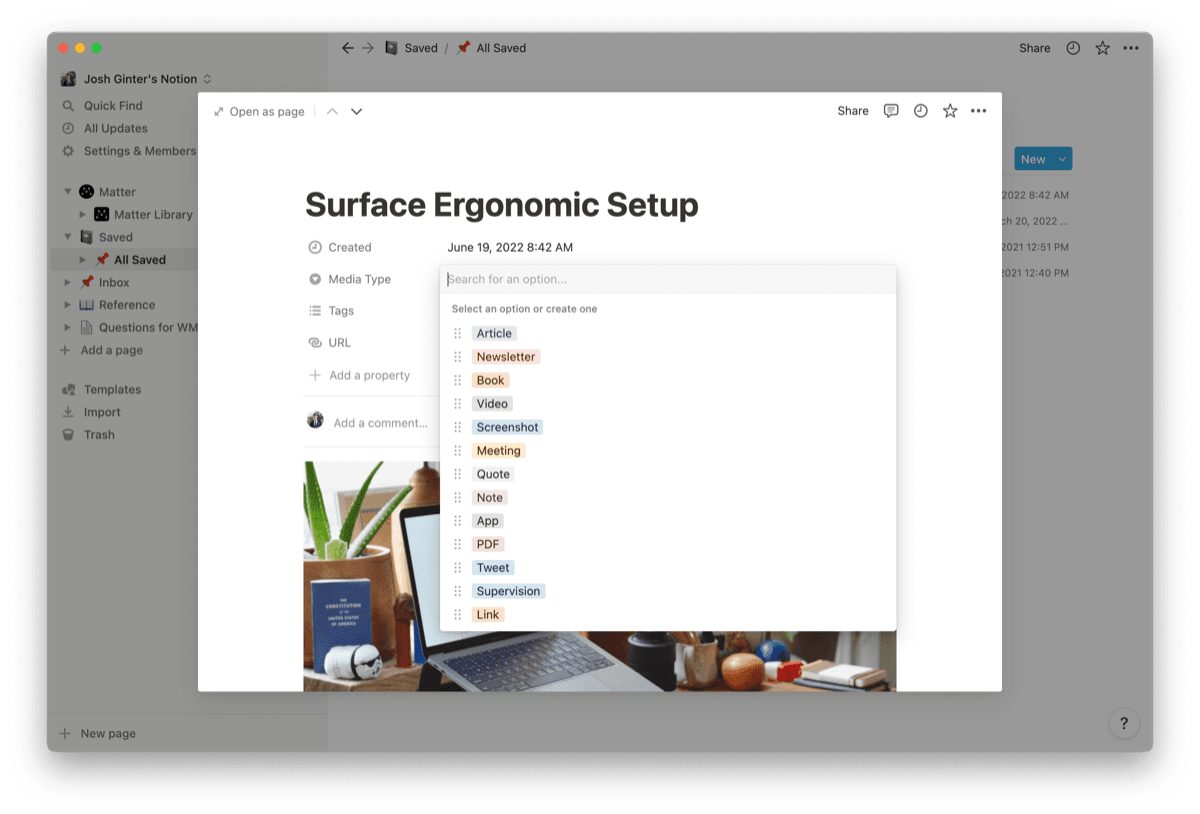
You can also create something called a database. These are amazing. Databases are essentially collections of pages. Like a spreadsheet, but on steroids. Every item inside a database is its own editable page, inside which you can store other subpages, and so on. Each page in a database has customizable properties, allowing you to label and contextualize your saved files for viewing in a variety of ways.
You can view these databases in several ways, known specifically as database views. For example, you can have a calendar view, list view, board view, gallery view, table view, and a timeline view. Each view takes the items (pages) inside the database and displays them to you in their specific way based on the customized properties you’ve set per item. So if you have a page with a “Date Created” property, you can quickly create a calendar view that displays your items based on the date the item was created. Notion is continuing to improve their databases and always adding new features.
More on Database Views
Though databases start to creep outside the territory of Beginners Guide, we think a basic understanding of each database view will help you quickly unlock Notion’s potential.
To recap, a database is a collection of pages and a database can be created inside a block or can be entire page itself. Finally, each item inside a database is its own page, with customizable properties you can set to organize the items in the database.
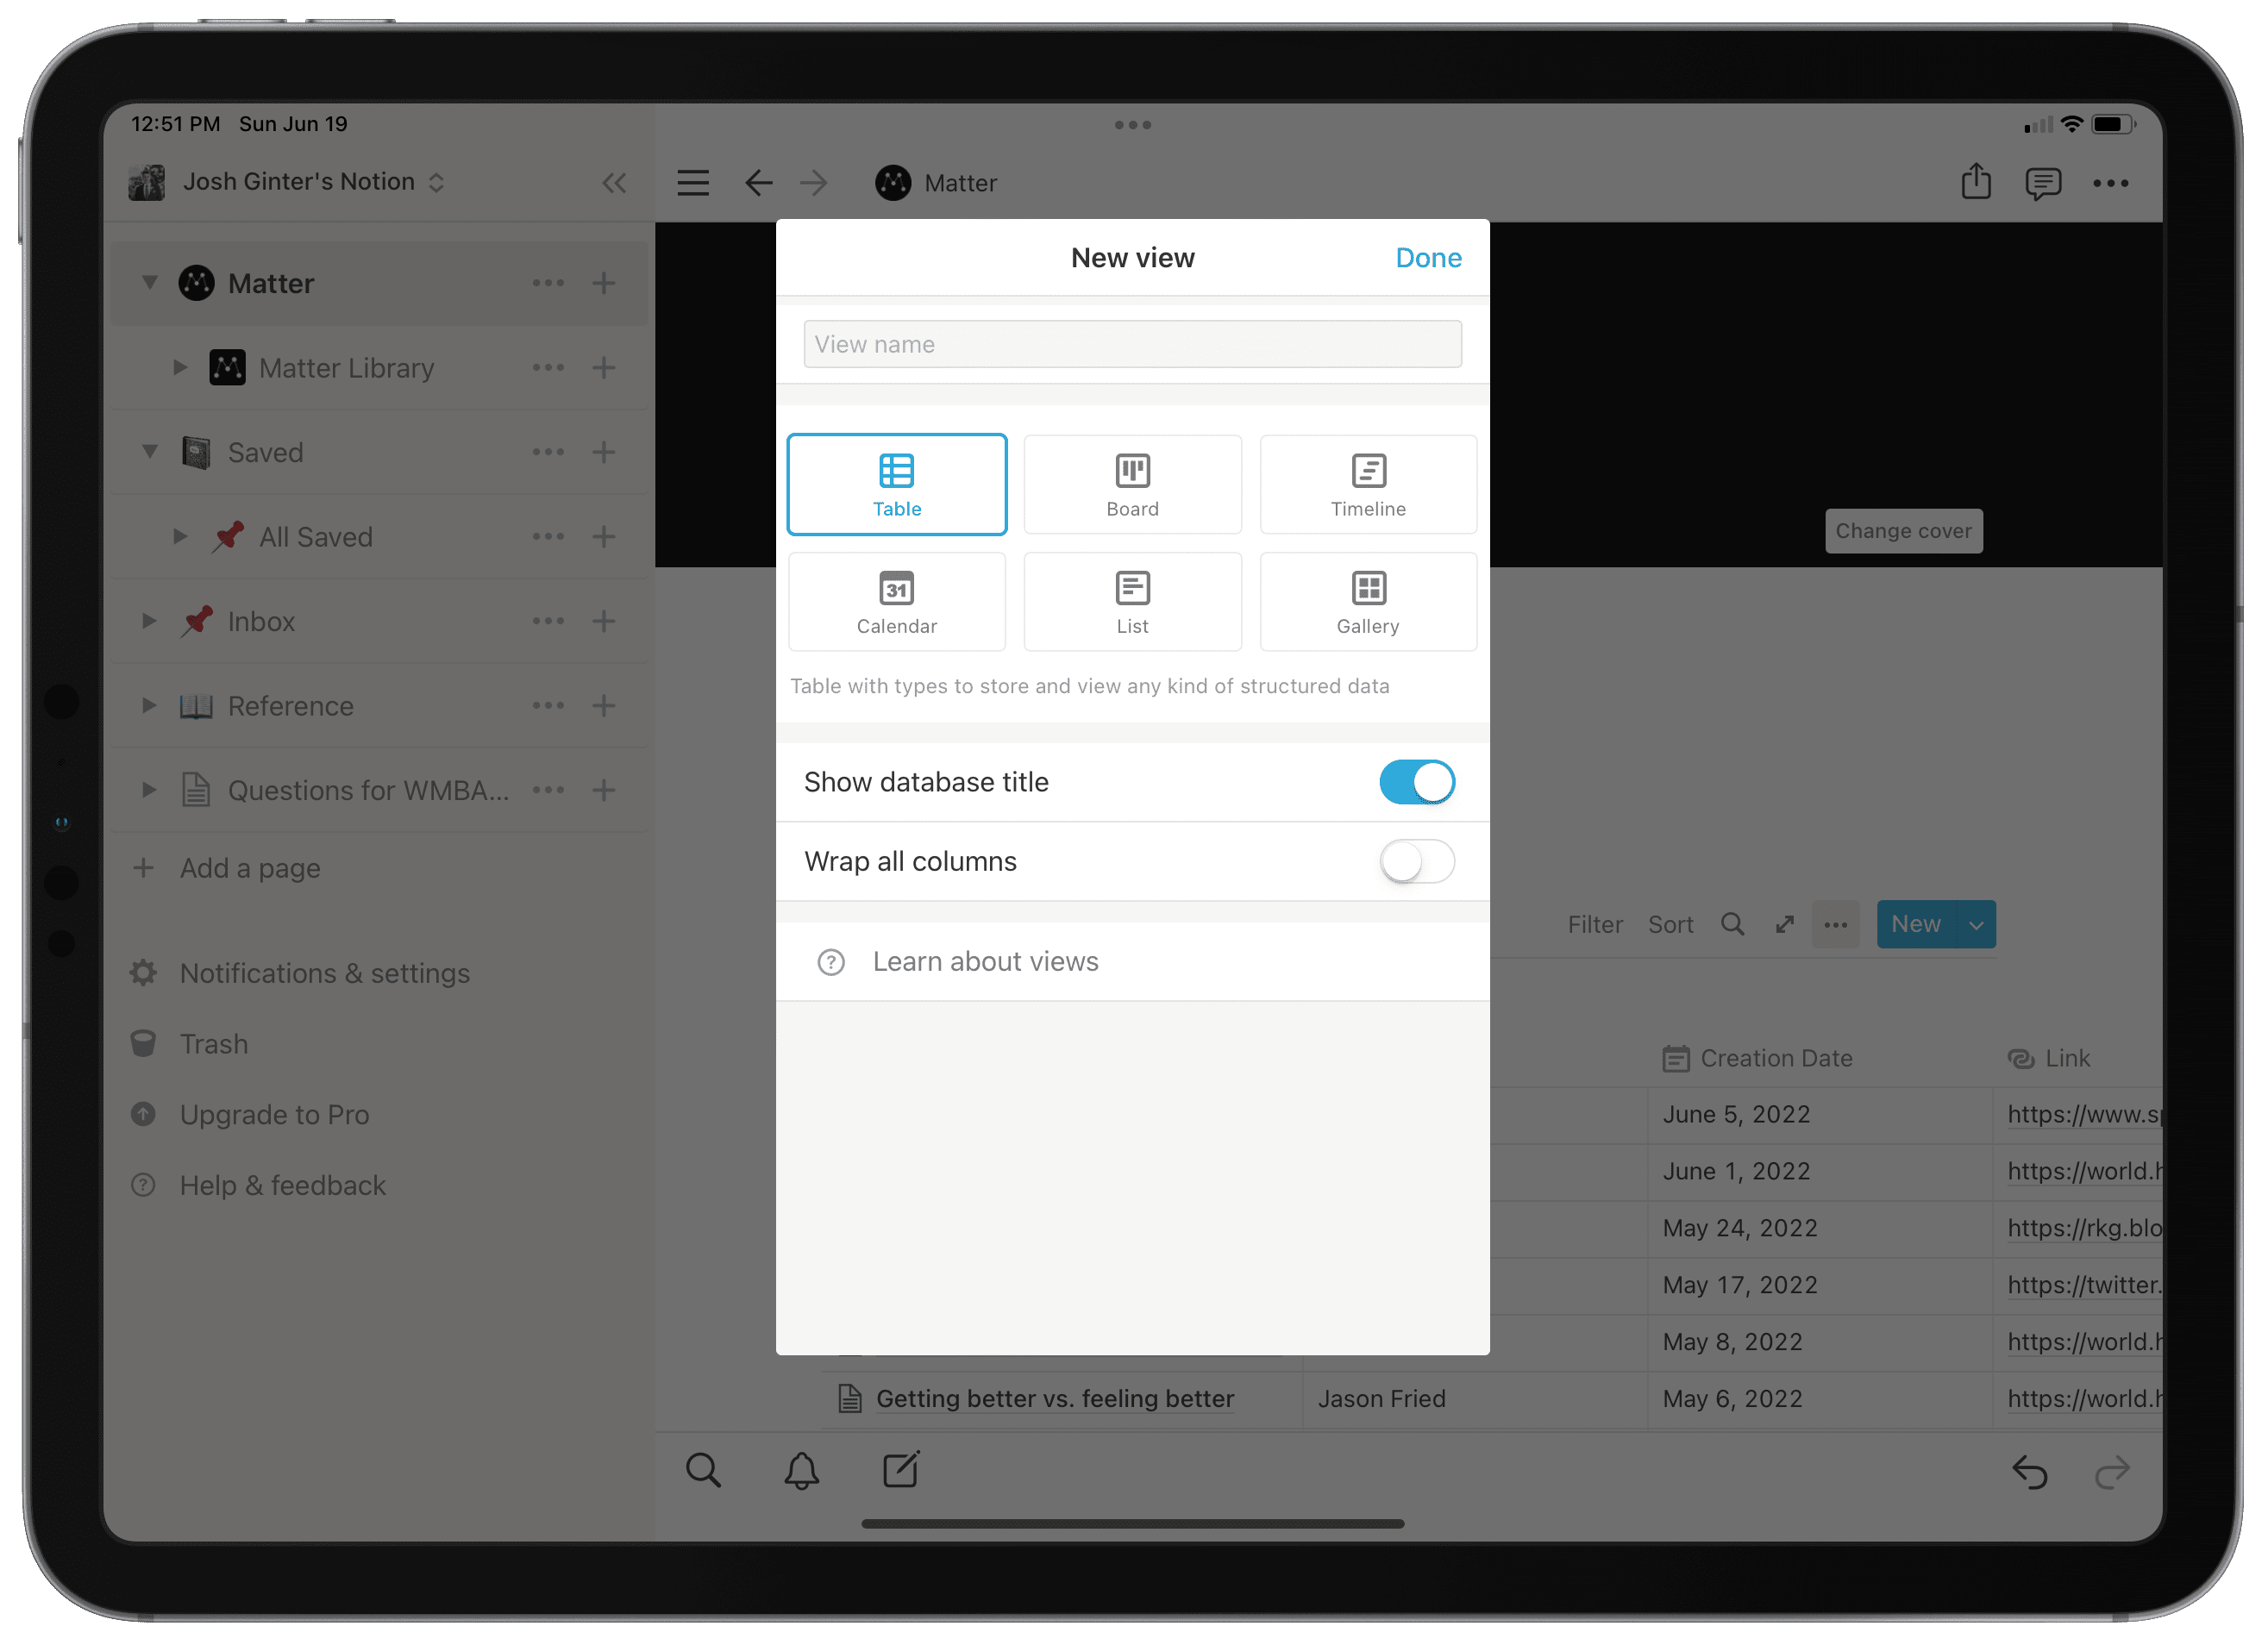
Once you’ve created your first database, you can create the following database views to view all your items in unique ways. To create a unique database view, click Add View right under the description of your database (or next to the current view). A small sidebar will slide in from the right side with six different options to pick from. You can create multiple views for the same database, enabling you to view your items in multiple ways.
Each database view type is considered a layout. The layouts are as follows:
- Table layout: This view shows your items in a page of rows and columns.
- Board layout: Formerly known as “Kanban view,” this view groups your items based on property and allows you to move the page from left to right or right to left between groups.
- Timeline layout: This view sorts items based on date properties and allows you to visualize the items in a left-to-right timeline.
- Calendar layout: This view also sorts items based on date properties and puts the items on a traditional calendar.
- List layout: This simple view showcases all your items in a long list and allows you to customize which properties to sort the list by.
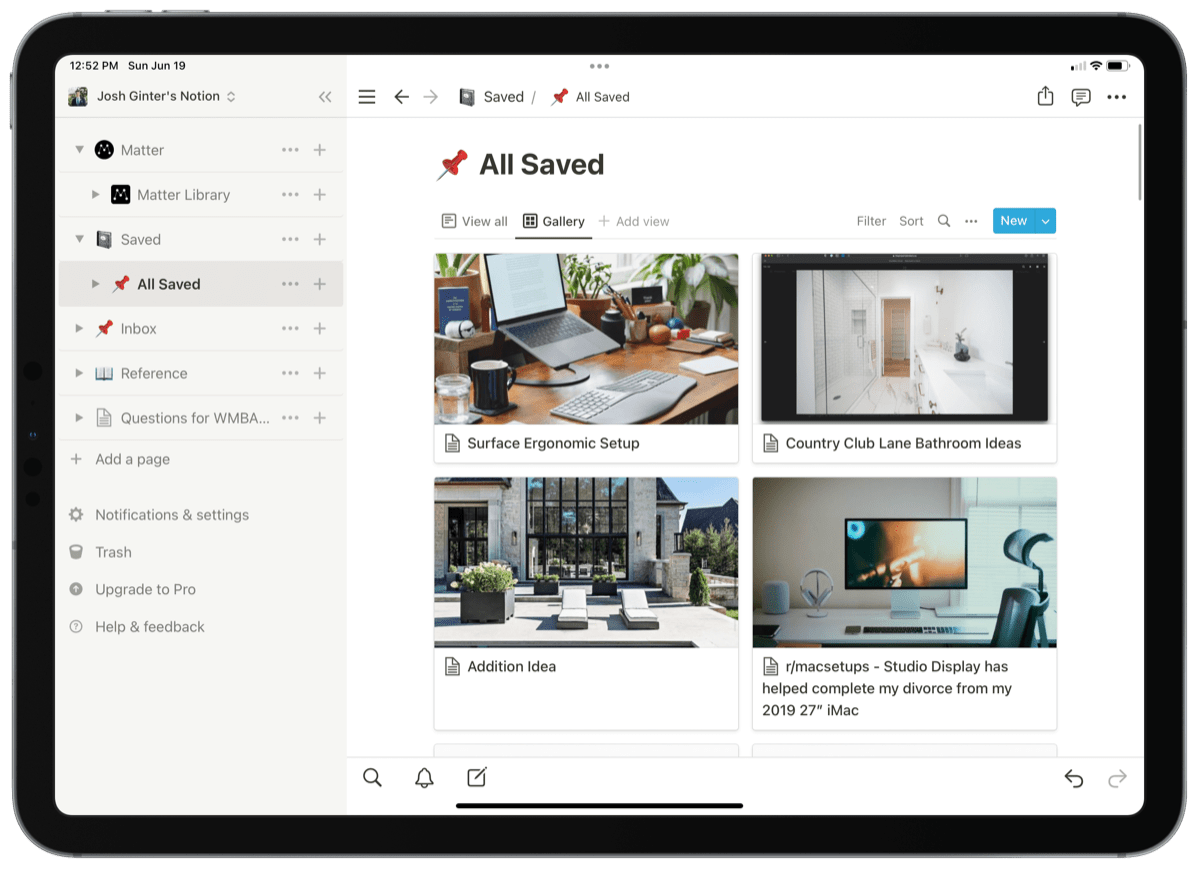
- Gallery layout: This view is best used with image properties or files and showcases your items in larger cards that are great for visuals.
Each Notion user will find specific layouts to be more useful than others, but our Sweet Setup team finds the Board layout and the Calendar layout to be the most useful. The Board layout is great for project management — each project can be its own database with a range of tasks as items. As you complete items, you move the items from left to right to mark completion. You can also throw the same tasks with due dates into a Calendar view to ensure you understand your deadlines in the traditional calendar format.
The best way to get accustomed to Notion is to jump in and play around with some of the blocks, pages, and databases. To access all the different kinds of blocks just type / and see all the options!
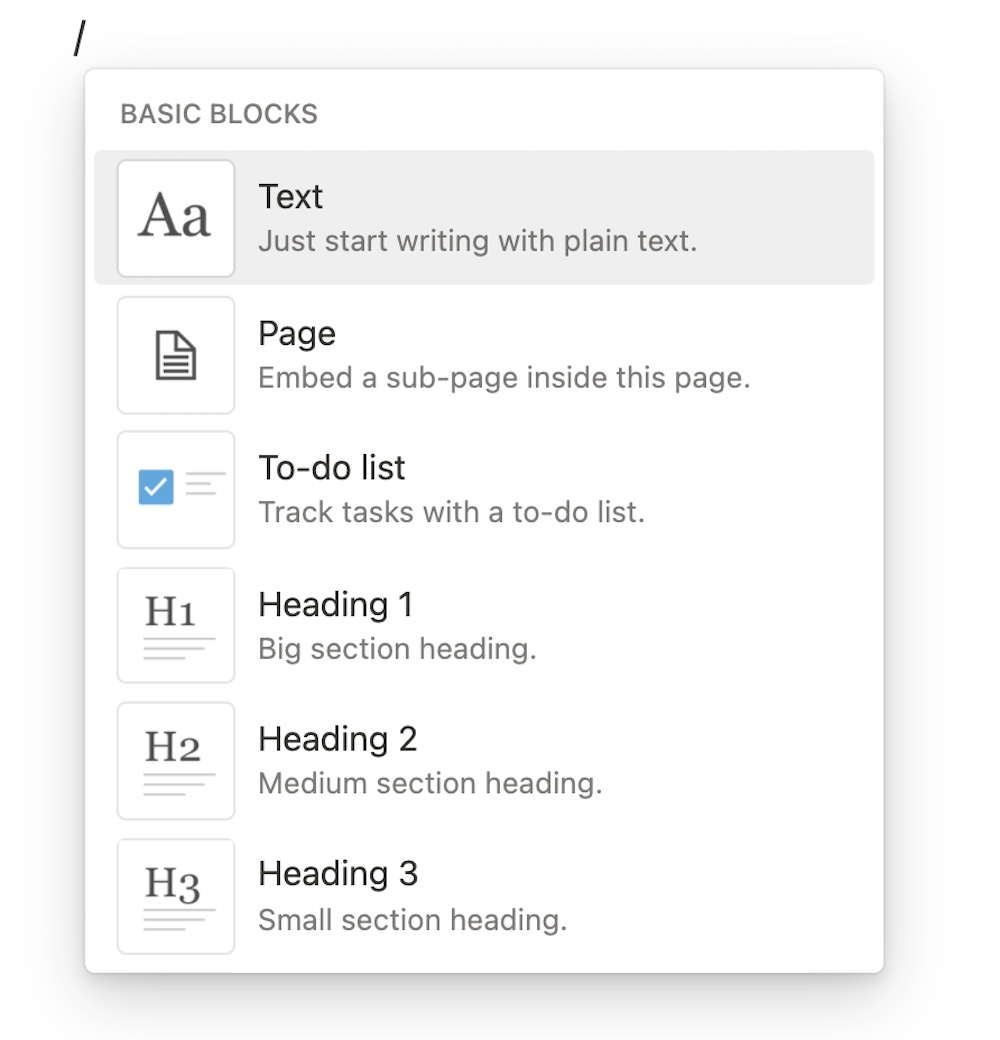
The next part we’re going to cover is how to organize your Notion account and not lose track of what can become your second brain.
Organizing Notion
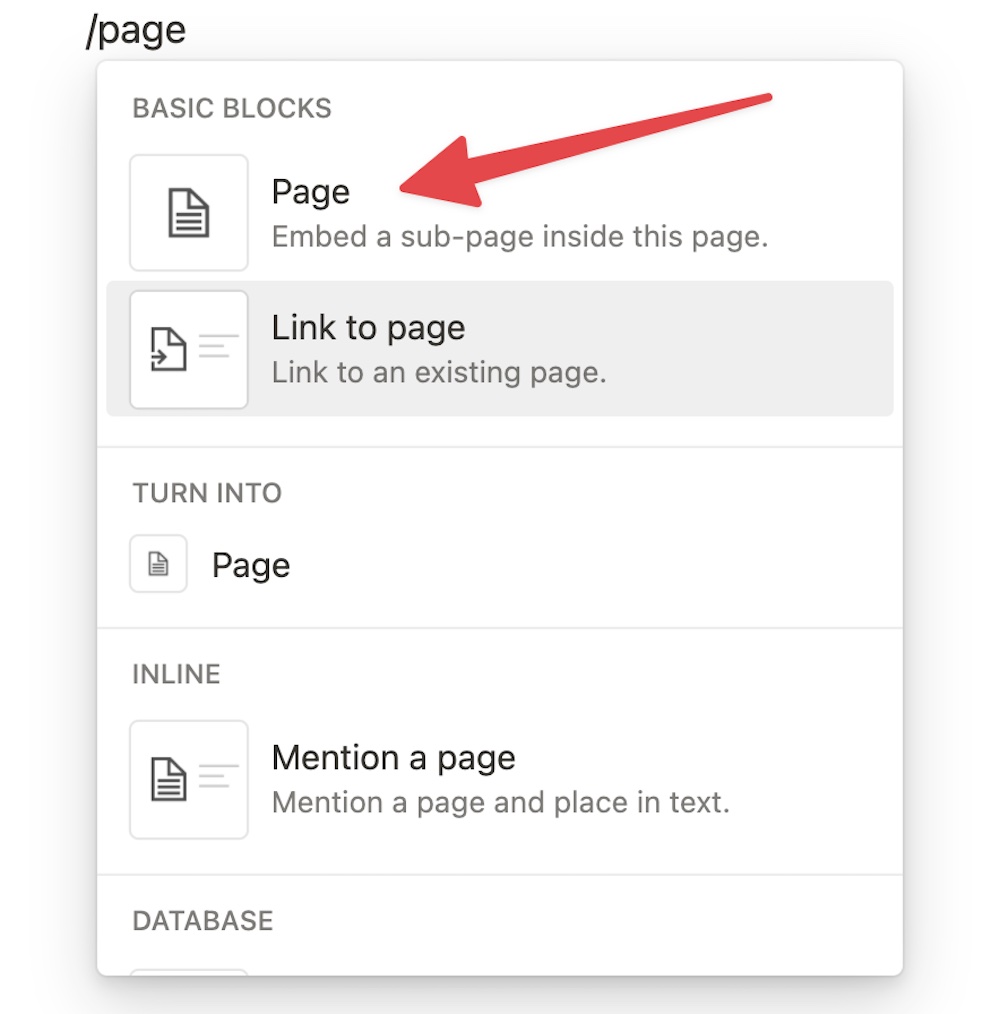
Since you have already played with blocks a bit, the next thing to try is creating a new page. You have two options: create a sub-page on your default workspace or create a new page in the Notion menu. To keep Notion more organized, I recommend creating a new workspace sub-page to start.
To do this, type / to bring up the block options and type page. Select the first option Page —> Embed a sub-page inside this page. When you do this, you’ll see Notion’s starter template options along with a range of possible page types, including databases.
Once you create the page, you can use the sidebar menu or back buttons to return to the primary workspace.
It’s possible to go as deep as you want with sub-pages, but we wouldn’t recommend that. You can be more organized without overloading on top-level pages. Linking between pages is another thing you can do in Notion that we find helpful, but we’ll cover that later. The general rule of thumb for Notion (thanks to Marie Poulin is that nothing should be more than three clicks deep.
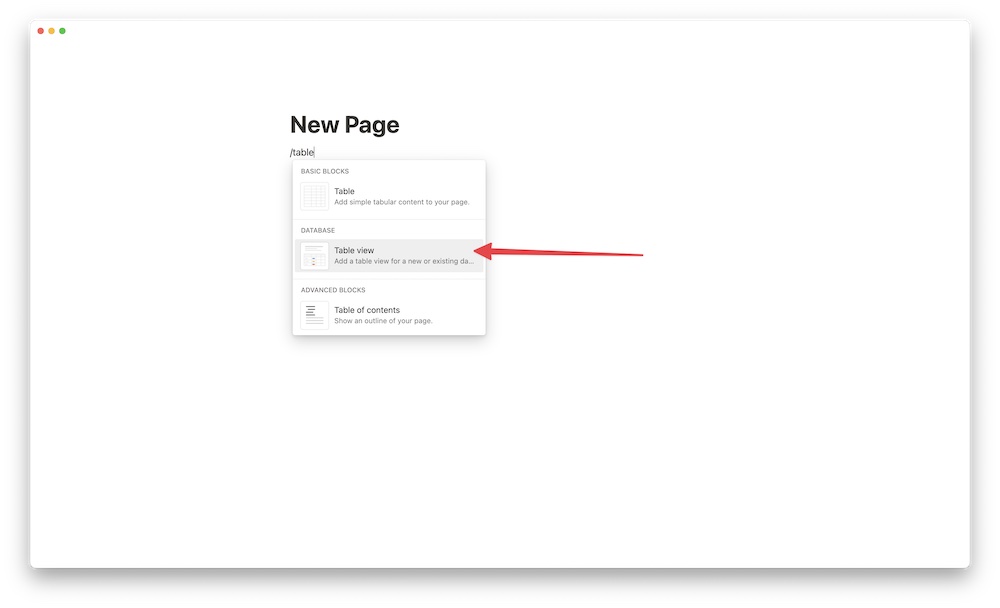
Let’s open the blank sub-page again. You already know how to add written content and media, so we’ll create an inline database. To do this, type / to bring up the block options, type table, and select the second option: table view. You’ll also note there is a simple table option. This would create a basic table with a few rows, similar to one you would drop in a Word document or see in Excel, but that’s not what we’re going for. We want to create a table view because that connects it with a database. We’ll use this page to create a Habit Tracker.
Creating a Habit Tracker
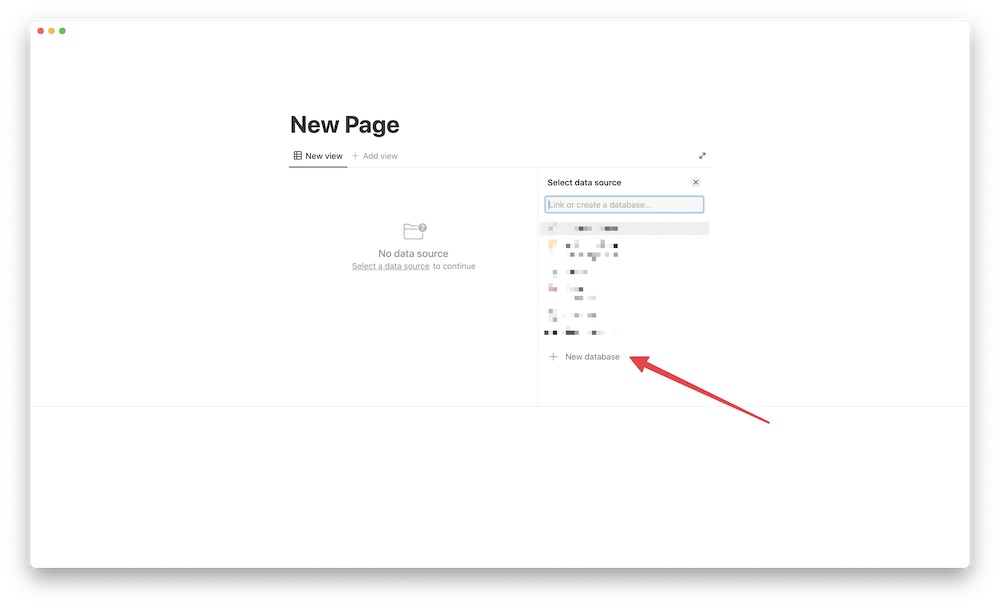
Now you’ll see the option to select data source. Since we are creating a new database and not pulling from an existing database, we are going to click New Database at the bottom. Once you click that, a new table database will appear. Go ahead and name the database something like Habit Tracker.
To start tracking your habits you need to create seven columns (one for each day of the week) by clicking +. Then, click the column and click edit property. Change the name to each day of the week and change the property type to Checkbox.
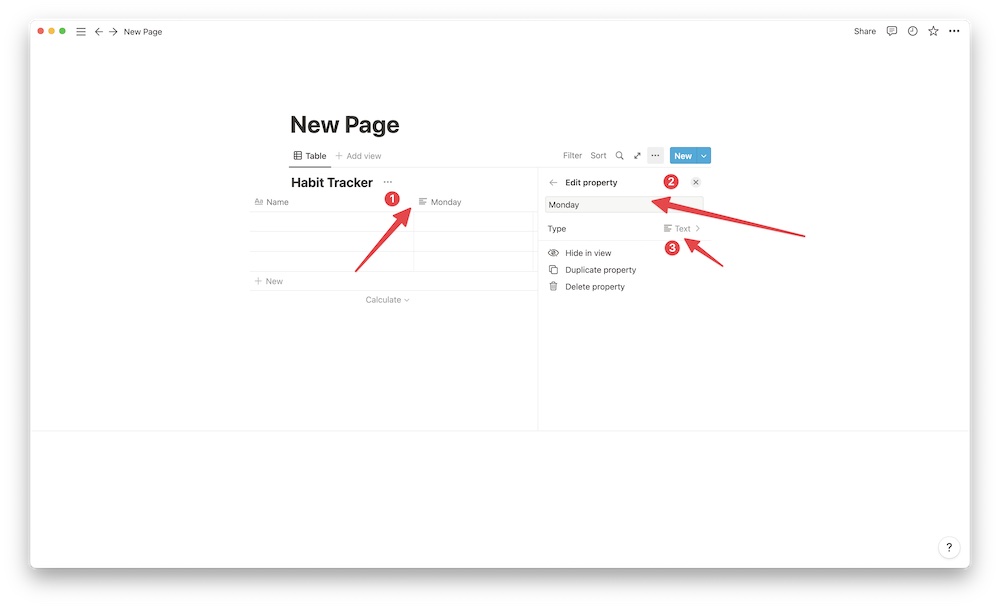
Add as many rows as you need to track everything, but don’t worry about adding a ton of things to track. You can always come back and add more later. You can also adjust the size of each column as needed.
It should look something like this:
![]()
(Look kind of boring? Don’t worry, you can add custom icons and cover images to spruce it up.)
Notion is very customizable and this is just one simple way to create a habit tracker. But with this simple creation comes a few drawbacks. It won’t automatically clear out the data each week. You will have to manually clear it all out and start fresh each week. If you don’t care about storing the data long term, then there’s no problem! You can just delete the data each week. If you do want to be able to look back and see the habits you’ve tracked over, say, a month, you’ll need a more advanced approach. You can check out this article to see a more advanced way to track your habits.
You could also create a slightly different table that tracks your habits for an entire month. That might look something like this:
![]()
As you can see, Notion is pretty much limitless. It also has some pretty amazing filtering capabilities that could take it to the next level, but we’re not gonna get into that right now.
Moving Pages in Notion
You can keep the Habit Tracker as a sub-page in the main workspace, but just for practice try dragging the Habit Tracker page off the top-level page and on to the sidebar menu.

By doing that, you have changed the Habit Tracker to another top-level page in your account. You can now create other sub-pages under it, move it back to the default workspace, or drag it to other top-level pages you create in the future.
Tasks
Creating a to do list or task list inside Notion can be done in a number of ways. You can create a database of items with each item being a task. Each of those tasks can then have some properties, such as On Deck, In Progress, or Completed. You could also create a simple Checkbox property that can be checked once you complete the task.
If viewed in a Board layout with status properties, your task list can look like a Kanban board where you move each task from left to right. Or, if viewed in a list view, you can see your list of checkboxes and check off your tasks as you go.
Of course, you can create properties to match all your needs. You can create properties to denote which area of your life the task pertains to (such as Home, Finances, or School) and then you can group sort your tasks based on which area of your life they relate to. This is handy for dialing in on work tasks and pushing home tasks out of the way until the evening.
Notion makes it easy to create a simple task list, and since you can share your Notion with a friend or family member, you could quickly create shared to-do lists as well — something even our favorite task management apps still don’t do.
Project Management
If you need something more than simple task management, Notion can seamlessly handle project management as well. We would consider a project a series of tasks that are to be completed either sequentially or in parallel and that work towards an end goal of producing something. A project can range from writing a thesis to designing and building a house. No matter what type of project you find on your hands, Notion can likely handle it.
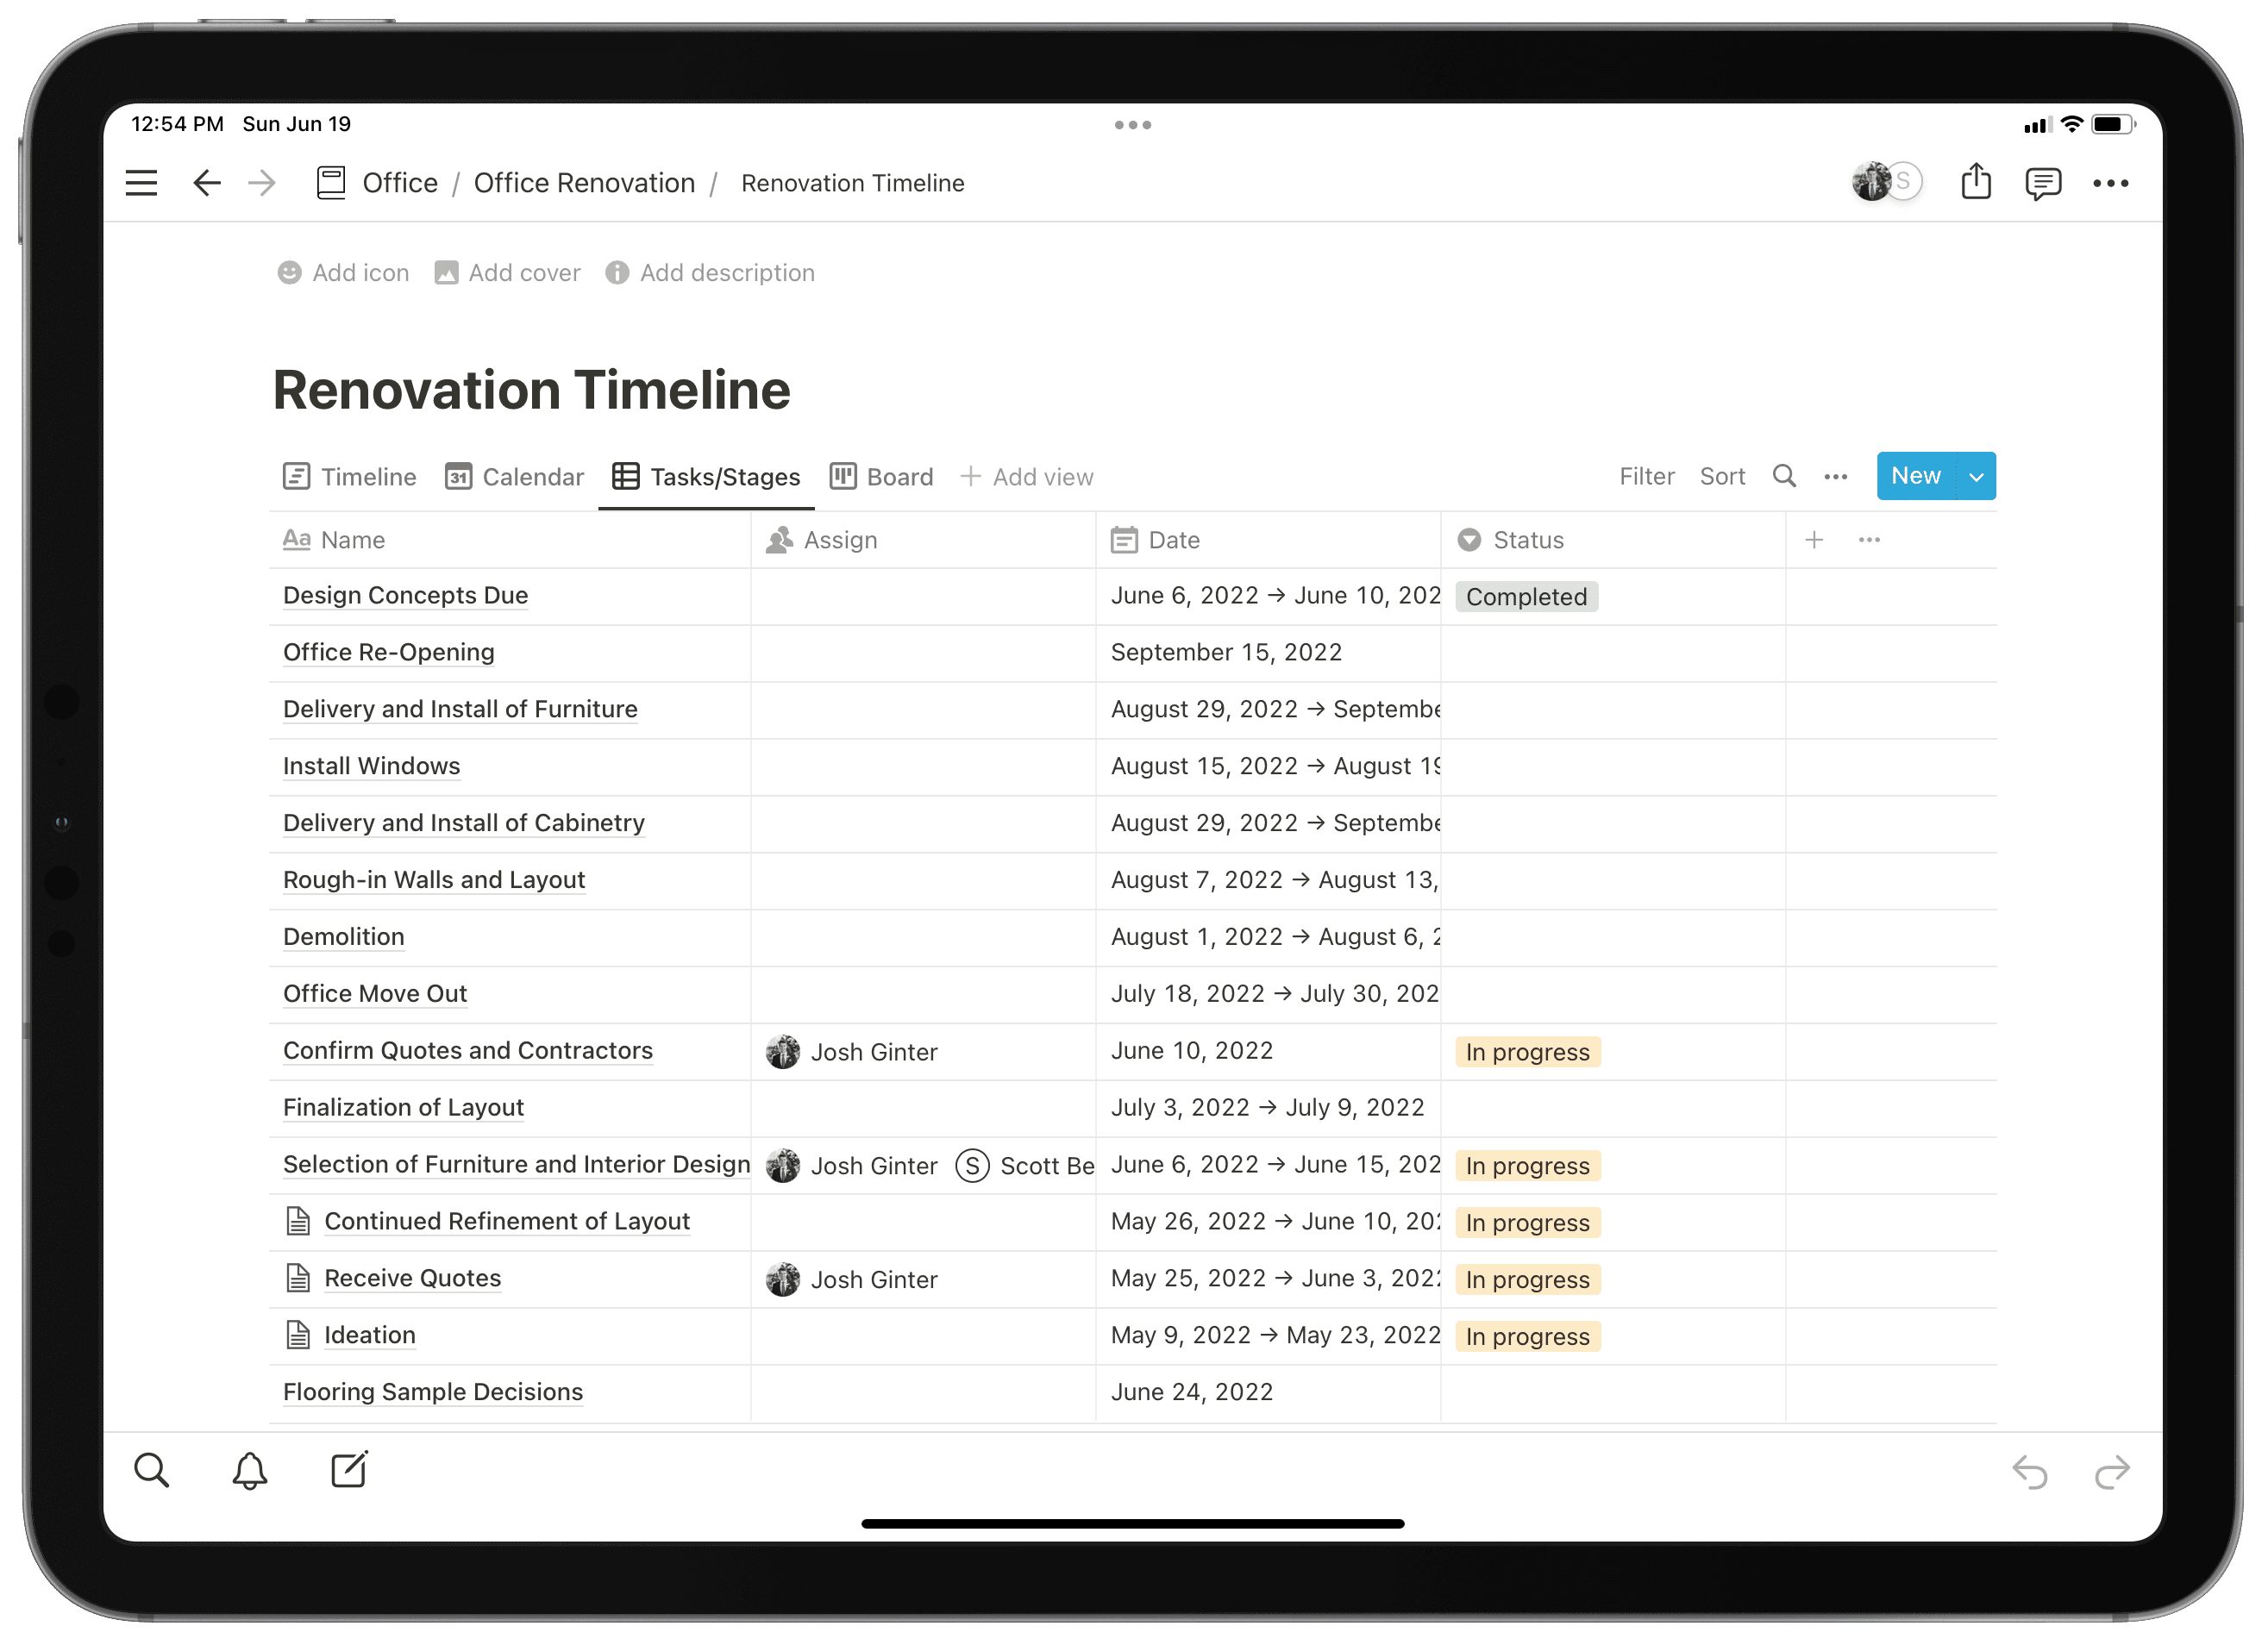
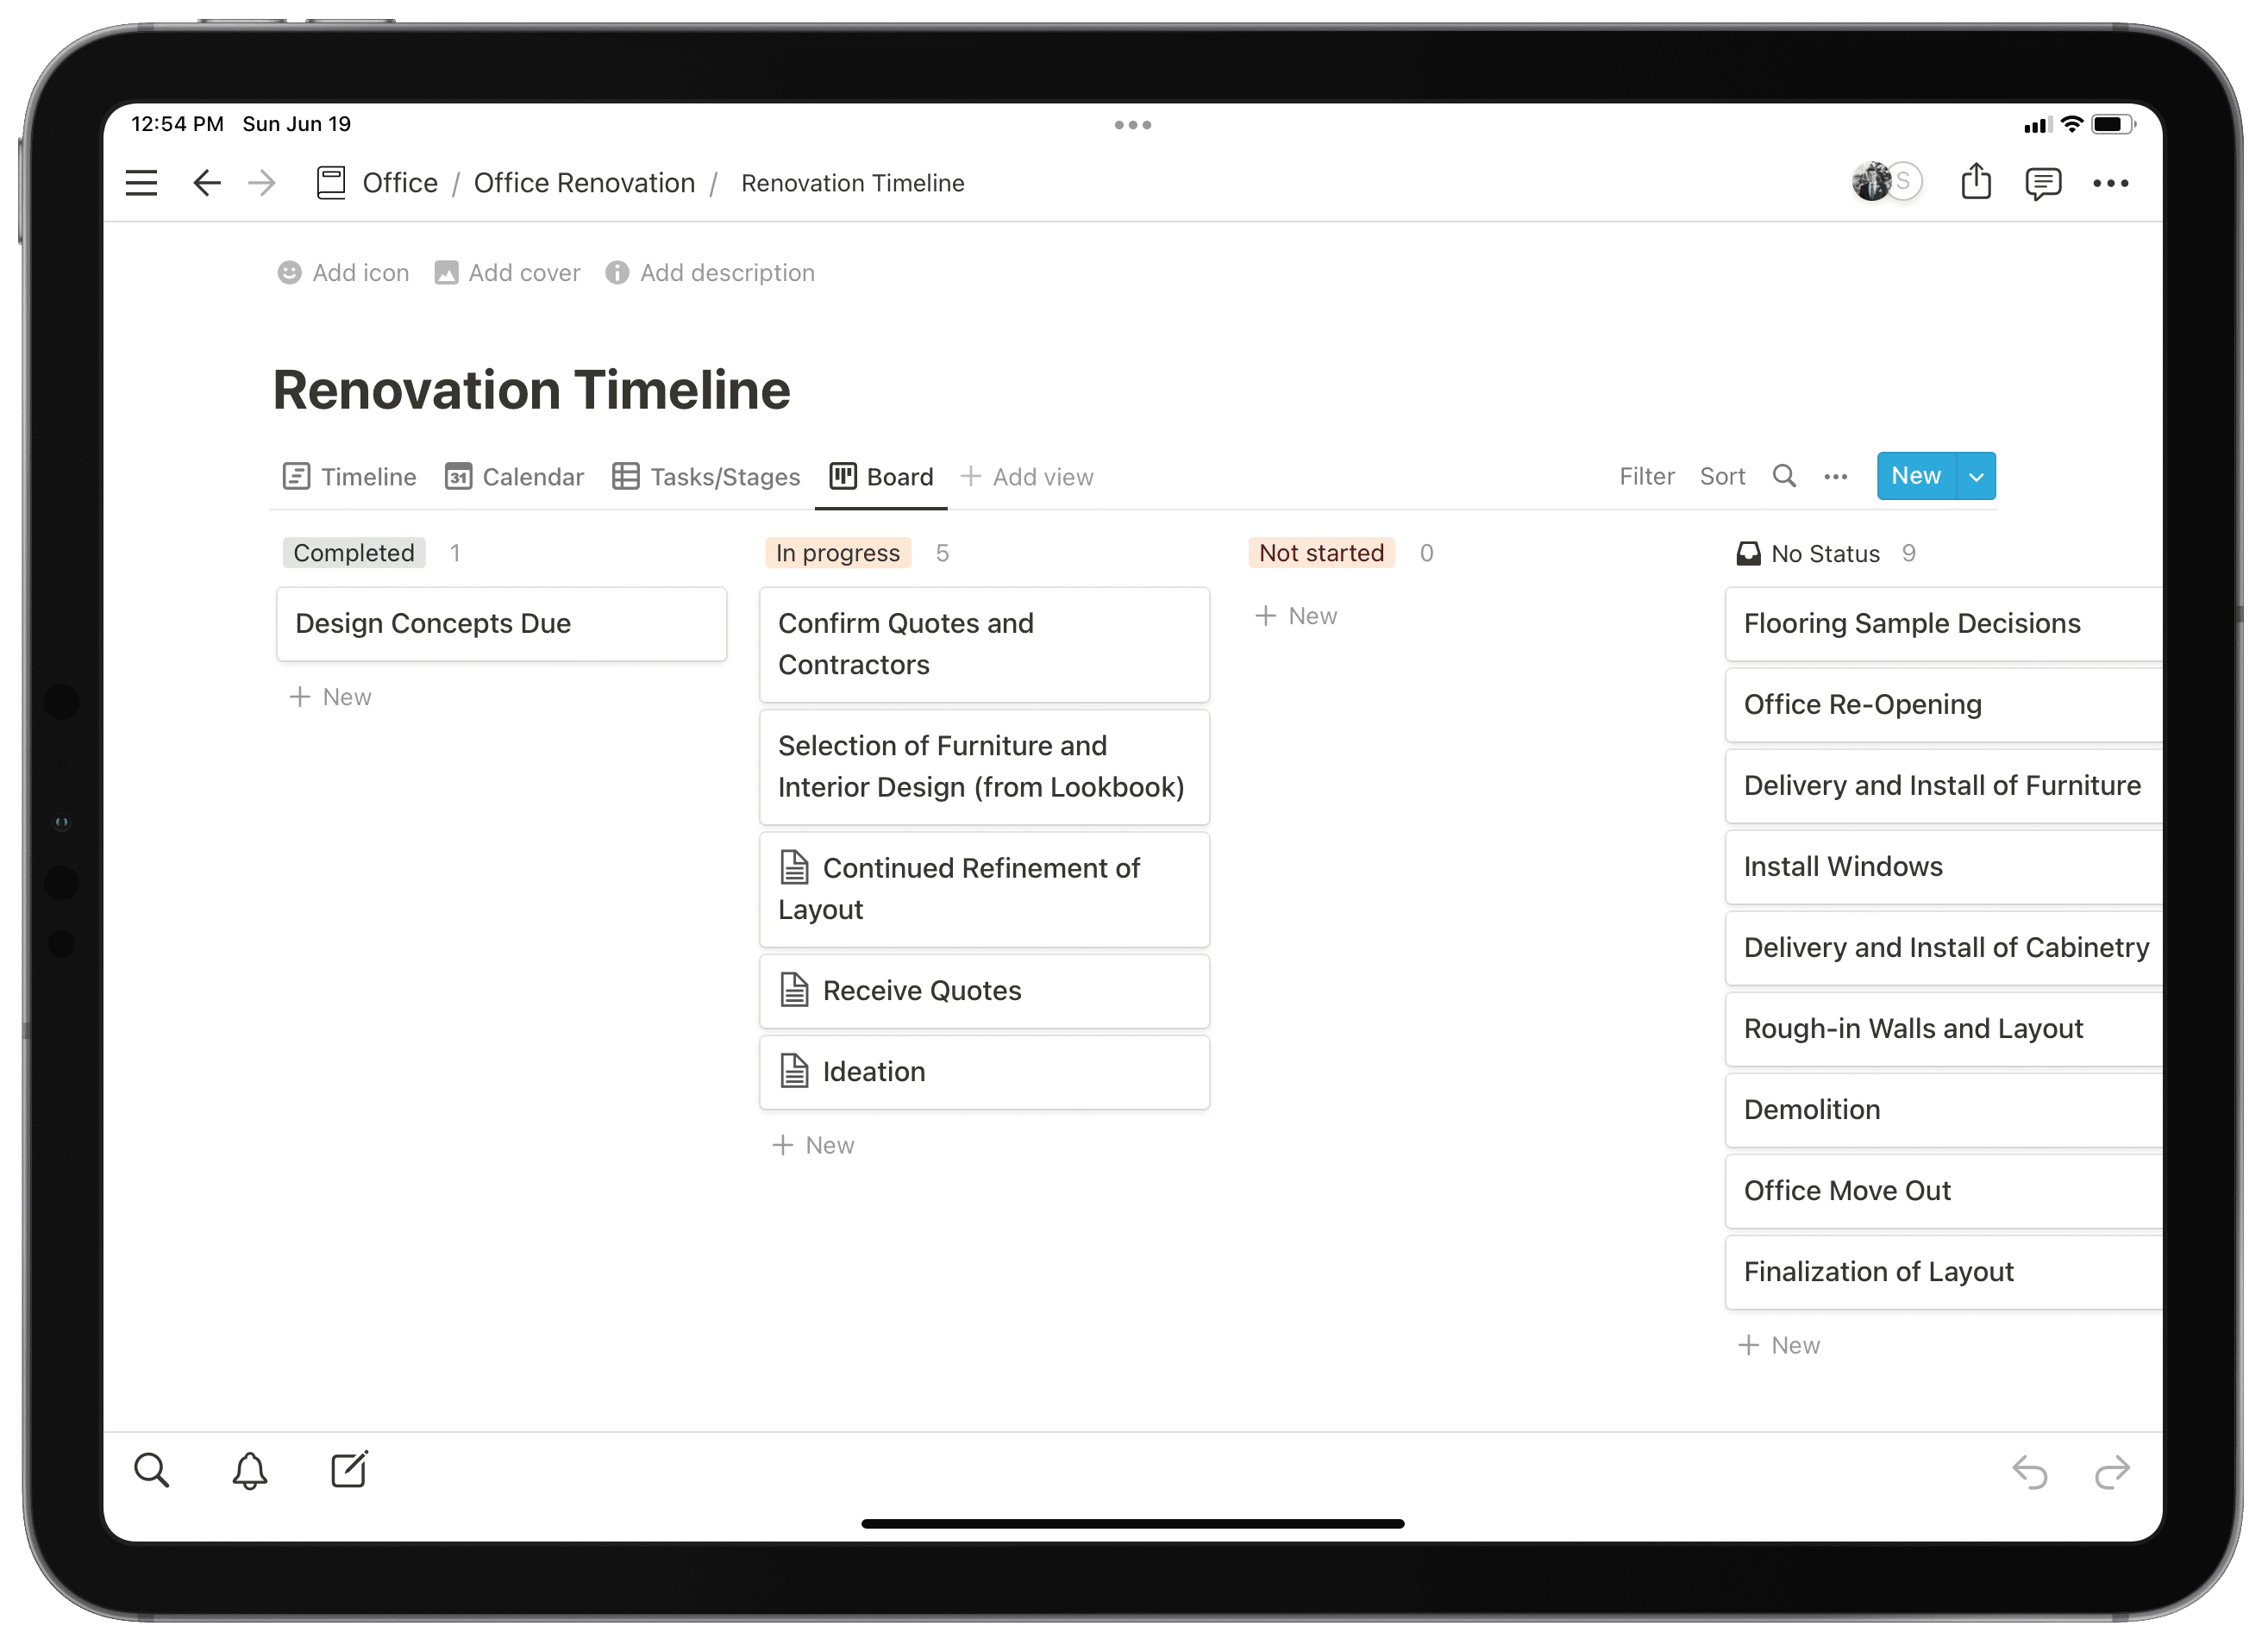
To show how to use Notion for project management, we’ll showcase a current project one of our contributors is working on currently. Josh is currently leading an office redesign project, complete with a new floor plan, entirely new furniture, and new workspaces for collaborative work.
The project itself is a database. Each item in the database is a phase of the project. Some phases include:
- Ideation
- Receive Quotes
- Selection of Furniture and Design Features
- Office Move Out
- Demolition
- Delivery and Install
Four different views have been created for this project:
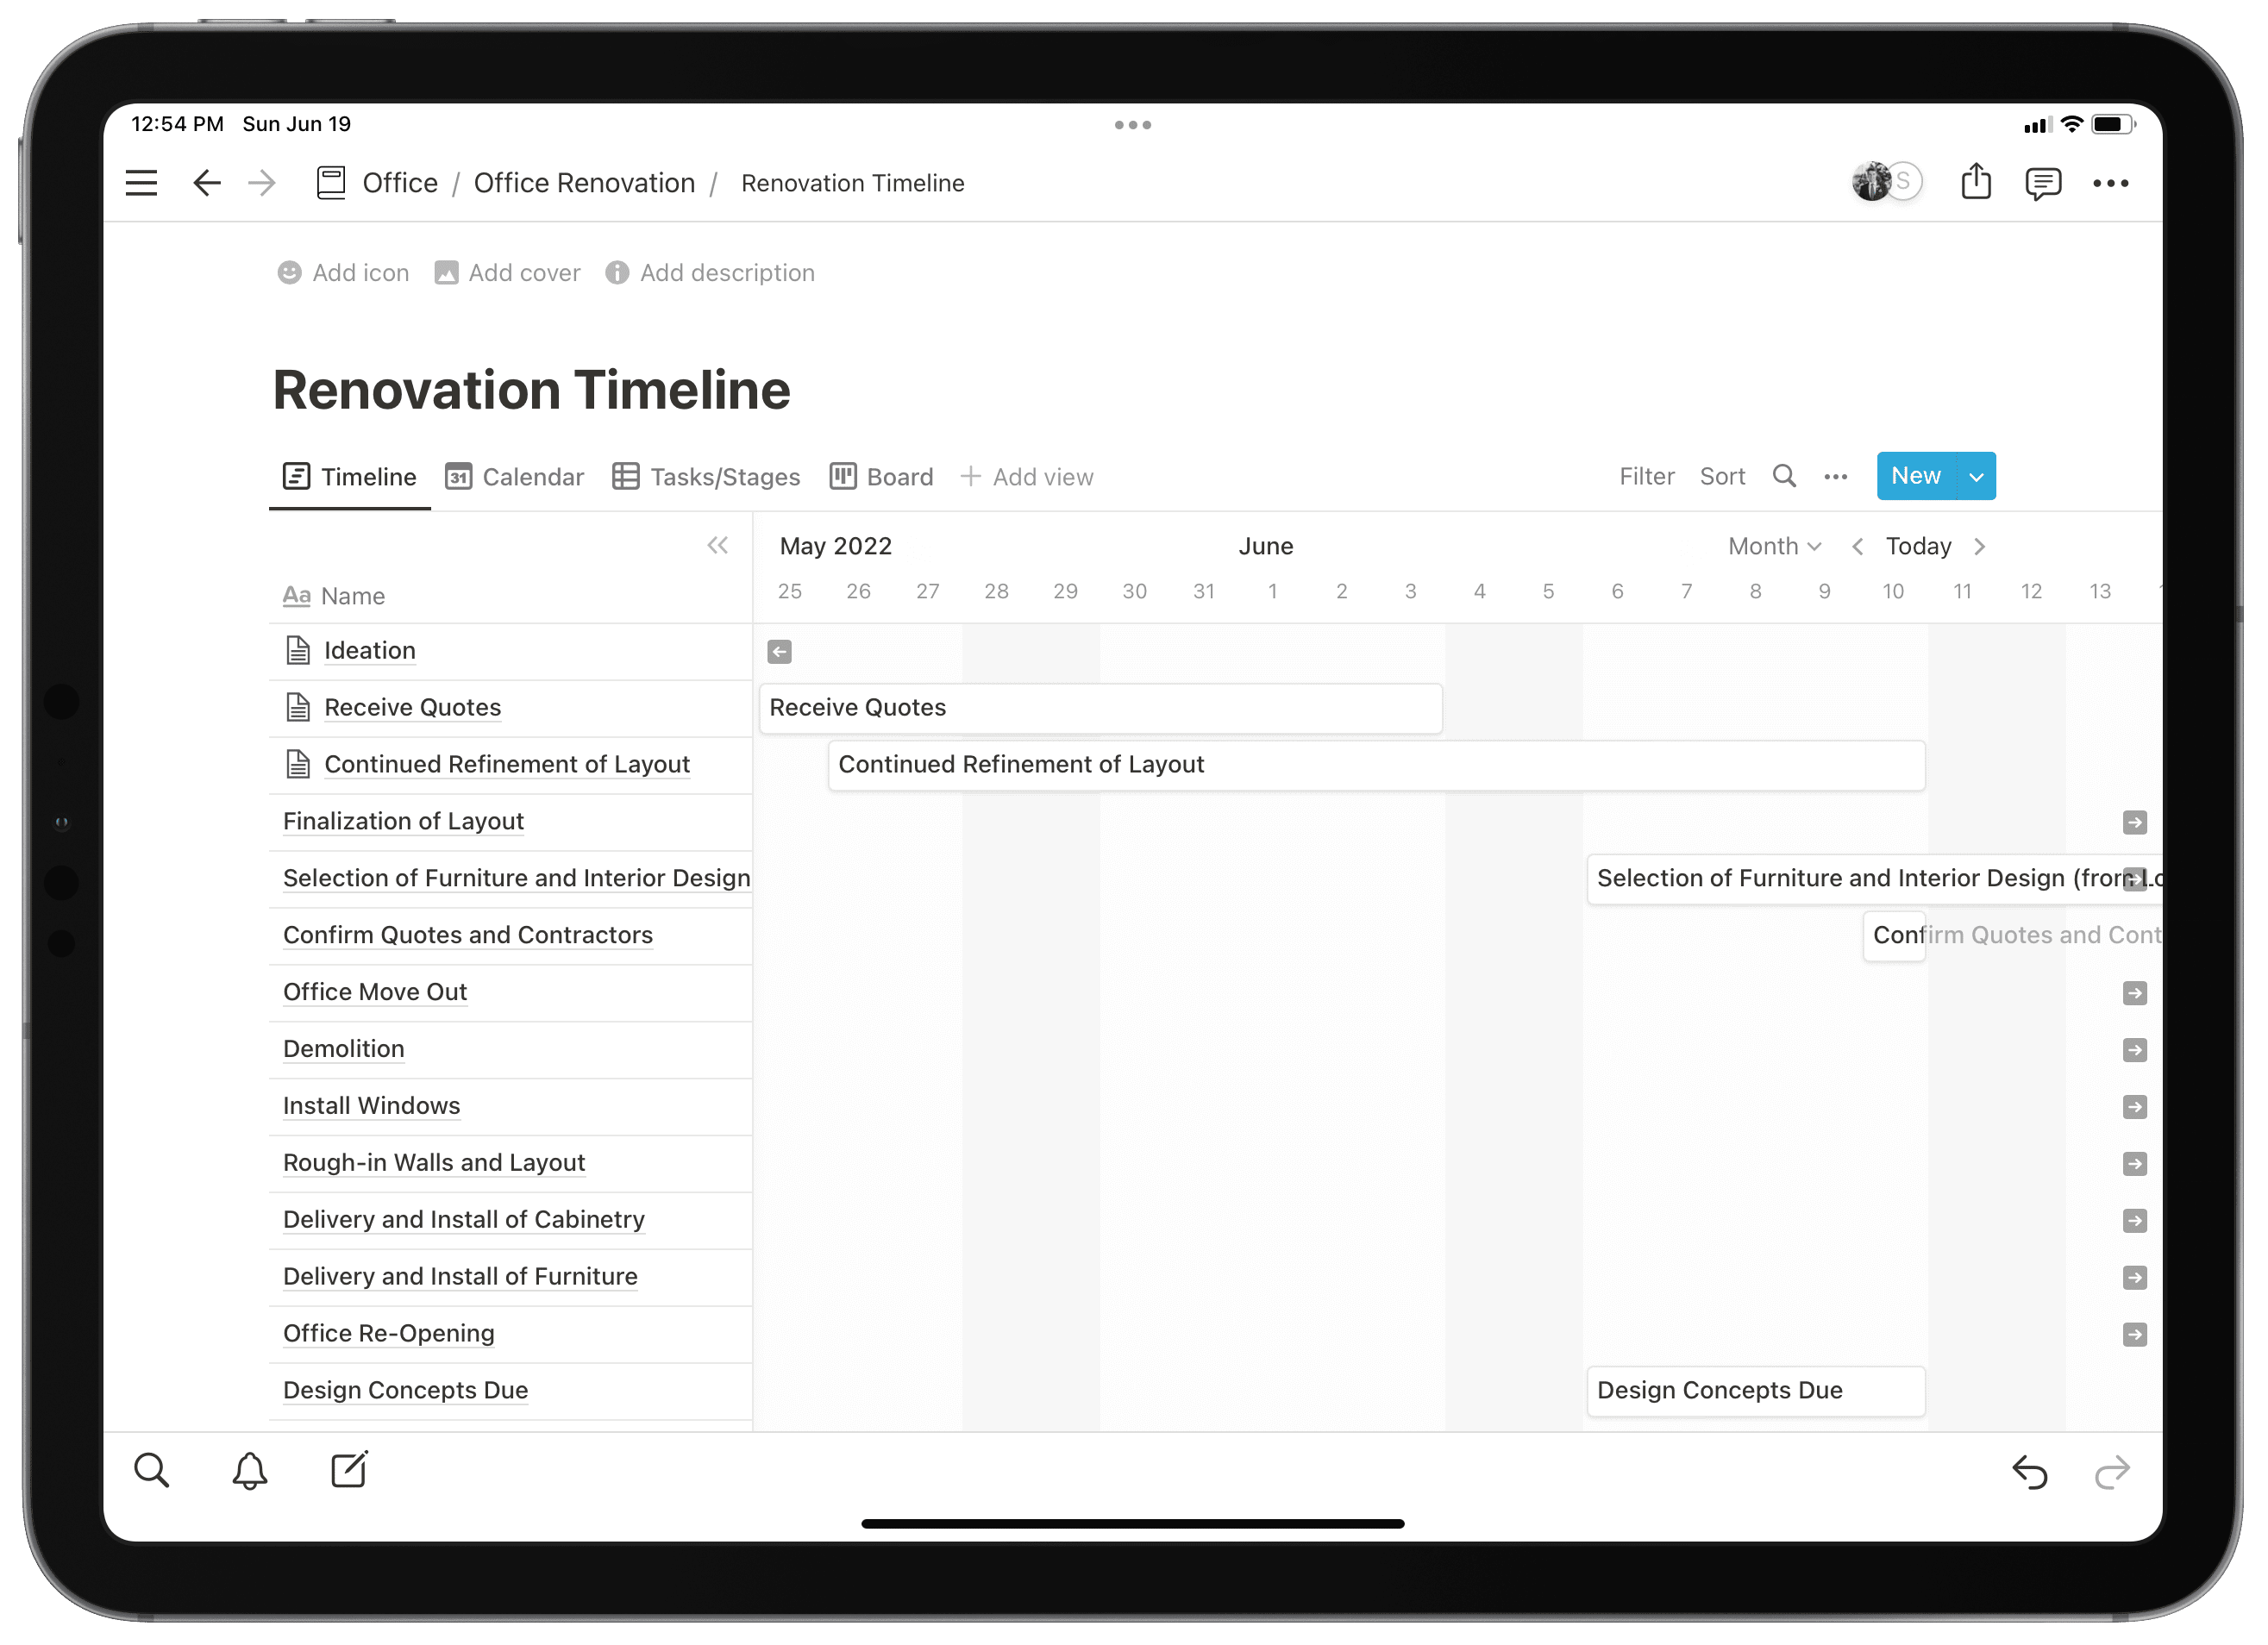
- Timeline — for viewing the most recent and current phases of the project
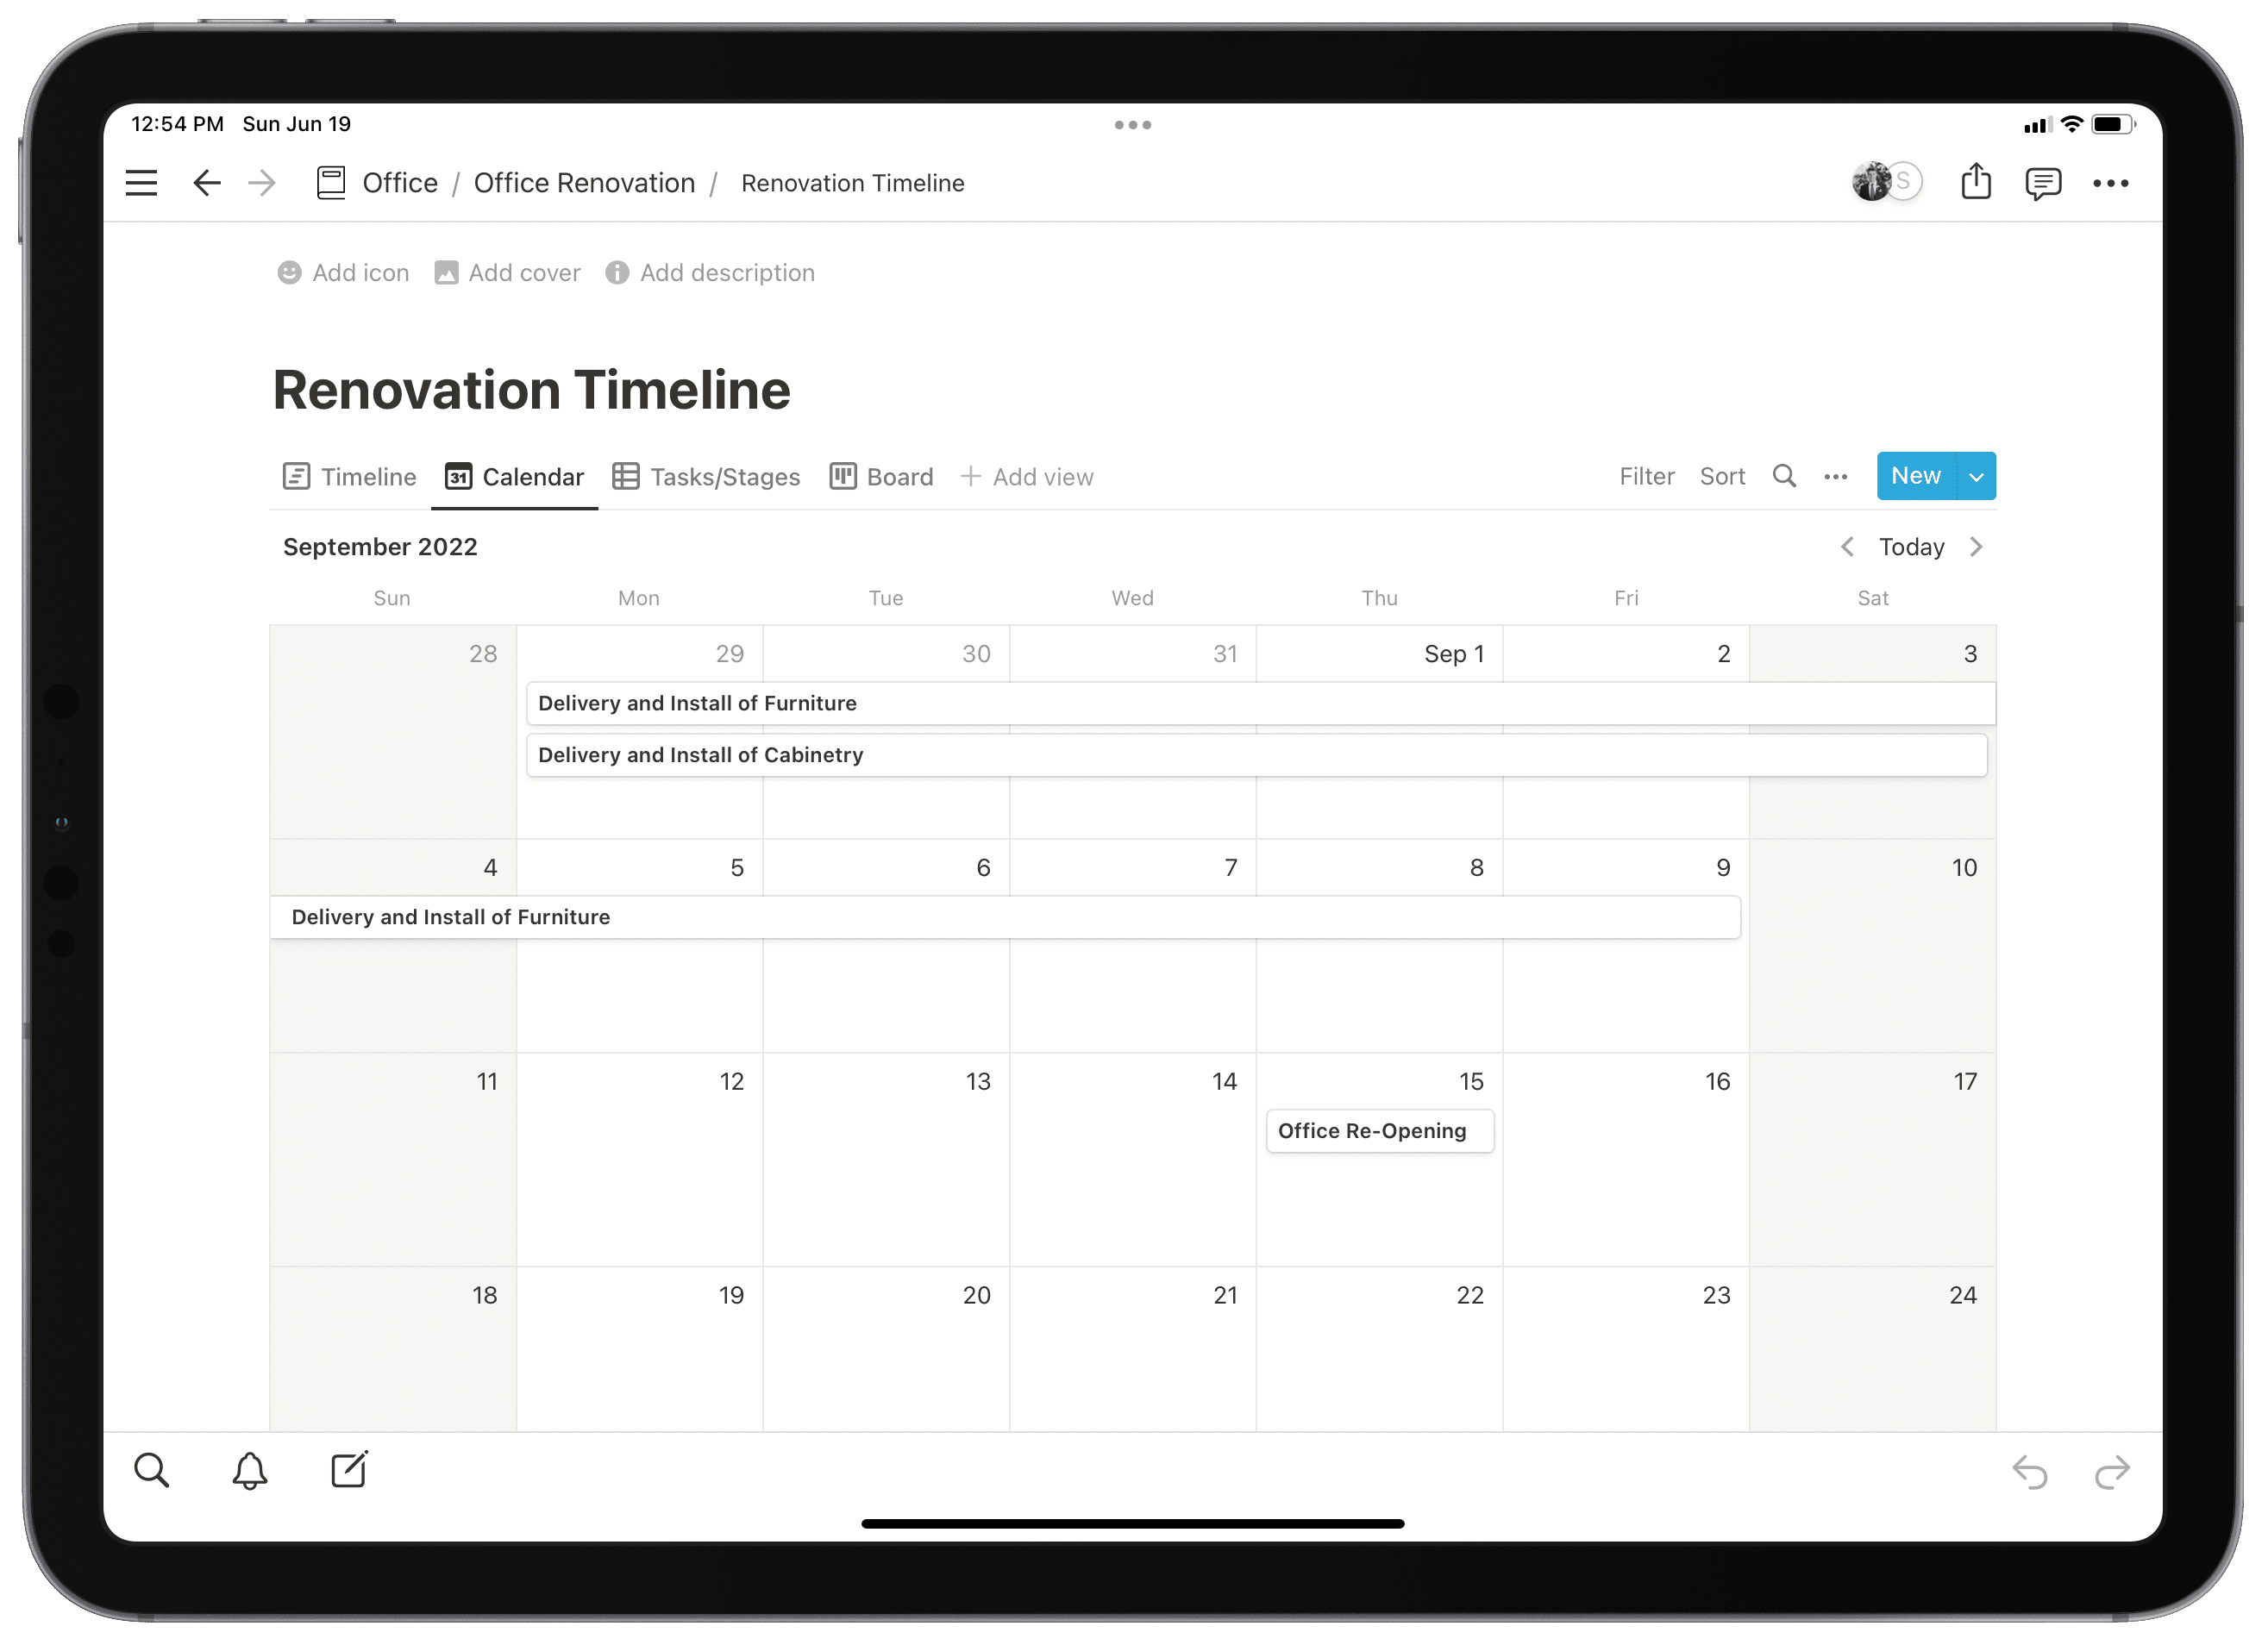
- Calendar — for a more forward-looking approach at seeing when each phase will start in relation to the others
- Table — for easily viewing each phase of the project and making changes to each phase’s properties
- Board — for quickly determining which phases are underway and which are in need of completion.
Inside each item in the database, there are a series of tasks to complete, various files being stored that are associated to that phase, and even further databases for tracking numbers and completion. For instance, the “Receive Quotes” phase has four or five PDFs for quickly viewing quotes from contractors and has a small database for tracking the overall quoted cost of the project.
This is all being done inside Notion. File storage, phase tracking, task completion, cost tracking, and more — all completed inside Notion. Plus, as this project is tracked inside a shared database, all items have shareable URLs that can be shared through email, Teams, or even inside Notion to allow team members to quickly jump to the appropriate parts of the project.
Hopefully this example gives an idea of how Notion can be used to build out bigger projects and track project completion.
Digital Storage
Free individual Notion plans are free of charge but come with some file size limitations. If you opt to pay for Notion, you unlock unlimited file uploads, making Notion a great option for storing backup copies of your files.
First, Notion can store files in a few different ways. You can create “File” properties in a page that simply store a file for you. You can create a “File” block, which allows you to upload a file inline with any other blocks in a page. Or you can insert a file from the new OneDrive, Google Drive, or Dropbox block types, which allow you to embed a file right in a Notion page. The OneDrive option in particular doesn’t allow you to store a file in Notion, however — it only allows you to embed a preview of a file in Notion.
Here’s another example workflow of how Notion can be used for digital file storage.
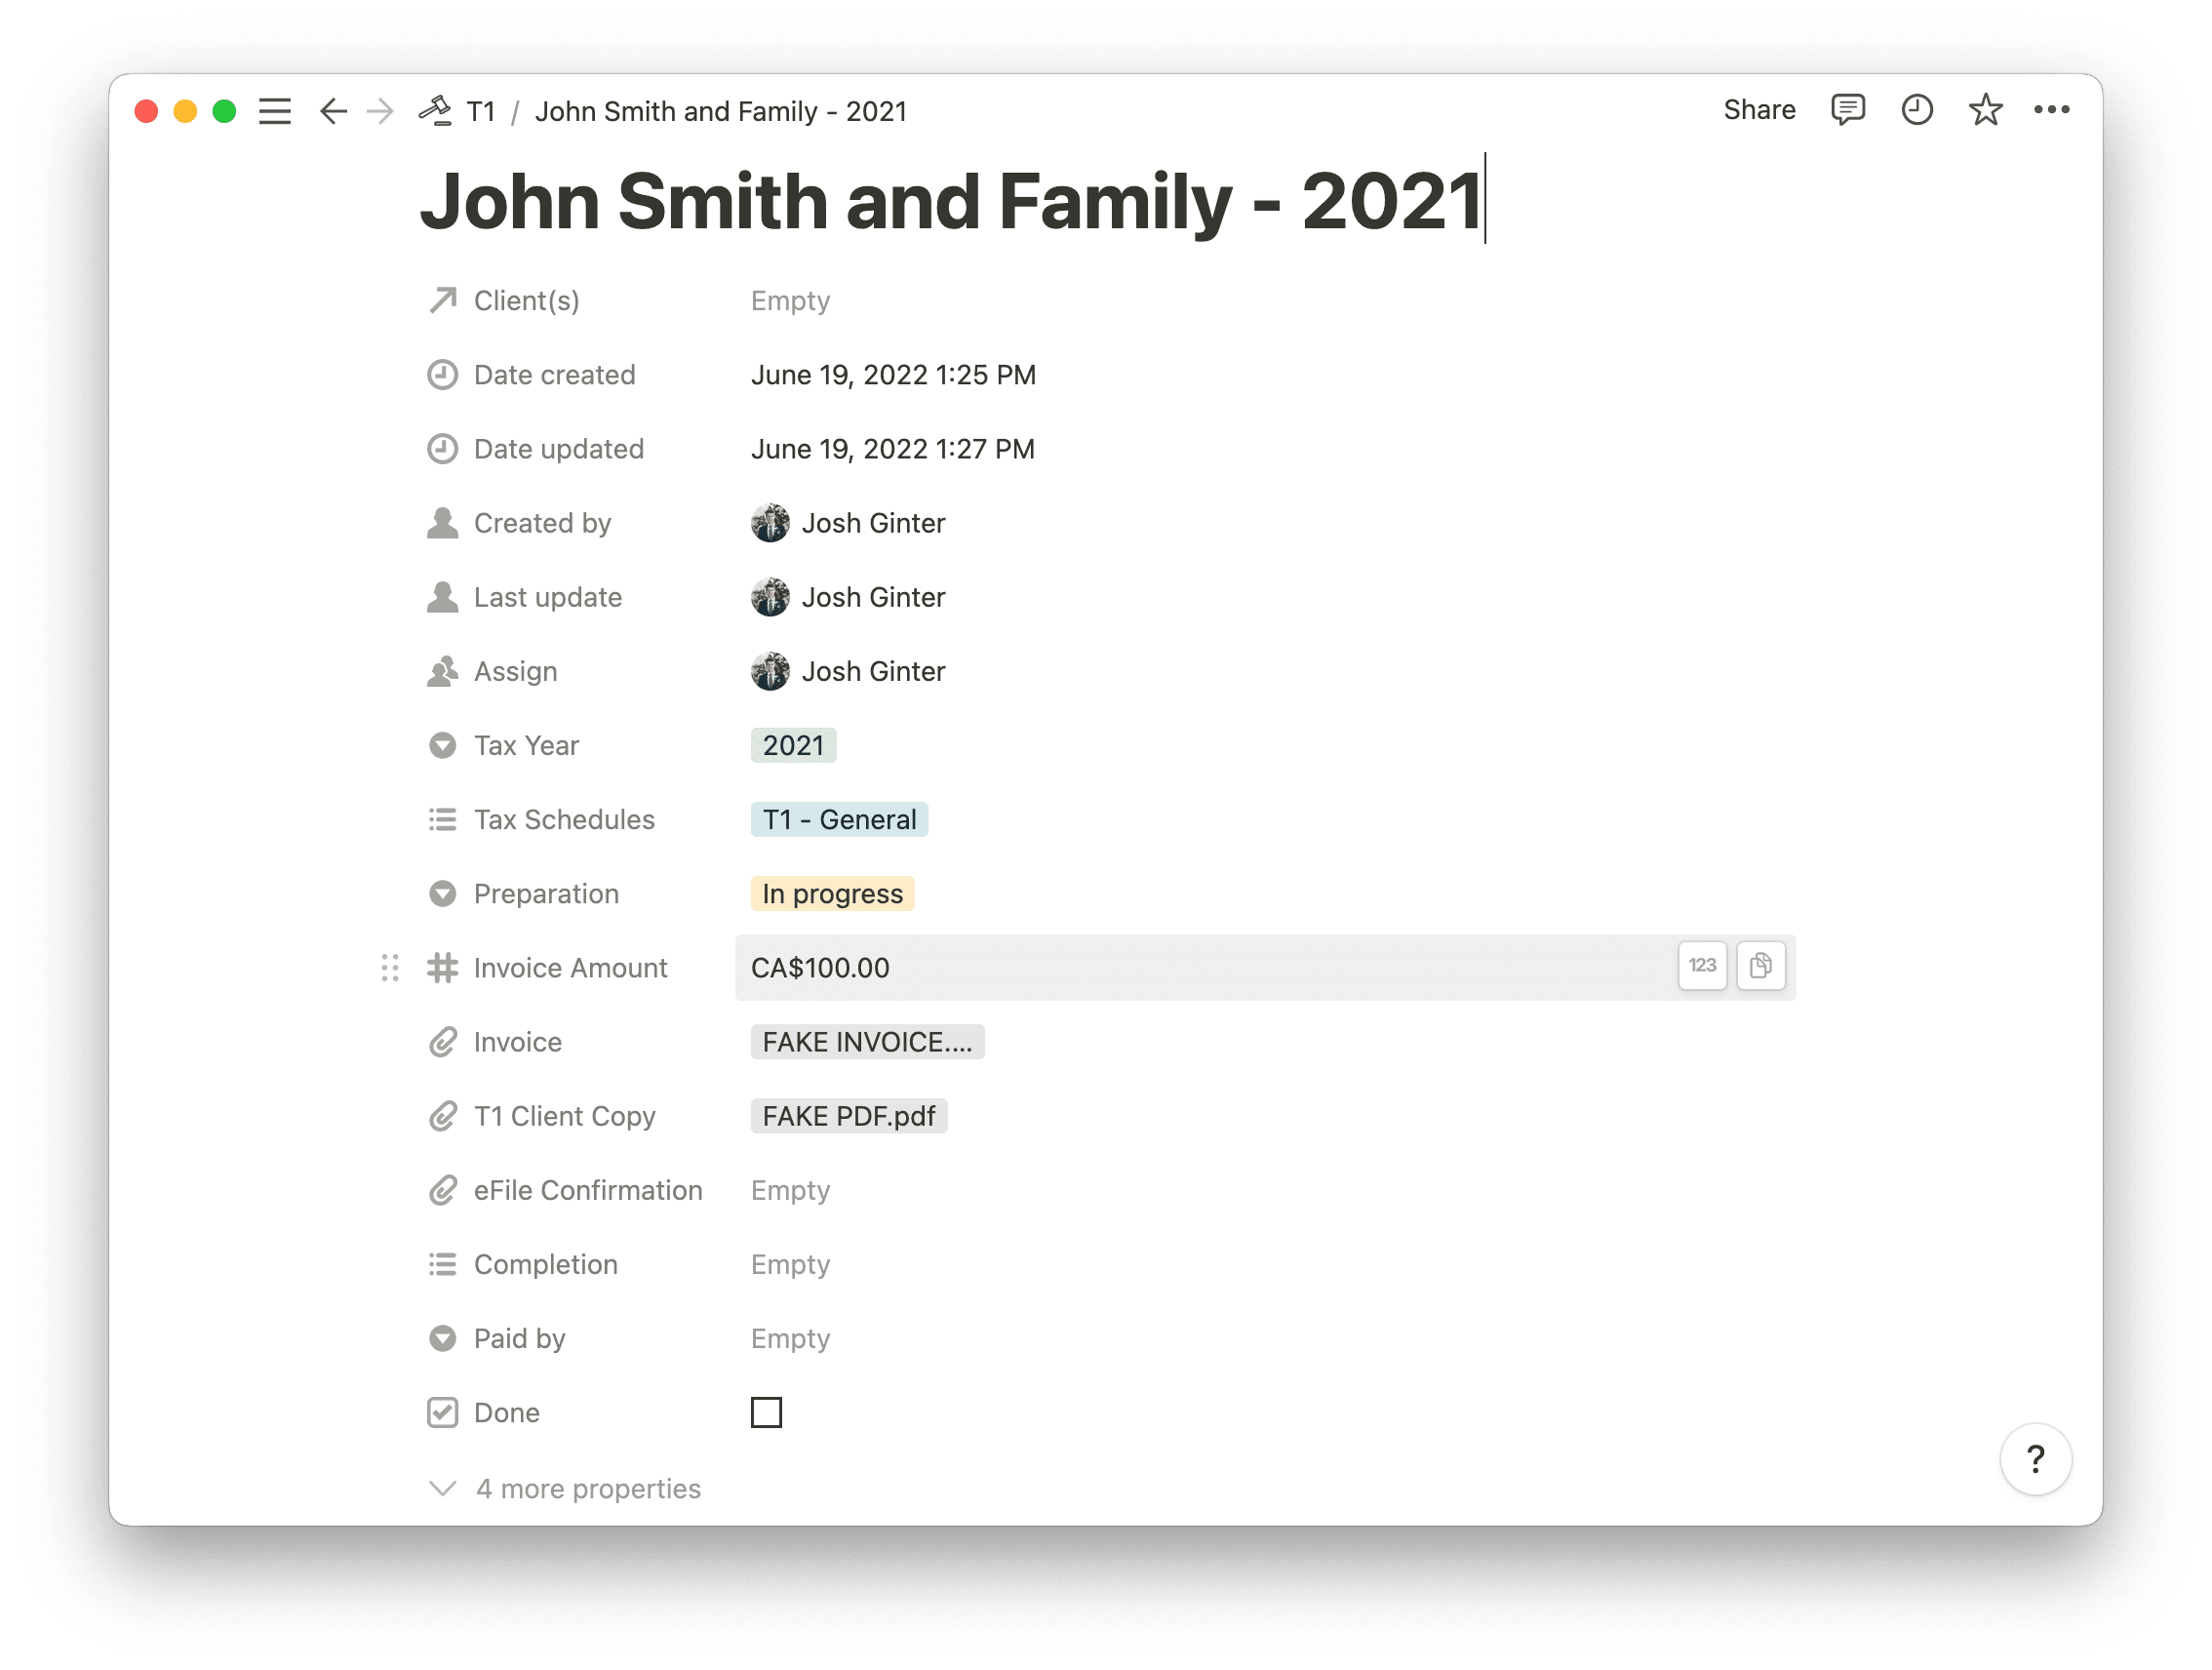
If you are a professional, you know how you compile document after document and file after file related to a specific client or a specific situation. If you create an item in a Notion database related to the root subject — say, the client’s name or perhaps the name of project — you can create file properties in that item to store consistent documentation you have for every item. Let’s say the client has an onboarding document you have all new clients fill out. Once completed, you can scan and upload this file to the file property in Notion and have a backup copy of the document available wherever you can access Notion.
There are a few benefits to using Notion for digital file storage:
- Files sync quickly — significantly faster than Microsoft OneDrive or iCloud Drive. If you need to share documents with other members of a team, these files upload very quickly and sync very quickly with team members.
- Files are easy to search for across your entire Notion workspace by simply using the Quick Find option in the left sidebar.
Notion probably shouldn’t be your only option for digital file storage, however. We believe Notion is best used alongside other file storage options. If Google Drive stores all your files, Notion can act as a backup copy of your most used files or files you need to share with team members. You have to manually upload files to Notion (as opposed to constant syncing in something like BackBlaze), so it’s likely you’ll miss or forget to upload a file to Notion. We would recommend Notion as just another layer of your backup strategy — not to be your backup strategy in its entirety.
Weekly Planner & Agenda
Notion allows you to create pretty much anything you want. One of the common ways to use Notion is as a monthly/weekly/daily planner and agenda. Although it is not as robust as other dedicated calendar or task management software, its flexibility is pretty great. A great feature in Notion is that you can bring several databases together in one spot. This means you can see your to-do list and your habit tracker within your weekly or daily agenda.
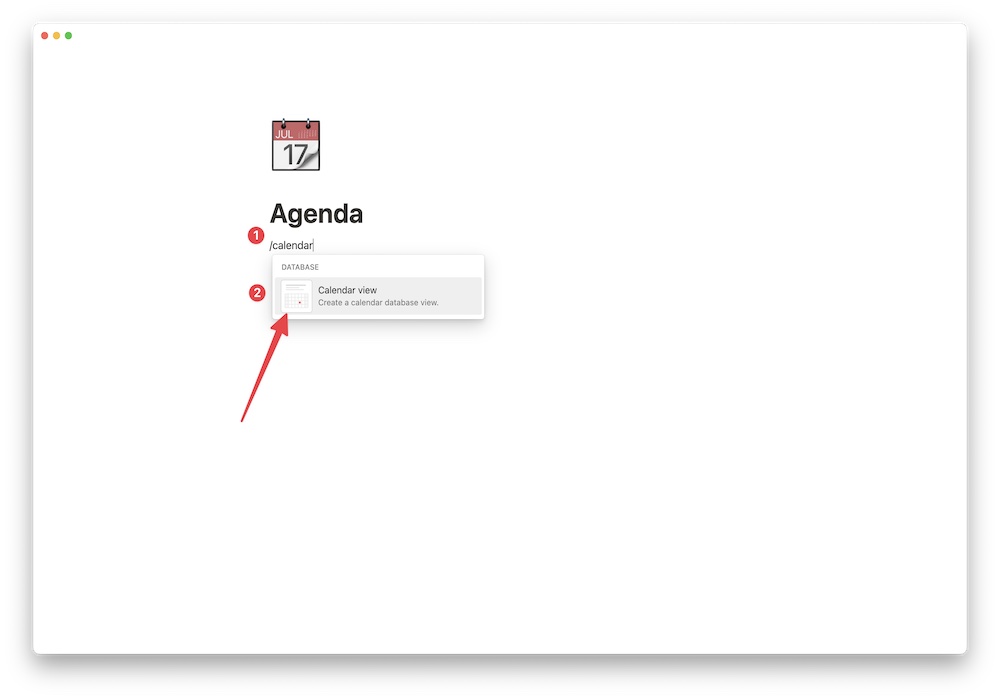
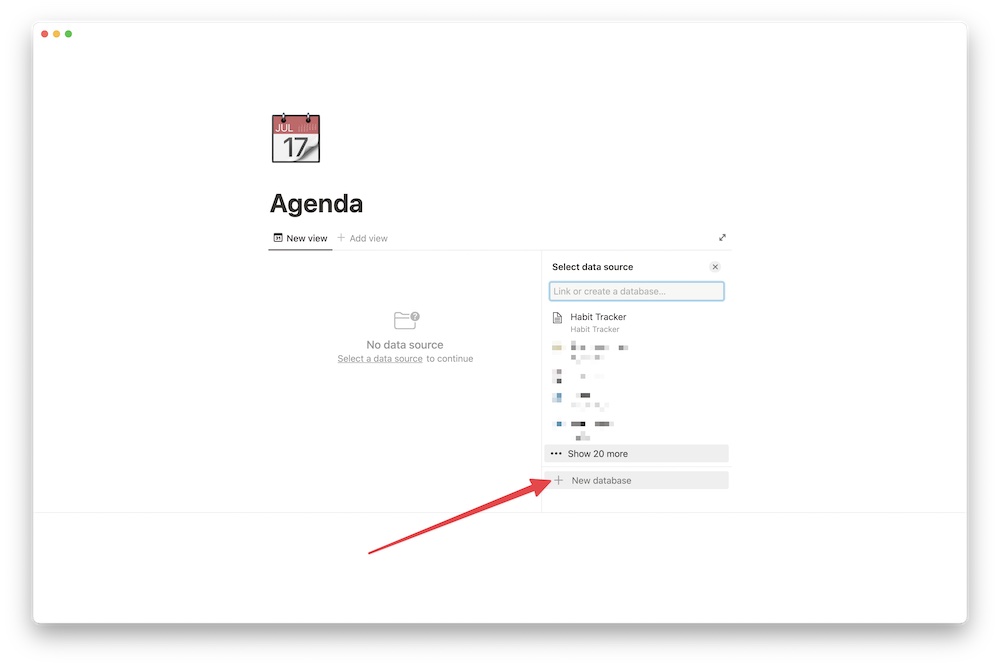
Let’s start by creating a new page and titling it Agenda. Remember, to create a new page hit Cmd + N or type /page. Within the body of the page type /calendar, then navigate to the bottom right and click new database. Name the database something like Calendar or Planner. You should now see a calendar on your page!
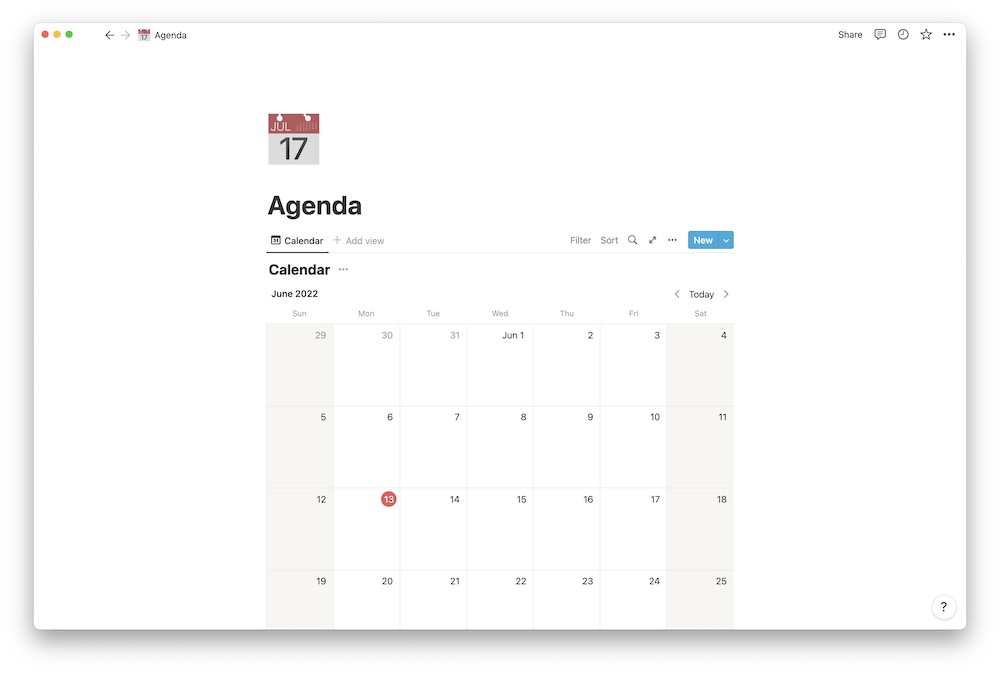
You can hover over each date and you’ll see a + button in the top right corner. When you click on this + button, you create a new entry. Click the + button for today’s date and add the date into the title. This is your entry for that day. You can add a number of properties to this page. In the body you can embed some of your other databases. Let’s look into how to embed your habit tracker into the entry.
Click into the body of the entry and type /create. Next, search for your Habit Tracker database and open it. You can see your habit tracker within your agenda. You can also embed a task list if you have one. Or, just add a few checkboxes for tasks (/todo) you need to get done that day. The main body of the entry can be used for taking notes in meetings, productivity journaling, gratitude journaling, or anything else you want to jot down.

You can also create a notion template for each day so that you don’t always have to connect your database every time you create a new entry. We talk a little bit about creating templates in our article about how we use Notion at The Sweet Setup.
There are several ways to view your agenda. Let’s quickly look at another view. Next to the Calendar View click + Add View. Name your view This week, choose Gallery, then click Done.
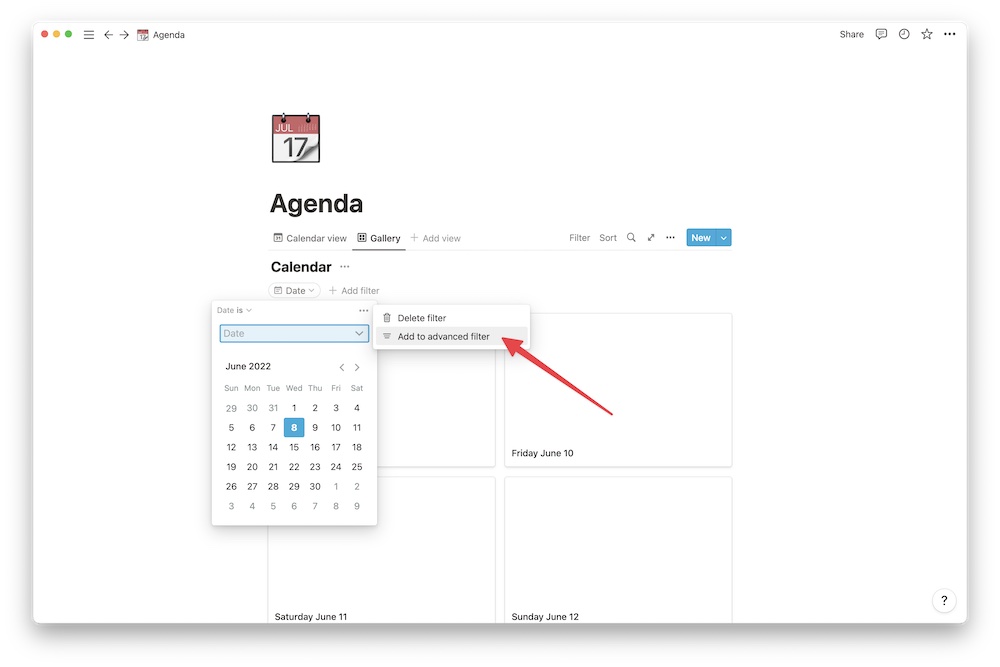
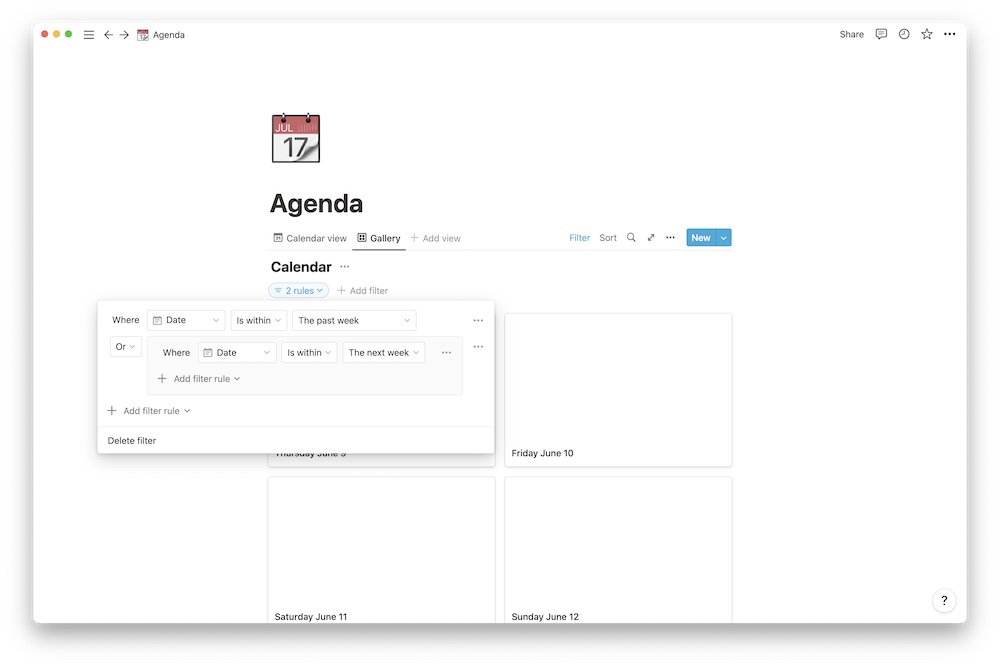
Now click Filter and then choose Date. Create a filter that shows you the cards that are in this past week and the next week. You can adjust these filters to show you whatever you like.
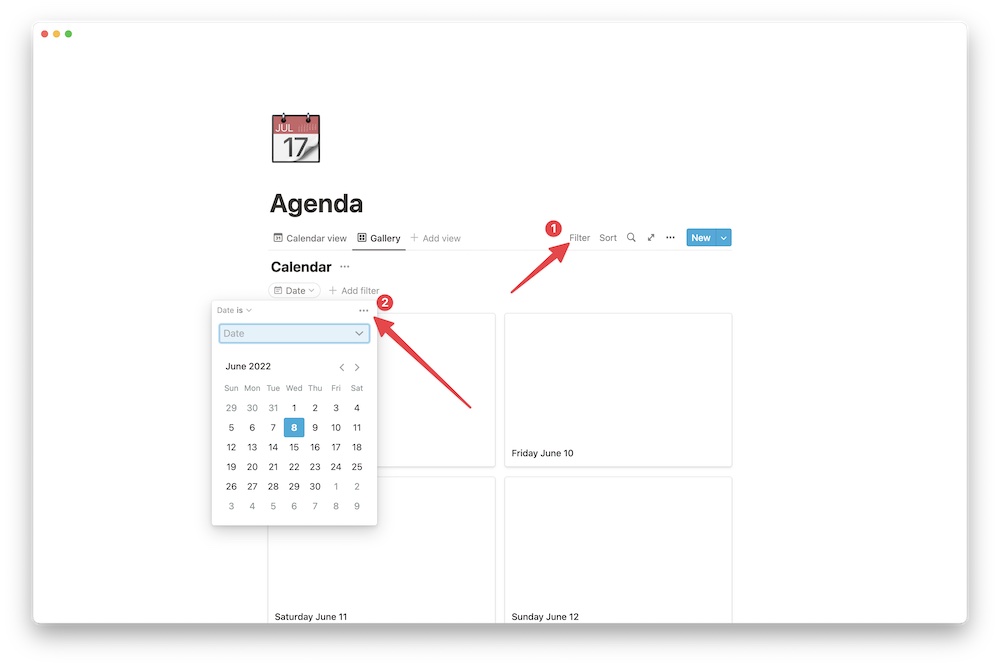
Create a filter that shows you the cards that are in this past week and the next week. You can adjust these filters to show you whatever you like.
You can also customize this page by adding page covers and icons.
As we’ve mentioned before, there are lot of different ways to do things in Notion. Notion does offer a simple daily agenda template. Remember that you can view the data in the calendar database many different ways (such as in a table, board, list, or timeline).
Bullet Journal
Some people have taken the bullet journal concept digital within Notion. Notion has a simple bullet journal template that you can use inside your workspace.. If you are a bullet journal enthusiast, this is a great place to start jumping into Notion.
Tips, Tricks, and Drawbacks
We’ve covered some of the more common basic tasks you can find in Notion, but here are a few more quick-fire tips and tricks. We’ve also added a few other people at the end that you can follow and learn from.
- The personal plan is free with unlimited blocks and pages. But if you want unlimited file uploads you need to upgrade to the Plus plan.
- Table formulas are a little tricky and not a complete Excel/GSheets/Airtable replacement if you’re a spreadsheet power user, but everyone else will be fine (Marie Poulin just included a mini-course for formulas inside of Notionin her Notion Mastery course).
- I love using the
Toggleblock to hide chunks of text or other blocks on a page. It’s great for keeping a page view tight with an option to unfurl. - You can turn blocks into other types by right-clicking the block and selecting the turn into option.
- It doesn’t have the PDF or image text recognition Evernote does. That’s really the only thing I miss in Evernote.
- Formatting can get a little tricky if you’re exporting written content out for a blog post or email newsletter. We write most of our articles in apps like Ulysses, Bear, or Obsidian and then drop it in our publication calendar in Notion.
- You can add page covers and emojis, and there’s also a great integration with Unsplash. You can also create custom icons and page covers via Canva.
- You can share a page publicly, almost like a blog post. You’d have to build your own index, but it’s doable for a few pieces of content.
- Try to
@a page to reference it from any other page. You can also copy and paste the page link and it will automatically create a Notion page link. - Notion has an extremely in-depth template library powered by their community of users. If you have a use case in mind for Notion, there’s a good chance there’s already a template to try out.
- Notion has an amazing search feature, similar to Apple’s Spotlight search. Click Quick Find in the top left corner or type
/pto bring it up. - You can use Notion on the browser, but the experience on the desktop app is far superior.
Is Notion the all-in-one app it claims to be?
There is a lot of excitement around Notion. We use it instead of Trello, BaseCamp, and Google Docs. Their team ships new features at an incredible rate, their basic personal plan is free, the team plans are affordable, and the flexibility is unparalleled.
There is so much to discover in Notion. One of the downsides is the risk of unorganized information. It’s important to realize that each data entry is actually creating a new page, just embedded in said database. On one hand, it’s really cool to open up a task and add notes or media directly to the entry. You then realize it’s possible to add another database or page directly in the entry and it goes on from there.
Sometimes using Notion is like looking in one of those mirrors where you see the reflection going back without end. That possibility exists! Every page can hold another page or database to infinity and beyond.
We love the power and flexibility of Notion. You can make it exactly what you need it to be. It also works for much more than just “work stuff.” It’s easy to plan vacations, Christmas lists, meal planning, and personal knowledge management in Notion.
If you’ve read this far, Notion is more than worth checking out. Take it for a test run and create a bunch of blocks, pages, and databases to see how it could fit your style and workflow. Like any new app, there will be a learning curve, but hopefully this article helps reduce the information onslaught that’s sure to come.
Additional Resources
- Check out our Notion workshop to learn how to create an uncomplicated Notion productivity setup.
- Our friend Francesco over at ToolFinder has an excellent YouTube channel with fantastic videos about Notion (and tons of other productivity tools).
- Marie Poulin has a fantastic YouTube channel where she shows off some of Notion’s best features, and her course Notion Mastery is an extremely in-depth course for those who want to go deeper into Notion.
- Thomas Frank organizes his 1.6 million subscriber channel with Notion.
- Curious Refuge has a great video with some quick Notion tips & tricks
Yes Yes Notion Workshop 💥 Create your simple, uncomplicated Notion setup for productivity and creativity.
If you are just getting started with with Notion — or you’ve been frustrated with your Notion setup — then you are in the right spot. This workshop series will walk you through everything you need to know to get set up for maximum creativity and productivity.
👉 Build a simple, uncomplicated Notion setup
👉 Collect and organize your ideas and notes
👉 Get hands-on, done-with-you support from our Notion expert