Creating custom Perspectives in OmniFocus
One of the most powerful features that using a task manager like OmniFocus offers is the ability to filter your tasks and projects to show you only what you want to see at any given moment. This goes back to the idea of contexts as presented by David Allen in his book, Getting Things Done. If you’re not familiar with the Getting Things Done (or GTD) system, a context is a person, place, or thing that you need in order to complete a task or move a project forward. For example, if you have to make a call, you might use “Phone” as a context. Or if you need to mow the lawn, you would use “Home” as a context.
When you assign a context to a task in OmniFocus, it allows you to filter all your tasks by that context. For example, I try to batch my email management during one time block so I’m not interrupted throughout the rest of my day. I create tasks in OmniFocus for messages I want to deal with later that include a link back to the original message, and I assign these tasks a context of “Email.” This allows me to pull up a list of all the emails I need to respond to inside of OmniFocus instead of having to track the messages down inside of my email client.
Perspectives in OmniFocus allow you to include additional task details like due date, defer date, flag status, and project status to customize your task views even further. If you wanted to see only tasks that are available to be worked on right now, require you to have access to your Mac, and are due next week, perspectives allow you to find the tasks that meet this criteria quickly and easily.
There are a number of default perspectives that are included with OmniFocus, but where things really get interesting is the custom perspectives that are available with the Pro version. You can buy the Pro version from The Omni Group’s website or upgrade from within the app if you already have the Standard version installed.
Once you have the Pro version, you can create a custom perspective by clicking Perspectives → Add Perspective.

From here, you can customize all the specific settings you want to use to filter tasks whenever you open this perspective. Let’s walk through these settings and set up a “Planning” perspective that allows us to see all the tasks that are available to be worked on to make planning our day easier.
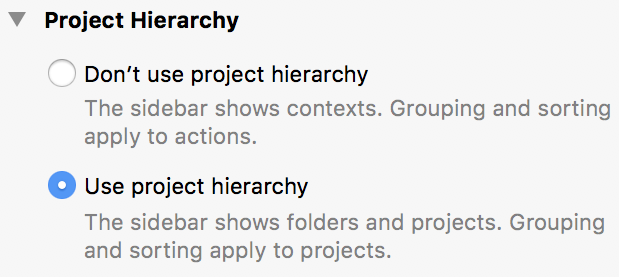
First, we need to decide if we want to use the project hierarchy or not. If we select Don’t use project hierarchy, then the sidebar will display contexts and all of our grouping criteria will apply to the individual tasks. If we select Use project hierarchy, the sidebar will show projects instead of contexts and all of our grouping and sorting will not be at the task level, but at the project level. For our “Planning” perspective, select Use project hierarchy since for planning purposes it will be useful to see what projects our tasks are associated with.
Next, under Presentation, we have the ability to sort and group our tasks automatically. You can use many different criteria to group and sort tasks in your custom perspective, including the folder the project is in, the due or defer date, and even the date of the next review. For our planning perspective, it’s fine to leave Group projects by as Ungrouped and Sort projects by as Unsorted.

Next is the Layout settings. By default, OmniFocus uses the settings that you have set in the Preferences. This is fine for now, so let’s jump down to the next section, Filtering.

This is where the magic happens. The options you select in this section will determine what tasks you actually see when you open this custom perspective. For our planning perspective, we want to see all tasks that we can work on so we can choose which ones to work on. To see the tasks that meet this criteria, we’ll use these settings:
- Filter by status: Any status — this will make sure ALL tasks will be considered, regardless of whether they are flagged or unflagged.
- Filter by availability: Available — we don’t need to see the tasks that are completed, and we don’t need to see tasks that we can’t work on yet (tasks that have a defer date set to sometime in the future). This setting makes sure that only the tasks that are available to be worked on will be included in our “Planning” perspective.
- Filter by duration: Any duration — if you include time estimates for your tasks in OmniFocus, this setting allows you to filter tasks by how long they will take to complete. For our purposes, we can leave this set to Any duration.
- Filter projects: Active — this makes sure that only projects that are currently active are looked at. Any projects that are on hold will not be included.
- Find text — this field allows you to only include tasks that include a specific term. We’ll leave this blank.
There are two other sections that we can use to customize our perspective. We won’t use them for this example, but let’s consider them briefly:
- Focus — this allows you to include only a subset of your projects in the custom perspective. For example, if you have separate folders for work and personal projects, you can select one of these using the “Focus” field.
- Sidebar selection – this allows you to only include certain selections from the sidebar in your perspective. For example, if you were in the “Projects” perspective and selected a specific project, then clicked Add Current Sidebar Selection, it would add that project to the list and filter out everything else that wasn’t part of that sidebar selection.
Our planning perspective is now ready to be used, but it still has the standard icon (which is kind of boring). Let’s change the icon by clicking the triangle in the icon field at the top of the perspective settings and selecting Choose File.

Select the icon that you want to use and click Choose to apply the new icon to the perspective. Here are a couple of resources for good perspective icons if you need them:
- Perspective Icons for OmniFocus by Josh Hughes (Free)
- Perspective Icons 2 by Icons and Coffee ($14.99)
Now click the star icon to add your perspective to the sidebar.

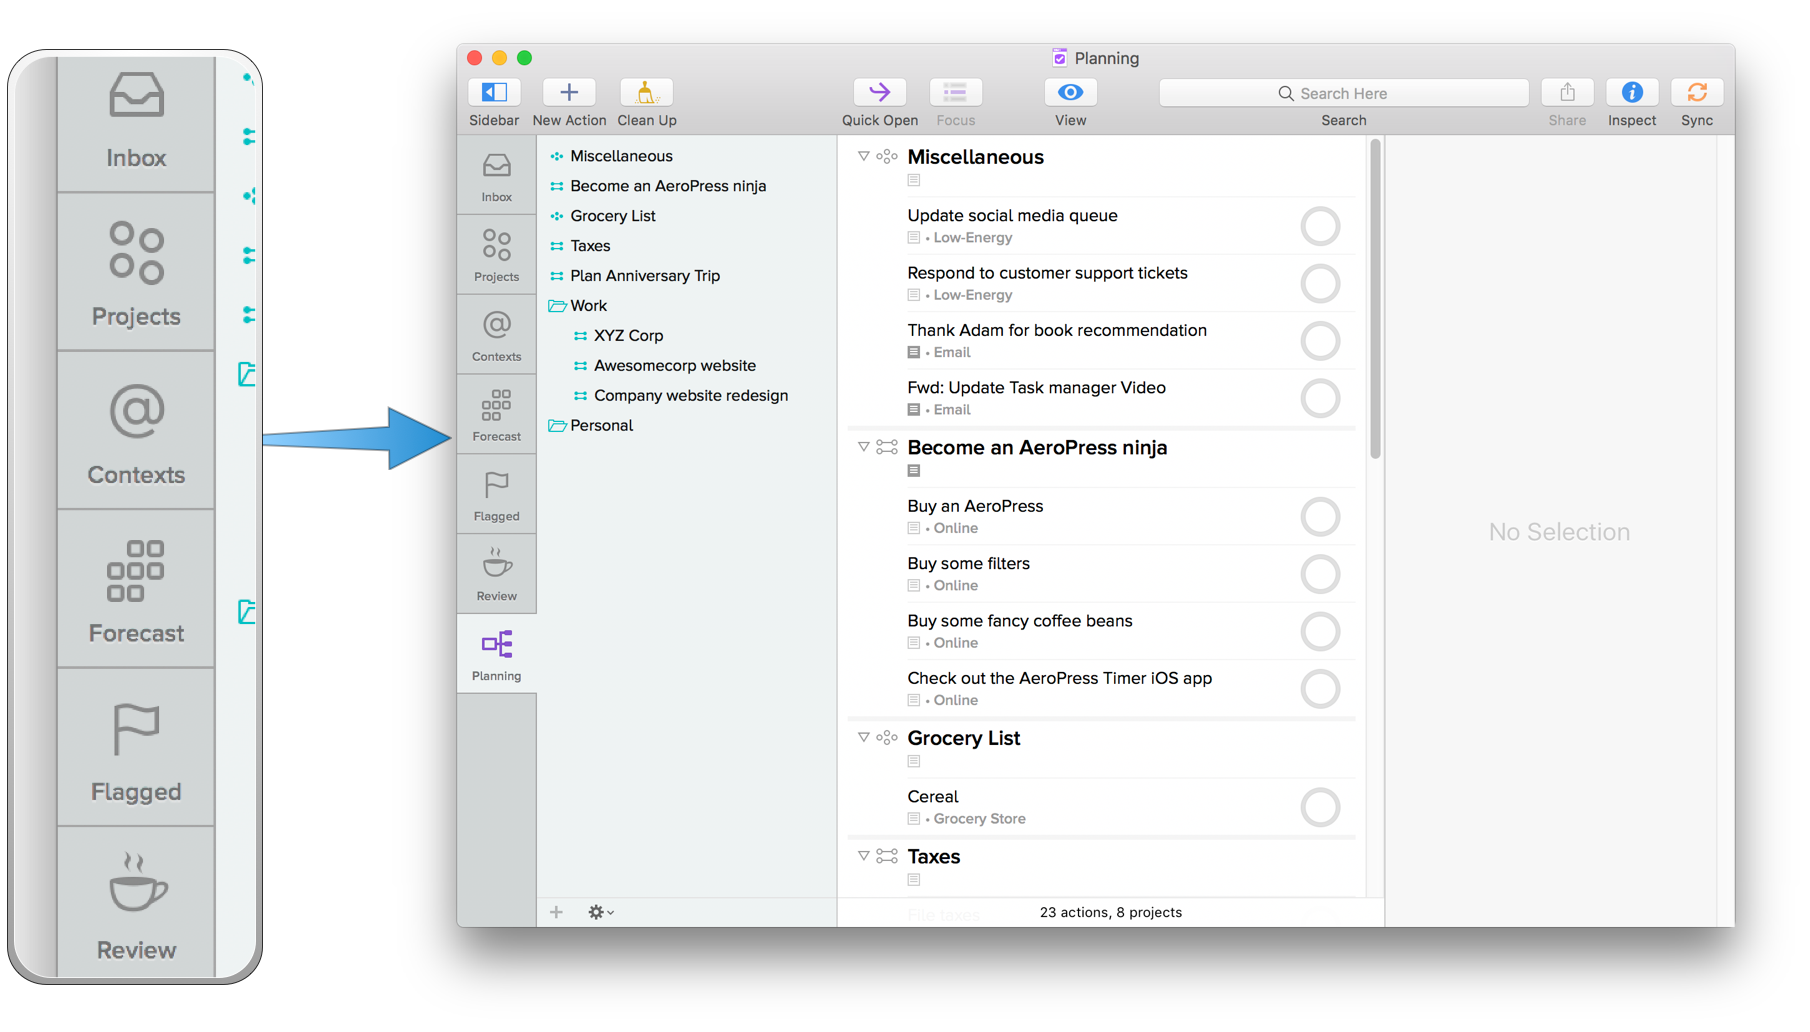
You can now select your custom Planning perspective whenever you want to clicking it in the sidebar. Doing so will open the perspective and show you only the filtered tasks that are available to be worked on.

Now when it’s time to plan your day, you can use your Planning perspective to quickly find everything that is able to be worked. Just select the tasks you want to include when planning your day. And, if you want to be really productive, you could even create another custom perspective to display only the tasks that you’ve identified you want to work on today. OmniFocus gives you the power and the flexibility to implement GTD effectively, no matter how many projects or tasks you have to complete.
We have more useful workflow examples right here.