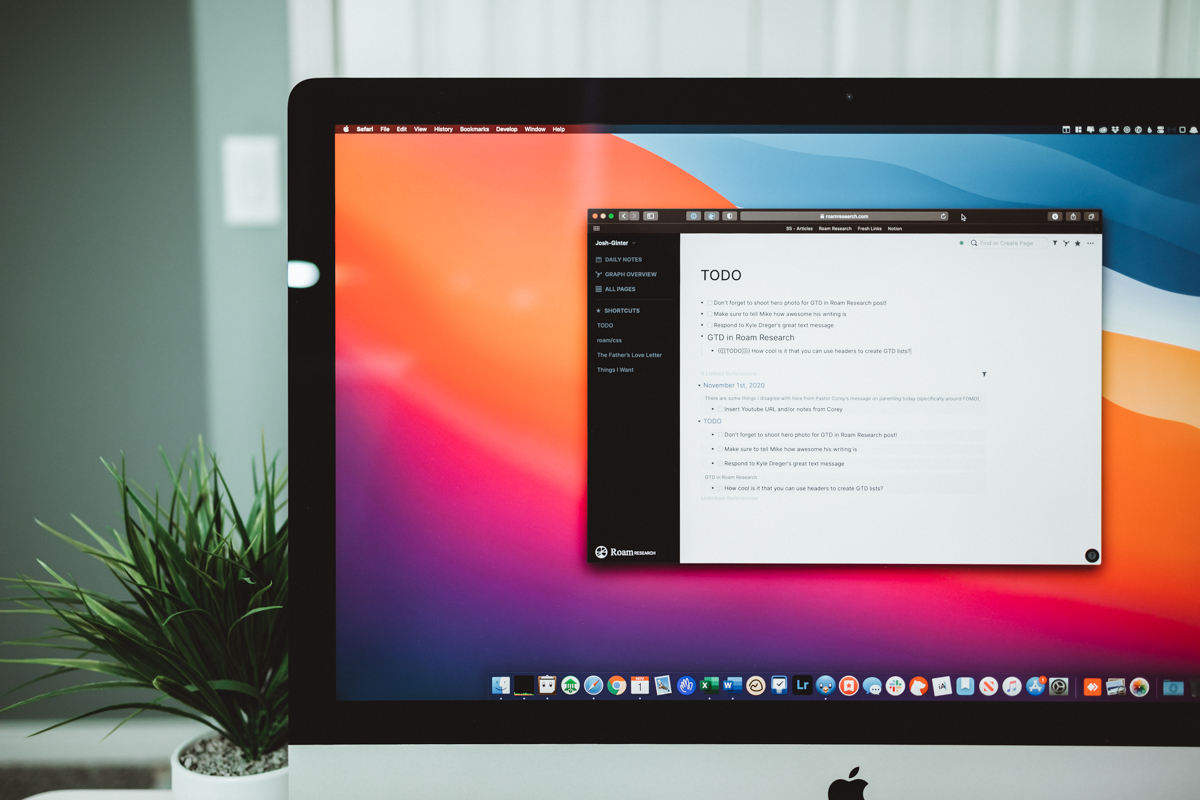
Using Roam Research for GTD-Style Task Management
As a self-proclaimed productivity nut, I’ve been using some version of the Getting Things Done (or GTD) task management methodology for many years. I’ve also been experimenting recently with Roam Research, and am intrigued by the app’s ability to tie everything together. I’ve tried to do this before and it’s failed miserably, so I was genuinely skeptical that Roam Research could really keep up as a full time task management solution.
But something about Roam feels different.
I’ve also recently re-read How to Take Smart Notes by Sönke Ahrens, and have been testing using a zettelkasten as part of my creative process. What I’ve found is that there is a lot of overlap between productivity and creativity for me, so I’ve been considering how I might bring my ideas and tasks together into a single system.
I’ve been testing this out in Roam Research for the last couple of months, and have come to the conclusion that not only is it possible to use Roam for GTD-style task management, but it actually is pretty great for the way I work.
How GTD Works
In a nutshell, GTD a simple framework that helps bring clarity around deciding what to work on when.
For many people (myself included), GTD is a major tipping point in their personal productivity journey. It provides a simple framework for deciding what you should do with each task that finds its way into one of your inboxes. That clarity can be revolutionary, and gives you the confidence you need to deal with all your tasks and projects effectively.
Before we look at how Roam Research can help us execute the GTD method, here’s a short breakdown of the five steps of GTD and how they work.
The 5 Steps of GTD
Step 1: Capture.
The first part of the GTD system is to capture everything that has your attention. Having loose ends hanging around makes it impossible for your brain to focus on one thing. Author David Allen calls this Emergency Scan Modality, where you are constantly scanning the horizon looking for the next fire to put out. Not only is working this way extremely stressful, but it also makes it impossible to do deep focused work.
Step 2: Clarify.
After you’ve captured everything, the next step is to clarify what it all means. This is where you decide what’s actionable and what’s not, as well as determine which actions have multiple parts and are actually multi-step projects. This is also where you decide whether to just get something done right away or delegate it to someone else if it’s not something you should be doing.
Step 3: Organize.
Once everything is captured and clarified, you need to organize and prioritize the things on your list. This is where you decide what you’re going to work on and when. You also need to make sure that your organizational system is set up in such a way that it will help you see the right things at the right time so you always know what you should be doing and when you should be doing it.
Step 4: Review.
This is where you reflect on everything you’ve captured into your task management system and make sure that all the information is still correct. If there are projects without clear next actions or tasks that still need a due date, this is where you update that info to ensure that your system runs without a hitch.
Step 5: Do.
The final step of GTD is to actually do the work. This is where a lot of people start, but without taking the time to do the previous steps you can’t be sure that what you’re working on is the right thing. To achieve clarity on what needs to be done, your brain must be free to let everything else go and focus on the task at hand as you work down your list.
The Tickler File
The Tickler File is a big part of the GTD system. It’s basically a reminder system that surfaces important tasks at future dates. The original tickler file was a series of folders that you kept in a filing cabinet, with 31 individually numbered day folders (1-31) for the days of the current month and 12 monthly folders for each month of the year (43 folders altogether). When you wanted to defer something to a point in the future, you just put it in that folder and forgot about it until then. When you opened the daily folder at the beginning of the day, the appropriate information would be there so you could complete the tasks that needed to get done on that day.
Fast forward several years, and there are now many options for digital versions of the tickler file that are much more efficient. Task management apps like Things and OmniFocus are built on this idea of surfacing the right information at the right time. And in Roam Research, this is done using the Daily Notes page.
Daily Notes are the first thing you see whenever you open Roam Research. It’s a place where you can quickly capture anything that’s on your mind, but it also serves as a way to surface tasks that are “tagged” with that specific date. It’s kind of like a due date, but it’s actually a little more flexible as you can use these dates for more than just when something needs to be done. So, if you have a task that you don’t want to think about for three weeks, just add a future date to it and Roam will link that task automatically in the Linked References section of the appropriate Daily Notes page.
But in order for that to work, you still need to know how to use Roam to accomplish the five steps of GTD.
Roam Research and the Five Steps of GTD

Roam Research is marketed as “a note-taking tool for networked thought.” So, can it really support the GTD productivity framework?
Absolutely.
There’s a few things you need to know, but with a few tweaks, Roam Research can indeed be the foundation of your system for getting things done.
Here’s a walkthrough of how I use Roam Research currently and how it lines up with the popular GTD task management methodology.
Step 1: Capture
The first step in the GTD method is to capture everything that has your attention. In Roam Research, this is pretty straightforward — you just open the app and capture whatever you’re thinking about in the body of the Daily Notes page. You can move things around later, but it’s important you capture these things as you’re thinking of them so you don’t forget them. As the saying goes, a short pencil is better than a long memory.
I really like how Roam goes straight to the Daily Notes page as it reduces a lot of the friction in capturing ideas as you have them. Friction is deadly when it comes to capture — the more friction in your system, the more likely you are to fail in capturing those thoughts when you have them. With Roam, you don’t have to decide what project or page something belongs on. Just open the app and jot it down as quickly as you can.
The problem is that Roam Research doesn’t have an iOS app. You do see a special Quick Capture interface on iOS when you open up Roam in a web browser, but I’d much prefer a native app on my iOS device. So instead of creating a Home Screen shortcut, I actually prefer to capture text into Drafts.
For years, I’ve been capturing things into Drafts on my iPhone and Apple Watch. The Siri dictation in Drafts on the Apple Watch is great, and I use it all the time when I’m out for a run. With the addition of Drafts on the Mac, I can now capture text anywhere and have it all synced into a central location in iCloud (which I love).
Getting things from Drafts into Roam isn’t seamless, but I don’t mind. I actually like the additional step of processing my Drafts inbox, as it gives me an additional quality control layer where I cut out things that aren’t important. Often I capture things into Drafts thinking “that’s a great idea,” but then later decide it’s really not. It’s a little extra work, but it helps me make sure that the things that end up in Roam Research are really the things that I want to do.
(I do the same thing with my fancy notebook, where I write things down so I don’t forget them and then decide later whether they should really make the cut.)
If you wanted to remove the extra step, you could absolutely capture things directly to Roam in your Daily Notes page. That is certainly the most efficient way to get things into Roam, and there are third-party developers working on iOS companion apps for capture on your mobile devices, like this one (public TestFlight link). Admittedly, they’re pretty basic right now, but I imagine in the future they will get a lot better.
Step 2: Clarify
After you’ve captured things into Roam Research, the next step is to clarify what everything means. Much of the information you capture may not be actionable (i.e. notes from an article you read or a podcast you listened to). But the stuff that does need to be done must be identified as either a 1) single task, or 2) a multi-step project and then broken down into actionable steps.
A task is simply something that you have to do. Roam Research calls these TODOs, and you can instantly turn a block in Roam into a TODO by hitting Command + Enter. This adds {{[[TODO]]}} to the front of the block and displays a checkbox that you can use to mark the task as done.
Roam also includes a couple of pages by default that can show you all your tasks to be done (TODO) and all your completed tasks (DONE). Out of the box, we can already start to see how Roam Research can be used for managing tasks, but there’s a couple things we can do to make working out of Roam a little bit easier.
First, make sure that you start all your task names with a verb that makes it clear what needs to be done. Write them in such a way that you assume “future you” knows nothing about this task. For example, Call Mom and Mom’s birthday are poor task names because they are too vague. It’s difficult (without any context) to know what exactly needs to be done with these tasks. But Call mom on her birthday or Send mom a birthday gift are great because it’s clear what needs to be done and why.
Next, add a due date for tasks that require it. In the past I’ve been nervous about adding arbitrary due dates to tasks, but in Roam this is pretty important as it’s the only way to get things to show up in your Daily Notes. By using a date on a task in Roam, you are essentially identifying the day that you intend to do something. And by adding a date to the task, Roam will then automatically pull those tasks into your Daily Notes on the appropriate day. This makes it easy to see what’s due today when you open Roam Research, and you can work off of those tasks at the bottom of your Daily Notes page.
As you break down and clarify your tasks, you may realize that some require multiple steps in order to complete them. These are no longer tasks, but multi-step projects. For projects, create a new page in Roam for each project you’re working on (i.e. Roam GTD Article). Next, put a header at the top and include some metadata. I personally like to nest the metadata under the header so that it can be folded. You can use whatever metadata categories you want by using two colons after the metadata term. This can be useful for organizing Roam data together, i.e. using Author as a metadata tag for notes that you take on books that you read. For projects, I like to use the following metadata:
- Due Date: this is when the project should be completed.
- Completed Date: this is when the project was actually finished.
- Status: this indicates whether the project is active, and uses the #Active tag so that I can look at all my active projects when reviewing.
- Criteria: this is a one sentence definition of what will be accomplished when the project is actually done.
- Tags: this is where I use the #Projects tag as well as any additional tags I think might be helpful when sorting this project later.
Below the metadata, I include another section called Resources. This is where I link to everything I might need in order to complete the project. For this project, I’ve linked to a couple of websites I used while researching as well as the sheet in Ulysses where I’m doing the actual writing.
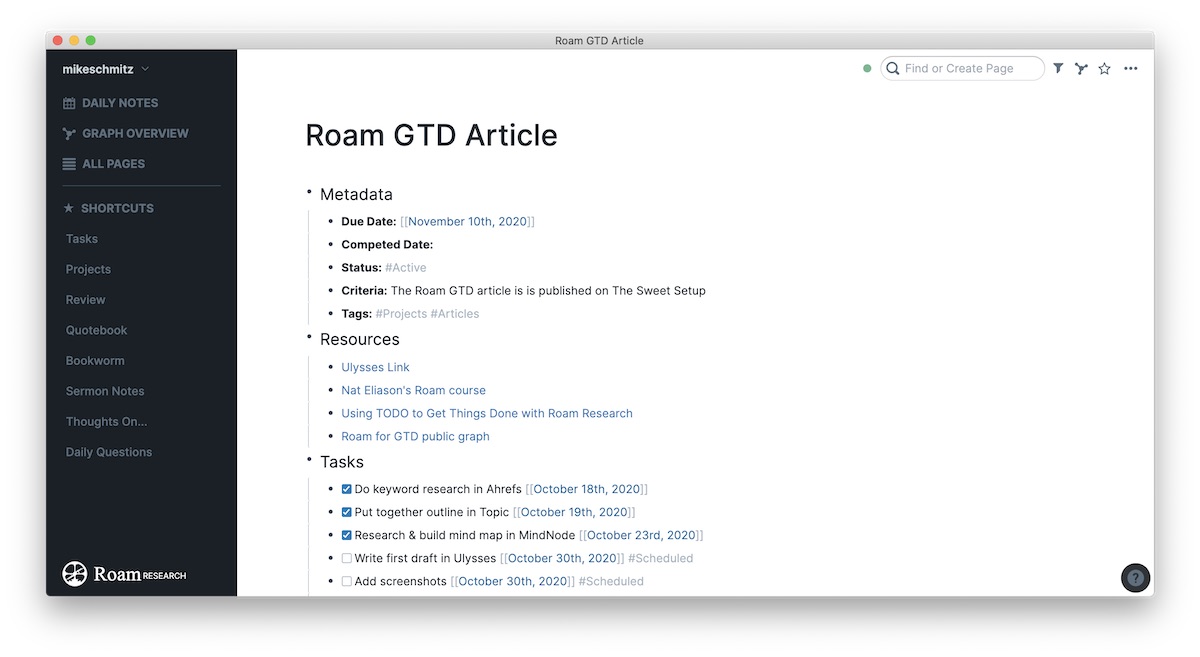
Last, I have a section where I list all of the tasks that need to get done for this project as TODOs. Once I have all the tasks for the project listed, I work backwards from the Due Date and assign dates to all relevant tasks so that they show up in my Daily Notes page on the day I should be working on them. I also tag any people I name in the tasks so that I can go to the page for that person and see what tasks I’m waiting on them to complete before I can complete the project.
Step 3: Organize
Once you’ve got all your projects and tasks in Roam Research, the next step is to organize them. This allows you to surface the relevant tasks when you need them and hide everything else so it’s not a distraction. We’ve already looked at how the Daily Notes can do this for you automatically, but there’s another powerful feature in Roam we can use to filter tasks on other pages called queries.
Queries are special blocks that search your entire Roam Research database (Roam calls it a graph) and return anything that meets your criteria inline. The query syntax can be a little bit tricky to understand, but it’s really powerful so it’s worth understanding. Here’s how it works:
To create a query, you can use a / command or type it out by hand. Every query starts with this syntax:
{{[[query]]: }}
The next part of the query are the modifiers you can use to establish the conditions that must be met. There a couple different things you can use here:
- and:
- not:
- between:
Use and: when you want to include certain criteria. For example, the following query would display all of your TODOs inside of Roam:
{{[[query]]: {and: [[TODO]]}}}
You can further refine this by adding not: — for example, this query would return all tasks except those tagged with #someday (which you could use to filter out your someday/maybe list):
{{[[query]]: {and: [[TODO]] {not: [[someday]]}}}}
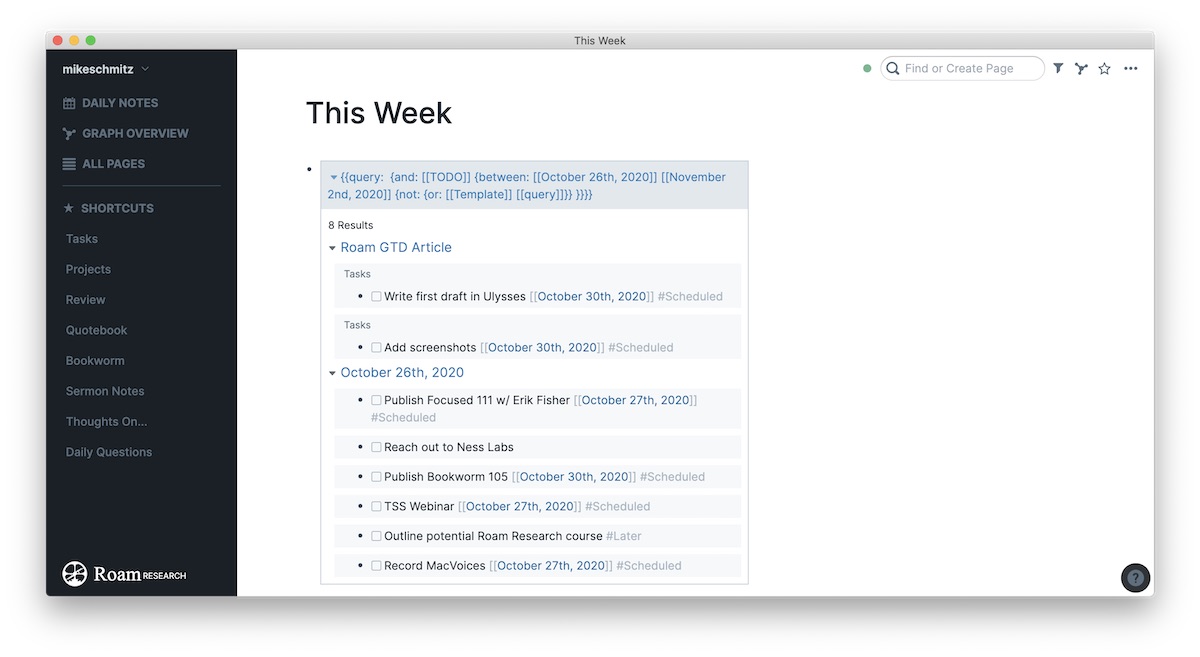
You can also use between: to return only tasks that fall between a certain date range. For example:
{{query: {and: [[TODO]] {between: [[October 26th, 2020]] [[November 2nd, 2020]] {not: [[someday]] }}}}}
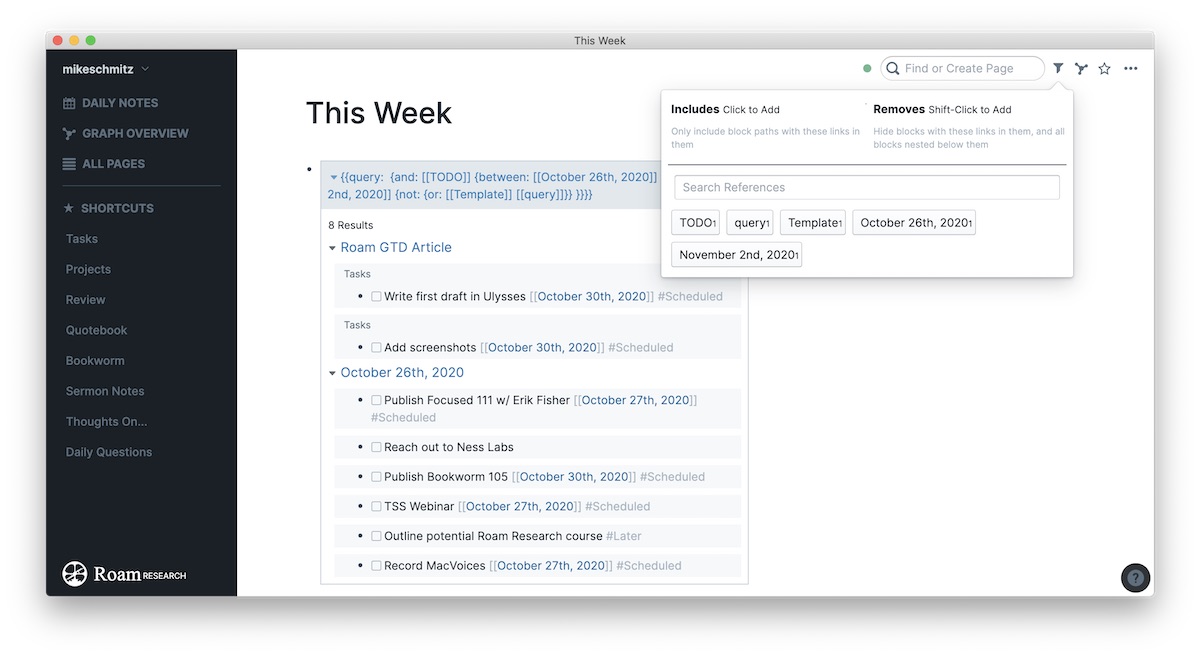
Keep in mind though that the order matters and it can be a little tricky to get these to work just the way you want. For example, I created a page called This Week that shows all my tasks for the week using the following query that filters out additional query results and any tasks tagged with #Template:
{{query: {and: [[TODO]] {between: [[October 26th, 2020]] [[November 2nd, 2020]] {not: {or: [[Template]] [[query]]}} }}}}
Every week as I’m planning my week, I just update the dates in this query to show me the relevant tasks. Here’s what it looks like:
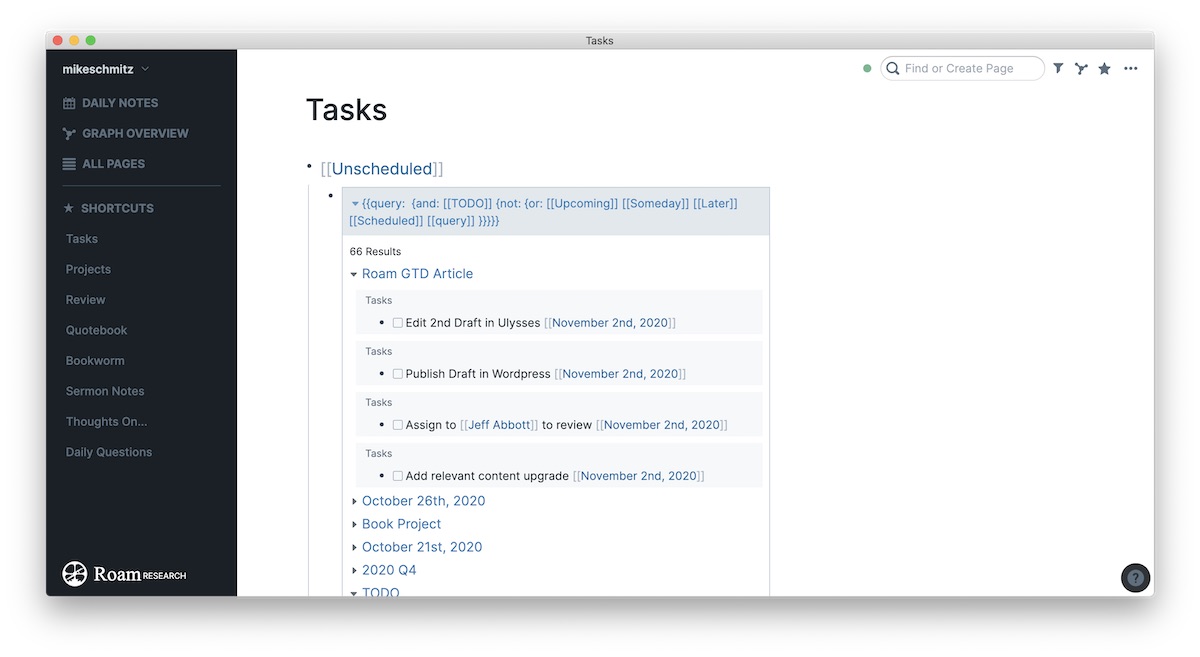
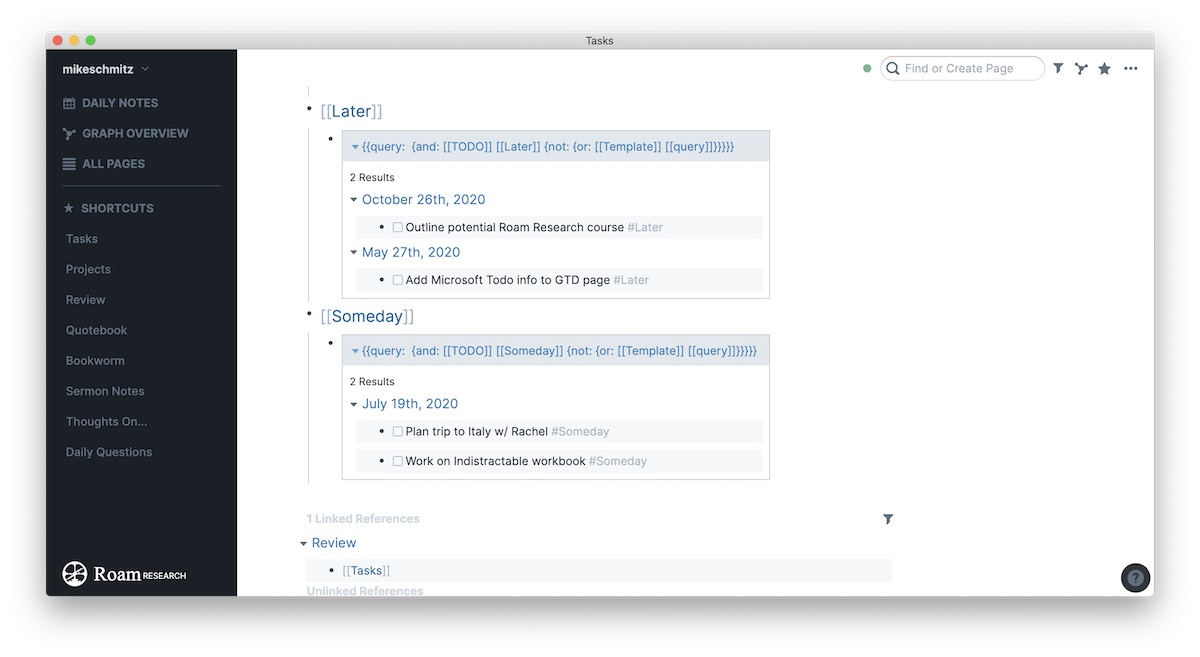
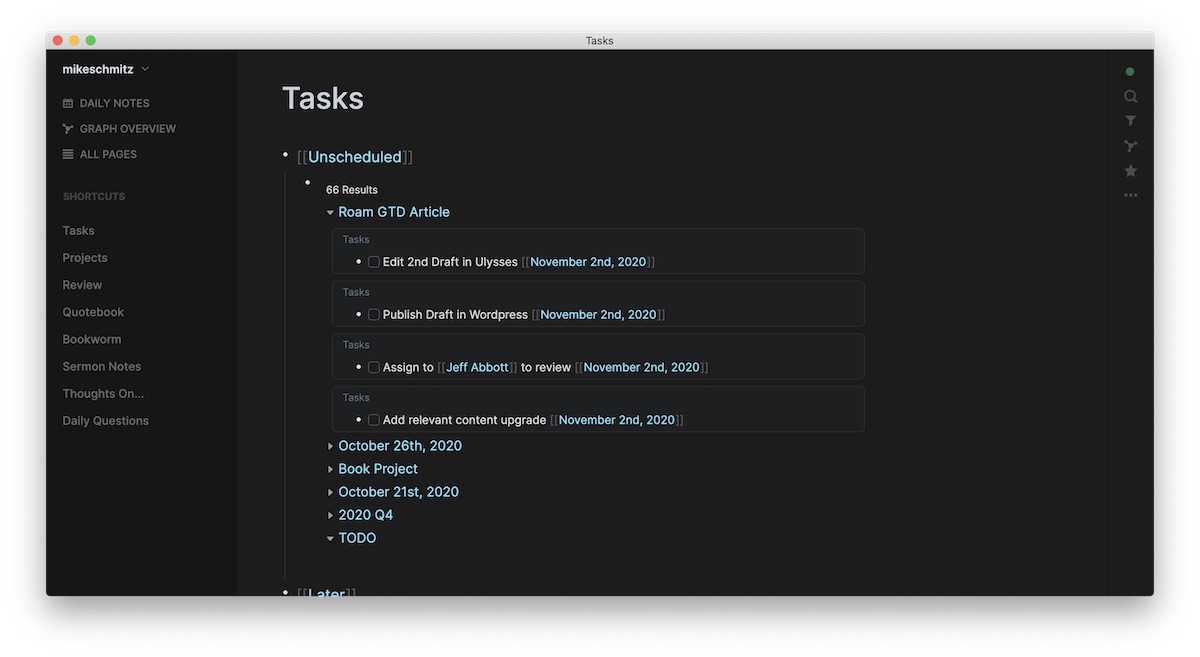
The cool thing about these queries is that you can set them up to filter data however you want. For example, I have a Tasks page setup that includes three separate queries for Unscheduled, Later, and Someday tasks. These are simple queries that return tasks that don’t have a #Scheduled tag, do have a #Later tag, or do have a #Someday tag respectively. This makes the weekly review process (we’ll cover that next) a lot easier.
By the way, Roam Research does have a Filters feature that allows you to filter the data you see on any page using a lot of the same criteria:
This filters your information in real-time, but I personally like to have these queries set up as I think they are a little bit quicker to surface the relevant information.
Step 4: Review
This is the step where a lot of people get tripped up. 95% of the time when someone says they’re having trouble getting GTD to work for them, it’s because they have neglected to review their tasks and projects regularly.
This can be a little bit tricky, because most task managers don’t have a great built-in way to review things easily. Unfortunately, Roam Research is no different. But it can be done, and it’s pretty straightforward when you take the time to clarify and organize first.
There’s a couple of steps to my weekly review inside of Roam:
First, I review all my active projects. This is pretty easy because I tag each active project with the #Active tag in the Status section of the metadata while I’m working on it. This allows me to simply go to the Active page to get the project list, then Shift-click on each project to open it in the sidebar. From here, I simply scroll through all of the project info and make sure everything is correct. If anything needs to be updated, I can modify it in the Sidebar and the project page is instantly updated. Once I’m finished with the project, I change this #Active tag to #Completed so that it no longer shows up when I’m doing my weekly review.
Next, I go to my Tasks page with the my three queries for Unscheduled, Later, and Someday tasks and review those. The unscheduled tasks are the most important, as these are tasks that I haven’t yet figured out when I want to work on them. For many tasks that’s fine, but the reality is that unless I make the time to complete them, they’ll never get done. So it’s important that I go through this list weekly and make sure there’s nothing here that I’ve neglected. If I find something I want to work on, I use the Date Picker to add a date to the task and tag it with the #Scheduled tag. This removes it from the Unscheduled query and makes sure that it will show up in my Daily Notes and This Week pages when appropriate.
Next, I review the Later and Someday queries. There’s usually not a lot in here, as these are both categories of things I’ve previously designated as “I don’t want to think about these right now.” The difference here is that Later includes things that I know I want to do (just not right now), and Someday includes the things that I may or may not actually get to.
Step 5: Do
The last step is to do the actual work. This is where all your hard work (theoretically) pays off, allowing you to stop worrying about whether you’re working on the right tasks and engage with the actual work.
When it comes to task management, this is where the rubber hits the road and you see whether you can really trust your system or not. If you’re constantly worried about whether the things on your list are the right things, you’ve still got some work to do. But if you’ve captured, clarified, organized, and reviewed effectively, you’ll find it easy for your brain to let go of everything else and focus on doing your best creative work.
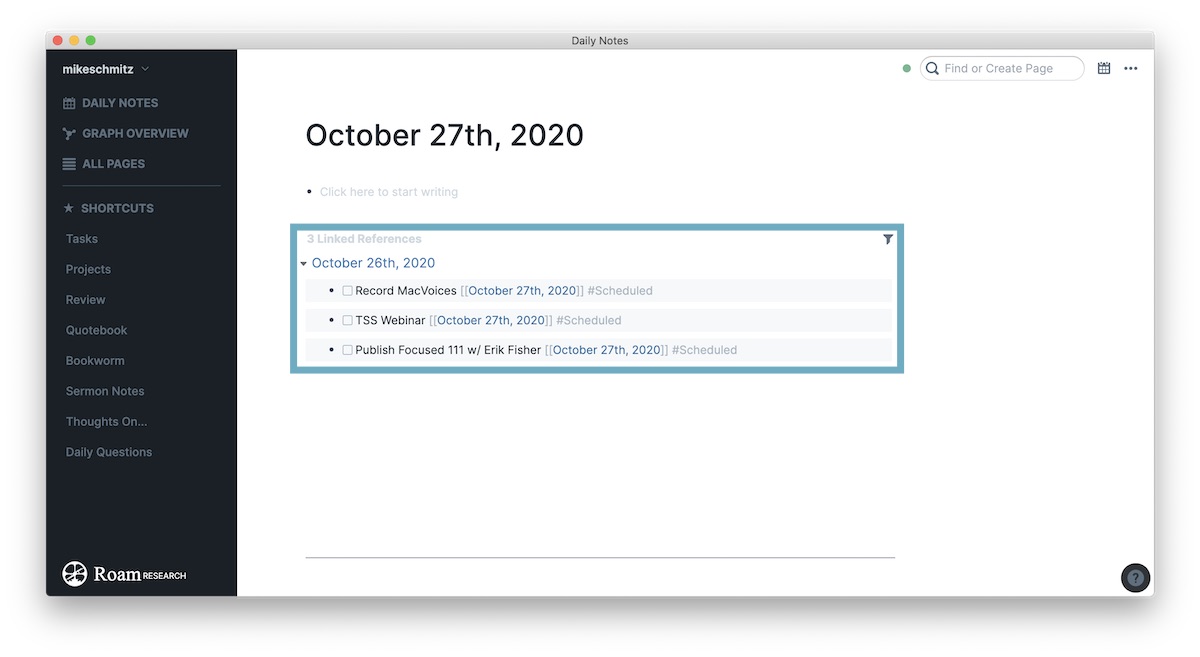
Theoretically, you could just work off of your Daily Notes page inside of Roam Research. If you’ve set everything up correctly, the tasks you need to get done will all show up here automatically in the Linked References section at the bottom:
Personally, I prefer to timeblock my day in my fancy notebook (I wrote about my hybrid system here), so I transfer these by hand and then work off my analog list. But it’s still handy to see everything that needs to get done today in one place.
Is Roam Research the Right GTD App for You?
That depends.
First, you need to decide what your goal is with using an application like Roam Research in the first place. The backlinks and knowledge graph features make it great for combining notes and doing research on different topics, but not everyone needs the ability to do this. If you’re a creator who relies on coming up with new ideas regularly, it can be an invaluable tool. I’ve personally found that I prefer to have my ideas and tasks together as it helps me to do my creative work more easily. But not everyone will prefer to work that way, and from a purely task management perspective there are better tools available. Roam is also really expensive (about $15/month), so no matter what other task manager you may be considering, it will most likely be considerably less expensive.
But if you like the idea of having everything in one place and being able to connect anything and everything, Roam is great. Instead of having your contacts database in one app and your tasks in another and your reference material in another, Roam Research allows you to bring all that stuff together into a single app. And for some reason, this works for me in a way that other apps haven’t. I get a lot of joy out of connecting everything in new and interesting ways. I also love that you can add your own CSS to style Roam just the way you want. For the sake of this article I’ve turned everything off on the screenshots so far, but here’s what my task queries look like with my custom CSS turned on:
If you like the idea of the Bullet Journal but want a digital tool for it, that’s basically what Roam gives you. And when you add queries and metadata to the mix, it can do just about everything a dedicated task manager can (minus callback URLs and the user interface isn’t as nice). It will take some time to get it set up just the way you like it, but Roam will give GTD fans all the tools they need to get things done.