The Ultimate Guide to Collaborative Writing in Ulysses
Ulysses is the best writing app for Mac, iPad, and iPhone users. Many folks who love writing in Ulysses have also wanted to use it as a collaborative text editor as well. However, setting up collaboration in Ulysses takes a little bit of nerdery. And so, in this guide we will walk you through the entire process, step by step.

The iPad offers writers an embarrassment of riches…
From excellent, modular hardware at various price points, to a vast ecosystem of apps for outlining, researching, and writing — our favorite writing app, Ulysses, is a powerful and customizable environment for all kinds of writing, but it suffers from one important limitation: there’s no built-in system for collaborating with others.
You could resort to an alternative, such as Google Docs, Notion, or Dropbox Paper, but many of us choose Ulysses specifically because of its native, fluid aesthetic, deep integration with iOS features, and a design focused on writing, not laying out documents. Not to mention the comfort of knowing that all our writing is accessible from one place.
In this guide, we’ll show you how to get Ulysses set up for collaboration with others using a version control system known as Git, and a companion app for working with Git on iOS/iPadOS called Working Copy.
Git can seem overwhelmingly geeky, but we’re going to take things step by step, and walk you through just the aspects you need to understand to get to work.
At the end of this guide you will have Ulysses up and running with the ability to sync and collaborate your work with others. Which is ideal for those who work with other writers and editors. Also, as you will discover, this tutorial is also for those who prefer iA Writer.
Table of Contents
- 1: A Brief Introduction to Version Control (with video)
- 2: How Git Works
- 3: Version Control for Writers
- 4: Getting Set Up on macOS (with video)
- 5: Getting Set Up on iOS/iPadOS
- 6: Collaborating on a Piece of Writing
- 7: Caveats and Disclaimers
- 8: Resources for Further Learning
- 9: Your Flexible New Collaborative Workflow
New & Updated!
Learn Ulysses
You deserve to be free to focus on your ideas, your writing, your notes, and your research.
But it can be frustrating to use an app that is difficult to use; or even worse… use multiple different apps and have your stuff scattered all over the place.
Learn Ulysses is the premier video course for improving your writing workflows with the best writing app, Ulysses.
Available now, with a special discounted pricing during launch week.
A Brief Introduction to Version Control
In 2005, Linus Torvalds was out of options.
He’d been working on building the Linux Kernel, a big programming undertaking, and he was running into frustrating limitations with the existing tools for keeping track of changes to the code as it evolved. Everything was either slow, insecure, expensive, or some combination thereof.
One of the great challenges in software design is collaborating safely. You need a way to have everyone work on code, fix bugs, and track changes so it’s painless to roll back any problematic updates. Meanwhile, the entire history of the project’s development should be saved so you can maintain a clear understanding of who made each change, when, and why.
This is what version control systems provide.
Collaborative tools like Google Docs effectively have their own simplified version control built in, which is great — if all you use is Google Docs. We need a way to bring those capabilities to Ulysses, though.
For Linus, none of the existing options fit his needs, so he decided to build his own. Something that could be quick, open source, and designed from the beginning to handle large projects, different workflows, and strong data integrity.
Git was born, and it quickly established itself as the de facto version control system for modern development.
You may be wondering why we care about a coding toolset, but this is where the flexibility of Git reveals itself. While it may have been designed to handle coding, code is just text and files, albeit in a language meant for computers.
Projects in Ulysses are also just text and files, though. Git is perfectly happy to track text, image, and any other kind of files you want to have in your project. Plus, you get the same advantages of accountability, revision history, and the ability to collaborate.
How Git Works
Everything you do with Git begins with a Repository (you’ll often see this shortened to “repo”).
A repository is simply a folder that you’ve told the Git software to watch for changes. Anything you do in that folder — from changing files, to adding or removing them — will be tracked and managed according to your commands.
Git itself is a software layer that you can interact with in a number of ways, though our preference is to use a dedicated app so that you have the benefit of an intuitive interface. There are many available, for any platform, but they all allow you to perform the basic commands of managing your repo.
To understand a typical Git workflow, we have to cover a few core actions you’ll be performing.
Creating and Cloning Repositories
We’ve established that a repository is just a folder containing your project files.
Whether you create it using your Git app, or you point Git to an existing folder, Git will add some hidden files into the directory that allow it to keep track of anything that changes in that folder.
Repositories that exist only on your device are called local repositories. Git is commonly used through a remote hosting service, like GitHub or BitBucket, to facilitate collaboration, but it’s actually not necessary; if you want, you can use Git with local repos to take advantage of version control benefits even when working on your own.
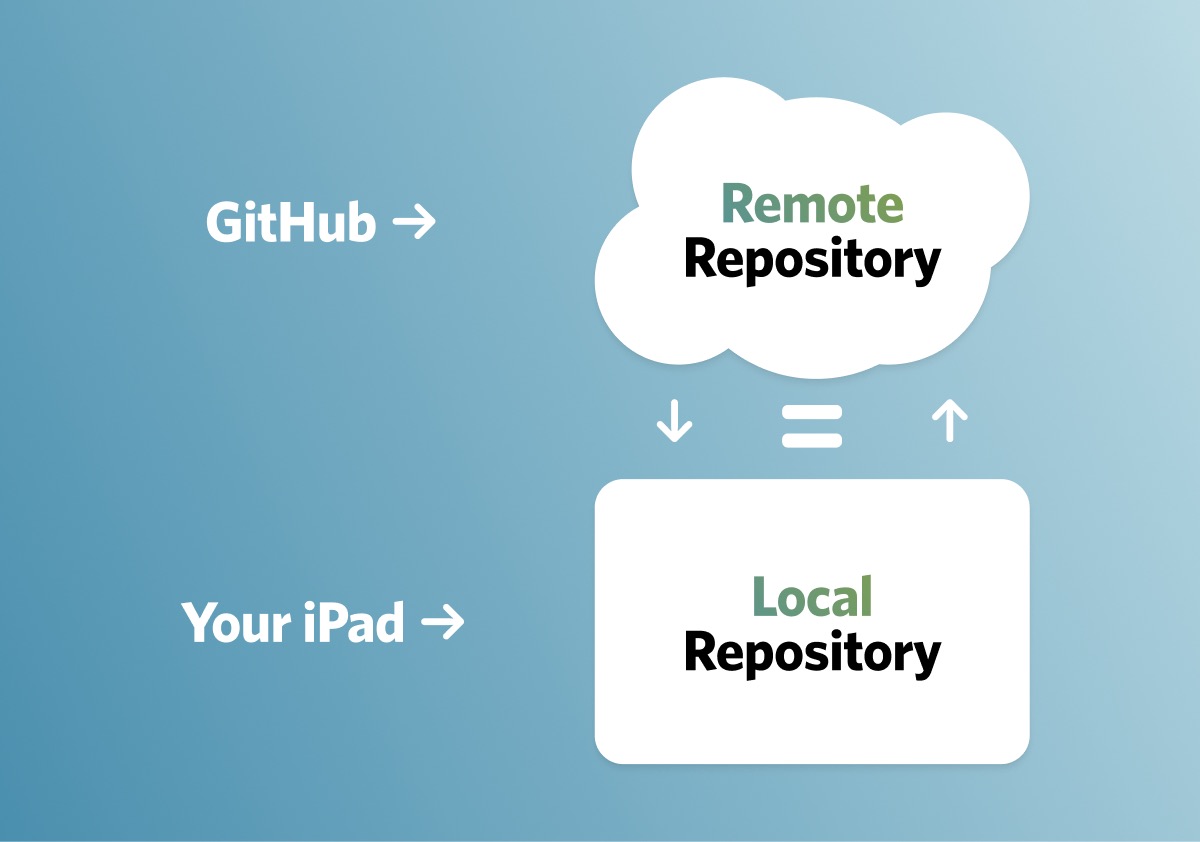
If a repository is hosted on one of these online platforms, or on a company server somewhere, it’s known as a remote repository. The only difference between a local and remote repo is where it’s stored.
To access a remote repo, we have to download a copy of it to your device before you begin working. This process is called cloning the repository, and it simply downloads a copy of the version-controlled project folder to your local device so you can begin working on the files within.
Committing Changes
As you work on files in your project, you’ll periodically tell Git to take a snapshot of the current state of things. This snapshot is known as a commit, and it captures any changes made since the previous commit.
You can think of commits like save points in a video game. Each commit is a step in the timeline of your project that you can revert back to at any point.
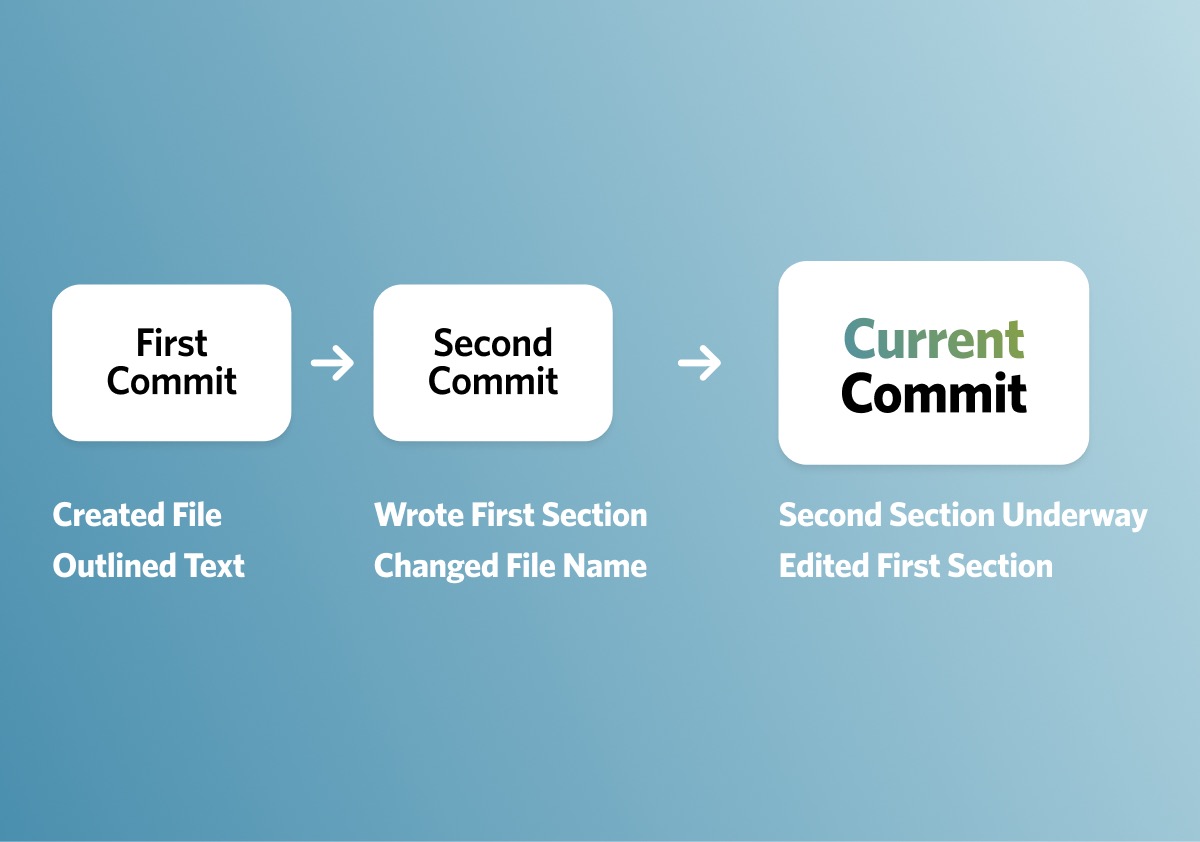
You can make as many commits as you like, and each one will include a description (so that, in the future, you know what that commit was intended to accomplish). It is also signed with your identity so the project history reflects who made the changes.
As you can imagine, this becomes important when multiple people collaborate on a repository because you‘ll be able to see who made each change and why.
Pushing and Pulling
While working on local repositories, everything is naturally up to date because the only copy of the repository is the one you’re working on.
When working with remote repositories though, the copy you’re working on locally doesn’t automatically stay in sync with the canonical copy stored online with GitHub (or wherever else). To maintain this sync, we use the Git push and pull commands to shuttle the repository files back and forth from our local copy to the cloud, and vice-versa.
Version Control for Writers
Let’s say we have a writing project on the go in a repository that’s hosted on GitHub.
We might grab our iPad and head to a coffee shop to work on a chapter. Before we get started, we’ll perform a pull operation to make sure our local copy of the repository is up to date with the online copy.
Pull compares the state of your local copy of the repository to the state of the remote copy and then downloads all the updated files and commit information.
Then we get to work!
After a while, we feel good about our progress and commit the changes we’ve made to the local copy of the repository on our iPad. This saves our place, but now we have to make sure the changed files are reflected in GitHub’s copy of the repository. To do this, we perform a push operation from our iPad to ferry the latest changes and commit info to GitHub.
Back home, if we sit down to continue writing at our iMac, we’ll have to retrieve the latest chapter from GitHub by performing a pull operation to download the changed files.
This process continues, with each device using pull to retrieve the most up-to-date files before a work session, making commits to mark progress along the way, and then using push to update the remote repository with the changes so they can be accessed on other devices or by collaborators.
There are a few details to note here.
First, you don’t have to push changes to your repo after each commit. You can accumulate several commits and just do a single push when you’re finished working. The end result is the same: the repository’s history will include the complete timeline of commits you made. This separation between commits and pushes is handy when you’re working offline because you know your progress is being saved. You can simply update the online repository the next time you have an internet connection.
Similarly, you don’t have to start working from a fully up-to-date repository. If your remote copy of the repository on GitHub has the beginnings of a new chapter, but you’re offline and want to make some changes to an older chapter that’s already part of your local copy, you can. You won’t see the new chapter (because those files haven’t been pulled to your local copy of the repository), but everything that was in the repo when you last pulled it will be there for you to edit.
Once you’ve finished and committed your changes, the next time you’re online and perform a push operation, Git will intelligently merge the two streams, leaving you with a repository that includes both your new chapter and the edits from the old one, with the relevant files available in GitHub as well as downloaded to your local editing device.
Getting Set Up on macOS
We now have a basic understanding of what version control systems are for, and what a simple workflow looks like for writers, but we need to tie things back to Ulysses.
You’ll recall that our goal is to set up a way to work on a writing project with one or more collaborators, so what we’ll be doing is the following:
- Creating a GitHub account to host our repository.
- Connecting to that repository and cloning it to our devices using a Git client (GitHub Desktop on macOS and Working Copy on iOS/iPadOS).
- Adding the local copy of the repository to Ulysses as an external folder in the library.
This setup allows us to write and edit the repository’s files directly in Ulysses, switching back to Working Copy or the GitHub Desktop app to make commits and perform push/pull operations as needed.
Creating the Repository
First things first: we need a GitHub account.
Why GitHub? It’s a proven, trusted, and ubiquitous Git host with a panoply of useful features and a generous free tier that more than covers the needs of writers like us.
Creating an account is simple, and will only take you a couple of minutes. Make sure to save your login credentials to a password manager for safe keeping.
Once you have your account, you can go ahead and create your first repository! I’m doing this on my Mac, but you can do everything from your iPad if you prefer.
You can create a separate repository for each project if you like, which is probably a good idea for larger works like a novel. If you’re writing articles for a site and want to collaborate with your editor, it might make more sense to have a single repository that you use to work together on multiple pieces.
This latter approach is the one I’ll take for the sake of example.
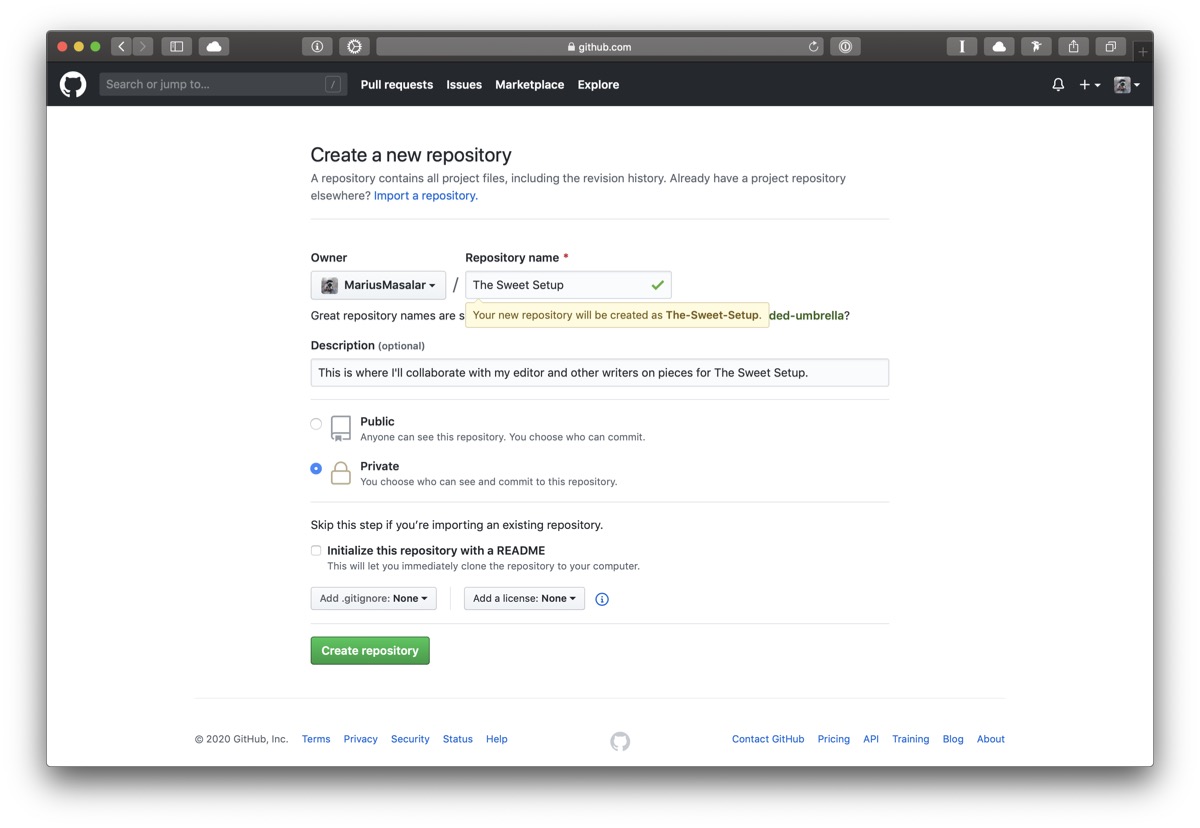
As you can see, I’ve given the repository a name and description, and I’ve opted to make it a private repo so that its contents are only visible to me and the people I invite to collaborate. You can safely ignore the other options at the bottom as they aren’t relevant for our needs.
Now that the repository exists, we’ll want to take a moment to get everything set up before we invite our collaborators. Since we’re on the Mac still, download the native GitHub Desktop app and sign in to your GitHub account in the app. You can then follow the instructions to clone your new repo to a sensible place on your computer (the Local Path).
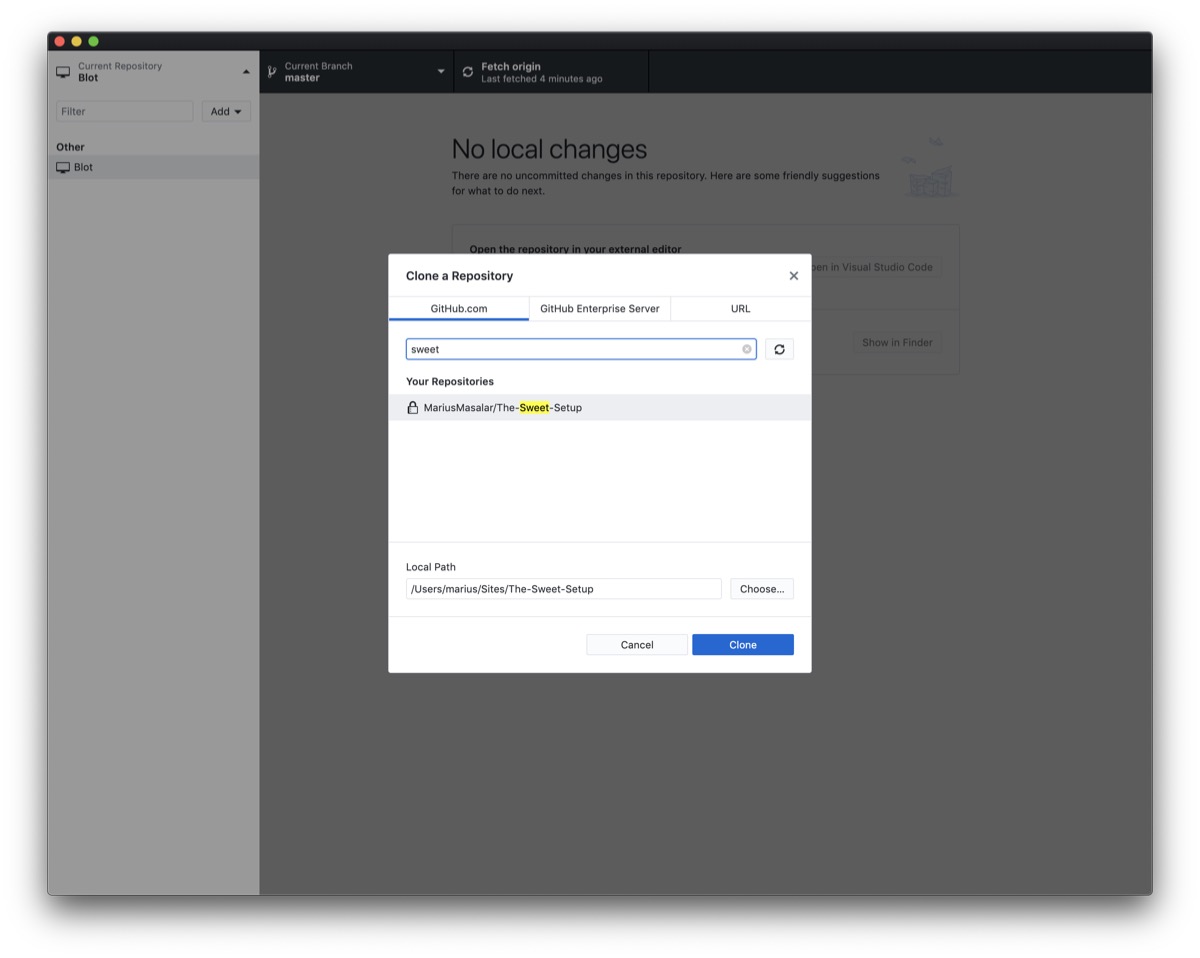
We now have a local copy of our new repository on our Mac! Since it’s brand new, for now it’s just an empty folder. If you click the Show in Finder button on the main page of the desktop app, you’ll be taken to the folder in Finder where you can see this for yourself.
Adding the Repository to Ulysses on macOS
I’ll open up Ulysses at this point so that we can use it to create an example text file in the repository and get things started.
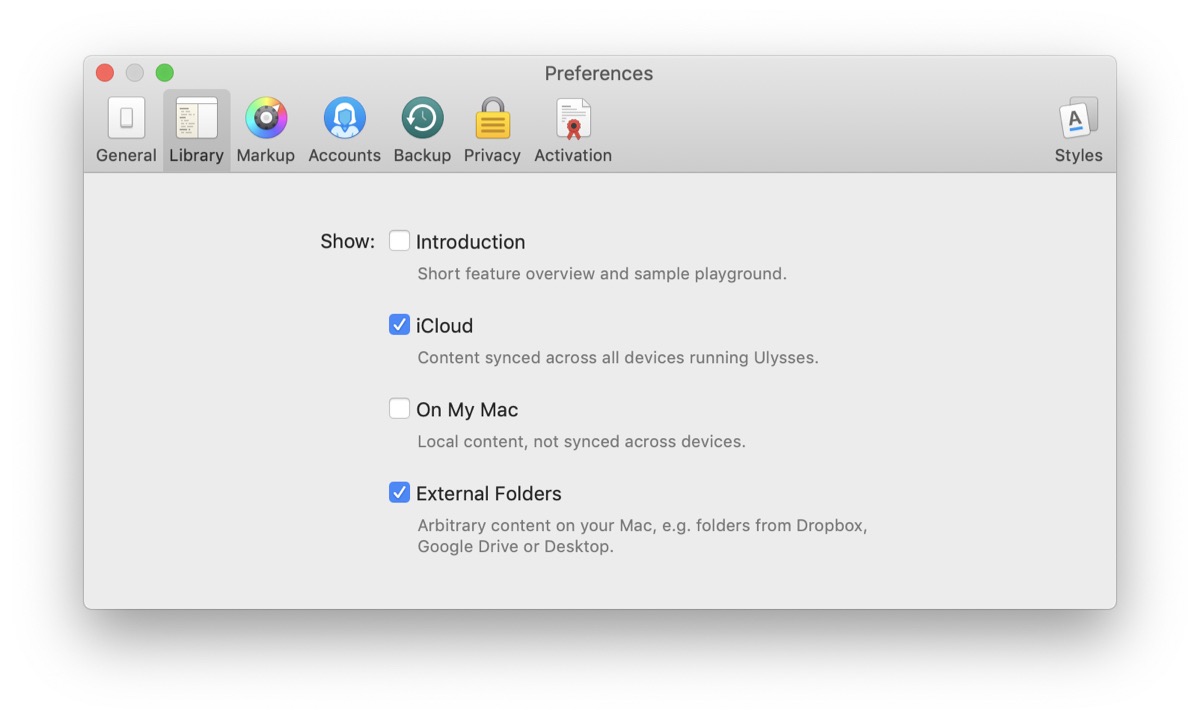
First, make sure that you have Ulysses configured to show the External Folders section in your library.
Next, click the Add Folder link in the sidebar and navigate to the location on your drive where you cloned the repository a moment ago. For maximum compatibility, make sure you set the file extension to .txt and uncheck Create reference links.
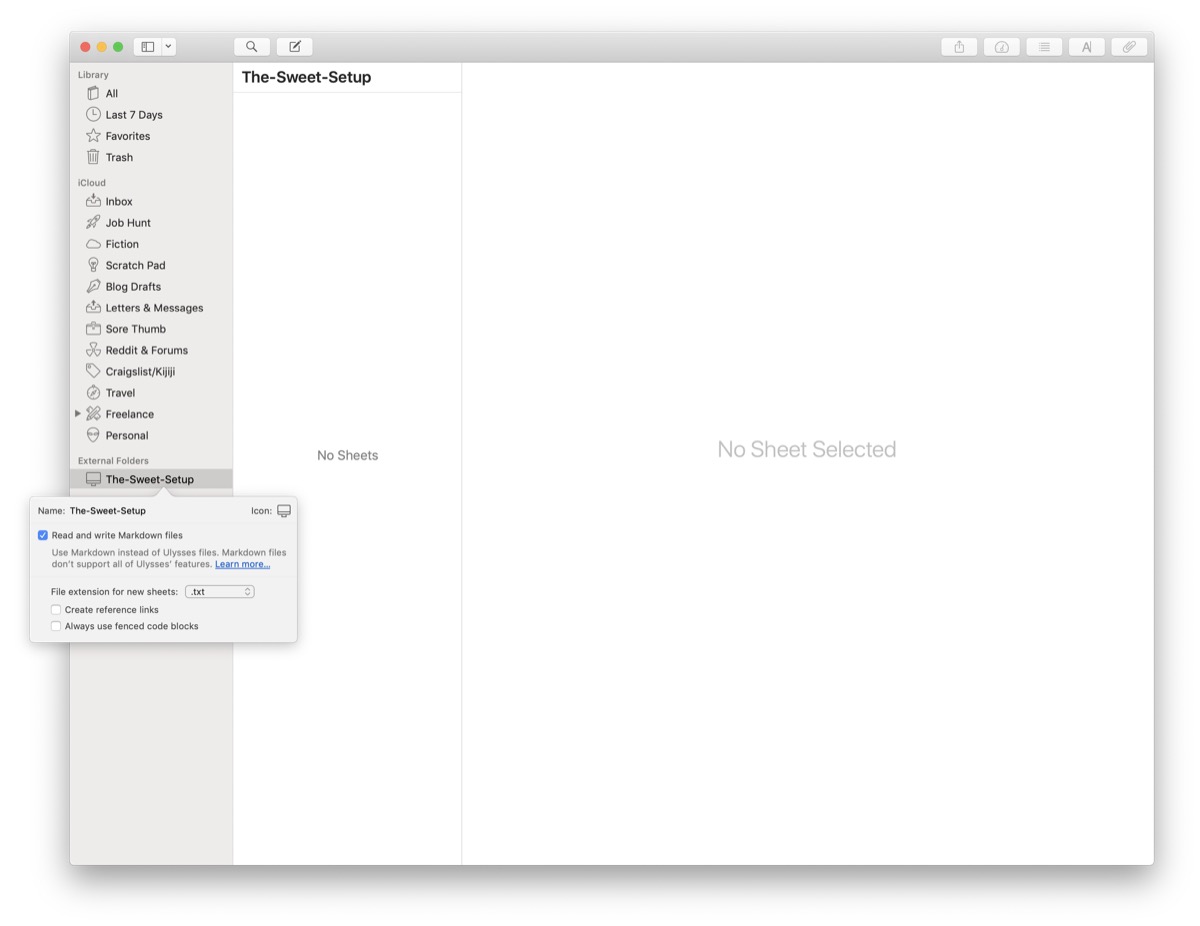
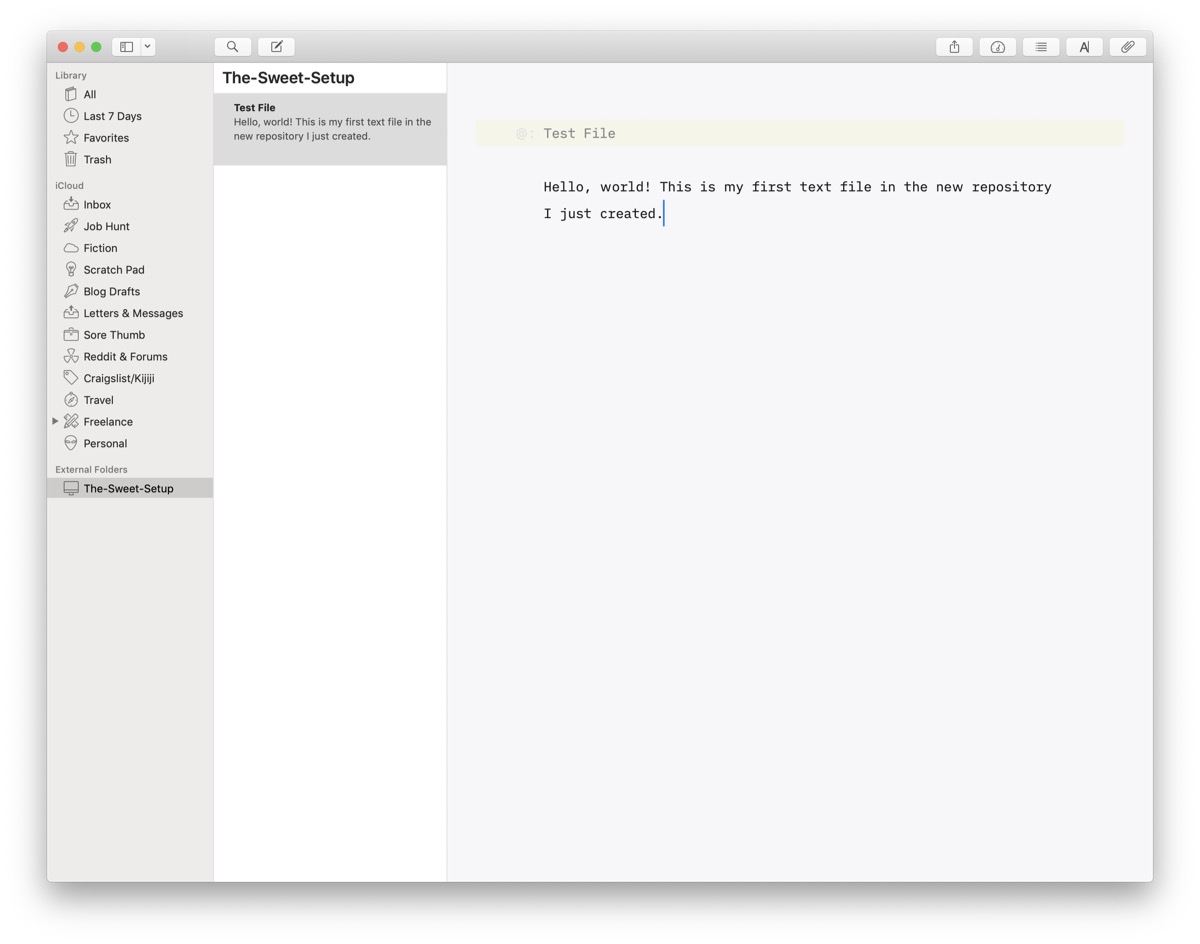
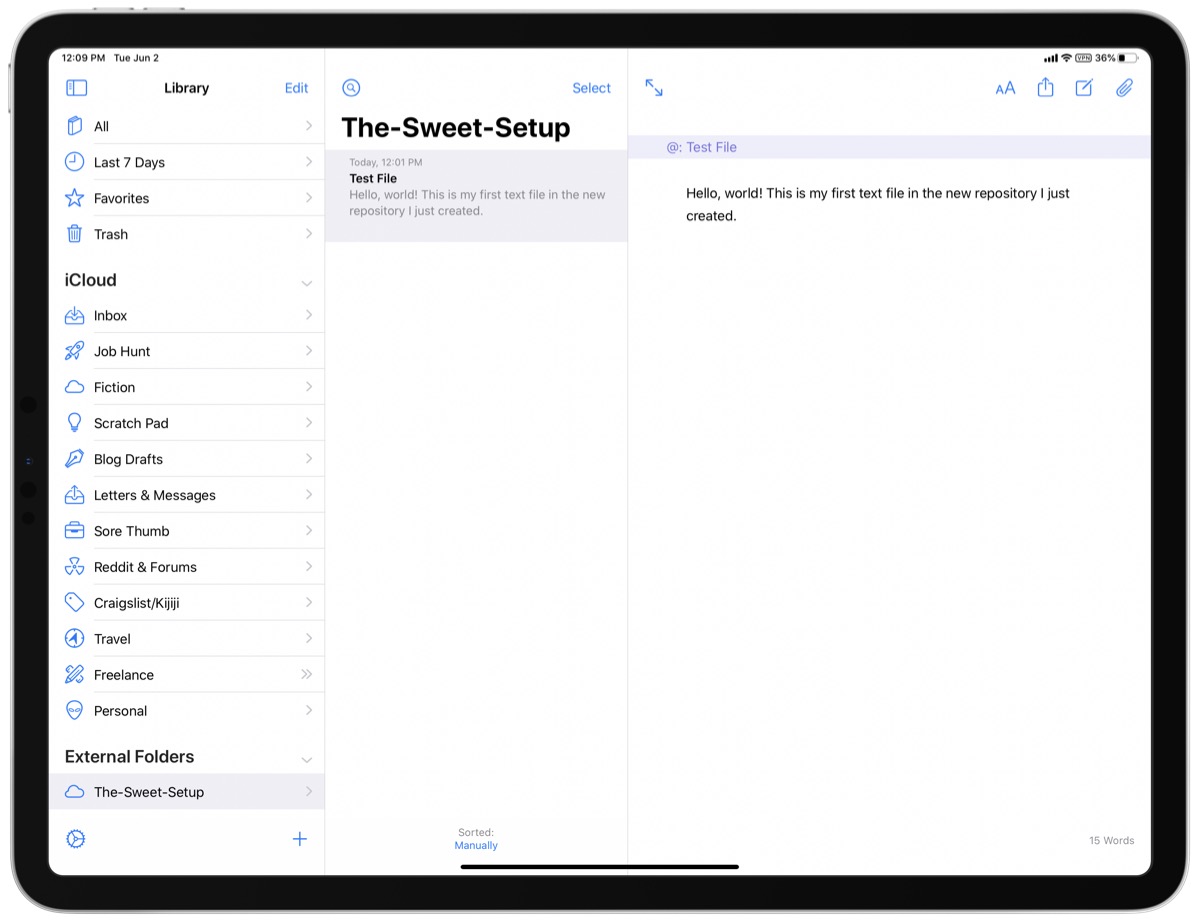
Now, we can simply create a sheet as we normally would in Ulysses. Since this is a plain text file rather than a Ulysses sheet, I’m using the @: syntax on the first line to name the file.
Making Our First Commit
Let’s flip back to the GitHub Desktop app now to make our very first commit.
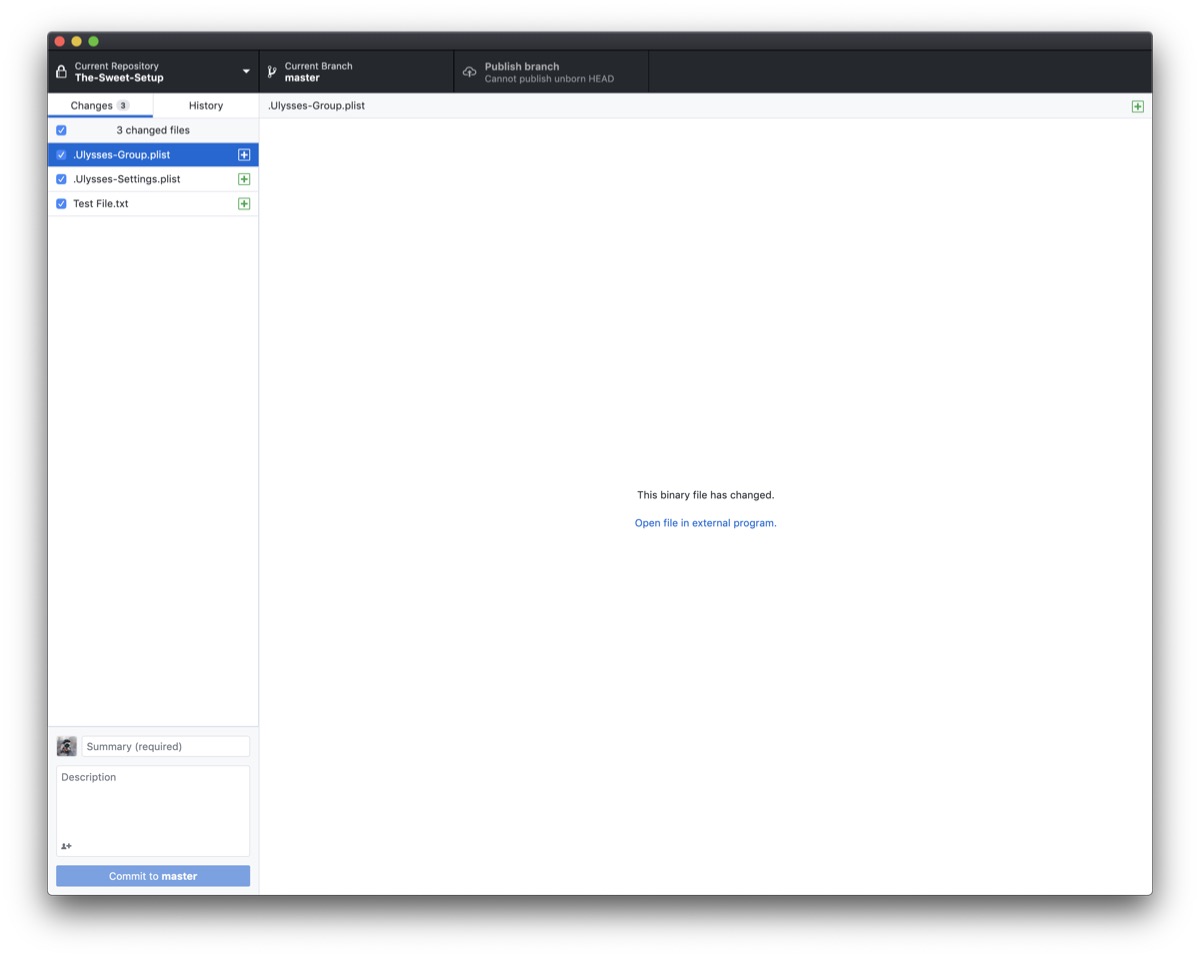
In the Changes tab, you’ll see that Git has identified a few files: two hidden Ulysses .plist files, and our brand new Test File.txt that we just created. The Ulysses files are created automatically by Ulysses in any external folder you add to the library and they’re used to store the sidebar icon and other configuration info.
These aren’t relevant to our work, so we can take this opportunity to quickly learn about another basic Git concept: ignored files. If you right-click on a Ulysses .plist file in the Changes area of the desktop app, you’ll see an option to ignore the file or even ignore all files of that type. This will tell Git to disregard any changes to those files so that our commit history isn’t cluttered with irrelevant stuff.
Go ahead and ignore both the .plist files. This will replace those files in the Changes list with a single .gitignore file that Git uses to remember anything you’ve told it to disregard.
Now that we’ve tidied that up, we’re ready to proceed.
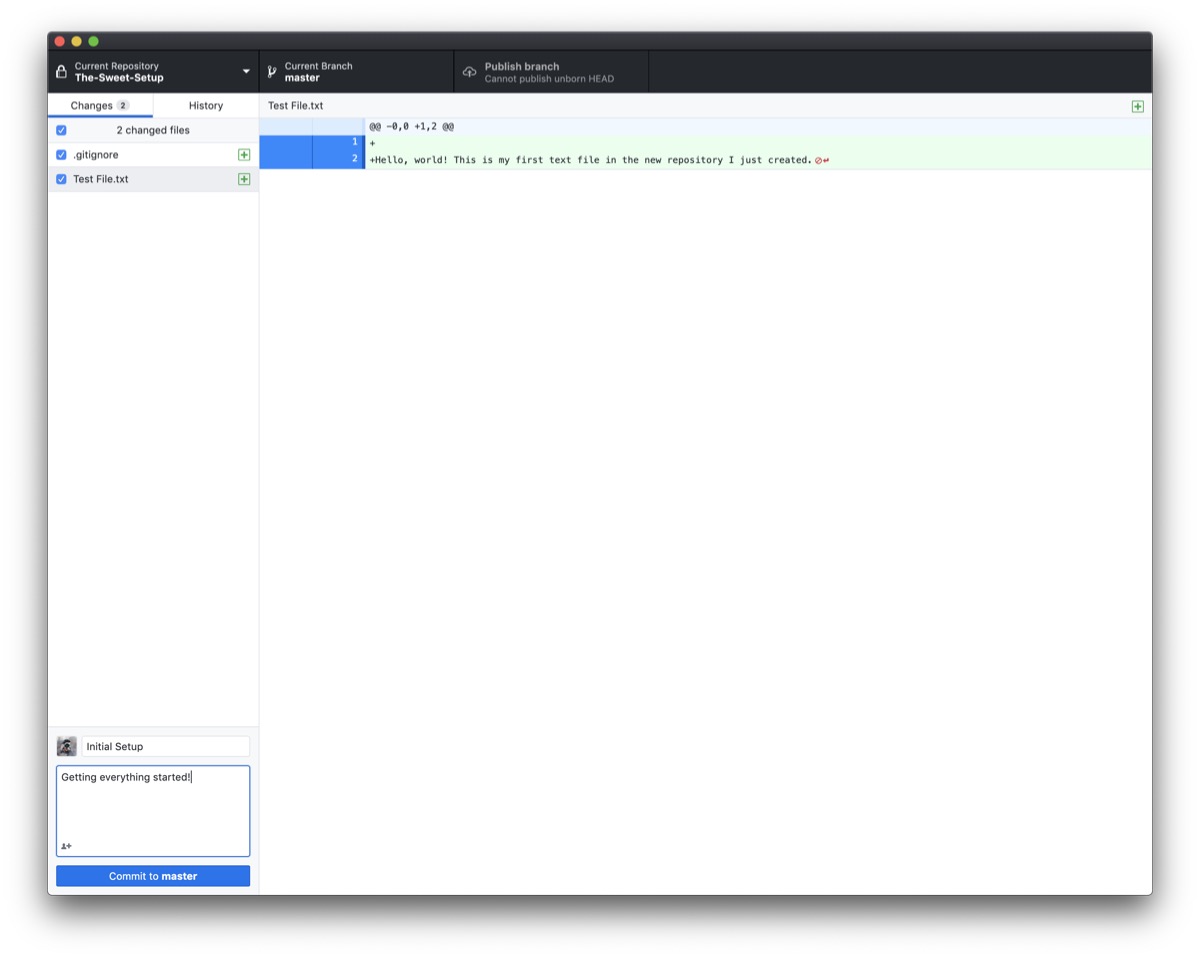
Add a summary and, optionally, a description, then click Commit to Master. You may be prompted to confirm the branch that you want to commit to. Branches are a more advanced Git concept that we don’t need to worry about.
There’s just the one called Master in the list, so click that.
Now we’re ready to publish the branch, which initializes the repository with the contents we added to it. Go ahead and click the big blue Publish Branch button.
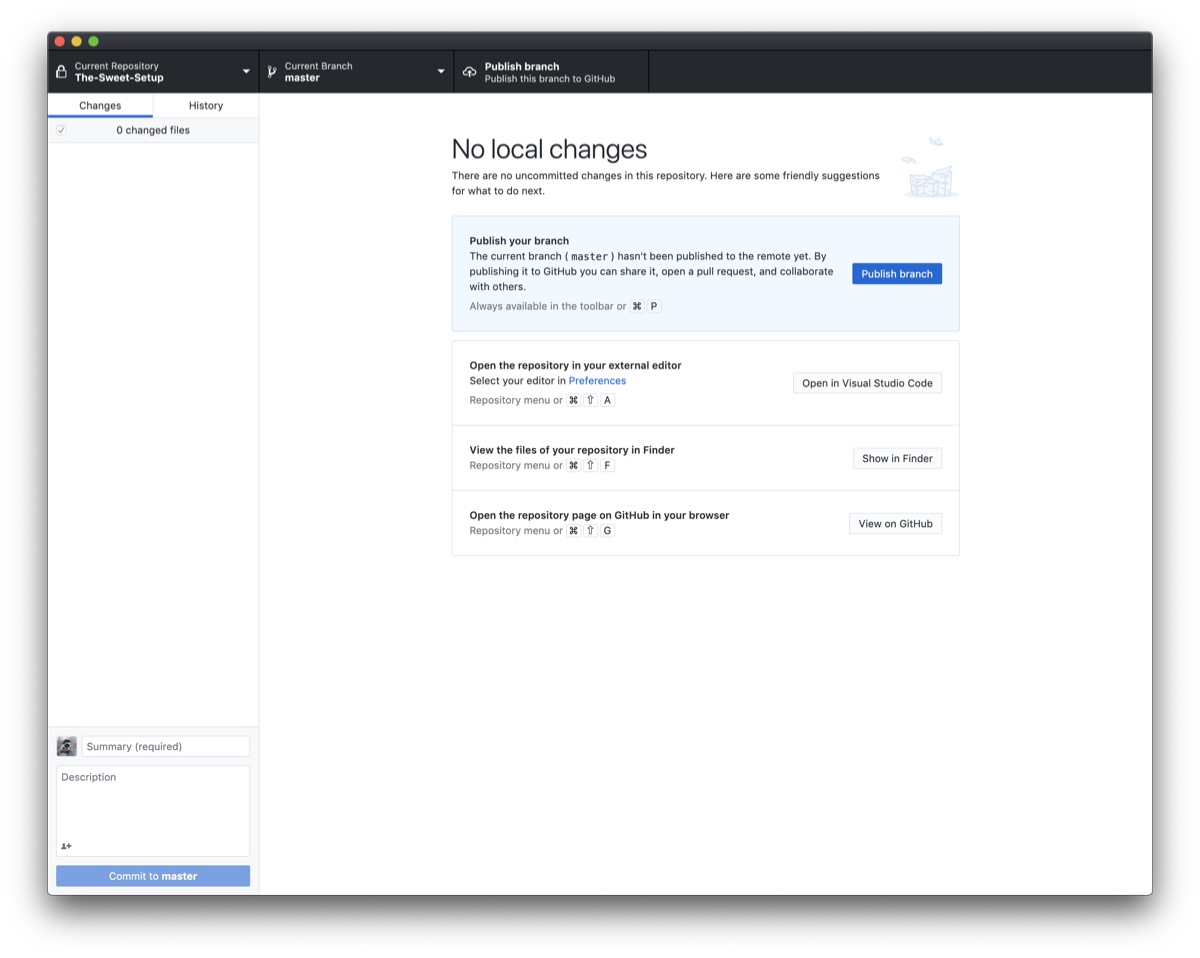
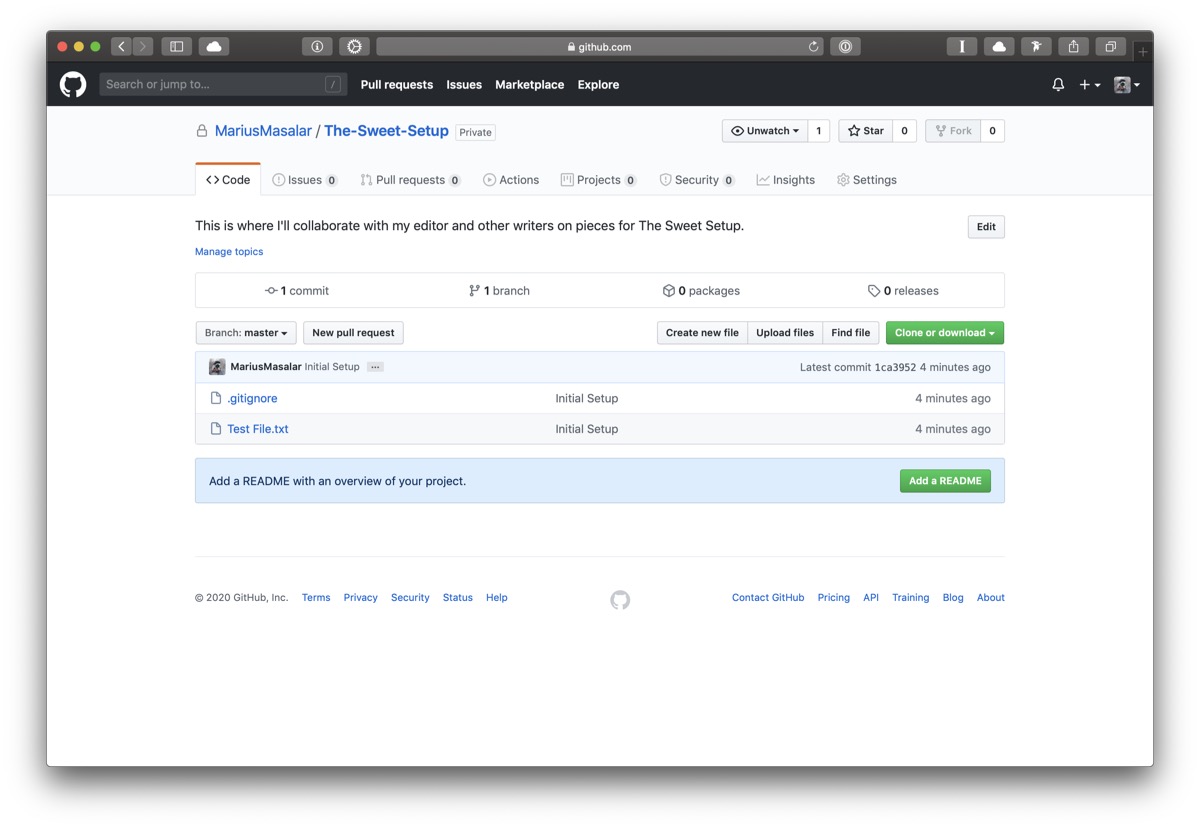
At this stage, our repository has a single text file in it (along with the hidden .gitignore file), and both our local copy and the remote copy on GitHub are fully up to date. You can visit your repository’s webpage on the GitHub site to verify this if you like.
Inviting Our First Collaborator
Now that we have our repository set up, we can share access with our first collaborator.
From the GitHub website, navigate to the repository’s Settings tab, and then choose Manage Access from the sidebar. I’m going to invite my friend, Thomas, to collaborate with me on this repository. He already has a GitHub account, so I’ll search for his username and add him. If he didn’t already have an account, I would encourage him to create one as we’ll both need to have accounts to work together in this way.
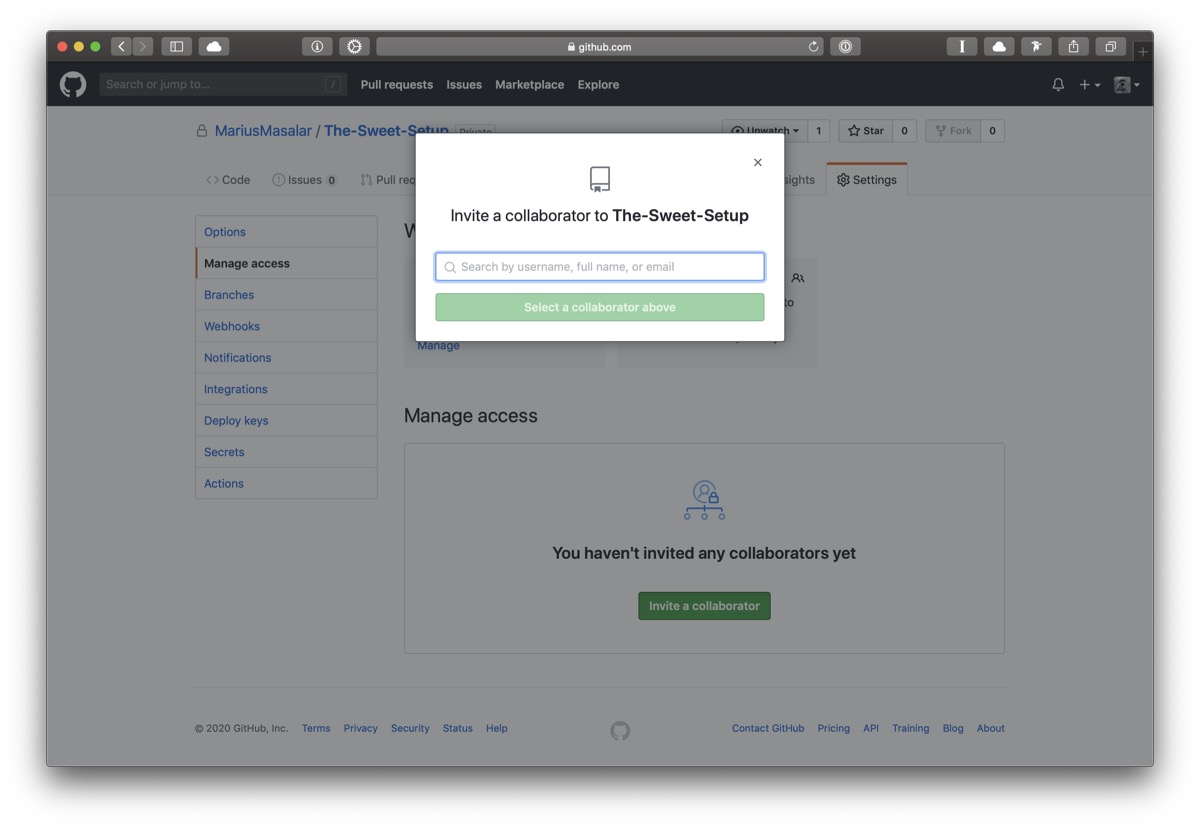
Once Thomas has accepted my invitation, he’ll see my repository in his GitHub account and be able to clone a copy to all his devices.
Getting Set Up on iOS/iPadOS
Now that we have everything in place, we can quickly add our iPad or even iPhone into the equation.
That’s where Working Copy, the best Git client for iOS, comes into the picture as our companion app that makes all this possible. Working Copy allows us to clone our repository from GitHub, and it makes the local copy of the files from the repository available to other apps through Apple’s Files.
Setting Up Working Copy
Working Copy is the iOS equivalent to the GitHub Desktop app; it’s where we’ll be performing our commits, pushes, and pulls.
Once you have the app installed, tap the + icon in the header and choose Clone repository. From the GitHub tab, sign in using your account credentials and then find the repository you created earlier. In the next step, leave all the settings as they are and simply tap Clone.
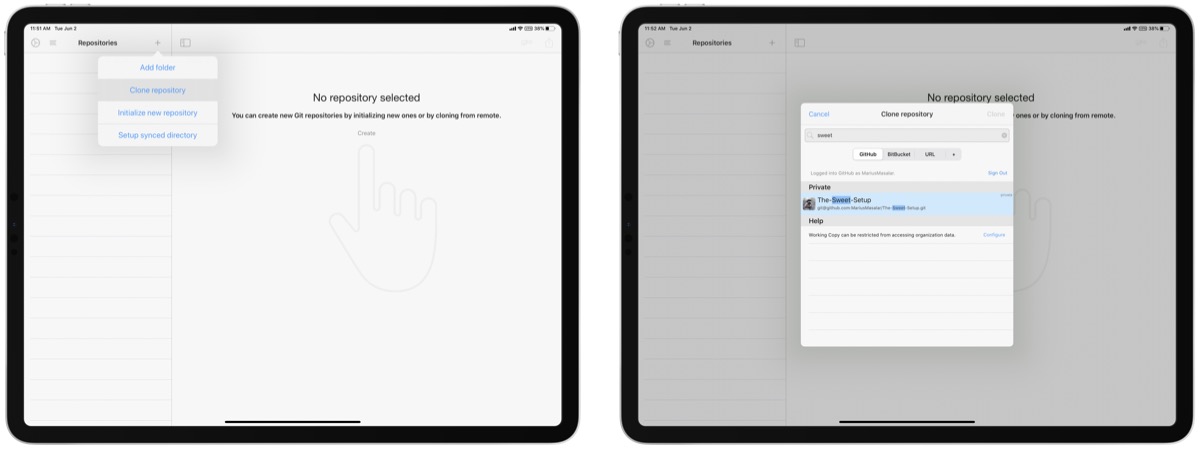
Working Copy will automatically create what’s called an SSH key pair for you and connect it to your GitHub account, allowing for secure access to your repositories without you having to enter your username and password each time.
Our repository is now set up, but we have one more important step to perform so that we can see our repository in Ulysses.
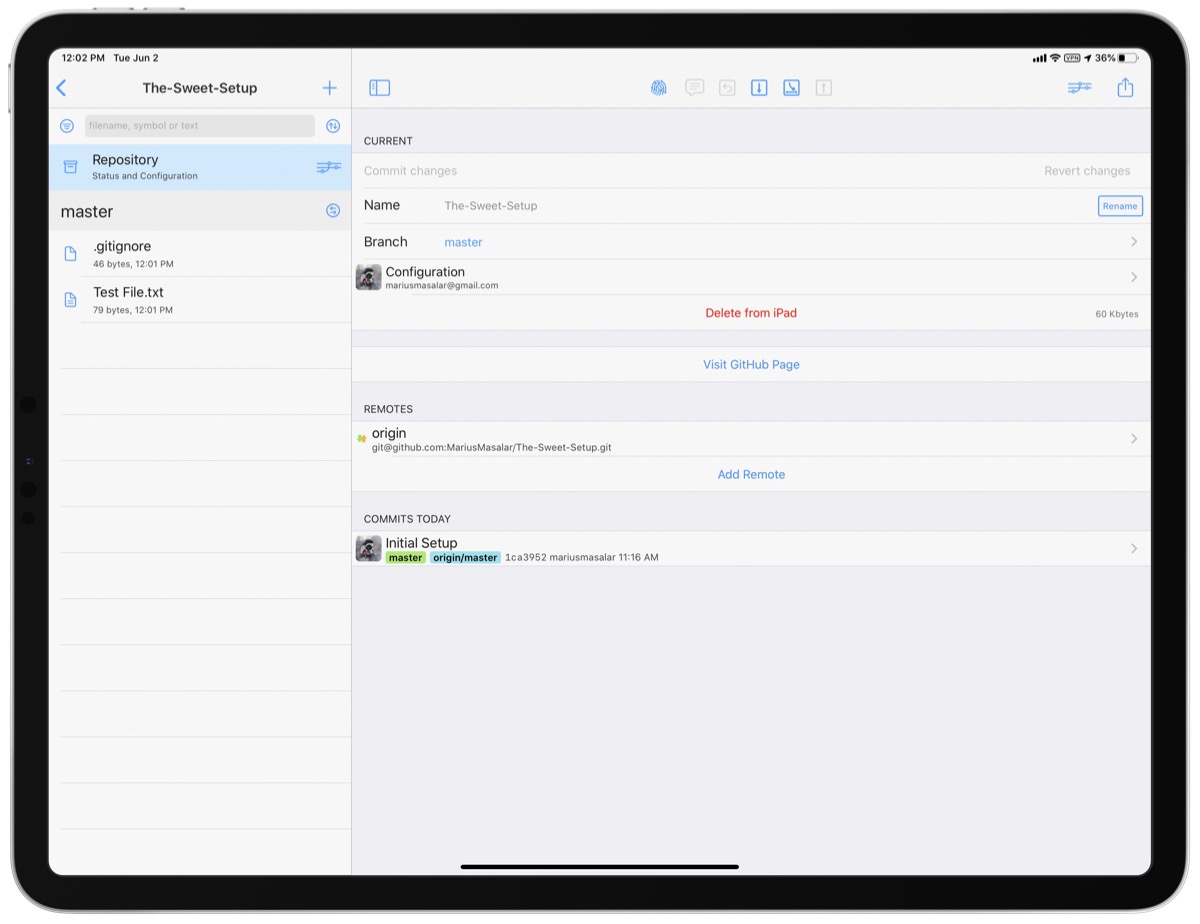
Open up the Files app on your iPad to continue. From the options menu above the Browse label, choose Edit and make sure that the toggle for Working Copy is enabled.
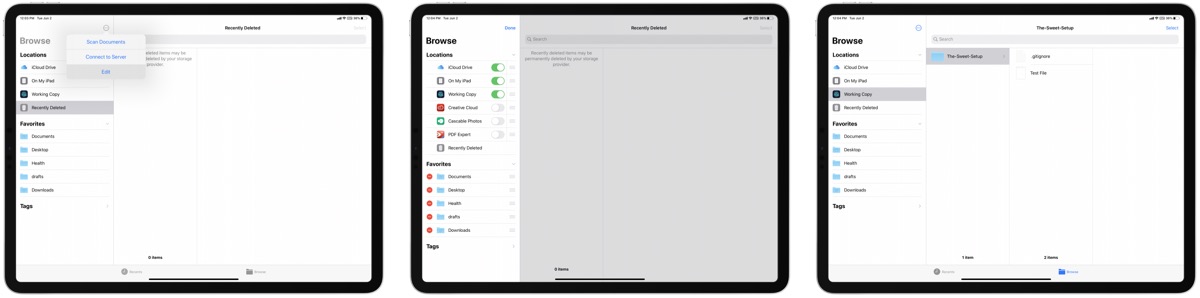
Now, we can view the contents of our repository in Files and in the system-wide file picker from any app — including Ulysses.
Setting Up Ulysses on iOS/iPadOS
We’re going to set things up in Ulysses exactly the same way as we did on the Mac side of things.
Navigate to Ulysses’ settings and open the Library section. Tap Add from Other Location… and select your repository’s folder from the Working Copy directory in the file browser.
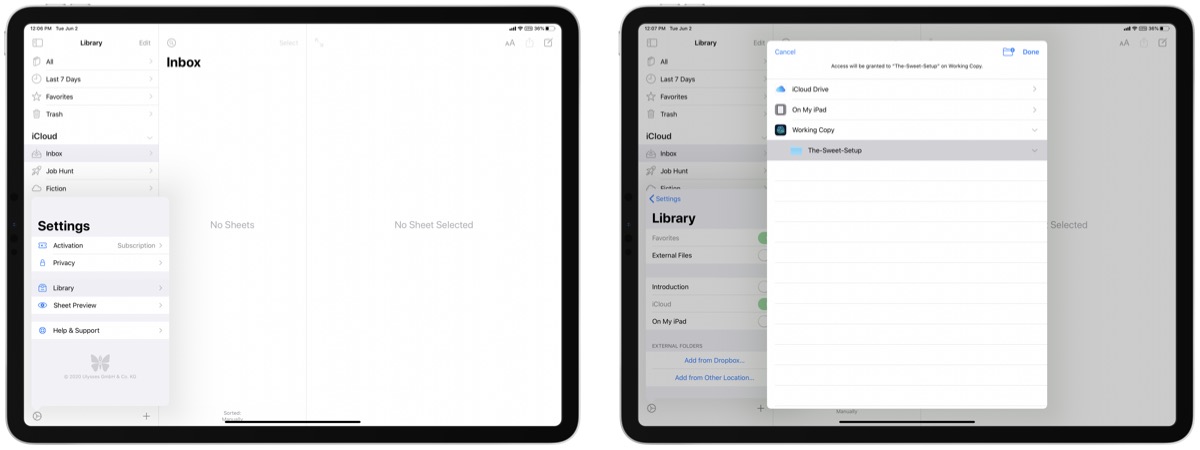
Tap done and then make sure your settings match what we did on the desktop — Default File Extension set to .txt and Create Reference Links turned off.
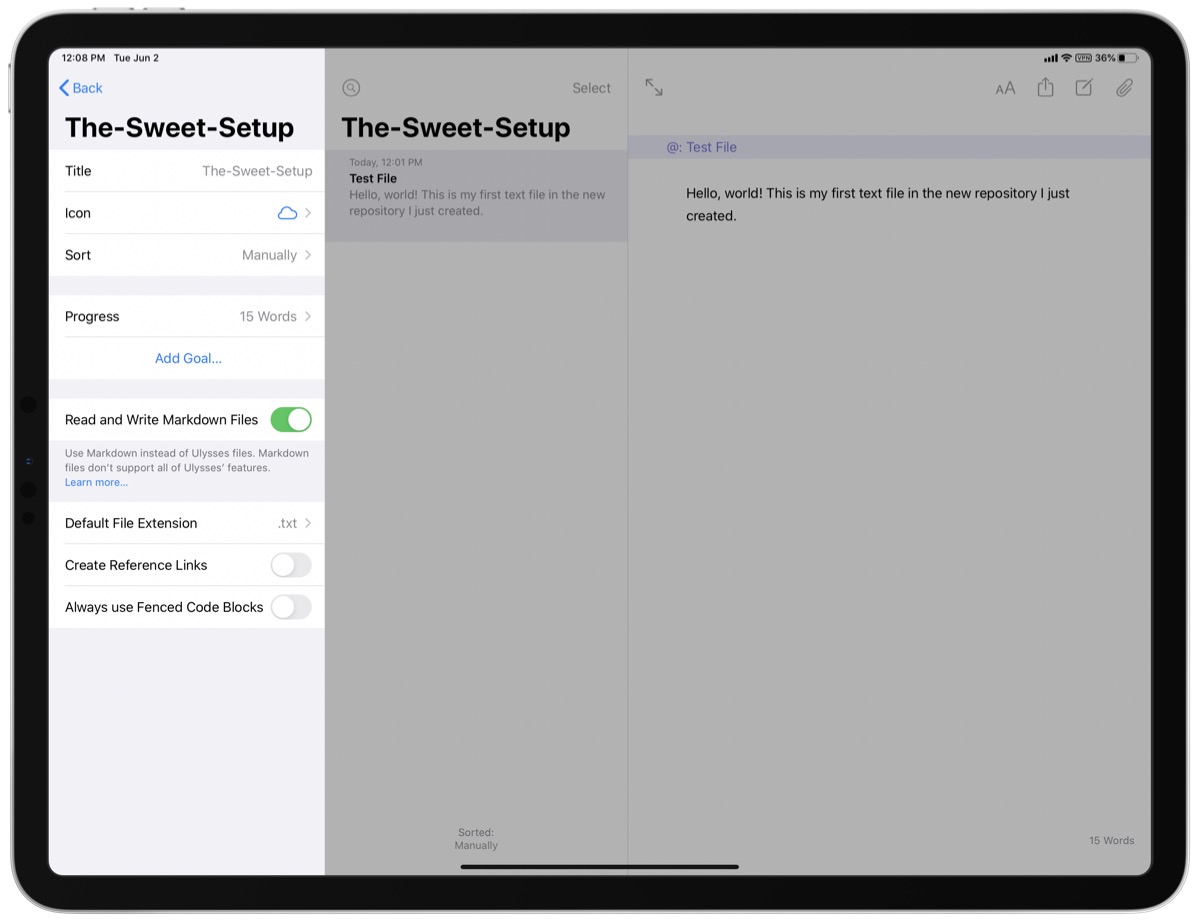
Now, we have our repository accessible in Ulysses’ sidebar, and we can view and edit our test file within!
New & Updated!
Learn Ulysses
You deserve to be free to focus on your ideas, your writing, your notes, and your research.
But it can be frustrating to use an app that is difficult to use; or even worse… use multiple different apps and have your stuff scattered all over the place.
Learn Ulysses is the premier video course for improving your writing workflows with the best writing app, Ulysses.
Available now, with a special discounted pricing during launch week.
Collaborating on a Piece of Writing
That was a lot of setup, but now we’re equipped to write, edit, and collaborate from any of our devices!
Let’s make some changes to the test file to help us get the hang of this new workflow. I’ll stick to the iPad since I do a lot of my writing there anyway.
Making Edits on the iPad
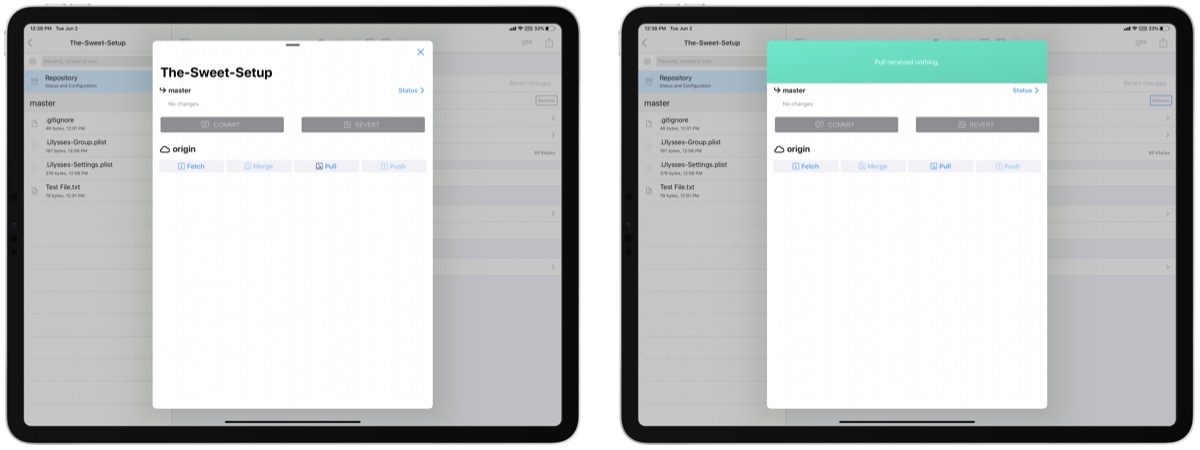
It’s a good idea to get into the habit of performing a Git pull operation before you start working, just to ensure that your local copy of the repository on the iPad is fully up to date.
We know this is the case in our example because we haven’t touched the test file since we created it, but let’s go ahead and try a pull anyway.
In Working Copy, tap the small fingerprint-like icon in the header and then tap the Pull button to initiate the operation. Working Copy will check with GitHub for any changes, and since there aren’t any, you’ll see a banner confirming as much.
Now we can flip over to Ulysses and do some writing.
I can do as much editing as I want, and at any point in time I can flip over to Working Copy to make a commit.
I might want to do this when I’ve reached an important milestone, or before making a substantial change to a section (in case I decide later that my changes weren’t for the better). Essentially, any time your project reaches a point that you might want to return to or be able to refer back to later, you should commit your changes.
These changes exist on my local copy of the repository on the iPad until I perform a push operation to send the updated file(s) and commit history to GitHub.
Committing and Pushing my Changes
Now that I’ve made some progress, I’m ready to push my changes to GitHub so that they’re available to my collaborators and I on other devices too.
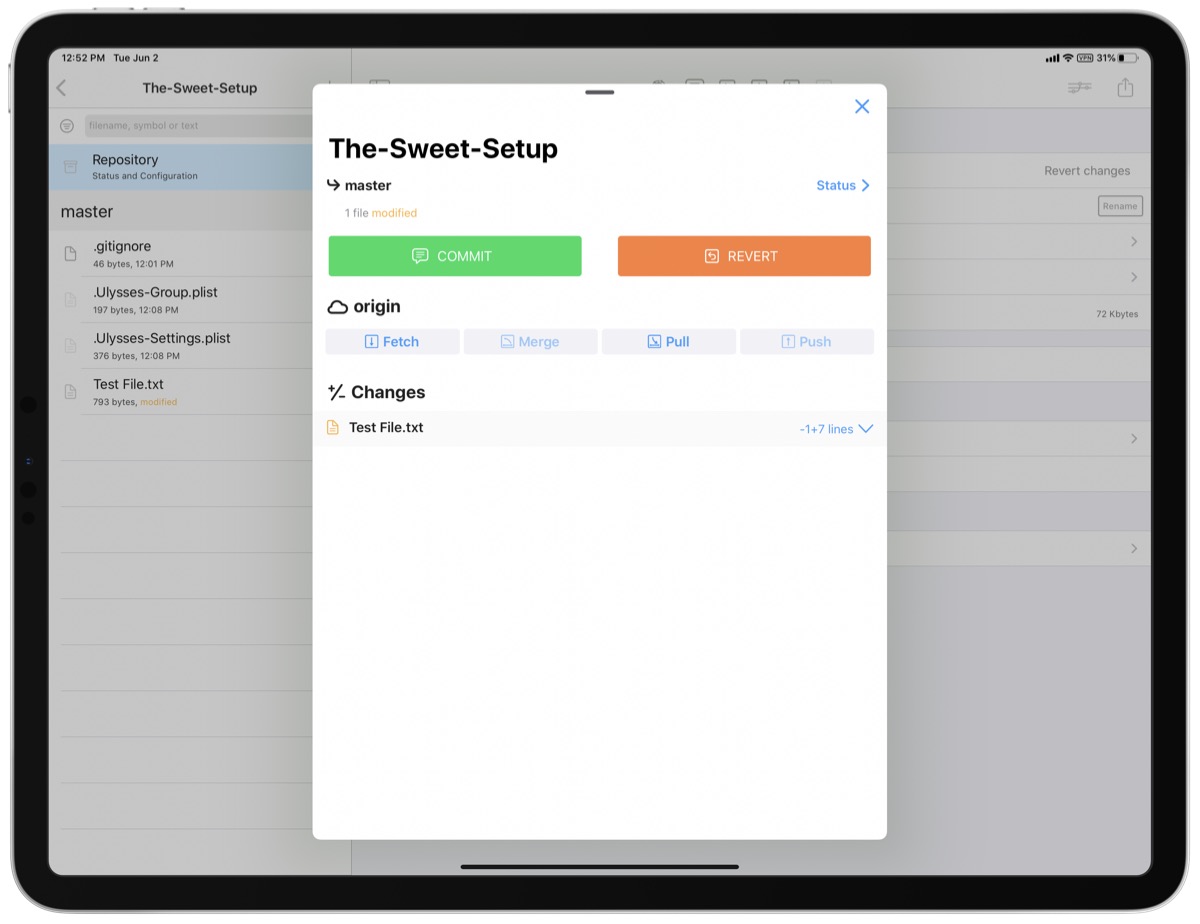
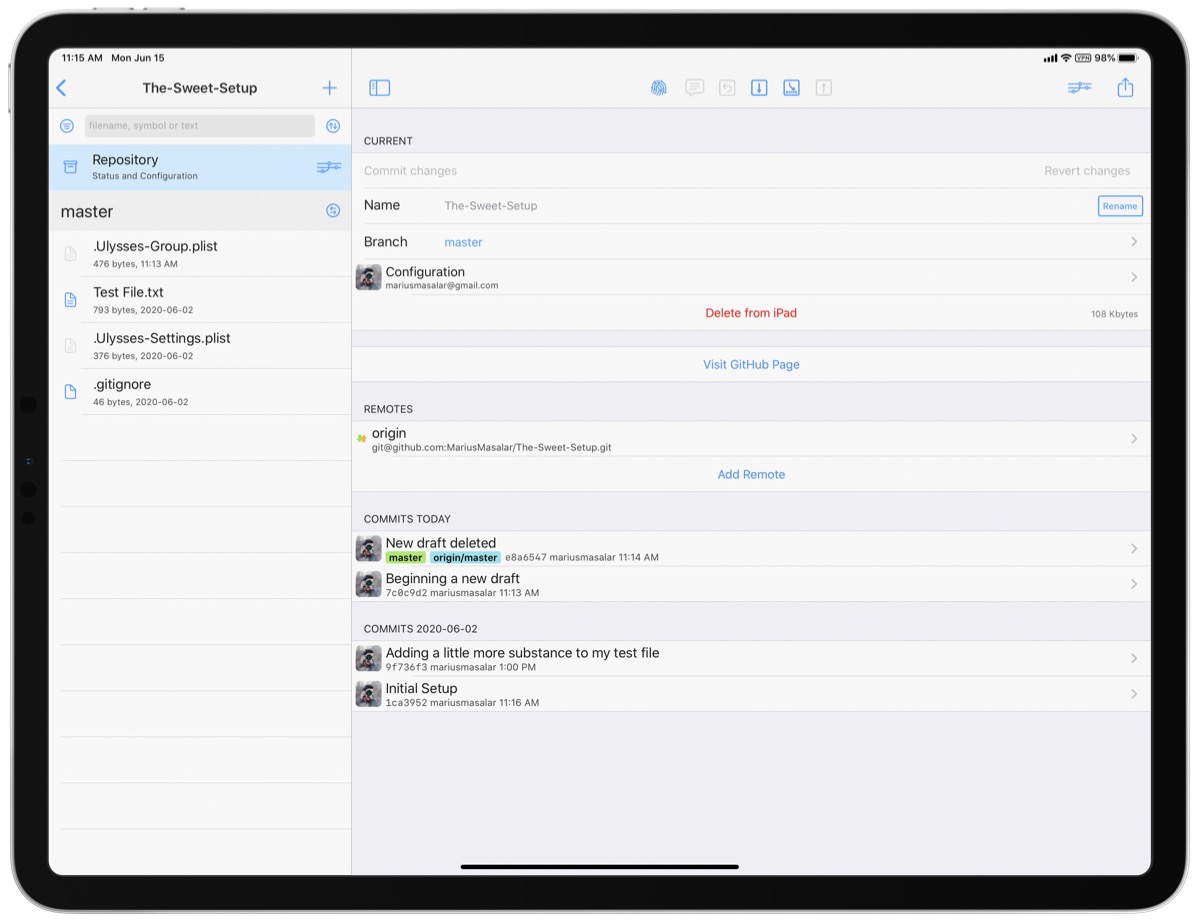
When I open Working Copy now, I’ll see that the repository icon has turned yellow, indicating that I have changes that haven’t been committed. The sidebar also shows me which exact files have been modified; in this case, it’s just Test File.txt.
To commit the changes, I can either tap the Repository item in the sidebar and tap Commit changes at the top of the main view, or I can tap the fingerprint icon again and use the big green Commit button instead.
I like big buttons (and I cannot lie), so I tend to prefer the fingerprint menu approach.
When you tap commit, you’ll be taken to a small modal window that lists all the changed files (just the one text file in this case) along with fields for a summary and description, just like we saw in the GitHub Desktop app earlier.
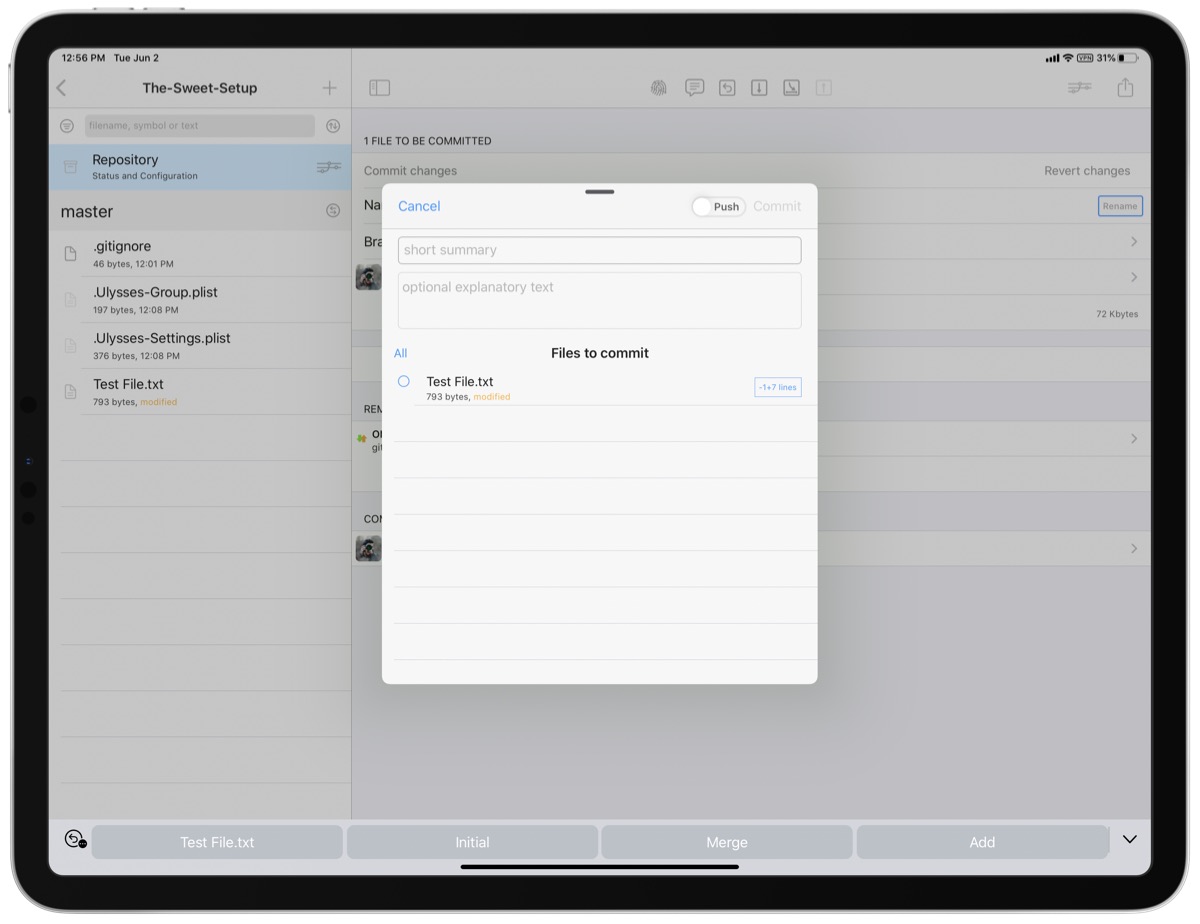
For our purposes, we always want to include any changes we’ve made in our commits, so you can simply use the All button to select everything in the Files to commit area without having to tap them individually. Again, there’s only the one file in our current example, but in the future you might be making commits after modifying several files, so it’s good to get into the habit of including everything.
Add a brief summary of the changes you made, and then take a look at the top of the modal window: Working Copy offers us a toggle to enable Push along with our commit.
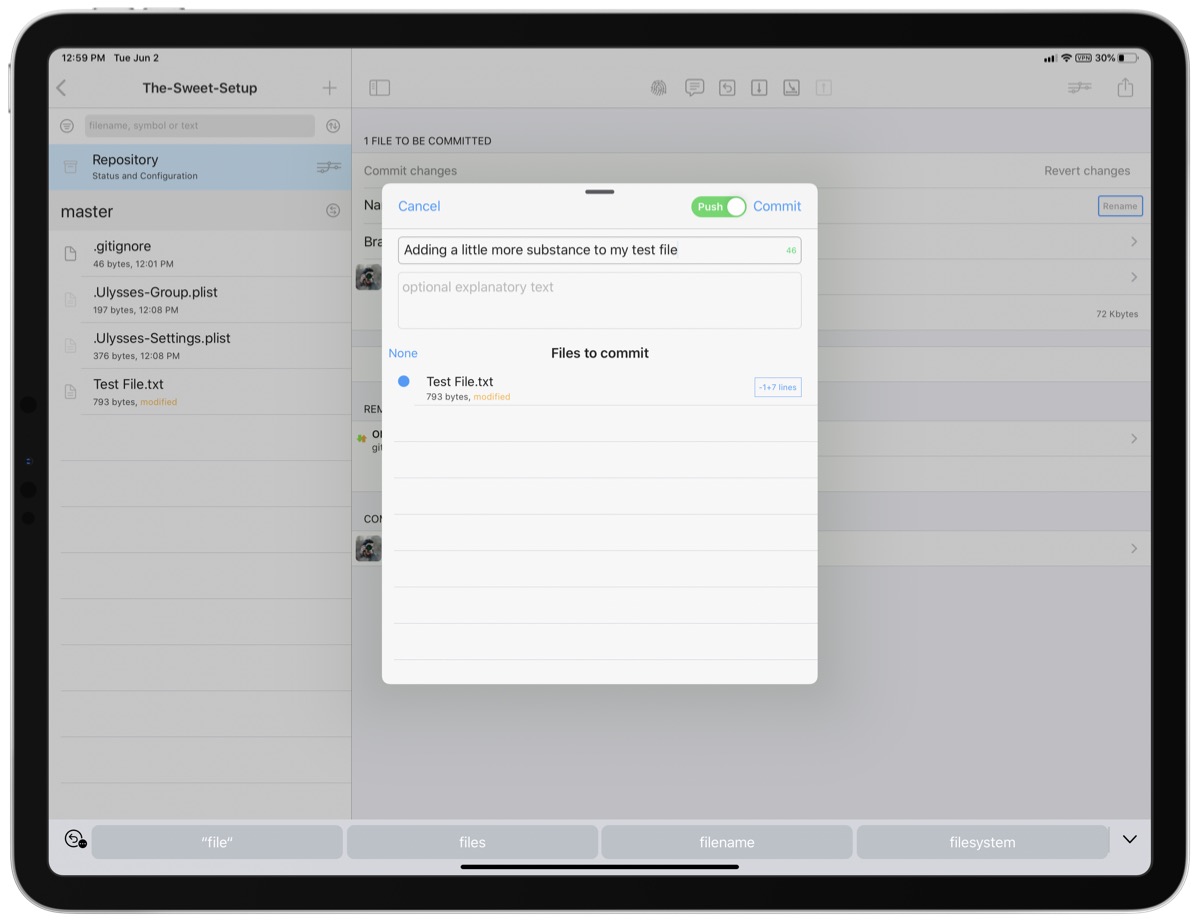
If we leave this off and tap Commit, our changes will be saved to the repository, but only locally on our iPad — we’d then have to manually push them in a separate step. This makes sense if you’re offline and you know you won’t be able to push.
I’m connected to the internet though, so I may as well save myself the extra step and toggle the switch to enable a combined commit/push operation. Now, when I tap Commit, Working Copy both saves the changes to the repository and pushes the changes and updated commit history to GitHub — in one step.
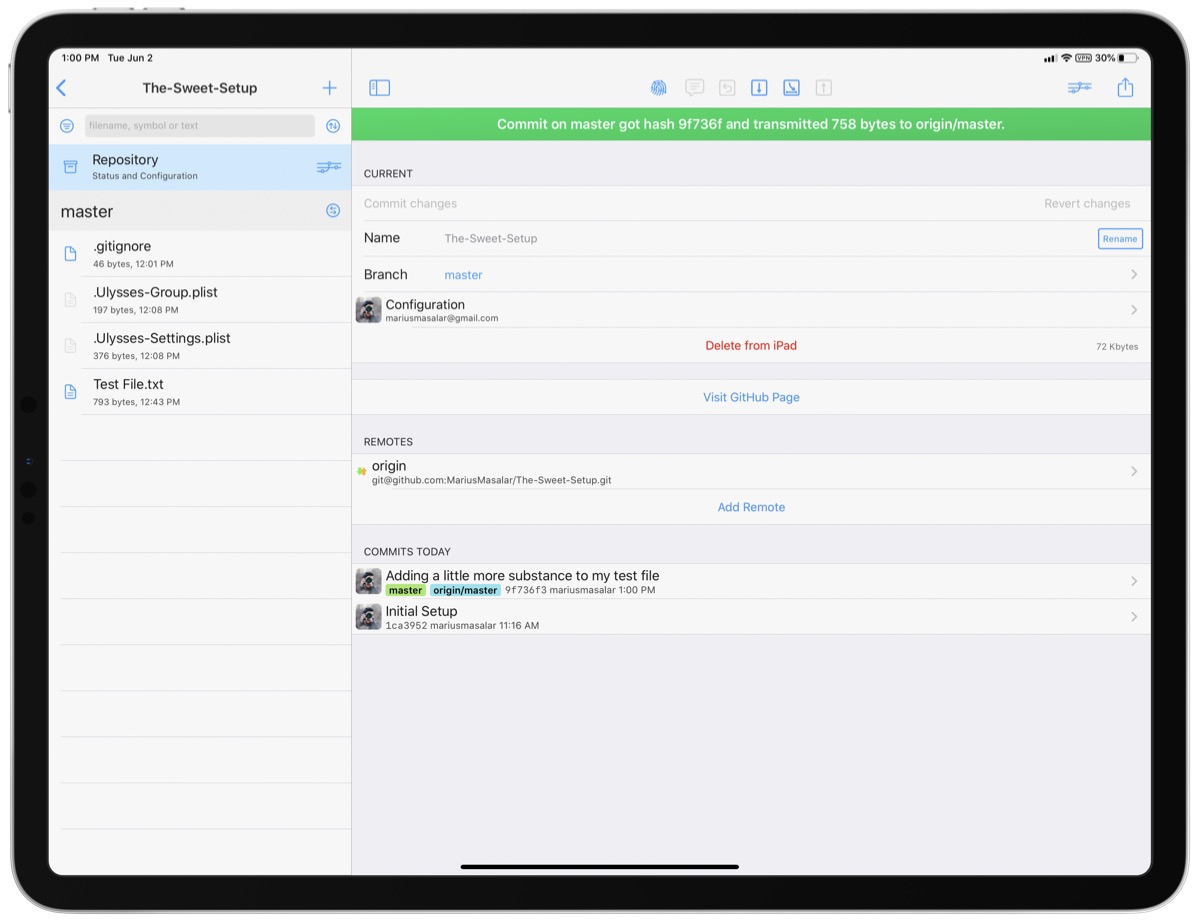
The repository’s status page now confirms that everything is up to date. We can see our latest commit added to the list, and there are no more yellow icons around.
Edits From Collaborators
At this stage, I might feel as though I’m ready to get another pair of eyes on this, so I let Thomas know that the draft is ready for him to look at.
Thomas, having cloned the repository onto his device of choice, will be able to perform a pull to retrieve my latest changes, and then read and make changes to my file.
If I wanted, I could start work on a brand new piece in parallel, knowing that the new file would simply be merged into the project alongside any changes to the initial test file later on.
To avoid complicating things, we recommend having only one person working on the same file at a time so that you don’t have to worry about merge conflicts.
Once Thomas has made his edits to my file, he’ll have to commit and push those changes from his end so that I can review them.
Reviewing Changes
At this point, let’s assume that Thomas has let me know he’s made his edits.
I’ll open up Working Copy again and perform a pull to download all the updates to my local copy of the repository.
Then, I can use Working Copy to visualize the changes that Thomas made.
If I tap the file in the sidebar, I can use the menu along the bottom to switch between Content, Changes, and Status views. The first shows me the current contents of the file, while the second view shows me a comparative view of the changes that were made in the latest commit — the one that Thomas just pushed.
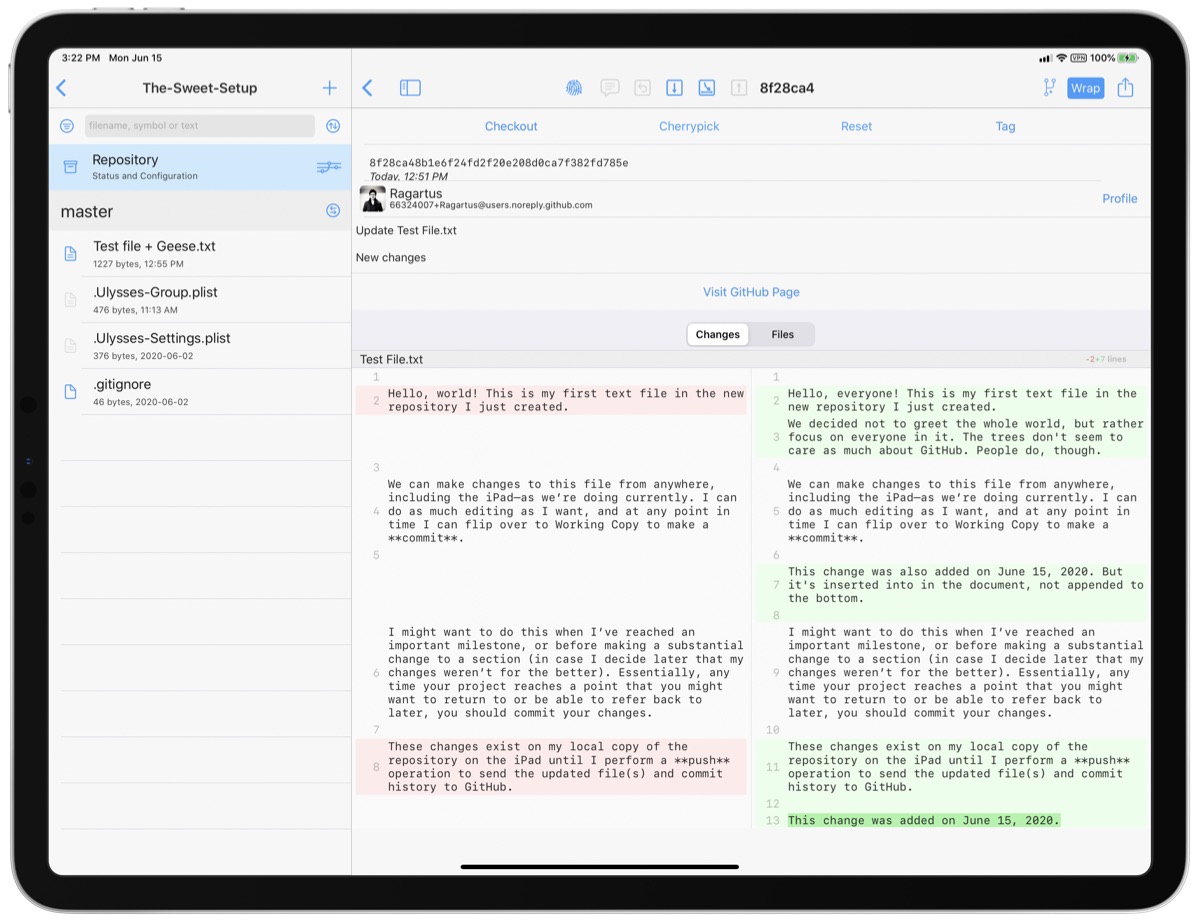
I can switch between a unified or split screen display to help me evaluate the changes quickly.
At any point in time, I can switch to Ulysses and make edits to the file, either building on what Thomas has done or reverting changes I don’t agree with (if appropriate). You may want to keep Working Copy and Ulysses open together in a Split Screen view to make this easier. Or, if the changes are minor, I can make edits in Working Copy.
Recovering From Mistakes
Mistakes happen, and when they do, you’ll be glad your project is version-controlled.
Since each change is being manually committed and pushed, it’s pretty much impossible to accidentally delete a file or anything like that because you’ll see the removal or problematic file change in your next commit summary and be able to undo it. Still, sometimes things can go wrong, so it’s important to know how to roll things back if you’ve made a mistake that’s been committed and pushed to the master repository on GitHub.
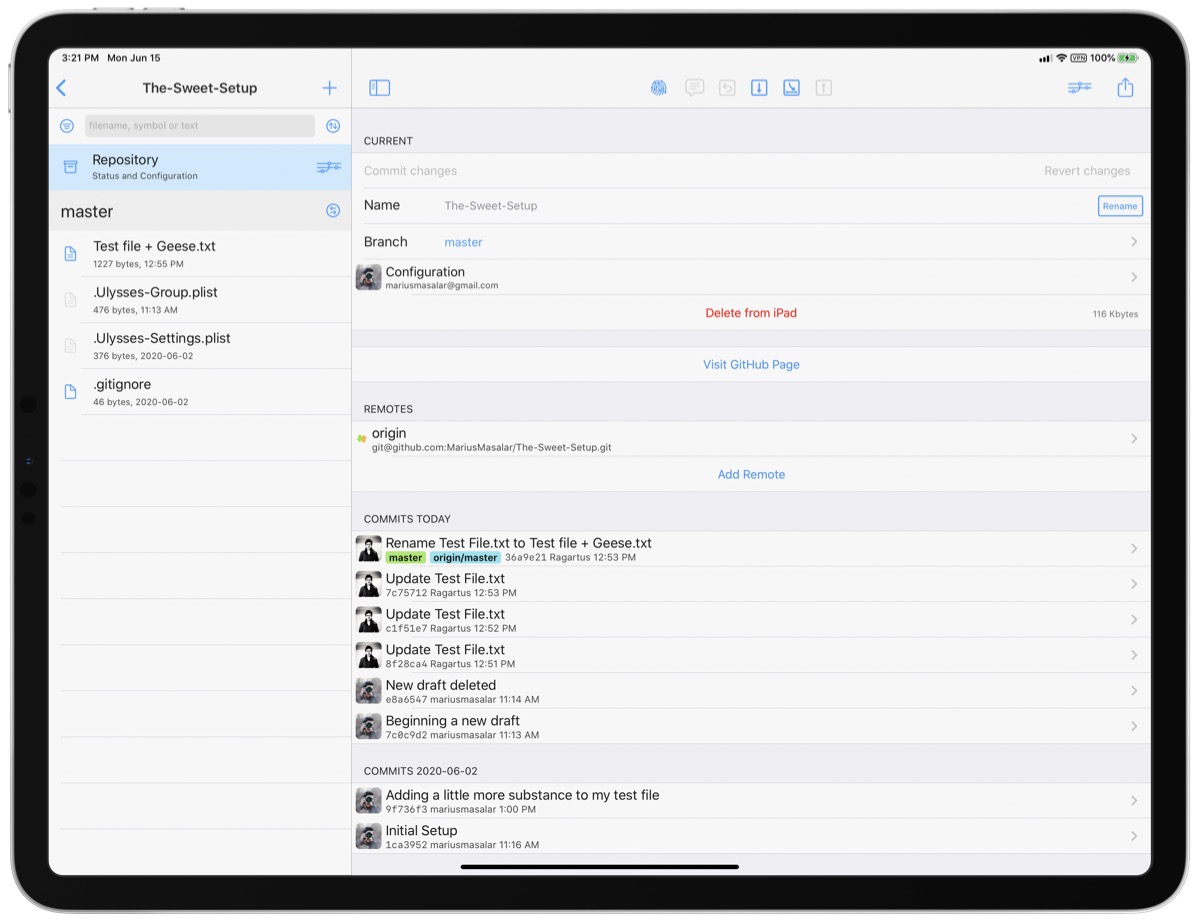
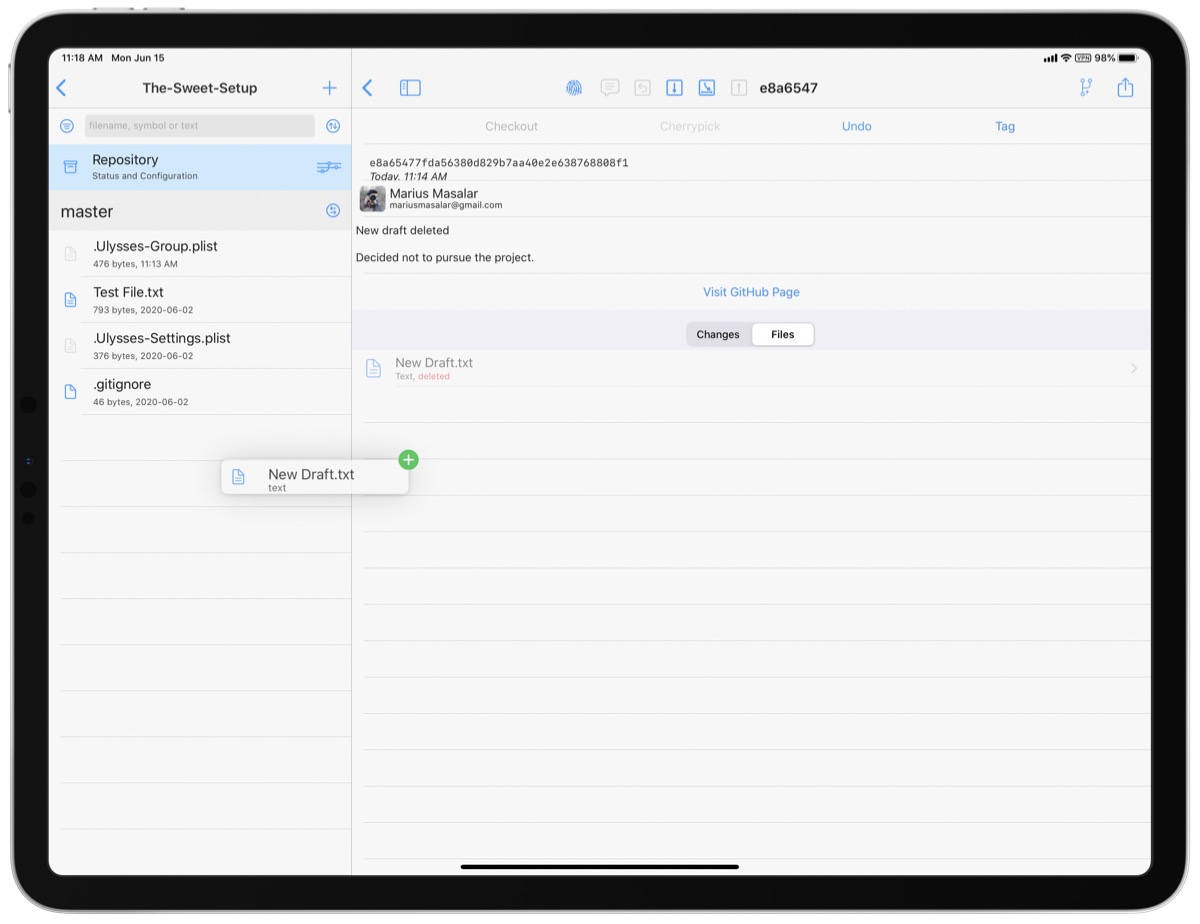
Let’s use an example. Say I’ve decided to start working on a new draft in my repository, but that draft was later deemed unnecessary and deleted. In Working Copy, I can see the relevant history of commits from the repository’s Status and Configuration view.
In this case, the two latest commits are showing the creation and deletion of the new file. In a real-world scenario, the commit you want to retrieve your deleted file from might be a fair ways down the timeline of changes, but the process of retrieving it remains the same.
All we have to do to get the deleted file back is to tap the commit where we deleted it and make sure the viewer is set to the Files tab rather than Changes. From there, we can simply drag and drop the file back out into our sidebar and the file is magically restored to our repository. Make sure to perform a new commit and push to establish its retrieval as a part of the project’s permanent record.
The same process applies for retrieving an older version of an existing file. When you drag it into the sidebar, you’ll be able to tap to see the changes that occurred between that retrieved version of the file and the current one. You can either immediately commit to replace the entire new draft with the old one, or you can selectively apply and reject changes between versions using the Changes view before committing the revised file to the repository.
Caveats and Disclaimers
Experienced developers or Git users will no doubt be raising a hand to comment on the absence of pull requests and other features that we’ve omitted from this guide.
The reason is simple: we’re looking to establish the simplest possible approach that leaves out as much of the complexity of Git as possible.
This is by no means the only way to collaborate using Git, but it’s the way we’ve found to be easiest for new users to grasp.
Resources for Further Learning
Since we’ve only just scratched the surface of Git and its possibilities, you may want to dig a little deeper on your own.
If you find yourself interested in learning more, here are a few resources we can recommend to help you build on the knowledge we’ve established so far:
Your Flexible New Collaborative Workflow
While the initial setup was complex, by involving Git, we’ve managed to add a collaboration layer to our workflow that functions across platforms and gives us the additional safety benefits of a robust version control system.
Best of all, the flexibility of this approach means that it’s not restricted to the specific app and service choices that we’ve made use of in this tutorial.
If you prefer BitBucket to GitHub as your Git repository host, you can replicate this exact same setup using BitBucket as the host instead. Similarly, if you find a different Git client that you prefer, say Tower for macOS or even the built-in Terminal, you can swap that in instead; the concepts remain identical, while only the interface changes. Even Ulysses can be swapped out for another app that allows you to edit text from external directories — I prefer using iA Writer, for example, and have set it up to access my Working Copy directories using the same approach that we used for Ulysses.
As you become more comfortable with core Git concepts, you’ll see ways of scaling this approach up to accommodate different workflows, large teams, and more!
This tutorial is one of many that is part of our in-depth course, Learn Ulysses.
New & Updated!
Learn Ulysses
You deserve to be free to focus on your ideas, your writing, your notes, and your research.
But it can be frustrating to use an app that is difficult to use; or even worse… use multiple different apps and have your stuff scattered all over the place.
Learn Ulysses is the premier video course for improving your writing workflows with the best writing app, Ulysses.
Available now, with a special discounted pricing during launch week.