How to automate Day One entries using IFTTT
There are many great reasons to create a journaling habit. And if you’re going to journal, we highly recommend Day One. (In fact, we even wrote the book on it.)
One of the main benefits of journaling is to remember what happened throughout the course of your day. Capturing small moments as they happen ensures you remember them with clarity in the future. But if this is difficult or cumbersome to do, then (if you’re like most people) you simply won’t do it. Fortunately, Day One makes logging important conversations, milestones, and special moments incredibly easy by allowing you to automatically create journal entries by connecting various services via IFTTT.
You can connect many different services to Day One using IFTTT, including social media posts, emails you send, and even health information from a Withings scale or Fitbit. Tracking all of this info automatically means you’ll have a log you can reference and even track progress against.
Let’s look at how we can send our Instagram posts automatically to Day One.
The very first thing you need to do is go ifttt.com and log in with your IFTTT account information. Once you’re logged in, search for “Day One” (or click here) to find the Day One IFTTT channel. On this page, you’ll find lots of “Applets” that you can use to pipe things into Day One automatically, but before you can activate these, you need to connect your Day One Sync account. Click Connect and enter your Day One Sync credentials on the following screen.
Once you’ve logged in to both IFTTT and Day One Sync, your Day One Sync account will be connected to IFTTT and you’ll be able to activate the IFTTT Applets you want to use. There are many different pre-existing Applets that were created by members of the IFTTT community that you can use simply by activating them on your own IFTTT account. For this example, let’s use the “Save Instagram photo to Day One” Applet.

Click the Applet, and then click Turn On to activate it. At this point, if you haven’t previously connected your Instagram account to IFTTT, you will be asked to do so. Once you log in to your Instagram account, you’ll also need to authorize access for Day One to access your media and profile info, so click Authorize when prompted to do so.
Once your Instagram account is connected, you’ll be able to configure your Applet before turning it on. You can toggle whether you want to receive a notification every time the Applet is run as well as select the name of the journal to which you want to save your photos. Once you have these set you way you want them, click Save.

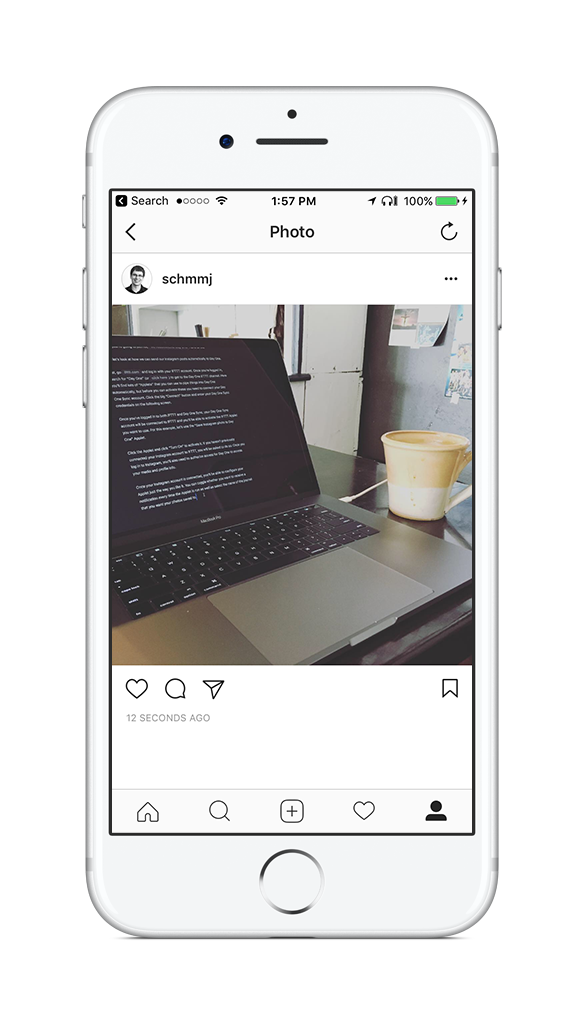
That’s it! Now, whenever you post an Instagram photo, it will automatically be logged to your Day One account. For example, here’s a photo I posted while I was writing this article:
And here’s what it looks like a few seconds later in Day One for Mac:

There are lots of other Applets you can use to automatically log information to Day One. Some of our favorites include:
- Save your tweets to Day One
- Share your Fitbit daily activity to Day One
- Save your Facebook status updates to Day One
- Completed iOS Reminders to Day One journal
- Save Liked YouTube videos to Day One
Creating your own Applet using Day One
If you can’t find the exact recipe you’re looking for, you can also create your own using the IFTTT service. Just click My Applets in the menu bar, and then click New Applet.

Next, select the trigger action by clicking the word this. In this example, we’re going to connect the Automatic smart driving assistant to Day One in order to log travel throughout the day, which is a spin on a popular Applet that logs trips to a Google spreadsheet automatically. To start, scroll down and select the Automatic Classic channel (if you have the Automatic Pro, you’d select the Automatic Pro channel instead).

Next, select the New Trip is Completed action, which will return you to the create Applet screen. Next, select the action you want to take by clicking the word that, selecting Day One, and selecting the Create New Entry option. This will take you to the Complete action fields screen where you can customize what the entry will look like when the Applet runs.
Select the journal you want the entry to appear in just like the previous example, but there’s a lot of other information you can also add from the Automatic device. In fact, there’s a pre-formatted message with a lot of information tokens already in place:

You can edit the entry if you want, but this is already pretty detailed and includes everything you might need, so you don’t necessarily have to. Once you have it just the way you want it, click Create action at the bottom. On the next screen, review the Applet you just created and select whether you want to receive notifications every time it runs before clicking the Finish button to activate it.
Get even more from Day One
Check out our newly-updated book, Day One in Depth. It’s jam packed with reviews, tips, and tricks that cover every function and feature found within Day One. This handbook goes line-by-line showing you how to make the most of our favorite journaling app.