A Different Photography Workflow
Midway through July, I did the unthinkable (at least, “unthinkable” in terms of photography kit these days): I sold off all my Sony kit — an a7II body, 24-70mm f/2.8 GM zoom lens, and a Batis 85mm f/1.8 prime lens — and downsized to the Fuji X-T2. Considering Sony’s non-stop camera releases, this move could be viewed as shortsighted.
But, if there’s one thing Sony camera’s don’t succeed at, it’s “fun.” Sony cameras are super clinical and technical. They look boxy and uninspiring. Sony lenses have absolutely incredible image quality, but they are so technically perfect, there’s almost no character left when you import your photos to the computer.
And, equally important, Sony cameras and lenses are relatively expensive, at least when compared to other camera systems.
So, I made the switch to Fuji.
I’ve had so much fun with photography ever since the switch.
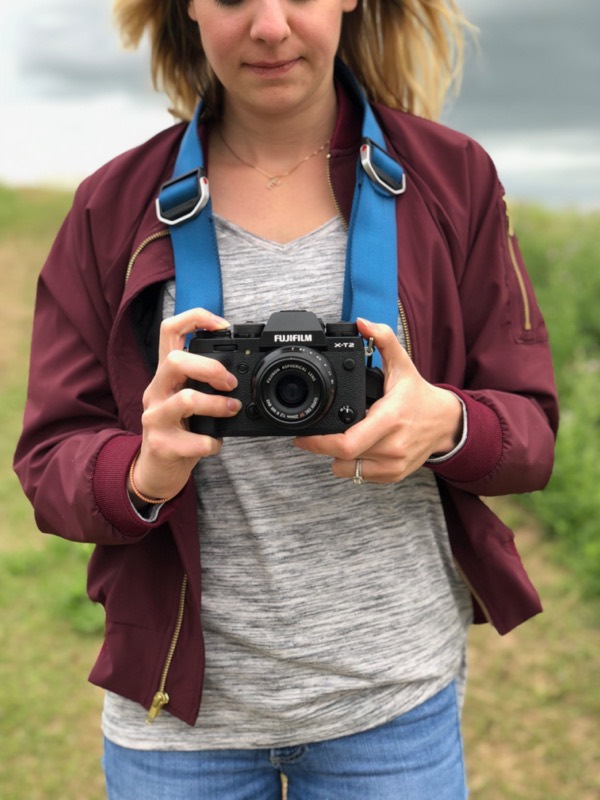
I bought the “Fujicron” 23mm f/2 and 35mm f/2 lenses and have carried the camera with me almost everywhere since July. I think I’ve shot more photos since July than I did in the year-and-a-half prior.
The Fuji X-T2 had a few major differences with the Sony a7II before it — namely in user niceties — which sort of forced me to reconsider my own photography workflow. Being one of those nerdy guys who writes for a blog, I happily obliged.
Get Our Best Photography Tips & Workflows
Transform your photos and edits from average to awesome with our in-depth, mobile photography course. It’s jam-packed with training, ideas, and lessons that can literally transform your photography overnight.
The X-T2’s Dual Card Slots
Fuji’s cameras have a ton of awesome features, like multiple dials, aperture rings on the lens, and a massive EVF for composing photos.
But one of Fuji’s hallmark features is its in-camera film simulations. Fuji’s history is largely one of film — Fuji’s Provia 100F, Velvia 50, and Pro 400H films from yesteryear (although still incredibly popular today) are ingrained in Fuji’s blood.
This wealth of film knowledge spreads into their digital cameras and makes for a ton of shooting fun. Film simulations and grain can be applied in-camera and are default function button settings right out of the box. Press the left arrow D-pad button on the back of the camera, scroll through Fuji’s film simulations, and fire a photo.

That film simulation is applied to the in-camera JPG. If you like to shoot RAW photos, you’ll have to flip the X-T2’s dual SD card slots into a RAW + JPG writing format. I currently have mine set up to write RAW photos to slot 1 and JPGs to slot 2. It should be noted that you can apply the Fuji film simulation profile to a RAW photo inside Lightroom CC, but there’s nothing quick about this editing process if all you want to do is share the photograph as quickly as possible.
So, out of the camera, I have a compressed RAW photograph complete with all the captured light information (great for full-scale editing in Lightroom CC and for backing up to the cloud or a local hard drive) and I have a saved photograph with Fuji’s awesome film simulations applied which is much smaller in size (about 10-12 MB or so). I recognize I don’t have two RAW copies of every photograph, but Fuji’s film simulations are just too great to ignore.
Importing: The Decision Tree
Once it’s time to get the photograph off the SD card and out into the world, I go through a little decision tree process:
- Do I need to share this quickly?
- If yes:
- Import JPG to iPhone or iPad
- Make small edits in Lightroom CC if necessary
- Share to camera roll, which syncs to iPhone
- Return to Lightroom to delete the JPG image
- If no:
- Is this a photo I want to share on Instagram, or is this a photo for a specific publishable photo shoot?
- Import RAW photos to Lightroom CC on the Mac or iPad (generally iPad)
- If yes:

A few notes regarding this decision tree:
- Every so often, I’ll grab both SD cards from the X-T2 and manually copy both RAW and JPG photos to a local hard-drive for local backups.
- I delete JPGs from my Lightroom library because the Lightroom library syncs to the cloud — I’d rather have RAW photos with full light information backed up to the cloud, if at all possible.
- I’m all about the decision trees.
So much of this workflow has changed over the last few weeks.
For one, I had fiber internet installed, meaning I can upload photographs to the cloud for the first time in my life. This is life changing quite honestly, and has implications far beyond photography and workflows.
Second, the new iPad Pro debuted, moving an increasing amount of this workflow over to the iPad. Editing in Lightroom CC was always a better experience than on the Mac before the newest iPad Pro, but there’s something about the latest iPad Pro’s performance and capabilities that really encourage the move to the iPad. I’ll have to pinch myself, but it almost feels as though Apple developed this iPad Pro with photographers at the very top of the inspiration list.
Editing in Lightroom CC
Adobe Lightroom CC is the same photo editor no matter which platform you choose, so I tend to use it for 99% of my photo editing. Not much has changed since this article from this past summer, so there’s little sense in rehashing it.
Really though, I don’t find I need to edit every photo I shoot. Not because they’re perfect masterpieces right out of the camera, of course. But rather because Fuji’s built-in film simulations tend to give each photograph a character of their own. In many respects, editing on top of Fuji’s built-in film simulations ends up making the photograph worse than it was in camera.
If the photos are for a specific photo shoot, then yes, I jump into Lightroom. But if not, I can often skip this step of editing entirely.
Sharing on Instagram, Basecamp, or My Own Personal Blog
Getting the photo out of the camera and into the eyes of the world is the whole point, so I tend to take as much time in this step of the workflow as in any other part of the workflow.
Instagram: I’m a firm believer in white frames around my photos, so I use an app called Squaready to add white borders before I share the photo. Apps like Focalmark are great for hashtag discovery, and you can use Darkroom’s new hashtag saving features to use the same hashtag sets for the photos you share on Instagram. (You can use Darkroom’s frames features to put a white border around your photo as well.) Unfortunately, both Squaready, Focalmark, and Instagram are all optimized for the iPhone only, so all this work is completed on the iPhone before sharing on Instagram.
Basecamp: For photos that need to be shared here on The Sweet Setup, the sharing process is a little shorter. Our editor, Jeff Abbott, created this awesome shortcut for optimizing photos and uploading to our WordPress backend all in one swoop, so I use this shortcut fairly often. Otherwise, Basecamp’s iOS app is great and works very well for adding photos directly from the camera roll.

Personal Blog: This is a step that is a continual work in process. I used to have a shortcut on iOS that optimized an image for the web through ImageOptim’s web API, but it has since stopped working. I’m in the middle of troubleshooting now.
I could also use an app like CropSize. CropSize is a relatively simple iOS app we love here at The Sweet Setup, which can resize and optimize images for the web. This app is so close and I’m continually experimenting with it heavily, but I find the app to be somewhat tedious to use. There are a lot of steps and taps to work your way through, all of which are begging for some iOS Shortcuts automation. If these can be baked into the app somehow, I think this may be a winner in the long run.
As it stands right now though, this is the only facet of my entire photography workflow where I choose to use a Mac. On the Mac, I use ImageOptim to optimize photos for the web and then use an app like Transmit 5 or Cyberduck to upload the images to the Amazon S3 server. Once they’re uploaded and the URLs are ready for sharing, I copy those into an app like Ulysses, where I pick everything back up on the iPad.
If CropSize can somehow be automated in the future, I’m pretty sure I’d be able to cut out the Mac from this entire workflow. I’m so close!
Photography is Fun Again
Whether new kit inspires us to get back into photography and enjoy the process of making photos is up for debate — there are definitely aspects of inspiration to be found in a new piece of kit.

But generally speaking, the more kit you have, the more it gets in the way of making, editing, and sharing great photographs. As the iPad continues to evolve and as cameras continue to adapt to the revolving door of technology, I love seeing how many extra gadgets and steps I can remove from the whole shoot-to-share process.
There are still holes in the workflow I’ve shared above, but it’s always a work-in-progress. The importing decision tree is kind of a headache, honestly. I hope to hone this area of the workflow more and more going forward.


Yet, if there’s one thing I’ve enjoyed about the last three or four months of photography, it’s knowing that specifications and RAW photos simply aren’t the key to making great photos. The Fuji X-T2’s 24MP sensor and built-in JPG film simulations have churned out more keepers since the summer than the Sony a7II and masterful 24-70mm f/2.8 GM zoom lens did for the entire year prior.
iPads and cameras — it seems to be the name of the game these days. With the Fuji and the profoundly capable iPad Pro in hand, there’s little that gets in the way of making wonderful photographs.
Get Our Best Photography Tips & Workflows
Transform your photos and edits from average to awesome with our in-depth, mobile photography course. It’s jam-packed with training, ideas, and lessons that can literally transform your photography overnight.