Mike’s Fancy DSLR Webcam Setup
In the past year, you’ve probably spent a lot of time you spend in virtual meetings. Even if you aren’t live streaming on Twitch, hosting a YouTube channel, or presenting webinars very often, improving your video can go a long way in making your online communication more effective.
And if you already have a nice camera, you have most of what you need to get your video looking awesome by using your camera as a high-quality webcam.

I will be the first to admit that I don’t know a ton about photography and lighting, but I’m still pretty happy with how this looks. In this article, I want to share what I do know so you can get similar results using your DSLR or mirrorless camera as a webcam.
The Hardware
First, let’s walk through what hardware you’ll need:
- A nice camera. For the sake of this article, we’ll assume you have one already. If you don’t, you probably won’t want to buy a fancy camera solely for webcam purposes (maybe consider using your iPhone instead). But if you already have a DSLR or mirrorless camera, why not use it to get the best looking video you can?
- Some way to connect it. There’s two main ways you can do this: USB or WiFi. I personally use a USB cable from my Canon camera that I plug directly into my Mac. Wifi is more convenient, but make sure you have a solid connection to avoid jerky video. You could also connect with an HDMI cable, but make sure your camera supports clean HDMI output first. If it doesn’t, the HDMI connection may treat your computer as a reference monitor and overlay a bunch of information on top of the video signal. One popular tool for connecting directly to your computer is the Elgato Cam Link capture device, but at over $100 it’s pretty pricey, and probably not necessary unless you want a way to connect to either a Mac or PC with a single piece of hardware.
- Some way to mount it. The most obvious way to do this is with a tripod, but I actually use this inexpensive desk camera mount because it goes high enough that I can position the camera at a slightly downward angle and it comes with a rotatable ball head. It clamps onto the back of my desk and is sturdy enough to hold both the teleprompter and my camera.
- Some way to light your face. You can get by with a cheap light ring here, but I personally use the Elgato Key Light Air. At $130 it’s a little pricey, but it’s very nice and I can control the power and temperature from my Elgato Stream Deck.
That’s really all you need to get some great looking video. If you look at my setup here though, you’ll notice a few other things I use to get the results I shared up above:
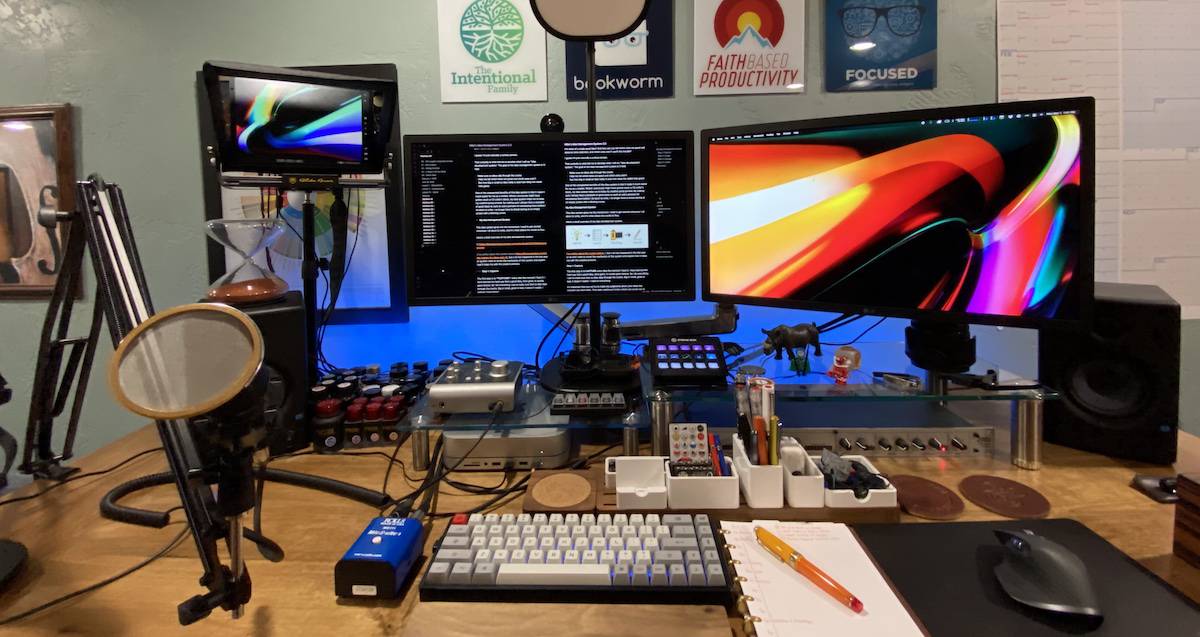
So if you really want to go all out, here’s a few more pieces of gear I’d recommend:
- Optional: a beam splitter (teleprompter). This is unnecessary, but I like using it for Zoom calls and webinars so I can continue to look directly into the camera and maintain eye contact. It’s a little thing, but I think it makes a big difference. The one I use is usually around $200 on Amazon, and allows me to overlay my Zoom window on my iPad screen (used as another monitor) in front of the camera lens.
- Optional: an upgraded external mic. You don’t need an expensive podcasting mic like me, but an external microphone that you can position close to your mouth when speaking will greatly improve your audio quality. But you need to balance quality with convenience, and you can certainly use your AirPods or built-in mic as well.
- Optional: LED background lights. You absolutely do not need these. But they are fun, and only about $30. The ones I use can be controlled with a remote, and allow me to control both the color and the brightness.
- Optional: AC Power. My camera is a Canon EOS 70D and is battery-powered, but I don’t like having to swap out the batteries. So I bought this cheap AC power adapter kit so that the camera can have constant power while being used as a webcam.
Camera Settings
Full disclosure: I’m not a photographer or videographer. What I know, I learned simply from trial and error. But that being said, here are a few tips for getting better video from your camera:
- Use the movie mode. This is the first step as many cameras won’t allow you to send video to your computer at all until you set the camera to the appropriate mode. You’ll also want to make sure that you turn off the “Auto Power Off” feature if your camera supports it so that it doesn’t disconnect your video when you’re in the middle of a meeting.
- Use a larger aperture if you can. Aperture is basically the opening in the lens that light goes through. The larger the aperture, the bigger the opening, the more light can get into the shot. This helps produce that soft bokeh (that beautiful background blur you can only truly get from a nice camera). Where things get weird is that smaller numbers actually mean higher aperture. For example, f/2.4 is larger than f/4.0. Your aperture settings will be determined by the lens you use, but for our purposes, a larger aperture (or smaller f/x numbers) is better.
- Keep your ISO under 800. ISO determines the amount of light that your camera lets in. The larger the aperture, the lower the ISO you’ll want to use. For indoor uses with external lighting, you generally want to keep this under 800 so that the subject is well lit and the background isn’t too bright.
- Use a shutter speed around 1/50s. From my basic understanding of DSLR video, this is a great starting point for smooth looking video.
Your exact settings may vary based on your camera model, but these are a good starting point.
Once you dial these in, we’re ready to get the software set up.
The Software
If you have a DSLR or mirrorless camera already, there’s a good chance the camera maker has some software that will allow you to use your camera as a webcam.
But if you use an M1 Mac like I do, there’s also a good chance it’s not going to work for you.
For example, Canon makes the EOS Webcam Utility which in theory makes this super-simple to set up. (I’ve heard Sony cameras and Nikon cameras have comparable software, but I have no experience with either of those brands.) If these free programs work for you without the need for additional software, great. The problem with software made by the camera manufacturers is that it tends to be infrequently updated. In the case of the EOS Webcam Utility software, it hasn’t been updated for Big Sur and won’t run at all on an M1 Mac.
So, I had to do some testing in order to find something else that would work. Fortunately, there’s a great little indie app called Cascable Pro Webcam that runs natively on Apple Silicon and can be used with a variety of DSLR cameras. It’s not cheap ($40 USD), but you can download a free trial from the company’s website to make sure it will work for you before investing in it.
The app itself is very simple — you just connect our camera (using either USB or WiFi), then select Cascable Pro Webcam as your video source in the desired app (i.e. Zoom, Skype, Microsoft Teams, Google Meet, Google Hangouts, etc.).
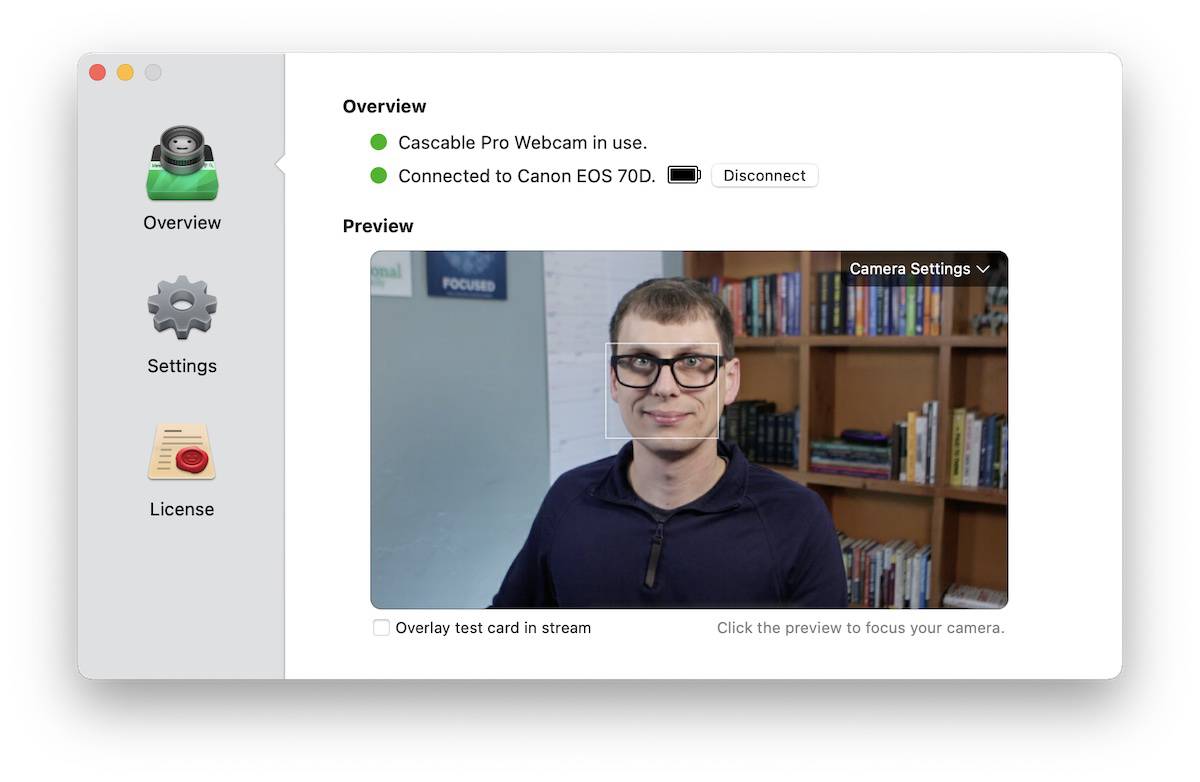
What’s cool about Cascable Pro Webcam is that you can adjust a bunch of the camera settings right from the app. For example, you can adjust the ISO, the aperture, the color temperature, and even select a different focal point by clicking on the image preview. If you’re using your camera for streaming, you can also upload a custom test card that displays when your camera isn’t active and let Cascable automatically optimize the incoming video feed for performance so everything looks silky smooth.
And if you’re not using the teleprompter like I am, that’s it — you’re done! With your camera mounted and connected to your Mac and Cascable Pro Webcam up and running, you’re ready to wow everyone in your next virtual meeting.
But if you’re going to use the teleprompter so you can overlay the Zoom window and look directly into the camera, we’ve got a little bit more work to do.
Using the Teleprompter
The problem with using the teleprompter the way I do is that the beam splitting glass reflects what is on your iPad screen. That means that if you simply use your iPad as another monitor (i.e. with Sidecar), everything will appear backwards.
There’s a couple of ways you can correct this:
The first way is to use a Luna Display. Luna Display is kind of like Sidecar+. It requires an $80 dongle, but does give you some additional features like a Teleprompter Mode that makes it easy to mirror your iPad display.
Unfortunately, I couldn’t get this to work (even though it’s updated for Apple Silicon and my Luna Display firmware was up to date). So I ended up just using Sidecar to use my iPad as another display and then OBS Studio to mirror my video feed so it looked correct in the beam splitter.
Admittedly, OBS Studio is overkill for this, but it’s not too tricky once you understand how it works.
First, fire up OBS and select Studio Mode from the options in the lower-right. This allows you to select the source that shows up on the left side of the screen. You can select an entire display, or a specific window. I like to use Window Source and select my Zoom Meeting window.
On the right side of OBS is what is being broadcast. Once you have your source looking just right on the left, click the Transition button to send it live on the right.
Next, make sure you have Sidecar up and running on your iPad. Then, right-click the image on the right and select Fullscreen Projector, and select the iPad display from the list.
At this point, your Zoom window is being broadcast to the iPad, but it’s still backwards in the beam splitter. So right-click the source on the left and select Transform –> Flip Horizontal.
Click the Transition button one more time, and the flipped video feed will be sent to the iPad. The end result will look something like this:
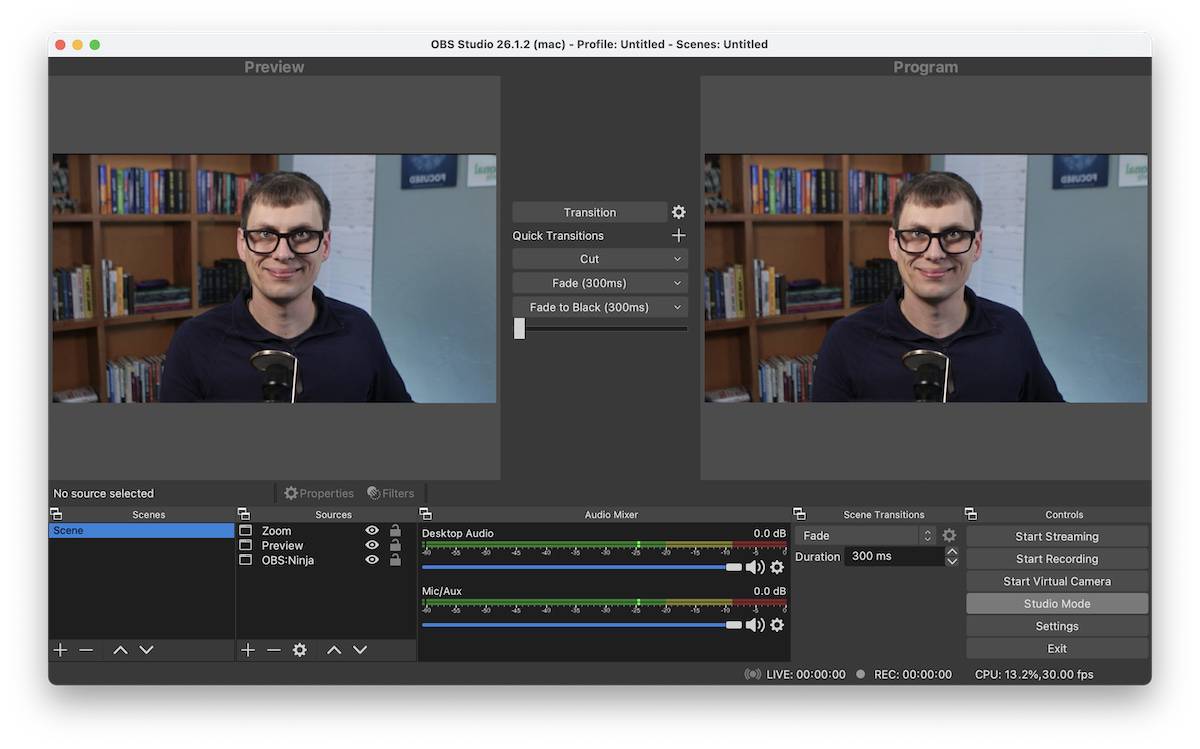
Notice how the image in OBS is flipped from the image up above. But this image is only flipped in OBS. The actual Zoom window itself is still open on another monitor, and only the signal being sent to the iPad is changed. So the video signal that the attendees see (and the actual program window) is unaffected.
Work From Home….
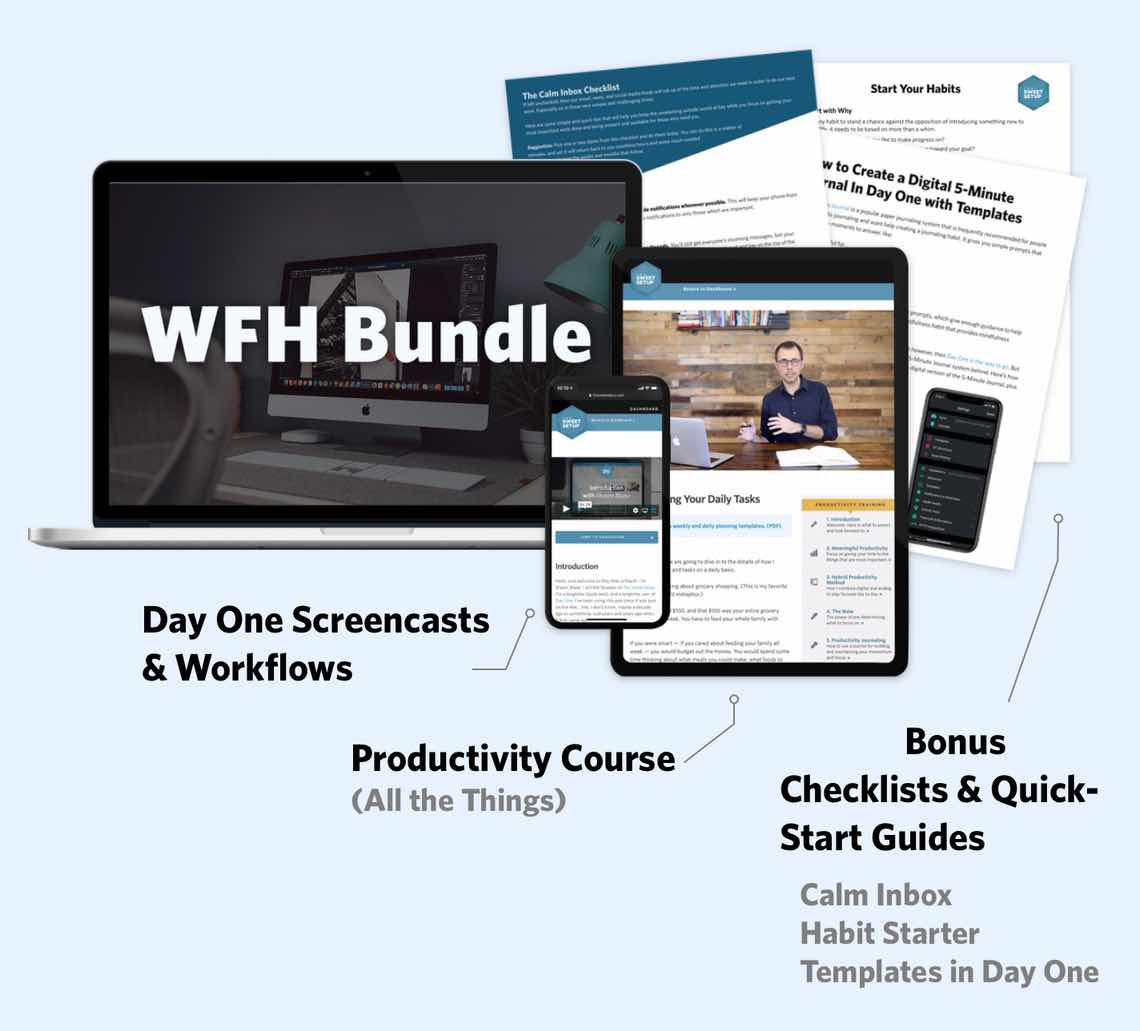
30% Off The WFH Course Bundle
Get our task and time management mini-course (All the Things (Analog)), plus with our Day One in Depth screencast course. This “WFH Bundle” is 30% off right now.
We’ll show you…
- How to schedule your day for maximum productivity in the least amount of time. This is especially helpful if you and your significant other are juggling responsibilities of kids and home life while also trying to do work.
- Weekly planning and reviewing. A great way to get ahead of your upcoming week so you can be prepared and have a priority of what needs to be done.
- Custom Productivity Templates: These are a few of the main PDF templates that you can print out or use on your iPad in order to follow along.
- How to use Day One, the best journaling app out there: which can help with reducing stress and anxiety, celebrating your wins each day, and keeping a log of what is happening in life right now.
Bundle Bonus: The WFH Bundle also includes three bonuses: The Calm Inbox Checklist, the Habit Tracking Quick-Start Guide, and Using Day One templates for the 5-Minute Journal.
Normal Price: $68
WFH Bundle Price: $47 (You save $21)