How to Make the iOS Mail App More Focused and Efficient
There are a plethora of fantastic email apps on iOS. We even have a list of our picks for the best email app on iPad and iPhone, and we created a quiz to help you decide which email app is best for you.
Call me old fashioned, but I personally still prefer the default email app that Apple makes. (Shrugs. Then ducks.)
But! I’m not handing in my Nerd Card. Because even though I use the stock email app (like an animal), I have made a few modifications to my iOS email setup to make email on my phone faster, easier, less distracting, and … more calm.
I’ve compiled a few of these tips and tricks here for you in the hopes that you might find them useful and that you too can save some time and be more productive with your email.
Here are quick links to the email tips (#3 is my favorite):
- How to use the built-in inbox filters
- How to Block Email contacts
- How to customize the list of inboxes you see
- Bonus: How to send an email without even opening the app.
Side note: if you like these, you will love our popular Calm Inbox course.
1. How to Filter your Inbox View on iOS
If your inbox has everything in it, it can be a bit overwhelming. While I think it’s best to archive as much as possible, sometimes you want to filter what you are dealing with.
With Inbox Filters on iOS, you can get a list that contains only the unread messages, only the flagged messages, only messages with attachments, etc. Or, you can filter by all of the above…
Most of the fancy and feature-rich email apps make a point of this feature. It’s a good one, but most folks don’t realize that Apple’s own, built-in email app has it, too.
Here’s how to filter your inbox view:
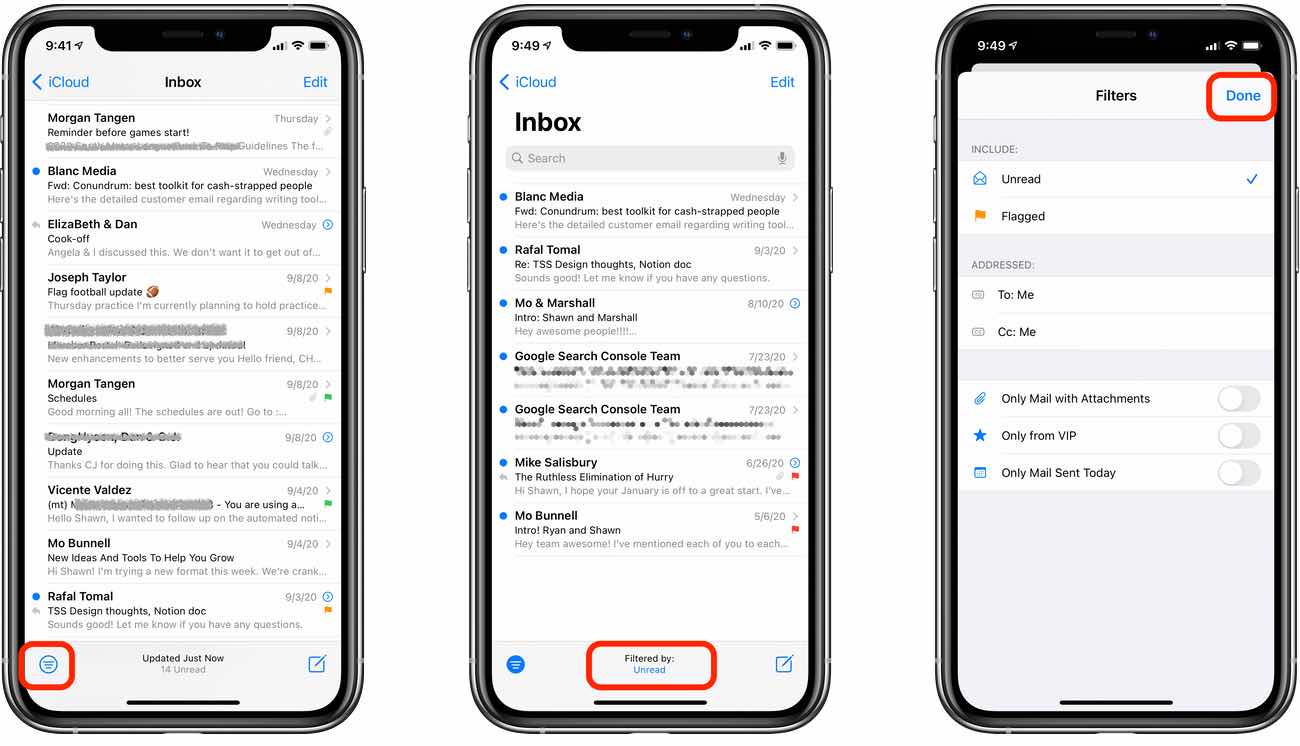
Pictured above, from left-to-right:
- From the inbox, tap the filter button on the bottom left to enter into the filtered view of your inbox.
- Tap the Filter By options in the bottom center to adjust what is and is not filtered.
- Adjust your filter preferences if you like in order to show only the messages you are wanting in your inbox right now.
(Note, as we’ll get to in tip three, there are some built-in Inbox filters already that can show you just messages that are flagged, just those that have been sent today, and more.)
2: How to Block Email Contacts From Sending to You Again
Do you ever get cold outreach emails from folks who follow up and then follow up and then follow up again? It’s the worst.
There are some services you can use that will eliminate future emails from those folks. For example, SaneBox has what they call the “SaneBlackHole” where you just move a message into that folder and then you’ll never see another email from that contact again. And HEY has what they call “The Screener,” where you have to give approval or disapproval of every new person who emails you for the first time.
These are both pretty cool, but you don’t have to use a 3rd-party service or app if you want to block folks from ever emailing you again.
You can easily block senders from within iOS, and your block settings even sync across all your Apple devices.
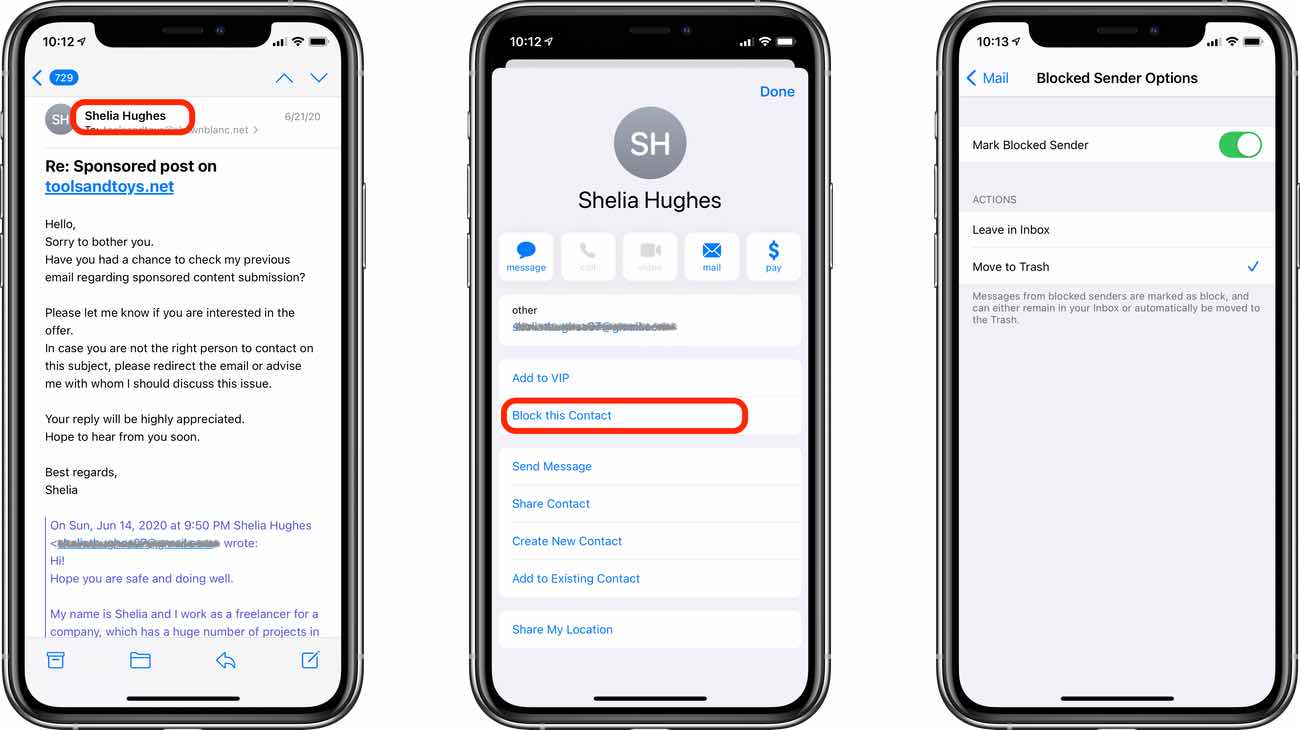
Here’s how to block an email address from being able to get into your inbox again:
When you get an email from someone and you just know that they’ll probably be emailing you again, and again, and again, and you don’t want to deal with it, do this to block them:
- Tap their name to bring up the contact info card.
- Tap Block Contact.
- Tap Confirm.
There are two options for where blocked senders go. You can have their messages still delivered to your Inbox, but with a red, crossed-out circle icon. Or you can have their messages moved to the Trash. I recommend the latter.
To adjust these settings for how blocked senders are dealt with, go to Settings app → Mail → Blocked Sender Options.
Note: While your list of blocked contacts will sync across your devices, the options for how to handle those messages is handled on a per-device basis. So if you want your blocked sender messages to appear in the trash, you need to set that option on each of your devices.
3. Customizing Your Inbox List (and the glory of the Today inbox)
When you open up your iOS email app, what do you see? Here’s what my email looks like:
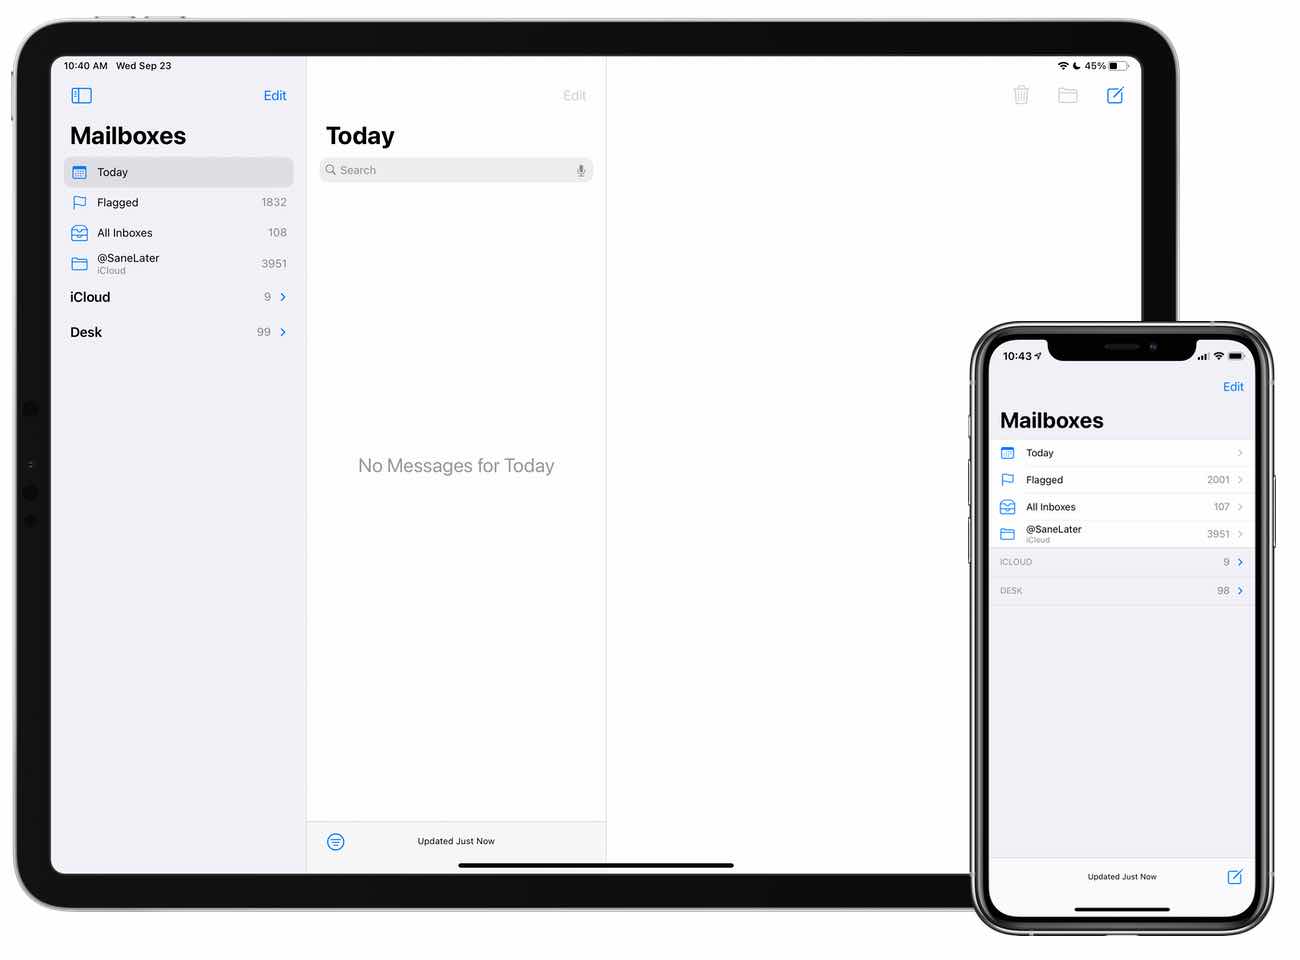
Notice on the left-hand sidebar of my email inbox list?
- Today: My “Primary” inbox is the Today inbox. All it shows me are the emails that have arrived today.
- Flagged: Then I have an Smart Inbox that only shows me the messages I have flagged.
- All Inboxes: A combined inbox for all my accounts.
- @SaneLater: This is a folder in my email that SaneBox sends newsletters, receipts, and other non-urgent messages.
Then, I have my two primary email accounts (personal and work) folded up and condensed, so I don’t see a huge list of every mailbox for each of them.
It’s very easy to customize which inboxes and folders you see, and which order they are listed in.
- Start at the top-most level of the iOS email app: Mailboxes.
-
Tap the Edit button in the top right.
From here, you’ll see a list of all the various email mailbox types. From the specific inboxes of your primary email account (iCloud, Google, etc.) to the mailbox for just VIPs, unread emails only, etc.
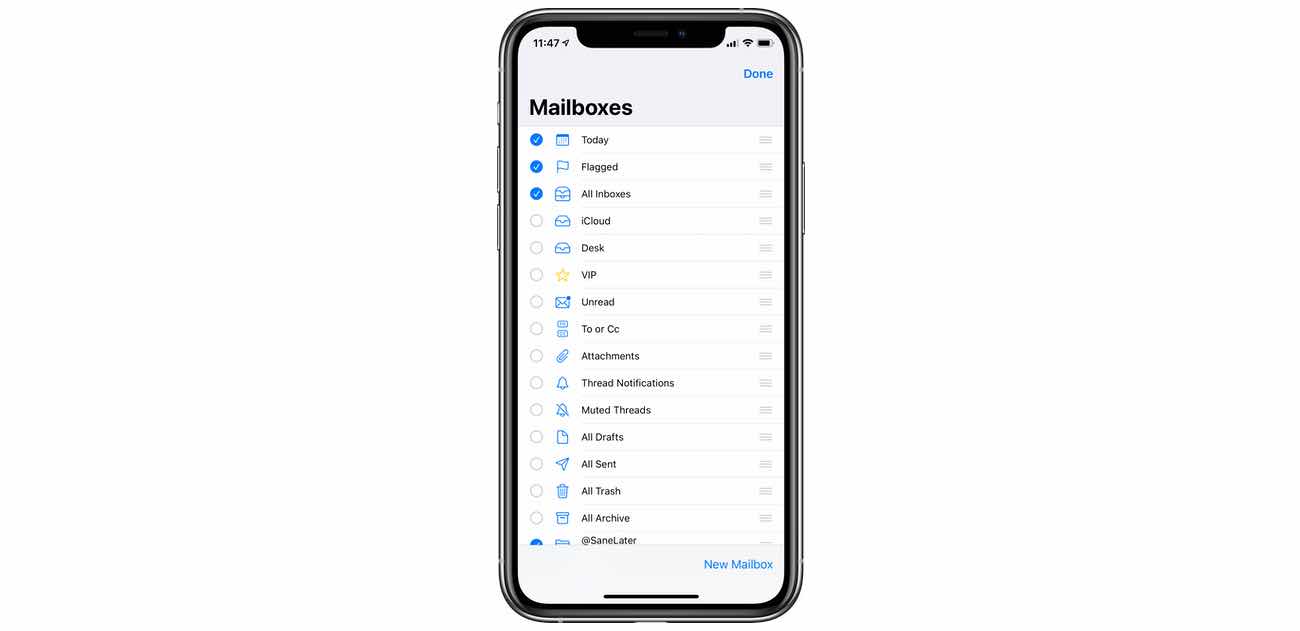
The Mailboxes that Apple Mail offers you are:- All Inboxes
- Account Specific Inboxes
- Today
- VIP
- Unread
- Flagged
- To or Cc
- Attachments
- Thread Notifications
- Muted Threads
- All Drafts
- All Sent
- All Trash
- All Archive
- Toggle the list of mailboxes that you do and don’t want to see. I personally have Today, Flagged, and All Inboxes toggled on.
- Add additional mailbox folders by tapping Add Mailbox. You can also move specific mailbox folders from your individual email accounts up into this list as well. Tap the Add Mailbox button at the bottom of the Mailboxes list (before your list of specific accounts). Then, tap the account you have a mailbox in, and then tap on the mailbox which you want to be visible in your top-most Mailbox listing.
- Adjust the order of your Mailbox list.
Before you tap Done, you can rearrange the order in which these mailboxes are sorted. When in the editing mode, just tap and drag on the handles on the right-hand side. Then, hit Done and enjoy your personalized Mailbox list.
Bonus Tip: How to compose an email without opening up the Mail app
Tired of trying to write an email to someone, but getting distracted by your inbox when you launch the email app? Do this instead:
On iOS, you can create this Shortcut that is straight-up just a new email. It brings up the new email sheet wherever you are, allowing you to compose an email without having to go into your email app if you don’t want to.
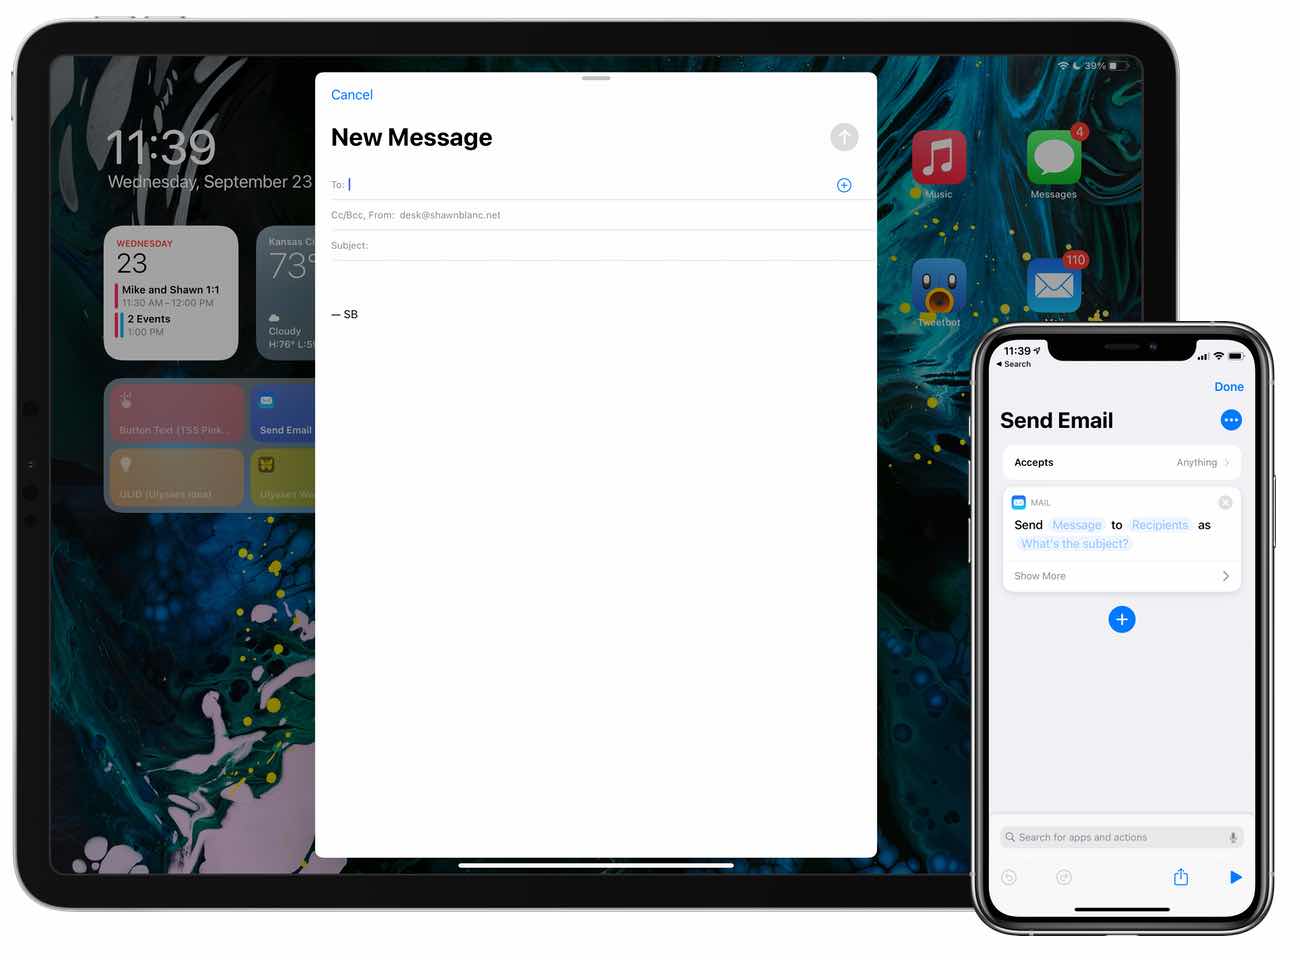
1: Create a Send Email Shortcut.
- Open the Shortcuts app.
- Create a new Shortcut.
- Add an Action and search for “Send Email”.
- Select the Send Email action in Shortcuts. That’s it! That’s the whole shortcut.
- Save your Shortcut with the title Send Email or New Email or whatever makes sense to you.
2: Use the Shortcut to compose new emails.
You can have this shortcut exist as its own app on your Home Screen, as a quick-launch action from a widget, or you can launch it from the Universal Search.
When you launch this Shortcut, it will bring up a blank email message without opening up your inbox. And, since it uses your default mail client, you still get access to your list of contacts. Brilliant for sending an email without being distracted by what’s in your inbox.
Ideas to Action Focus Booster 💥 Double your creative output with a simple system for organizing
The Ideas-to-Action Focus Booster shows you how to translate your notes, thoughts, and plans into rapid progress (instead of getting stuck at the start).
👉 Step #1: Capture Your Genius → Create your own digital idea incubator. You’ll learn how to leverage tools like Notion, Obsidian, and more to organize every spark of inspiration worth saving.
👉 Step #2: Develop Your Ideas → This is where the magic happens. Connect the dots on your ideas and unlock the creative energy to see them through.
👉 Step #3: Execute Your Vision → Turn inspiration into action so you can finally share what’s in your head with the rest of the world.
Bonus: Yes Yes Notion → Discover how to make Notion your command center for turning ideas into action in this 2-part bonus workshop.
Get all this, and more, inside the Focus Club membership.
Join 300 focused members who have access to $5,000 worth of our best courses and masterclasses, the Digital Planner, a Private Chat Community, Monthly Coaching Calls, and much, much more…