How to Use Keep It for Long-Term Research
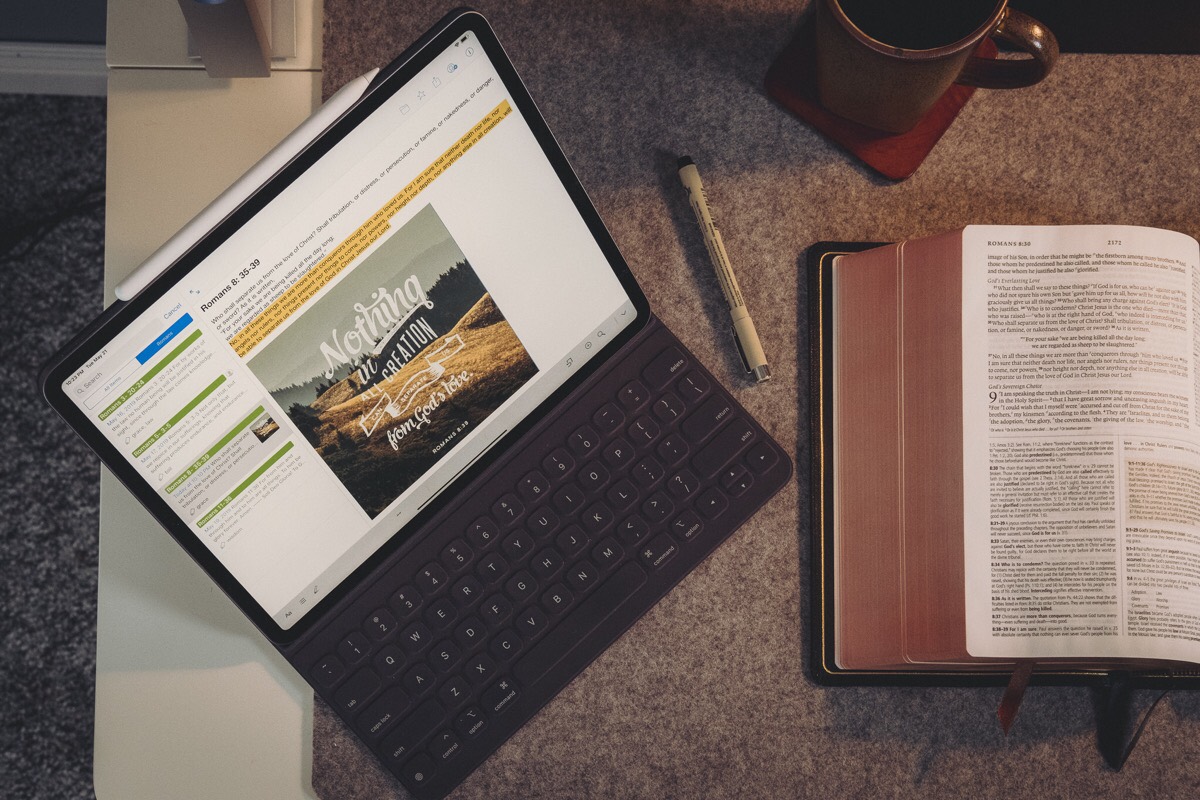
Right around this time last year, Chris Bowler wrote an awesome guide for The Sweet Setup for using Ulysses as a long-term research tool. Chris shaped his article around how he studies the Bible inside Ulysses, but the premise of the guide applies to long-term research as a whole: Any app that can provide structure, tags, highlights, notes, attachments, and more could be shaped into a long-term research tool.
Fast forward a year and I’ve found myself looking for my own system for Bible study and long-term research.
My Requirements
Being the nerds we are, any chance to dive into a completely new set of apps and services has to be taken seriously — I couldn’t just adopt Chris’s Ulysses long-term research methodology and call it a day. No — it only made sense to create an entirely brand new system inside of an entirely brand new app, because surely my needs were completely different than Chris’.
Well, they’re not — my requirements for a long-term research tool are basically identical.
But that’s not to say that my tendencies aren’t a little different, and your tendencies could be completely different than both of ours. Where Chris — as I’ve inferred from his guide — likes to take personal notes and jot his own personal thoughts alongside the text he’s studying, I find myself coming at long-term research from a different angle.
- Capture: This is the single most important element to any long-term research tool that will stick for me. I am a collector at heart (I have the entire Field Notes collection dating back to “Day Game,” which isn’t much of an achievement, but it’s something!), meaning anything and everything I find on Twitter, on the internet, in email newsletters, or in magazines gets saved somewhere for the future.
- Tags: Like Chris, tags comes in as a top requirement for any long-term research app. If I look back 10 years from now at my research tool of choice, I’m bound to have hundreds of tags.
- Rich Text: For my writing and note-taking app, Markdown functionality is fundamental to how I work and think. However, when it comes to this type of research, I prefer using rich text to format any written notes, passages, or quotes I’m saving. This keeps formatting syntax hidden away and keeps actual formatting immediately visible when studying.
- Search: The giant no-brainer of all, search is fundamental to a digital long-term research tool. In the case of a Bible study, writing in your Bible is often seen as a way to research, but this has never clicked for me — how are you supposed to search all instances of your tagged theme inside a physical book? Digital tools make short work of this kind of search, so you may as well take advantage of it.
- OCR: Last but not least, OCR stands as a particular reason why an app like Ulysses, Scrivener, or Bear won’t work for my long-term research needs. Long-term research apps, to me, require the ability to search not only written text, but also text in scanned PDFs and images. Making an image searchable is how digital tools go to a whole new level and how you can cohesively study all sorts of saved media on a specific topic.
This set of requirements narrows the field down to only a few apps and services.
Stop losing your ideas and notes to multiple apps…
An online course to help you save time, organize your notes, and master the best writing app for Mac and iOS: Ulysses.
Why Keep It Works For Me
The three options — at least the first three that came to my mind — were DEVONThink, Keep It, and Evernote. DEVONThink is super powerful and a little more expensive than the other options. Evernote has been around forever, is probably the king of long-term research tools, but is also somewhat boring.
Keep It, a relatively new app available on both iOS and macOS, came to my attention when Federico Viticci highlighted the app in one of his must-have app lists for the year. Keep It has a great iOS-ready design, an affordable subscription plan, fantastic capture tools, and great search. In short, Keep It fulfills every single one of my requirements listed above.
I’m not too far into Keep It on the Mac and Keep It on the iPad to know whether one is more powerful than the other, but I think this stands as a point in and of itself: Like so many of the best iOS apps available today, Keep It on the iPad can be spoken in the same sentence as Keep It on the Mac, at least in terms of power, feature set, design, and ease of use. In fact, Keep It on the iPad is probably easier to use thanks to both Drag & Drop and the Apple Pencil.
Capturing thoughts, files, notes, images, and more is a breeze in Keep It for the iPad. As such, I’ve dove headfirst into the app to build out my Bible study structure.
How I’m Using Keep It on the iPad
I’ll run through my list of requirements listed above and how Keep It fulfills each requirement with ease, but I’ll start with the most important factor of all.
Structure and Tags
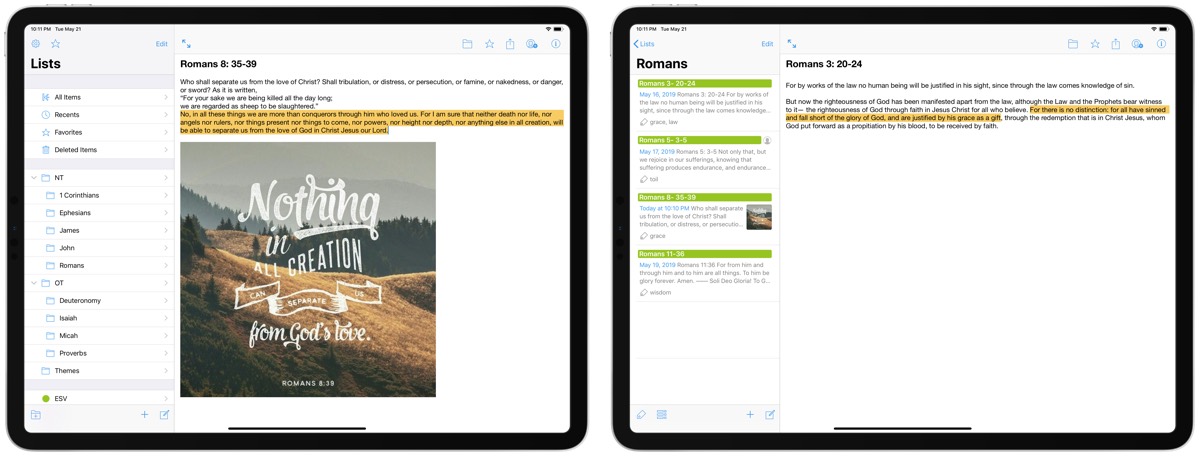
Keep It uses folders, bundles, tags, and labels to keep everything structured and organized in your library. I have parent folders set up for each testament in the Bible and I have child folders dedicated to each book in the Bible. The same could be completed for any thesis or dissertation research — major themes or topics could act as a parent folder, while specific books on those themes or topics could have their own child folder with a bunch of notes and media inside.
Bundles can be used to group any of your specified notes and items in one area. This is especially helpful if you want to throw everything about two or three themes into one area, and once you’re done studying, you want to discard the grouping of those files rather than the files themselves. This is such a handy feature and one not easily present in non-research apps.
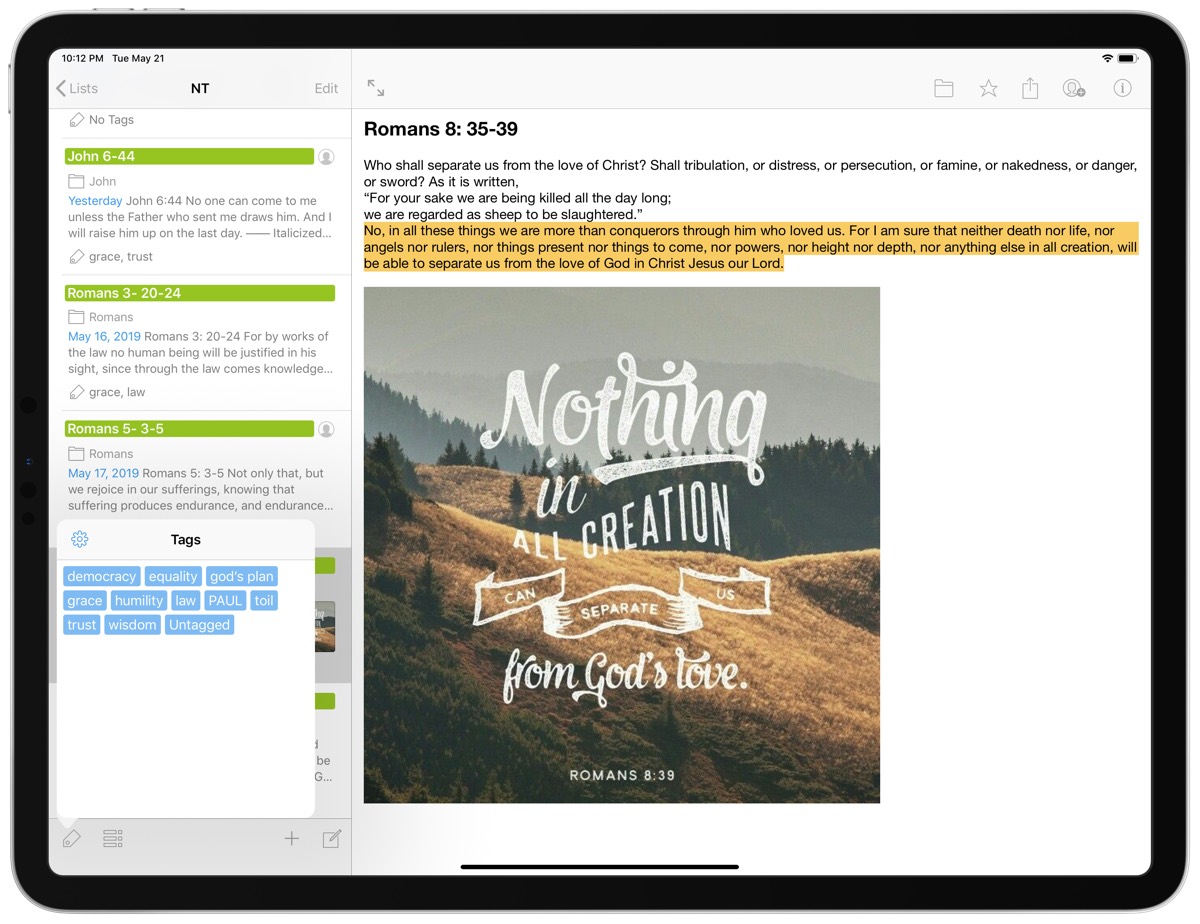
I have a tag for each theme in my study. (This is probably how most people use tags.) I especially like the way Keep It on the iPad allows you to create new tags for a note — simply type and hit enter to create a new tag. This means you can also add spaces to your tags, making search that much easier.
I use labels specifically for highlighting the different translations each of my saved passages originate from (ESV, NIV, KJV, etc.). Labels could be used for a variety of purposes, but the key to labels is that they’re color-coordinated. A note with a label inherits a colored header from the label, so you can visually differentiate between all your notes and files simply by your label color choices.
Capture
Keep It, especially on the iPad, excels in the capture department.
Text files can range from rich text (one of my other requirements), Markdown, and plain text, and a quick Command + N keyboard shortcut creates a new text document on a whim. You can even choose what type of default note is created when you hit Command + N — I like rich text, so the standard “Note” is what I have set as default, but you can change this to Markdown if you prefer.
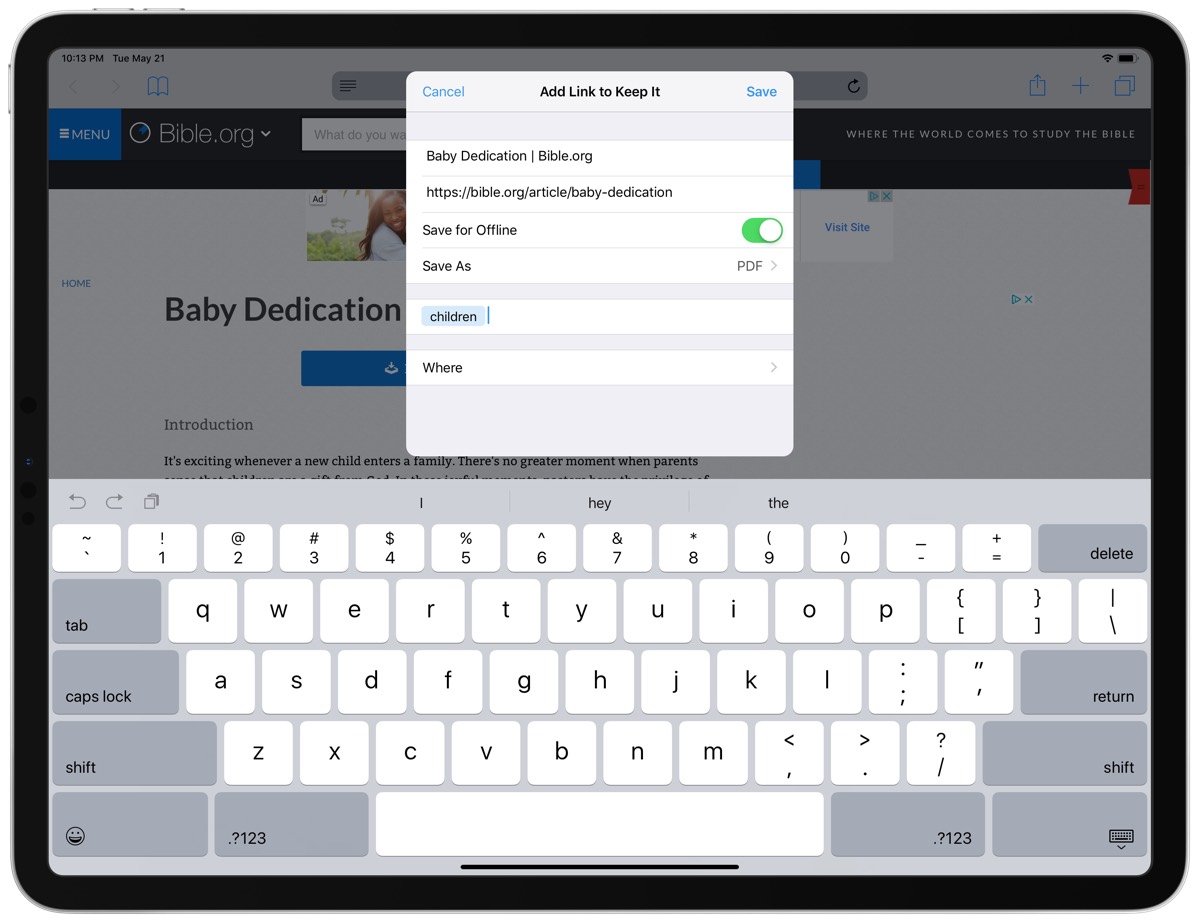
Files of almost any type can be captured from anywhere on iOS via the share sheet extension. Inside Safari, you can tap the share sheet extension and create a web link in Keep It, and even quickly name the file, tag it, save it for offline viewing, and save it directly to your folder structure all from within the share extension. Web links can be saved specially inside Keep It — you can save web links as a PDF or even as a web archive for offline reading.
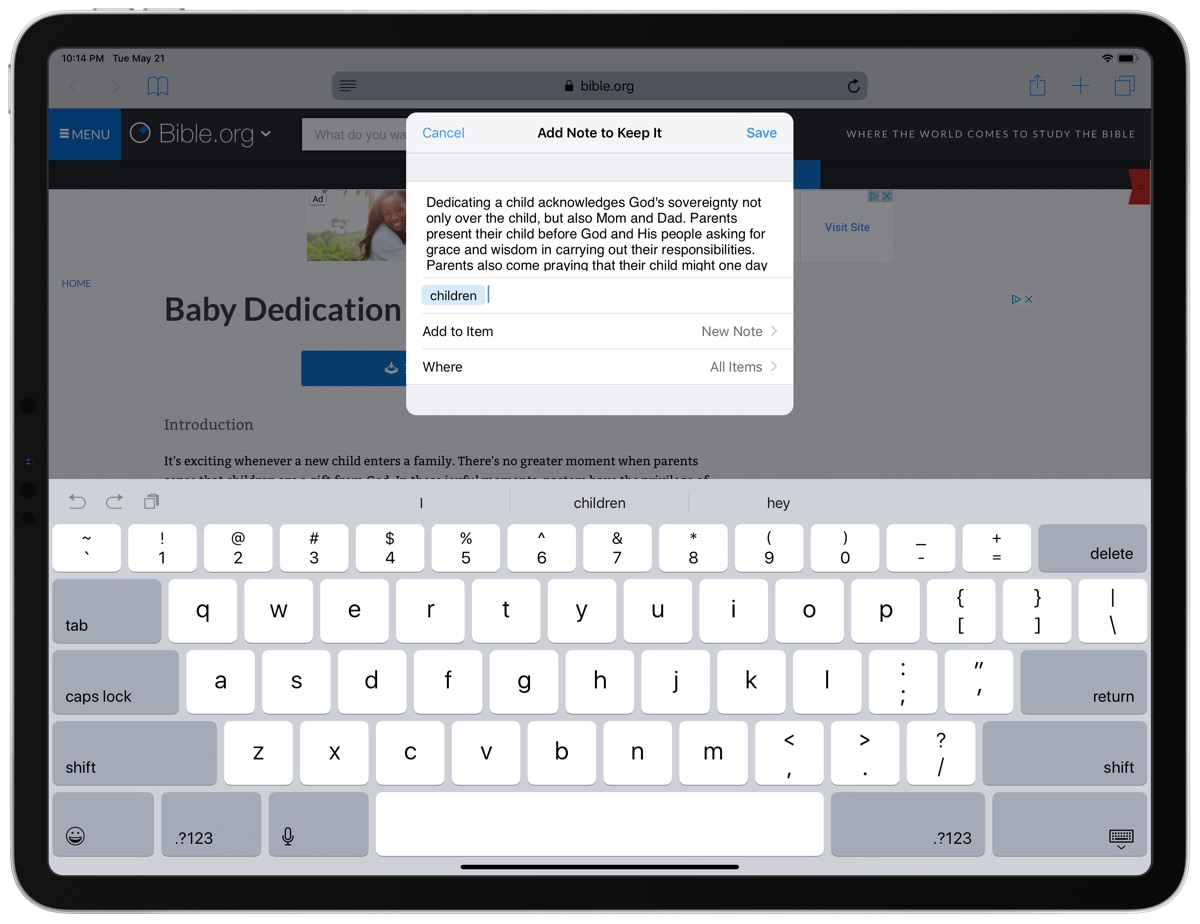
The share extension changes depending on what you’re trying to capture. If you highlight text inside Safari, for instance, you’ll be presented with an alternate share sheet, allowing you to append the highlighted text to a previous note, tag it, and more. You can also drag and drop highlighted text into Keep It on the iPad — my preferred method for highlight and passage capture.
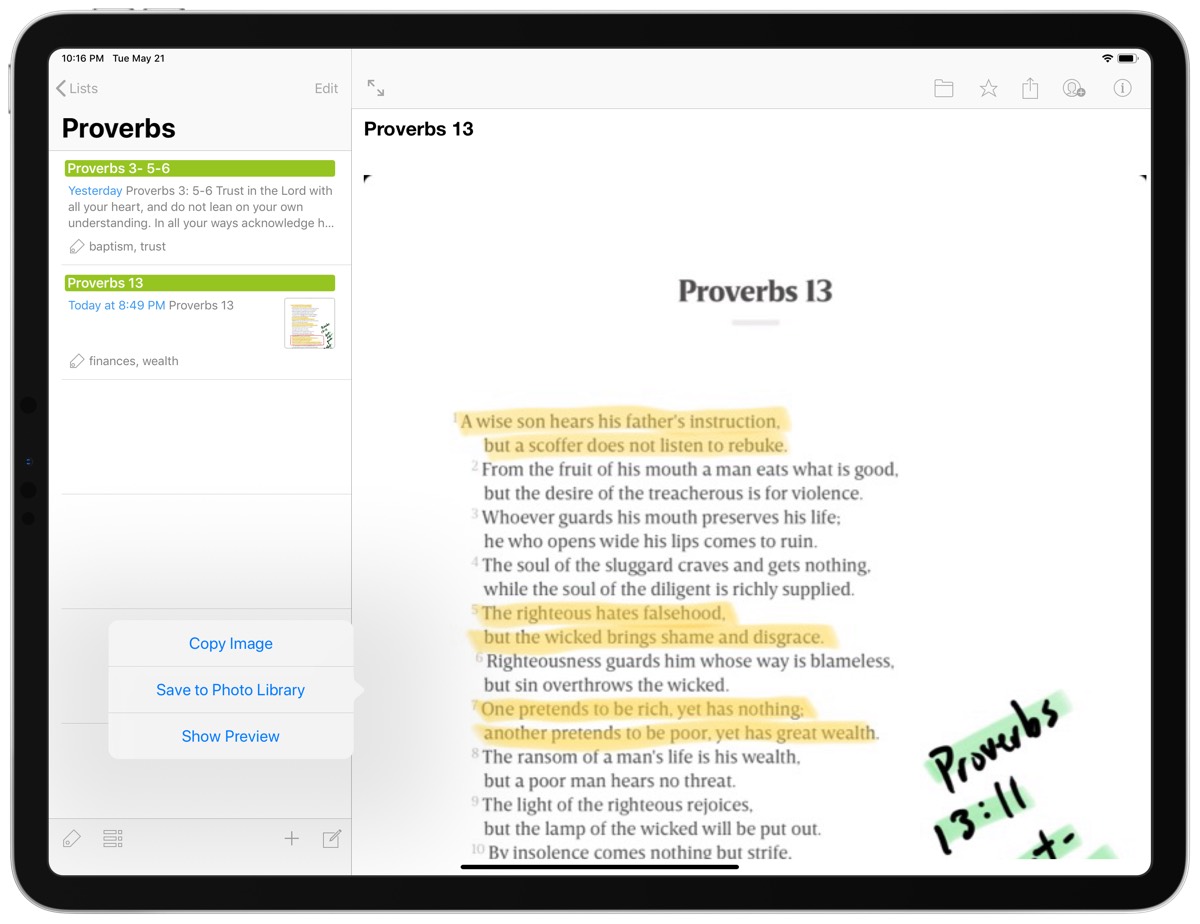
Lastly, if you prefer to annotate PDFs and images inside an app rather than prior to the file entering the app (I’m thinking, for instance, where you’ve taken a screenshot and want to annotate it in Apple’s default screenshot view before sending it to Keep It), you can do everything inside Keep It as well. I annotate written text with highlights all the time, but it’s great to know you can apply this with Apple Pencil as well.
Rich Text
So far, I’ve saved all my text documents in Keep It as rich text, for the simple fact that most of my notes are short and I’m trying to heavily format the most important parts of each note. Ideally, I want my notes inside Keep It to look very much the same as if I were physically writing them in a notebook or inside a textbook.
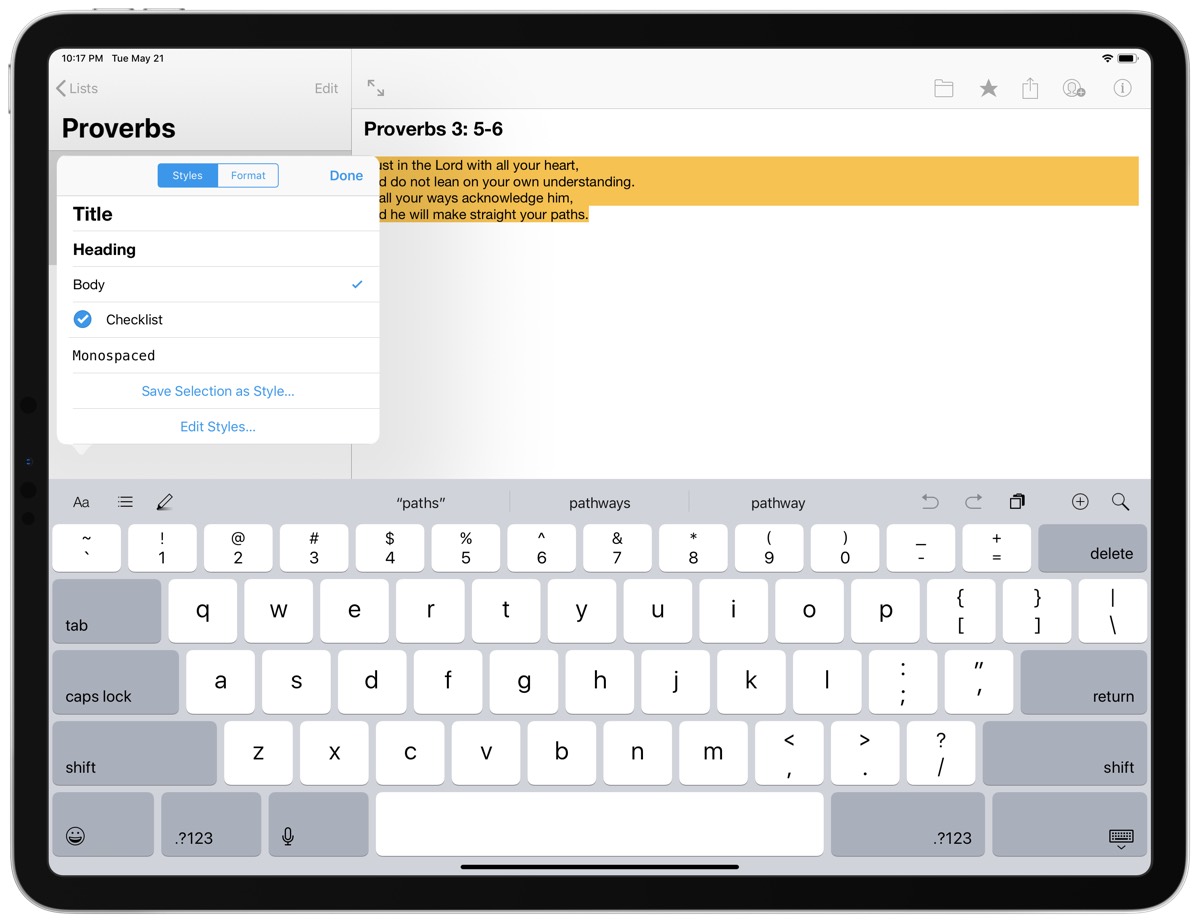
My only complaint with Keep It on iPad so far is where rich text formatting interface elements are held. While formatting options are in the header of each note in Keep It on the Mac, formatting options are actually somewhat hidden inside the top row of the keyboard in Keep It on iPad. As I test both the Mac and iOS apps, the continuity in creating text notes really falters here. I greatly prefer formatting in the header — like so many other apps out there — than to it being hidden at the bottom of the screen in the keyboard bar.
However, the list of rich text formatting options is great for an iPad app. Titles, headings, and body text are all easily distinguishable; fonts, text colors, text sizes, and even background colors are customizable; and you can even save your selections as a style so you don’t have to make individual changes all the time to specific types of material. Think, easily being able to format the author’s words in a note and then quickly formatting your own words differently.
This is the only element of my entire working life where I prefer rich text to Markdown. Aside from the location of the formatting options, I’m very happy with Keep It’s rich-text formatting.
Search and OCR
Searching in Keep It operates in a familiar manner to most other apps on iPad. Inside a note, if you hit Command + F on your external keyboard, you can search within the chosen document or file for your search query. For long notes and text documents, and for searching scanned PDFs and images, this type of search is awesome.
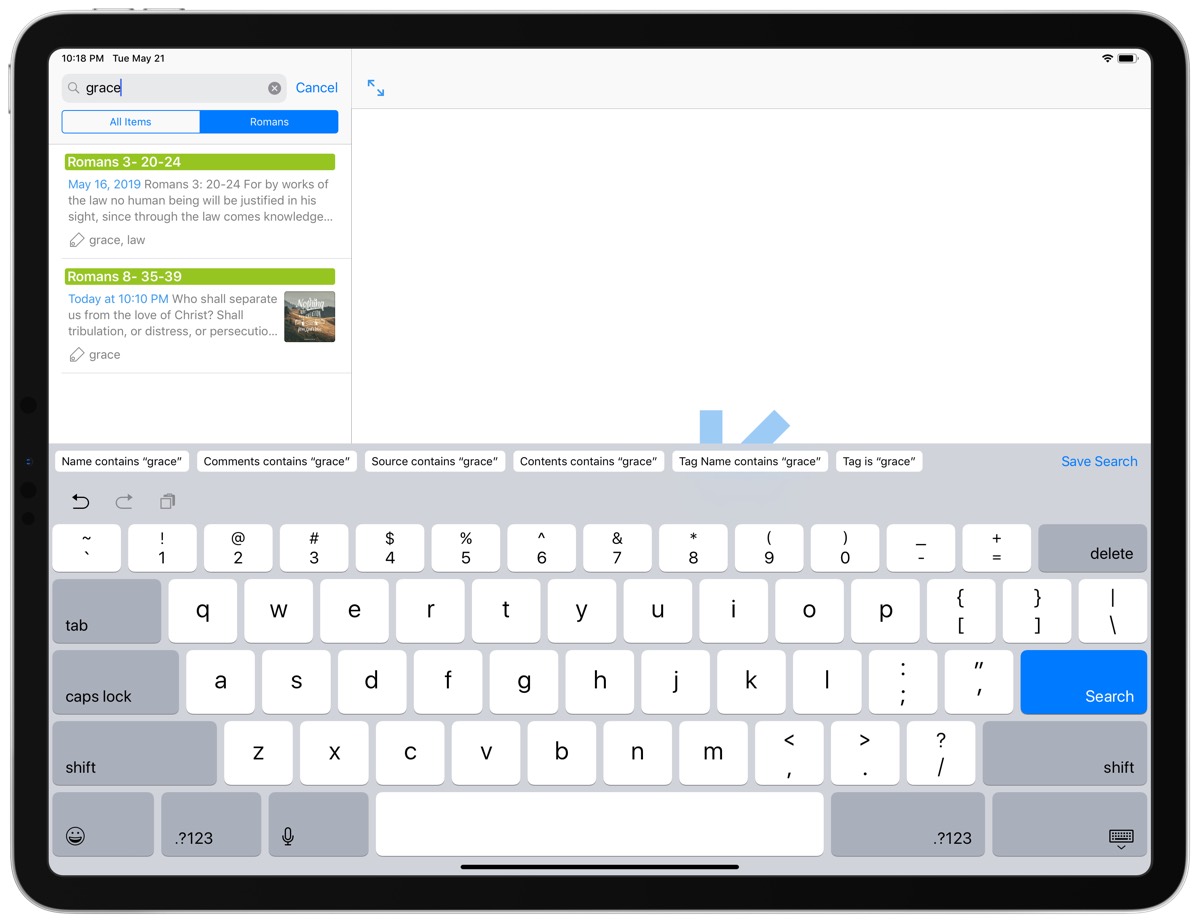
To search your entire library, you begin by finding your search bar inside the menu on the left side of the screen. If you want to search only inside a specific folder, tap the folder, pull down the list of items on the left, and reveal the search bar. This will bring up your search query, where you can choose to search only within that folder. It’s a bit of an odd double-tango, but it works.
The more important thing is that Search is powerful inside Keep It. When you begin your search query, the row above the keyboard allows you to change parameters for your search. You can set parameters like:
- Name contains
- Comments contains
- Source contains
- Contents contains
- Tag Name contains
- Tag is
And you can save your searches as well.
These searching parameters, combined with OCR of scanned PDFs and images, is where a long-term research tool like Keep It truly shines. You simply can’t search for stuff like this inside Apple’s Notes app, Bear, or other multi-functional apps like Ulysses, Scrivener, Day One, etc. You may be able to search like this by hijacking different ways to make things work, but nothing will come close to the ease and smoothness of searching across a giant library of media with two or three taps like in Keep It.
As a whole, Keep It fulfills my requirements for a long-term research app to the T. At heart, I love to capture. Capture a tweet here, a web link there, and snap an annotated screenshot over here. I may not add my own comments to the file at all, but having the ability to save all sorts of file types to one place, tag them within a specific theme, and then search them later on is music to my ears.
Long-Term Research Takes a Long Time
Long-term research takes a long time. It’s supposed to take a long time. Lifelong learning can’t be completed inside a single year or even a single decade, after all.
But this raises two concerns I have with Keep It.
First, while I appreciate Keep It is paid for via subscription — and thereby, at least somewhat, ensuring more consistent revenue throughout the app’s lifespan — the app is way less known than other major players in this category. The fear of Keep It being swallowed up by a competitor or being sunsetted due to business reasons scares me, especially when looking at the long-term. For shorter-term users — perhaps those writing a dissertation or thesis, or those writing a book — I don’t expect this will be a major factor in your decision process. But with the rate of change in the iOS app industry, will my notes and research be available for my entire lifetime inside Keep It?
Second, while the benefits of using a digital tool far outweigh the consequences, there’s still something about physically writing in a book. Especially an heirloom item like a Bible. Perhaps this is specific to my use-case, to which I plead ignorance. But one day, I’d like to pass on my research and thoughts to the best of my ability. Keeping everything inside Keep It — if it’s around when I’m in my elderly years — is probably less safe than keeping it in a physical format.
Both of these may be inconsequential factors for some, but long-term research does pull out a unique set of characteristics that require thought. I hope Keep It can find a healthy user base for long-term business health.
Wrap Up
I finally (finally!) had a reason to try out Keep It after seeing it pop up in screenshots and must-have app guides. Now that I’m in the app, I’m not disappointed in the slightest.
We’re working on a major review here at The Sweet Setup, with the hopes of pinning down the very best app for long-term research. Keep It is going to be a player in that review, to be sure. Where it ends up will remain a mystery for now.
But for my current study purposes, Keep It has completely nailed every feature I could ask for in this kind of app. I’m still in the early stages of building out my research, but when the time comes to search through the thousands of notes and media files I intend to save, I’m sure I’ll be quickly reminded of the strength of digital tools and how they can make put the logistics of research aside and focus our attention at the content at hand.
Stop losing your ideas and notes to multiple apps…
An online course to help you save time, organize your notes, and master the best writing app for Mac and iOS: Ulysses.