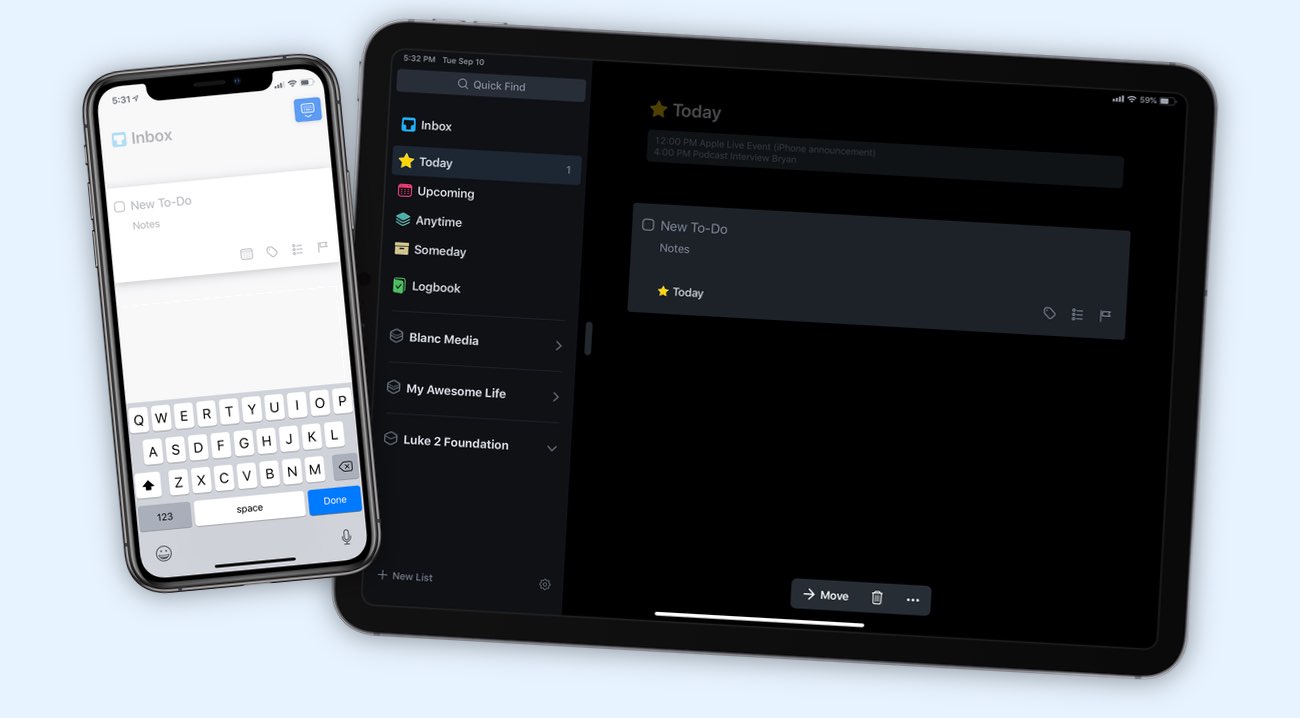
Automations and Workflows for Things on iOS: The Complete Guide
In a significant update to Things 3, Cultured Code has added deep linking features that allow for new levels of automation and workflows for Things on iPhone and iPad. In this guide, we cover all the ways you can use these Things iOS Workflows to your advantage, plus we’ve got several examples and downloads for you.
Things 3 is our favorite task manager, and we have an in-depth training course available as well that includes additional workflow examples and downloads.
Bonus! One more thing…
The Complete Guide to Managing Tasks in Things (Video)
If you struggle to keep up with all your tasks, we can show you some organization tips that may help you.
We put together a video that shows you everything you need to know about a task in Things:
- The difference between start dates and due dates and how to use them effectively.
- How to set up reminders so you never forget an important task again.
- How to use checklists for tasks that require more than one step.
- How to configure daily, weekly, monthly, or even annual repeating tasks.
- And more…
You don’t have to use any of these things in your tasks if you don’t want to. But knowing what they are and how they all work will help you be more organized, save time, and ensure you are using Things in the way that suits you best.
This video is something we have made available for free to our email subscriber community. You can get it right now. By joining the Sweet Setup community you’ll also get access to other guides, early previews to big new reviews and workflow articles we are working on, weekly roundups of our best content, and more.
Things on iOS Adds Support for Automations and Workflows
With the newly updated Things 3.4, the team has added add, add-project, show, search, version, and add-json commands to the URL scheme. With these, you can easily create deep links that, when tapped, will open Things and add tasks or projects, show tasks, projects, or headings, or search your whole to-do list. Plus, for developers or those willing to tinker, Cultured Code has added support for importing items using plain text encoded in JSON.
These changes open Things up to a world of iOS automation that its users were missing out on. Plus, the links will work on Mac too. Now, instead of tossing everything in your Inbox, it’s possible to use deep links to add tasks and give the tasks notes, with just the right set of tags applied, set up with reminders and due dates, and organize it exactly how you want as you add it.
Since the newly updated URL scheme taps into almost every feature of Things, it’s possible to do things like (but not limited to):
- Adding a website to your Research area with the page name as the title and link in the notes.
- Splitting a Markdown checklist from Drafts and have it turn into a full project.
- Designing an elaborate packing list that adjusts the number of items you bring based on how long your trip is and importing it only when you need it.
- Plugging in an entire course syllabus or book table of contents and tracking your progress as you go.
Even more, when you combine Things’ new automation with other apps that have their own unique URL schemes, you can build an array of workflows and links that connect your apps together on whole new levels.
Jump to a section

My Background
Before we jump into a quick tutorial of iOS automation, I’d like to paint a quick picture of my background in the field.
As part of the Workflow team in the past,[1] I built most of the workflows in the new version of Workflow’s gallery and wrote the Workflow documentation.
I joined Workflow after being a power user and reading MacStories religiously. However — and perhaps most importantly — I was not an engineer, I am a “regular” who has learned this stuff. As a result, you should be able to pick it up as well.
This is an extremely important aspect that I want to reiterate: You can pick up the basics of URL schemes in iOS and interact with the apps on your iPhone and iPad in new, more efficient ways — regardless of your prior experience. The world of automation in iOS is ripe for the picking and is accessible to a far larger group of people than many may think. With this tutorial and a little practice, I think you can bend the new Things 3.4 update to your heart’s content and improve your productivity workflows in the process.
Why use deep links with Things?
Things is our favorite productivity app, even though we crowned it as such while other similar apps had deeper automation features. Its design and mode of thinking for managing a to-do list are very in-tune with a mobile-forward lifestyle while still being a fantastic Mac app. But now, with Things 3.4, the whole package has added high-level automation features and is even better at serving the needs of potential users.
If you’ve settled into Things, you likely have a stable set of areas, maybe some system for tagging, and have some longer-term projects. You might add things to the Inbox from the share sheet, dabble with the Siri integration, or even have a few a workflows already, but those methods and your setup can quickly feel inadequate — especially if you’re eyeing competitive productivity apps or if you’ve had an overload of tasks recently.
The new automation features in Things let you create new to-dos, checklists, projects, headings,[2] show items, search, get the current app version, and add via JSON. What this means from a practical productivity standpoint is quicker capture for new items that lets you put items into the right spot immediately, and quicker access to your areas, projects, and tags.
Plus, it allows for those familiar with JSON to add every type of item into Things, fully structured and ready with each feature of the app customized to your liking — power users can add as much complexity to their systems as they desire. In addition, the JSON import feature could enable a full community around creating project templates for Things where you could share and download other people’s projects (so you don’t have to build them yourself).
Furthermore, JSON support opens Things to deep automation from third-party developers like MindNode, who can export their data and import into Things. The team at Cultured Code has even gone so far as to add code examples.
Things has become a personal productivity tool that’s approachable to anyone with just a handful of tasks, or as deep as any professional would need it to be.
How it all works
Let’s dive in and see how Things accomplishes this. We’ll explain the basics of deep linking, walk through each command, and set you up with some automations. We’ll show you how to retrieve links for current tasks, make your own searches, and create new deep links for each command with Workflow and Launch Center Pro.
In a future article, we’ll teach you a bit about JSON, give you some more advanced examples, and then show you advanced Workflow examples with JSON and Dictionary actions.
Furthermore, we’ve built custom workflows for connecting Ulysses, Bear, and Things together, and we’ve put together JSON templates to import our Learn Ulysses and All The Things courses.
Basics of deep linking on iOS
Most apps on iOS can be launched by tapping a link like twitter://. Just like typing in http:// takes you to a location on the web, replacing http with an app name can tell the operating system to take you there.
Developers who have implemented URL schemes can allow you to add commands to that link and perform an action once the app is opening. For example, if you want to add a new tweet, you can use add as the command and tap twitter://add to open into Twitter’s compose sheet. But this command can also be set up to accept a value as well by giving it a parameter like text for the tweet contents, so that twitter://post?message=Hello can open into Twitter with the word “Hello” pre-filled.
When developers devise a URL scheme that accepts data and then performs an action based on that data in their app, users can then build their own deep links as shortcuts to their desired goal. With a URL scheme, users can pass text into the app, build bookmarks like twitter://list?id=Bloggers to jump into certain parts of the app, or quick start a search using something like twitter://search?query=Sweet%20Setup.
When you combine this potential with apps like Workflow, Launch Center Pro, and Airmail, you can set up utilities to construct powerful deep links, follow steps as you go to enter new information, and even programmatically extract details from your emails.
Taking advantage of the deep link capabilities from the apps you already use helps you:
- Make your phone or tablet much faster and easier to use;
- Tap into features you’re not taking advantage of yet; and
- Unlock powerful scripting-level capabilities you couldn’t do otherwise
The Things URL scheme
Basics and how to turn it on
Things’ main URL scheme begins with things://, which hasn’t changed. Tapping on a things:// deep link is the same as tapping on the icon — it just takes you into the app, still left in whatever state it was previously.
In the past, Things’ automation support was limited to adding tasks to the Inbox, which enabled the “Add to Things” action that exists in Workflow. However, filling up your inbox with unstructured to-dos isn’t always the best strategy — if you’re already making a task, you might as well fill it out and sort it properly now.
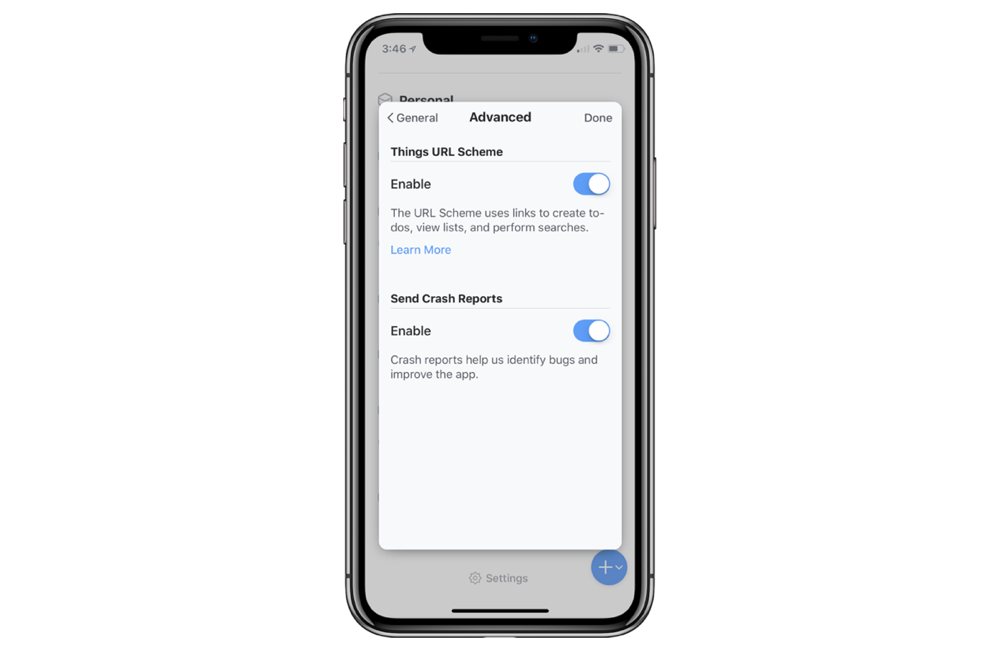
If you use a deep link into Things for the first time, you’ll be prompted to enable the URL scheme so the app can accept any new deep links in the future. If you want to turn it off, scroll to the bottom of the main screen and tap the Settings tab, then go to General → Advanced → URL Scheme to enable the feature.[3] After that, any version of Things updated to 3.4 will be ready to accept incoming deep linked commands.
Alternatively, on the Mac, you must turn on the URL scheme from Things → Preferences → General. This way, any deep links created will also activate when clicked on the desktop, taking you straight into the corresponding item in Things for Mac.
Once the URL scheme is activated, you’re ready to utilize deep links with Things.
The main commands
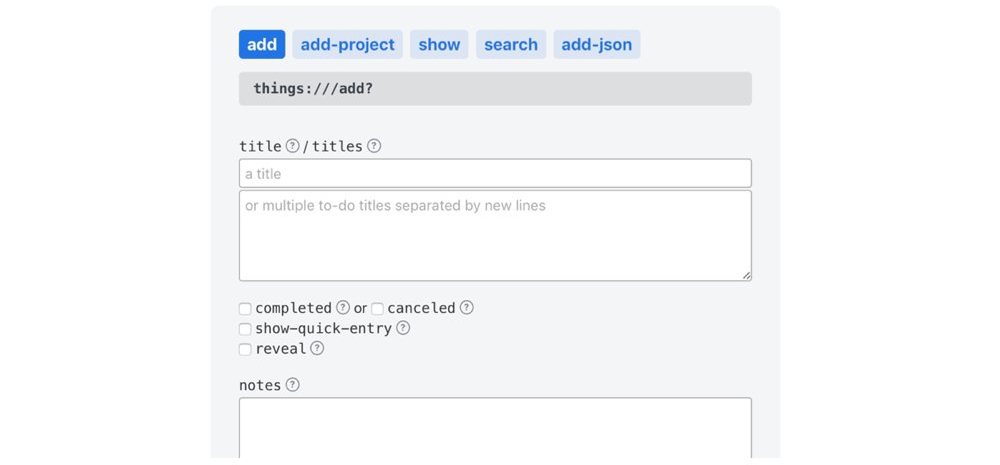
Things has four primary commands: add, add-project, show, and search.[4]
If you’re trying to add new tasks, projects, or headings, you’ll want to use add and add-project. If you’re looking to open a specific task, project, tag, or area, you’ll want to use show. If you’re looking to query your whole database using a keyword or just show the search screen and the keyboard, use search.
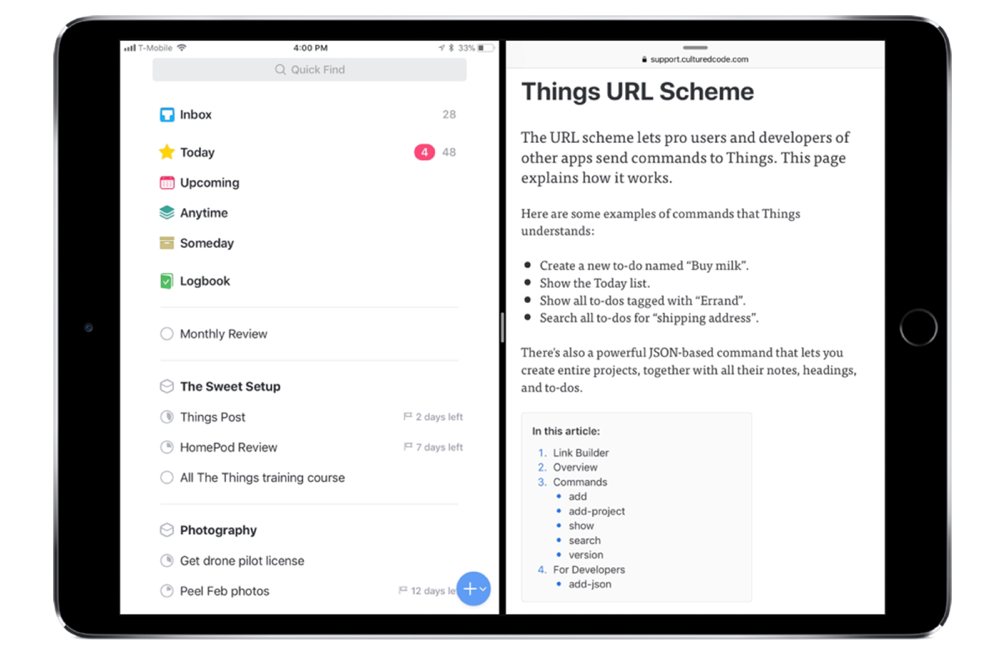
Cultured Code’s Link Builder
A great way to create these types of links is using the Link Builder tool on Cultured Code’s documentation for Things. You can toggle between the five main commands, filling in the parameters as it displays the link above. This can be super handy as entering text into the Link Builder automatically encodes everything, so new lines, spaces, and other characters in the URL can be properly decoded as the deep link is executed. Plus, the “?” icons on the page tell you descriptions for each of the parameters, so you can learn more details about the parameters by hovering on a Mac or tapping on mobile.
The Link Builder is great for getting familiar with the Things URL scheme and testing out a few links once you’ve read the documentation. It’s also helpful for pre-building show and search links and building a template in URL form – especially on the Mac. However, these links are static and won’t allow you to dynamically fill out parameters in the moment. You can use AppleScript or launchers like Alfred to control Things on the Mac, but if you want to create automations on mobile to build deep links programmatically, you’d have to use apps like Workflow, Drafts, and Launch Center Pro.
However, before we get to the automation part, we’ll explain more about each of the main commands and how they work.
The add commands
With the new deep-linking capabilities of Things, you are able to use commands to “add” a new to-do, multiple to-dos, and projects into your task list.
add
The add command is designed to add one or more to-dos into Things. You specify either one title or multiple titles, enter notes, choose when to start, add a deadline, add tags, enter checklist items, place it in a list, mark it as completed/cancelled, or choose to show the quick entry as one is added. Plus, you can choose whether Things should reveal the new item after opening. Each of these parameters are optional, so you can add all, some, or none to your deep links if you want.
Add a title and notes: In order to give your task a title and notes, you’ll need to create text strings that the program can properly interpret. Using URL encoding, you can add/replace non-letter text with special characters like %20 for spaces or %0a for new lines.
Here’s a simple version to get you started – it sets a task to finish reading this post with the link to our website in the notes: things:///add?title=Finish%20Sweet%20Setup%20post%20on%20Things¬es=https%3A%2F%2Fthesweetsetup.com%2F
When to start: If you’re choosing to add when to give the task a start date, you can enter a date string or date time string, plus the built-in values for today, tomorrow, evening, or someday. Adding the time to the date lets you create a reminder to go off at that time — separate it as date@time if you want to be notified at that time. For example, if you wanted to review your Inbox tonight, you could use things:///add?title=Clean%20up%20Inbox&when=evening, or you could do a mind dump on Friday morning with things:///add?title=Mind%20dump&when=2018-02-2308:30.
Adding Tags: If you want to include tags in a task created via deep link, they need to be comma-separated in the URL. For example, things:///add?title=Publish%20post&tags=Blog,Work. This only applies an existing tag to your task and won’t create a new one – this is partially security from bad actors sending deep links with tons of tags, but is also useful in case your deep link has an error so it won’t add a mess of strings as tags accidentally.
Multiple items: If you’re adding titles and checklist-items, they need to be new line-separated strings (\n encoded to %0a) so Things can identify them individually. And when you’re adding multiple titles, the parameters in the URL are applied to all the created to-dos.
Here are a few examples:
- Adding random tasks at the same time:
things:///add?titles=Finish%20laundry%0aClean%20the%fridge%0aTake%20a%20nap - Add a grocery list:
things:///add?title=Pick%20up%20groceries&checklist-items=Milk%0aEggs%0aButter%0aBread
Move it into a list: If you want to specify where to place the to-do, you can use the list parameter and enter the name of one of your projects or areas.[5] You can also use list-id as well if you want to be exact, taking precedence over list. This unique identifier is given to every item in your Things library, whereas two projects might have the same name and could create issues. If you were adding to your Blog area you’d use ?list=Blog, or ?list-id=.
If you’re adding a to-do to a project that has existing headers, you can also specify header and its name in the URL to place it there.
Again, a few examples:
- Add project in area
things:///add-project?title= Explore%20Bay%20Area&area=Travel - Add task to project that has headers:
things:///add?title=Temescal&header=Berkeley&list=Explore%20Bay%20Area
Reveal: Another helpful parameter to include in your add links is reveal, which you can set to true or false to determine whether Things should show the new task once it’s created. This can be useful if you’re making a new to-do and want to examine its final result, but is also helpful to leave off if you want to add something and move on.
Task IDs: Things has also added support for retrieving the IDs of newly created tasks, using a technology called x-callback-url, (which is beyond the scope of this article).
We’ll cover this later, but for now it’s worth noting that once you create a task, you can get the identifier for that new task.
add-project
Adding a project is very similar, except you can’t add multiple projects with one URL. Things lets you add simple to-dos instead of checklists, and you must specify the area or area-id instead of having list and list-id.
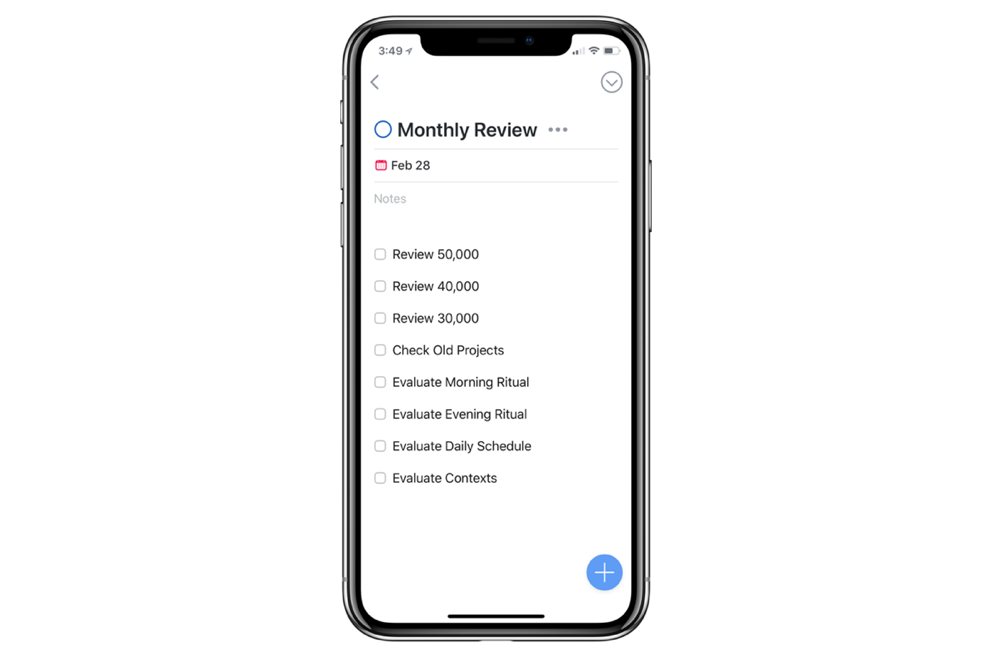
An example using David Allen’s GTD methodology would be this link for a Monthly Review:
things:///add-project?title=Monthly%20Review&to-dos=Review%2050,000%0aReview%2040,000%0aReview%2030,000%0aCheck%20Old%20Projects%0aEvaluate%20Morning%20Ritual%0aEvaluate%20Evening%20Ritual%0aEvaluate%20Daily%20Schedule%0aEvaluate%20ContextsSomething to note: to-dos created with your project don’t have any unique attributes of their own applied, plus you can’t programmatically add headings in to organize further. Using add-project is almost like taking an existing Things to-do with a checklist and using Things’ built in “Convert to Project” feature to turn it into a project and list of to-dos instead.
If you’re using add-project and hit a ceiling of what’s possible, you likely need to move on to using add-json to enable more structure and flexibility in what you’re adding.
add versus add-project
Here’s a table of the overlap between the parameters for add and add-project.
| Parameter | Add |
Add-Project |
|---|---|---|
title |
✓ | ✓ |
titles |
✓ | |
notes |
✓ | ✓ |
when |
✓ | ✓ |
deadline |
✓ | ✓ |
tags |
✓ | ✓ |
checklist-items |
✓ | |
to-dos |
✓ | |
list-id |
✓ | ✓ |
list |
✓ | ✓ |
heading |
✓ | |
area |
✓ | |
area-id |
✓ | |
completed |
✓ | ✓ |
canceled |
✓ | ✓ |
show-quick-entry |
✓ | |
reveal |
✓ | ✓ |
on x-success, return x-things-id |
✓ | ✓ |
With add, you can uniquely add multiple titles, specify a heading, add checklist-items, and show-quick-entry. Plus, you can specify the list or list-id for which a “list” is either a project or an area.
For add-project, you can uniquely add a new-line separated list of to-dos titles, plus you must specify the area or area-id.
Both add and add-project allow for a title, notes, when, deadline, and comma-separated tags.
With these commands for adding new items, Things has opened up its database beyond the inbox. Now you can make automations to quickly add tasks or projects, set up simple templates, and use other apps to dynamically create new items in your task list.
Show and Search commands
The Show and Search commands, instead of adding content in, are about jumping into Things and going either straight to a to-do, project, area or tag, or heading to the search screen to query the entire list.
Search
Search is the most straightforward of the Things commands and only lets you add a query parameter. With this, you can add your search term and launch into Things to display the results. Or, you can just use things:///search to open right into the Search screen, ready to go.

Some examples:
- Use
things:///search?query=[[Draft]]in Drafts to search the draft contents. - Use
things:///search?query=[[Prompt]]in Launch Center Pro to enter your text query as you fire off your action. - Use something like
things:///search?query=readingto always search for the same keyword.
Show
Show is a more flexible open command for Things, allowing you to show something by its title, show it by its unique ID, or show something and apply a filter on the view by tag so you only see a subset of tasks.
ID: Each area, project, tag or to-do in Things has a unique identifier that can be used to return directly to that item. You can create links for tasks, projects, and areas, but not headings or checklists.
If you tap on the Action menu in the top right of a project and hit share, you’ll open the iOS share sheet where you’ll see “Copy Link” in the bottom row of action extensions. Tap that and the full URL into the Things task will be copied to your clipboard, already using the show command. If you tap that link later, your device will open the app back to that item.[6]
Query: If you don’t have a unique ID or don’t want to use one of the filter lists, you can use the query parameter instead to open an item whose name matches your text string. But this only works with areas, projects, tags, or using the keyword for the built-in lists (inbox, today, anytime, upcoming, someday, and logbook). If you want to use the parameter to find a single to-do by its title, you’ll have to use search instead.[7]
Filter: The filter parameter for the show command is a powerful addition to the command, letting you apply a filter by tag to the list you open. This can be useful for drilling down to exactly what you need in context and not getting distracted by other tasks that aren’t relevant in the moment, especially if you’re a proficient user of tags in Things.
Here’s a few examples of show URLs in action:
- Show only my urgent tasks due today:
things:///show?id=Today&filter=Urgent - Open my project or area titled “Family Vacation”:
things:///show?query=Family20%Vacation - Show my important blog tasks:
things:///show?id=8C2DA193-696B-4193-BA24-EA7EF0E17311&filter=Important - Show me any tasks I can do while I’m bored at home:
things:///show?id=Anytime&filter=Bored,Home
show versus search
Here’s a table of the overlap between the parameters for show and search:
| Parameter | show |
search |
|---|---|---|
id |
✓ | |
query |
✓ | ✓ |
filter |
✓ (optional) |
With show, you are able to use a unique id to be more specific than a title, or you can add a filter to only show results with a certain tag.
With search, you can use a string to query a result or you can use the base command to open the search screen. Plus, you can only open individual to-dos using search – you can’t type in a task name with show.
With search and show, users are able to use deep links to open into Things and find what items they’re looking for right away. They enable bookmarks, smart searches, and fast queries – now you can get the benefits of a digital task manager with the focus of a managed to-do list.
Quick Automations
While the new URL scheme blows the door open for creating a plethora of Things deep links, we’re going to focus on a few areas so you can quickly get some set up.
Generally, it’s useful to set up deep links as bookmarks, quick actions, and workflows to do some more advanced automations.
Bookmarks
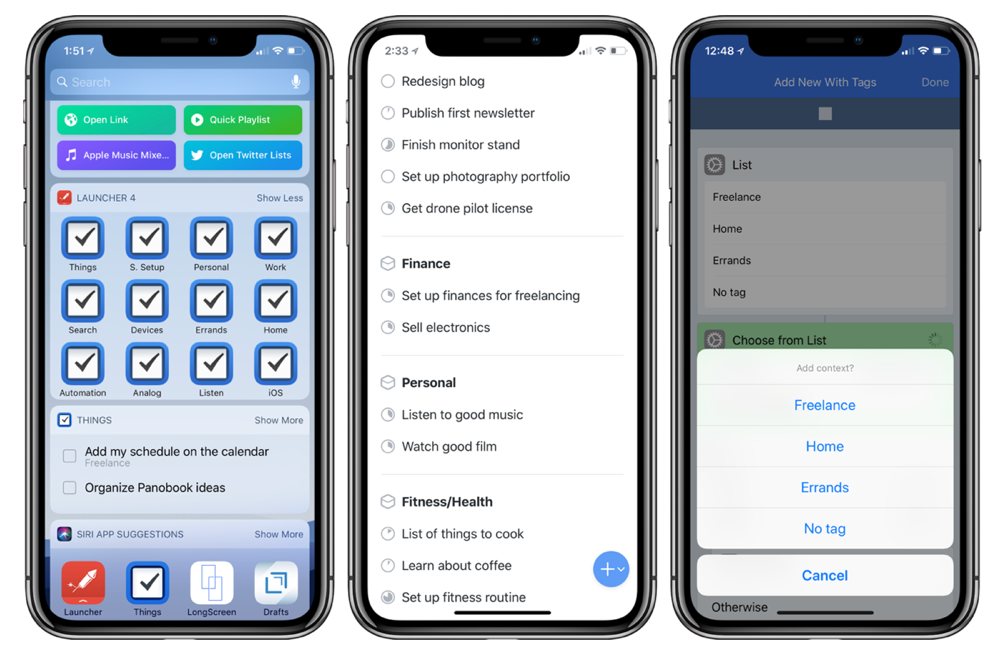
On the most basic level, Things’ show command can be used to make bookmarks into your to-do list. Using apps like Launcher, Launch Center Pro, and Workflow, you can take your things://show?id= URLs and arrange them as shortcuts into your areas, projects, or tags.
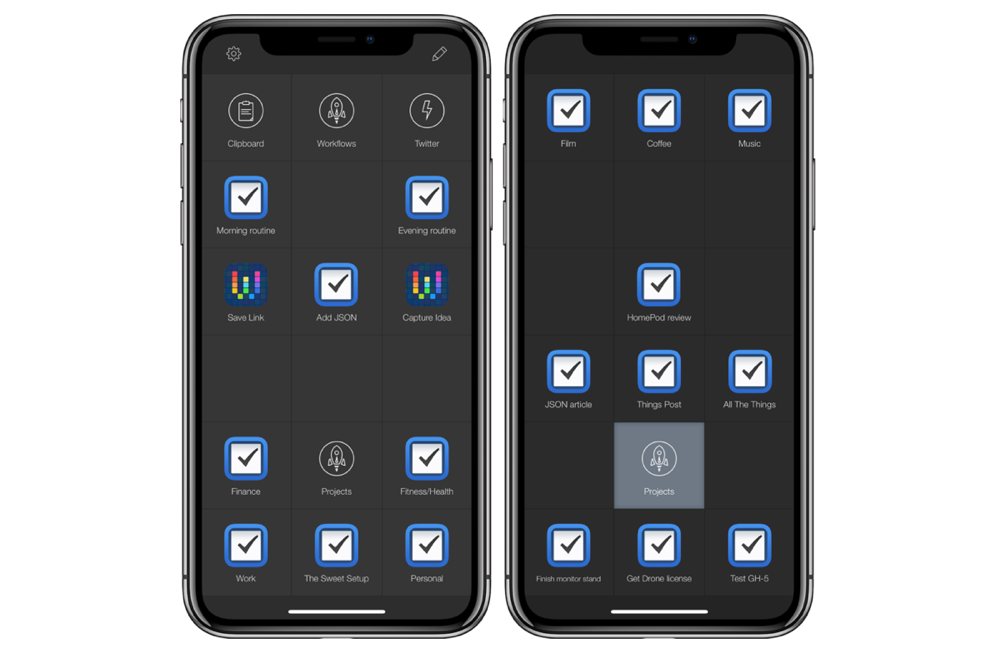
I’m currently using the app Launcher on my devices to open links into my various Things areas and tags. In the screenshot below, the first Launcher action in the top row opens the app, and the other three open into my main Areas: The Sweet Setup, Work, and Personal.[8]

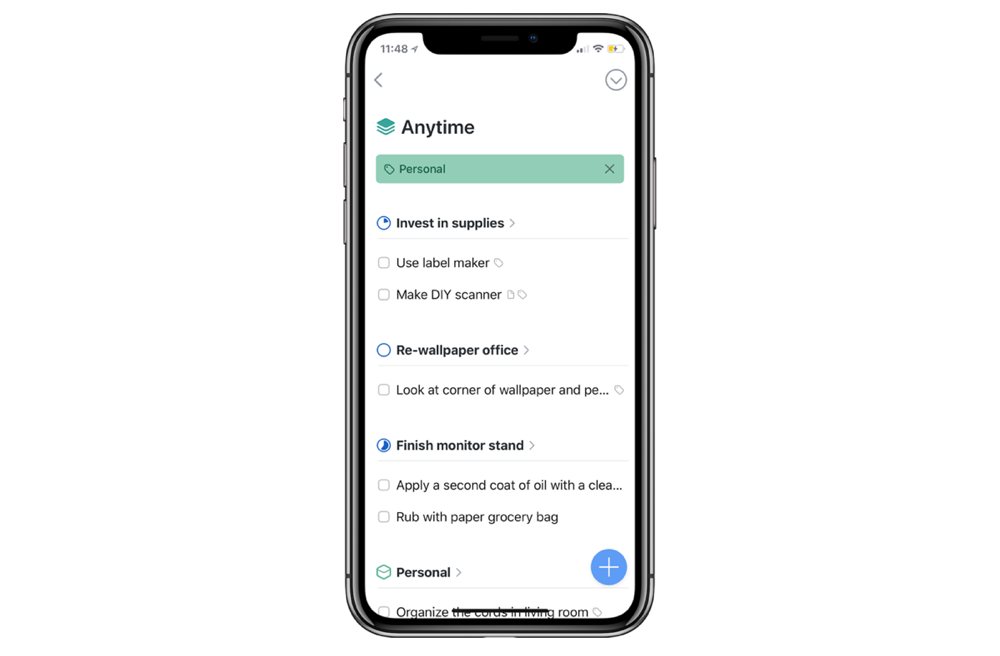
The first launcher just opens Things, and the second one opens my Area for The Sweet Setup. Then, the “Work” and “Personal” links are set up to search my Anytime list with a filter by the tag, so I can just jump into any work or personal tasks that are ready right away.
I chose this setup because I take advantage of how Things applies tags – if one is applied at the top-most level to an area or project, filtering by that tag will show all of those subtasks (as if they are tagged indirectly); however, if you show the tag instead of filtering by it, Things will only display the items tagged directly.
Below I have a few show bookmarks that are set up to utilize the same “search Anytime by filter” method I use above, jumping into only active tasks. I have tags for physical contexts like Home, Devices (plus more below to be more specific), or Errands that I do apply to every task, so these let me see those all in one tap. The only tag where I use the unique ID is for Automation, since I tag a lot of tasks with that directly.
I use these bookmarks most often when I want to focus on something in one of those areas, or when I’m looking to review my tasks. Having them nearby helps me keep everything up to date, plus I can bypass my Inbox or Today view so I don’t get distracted by anything else.
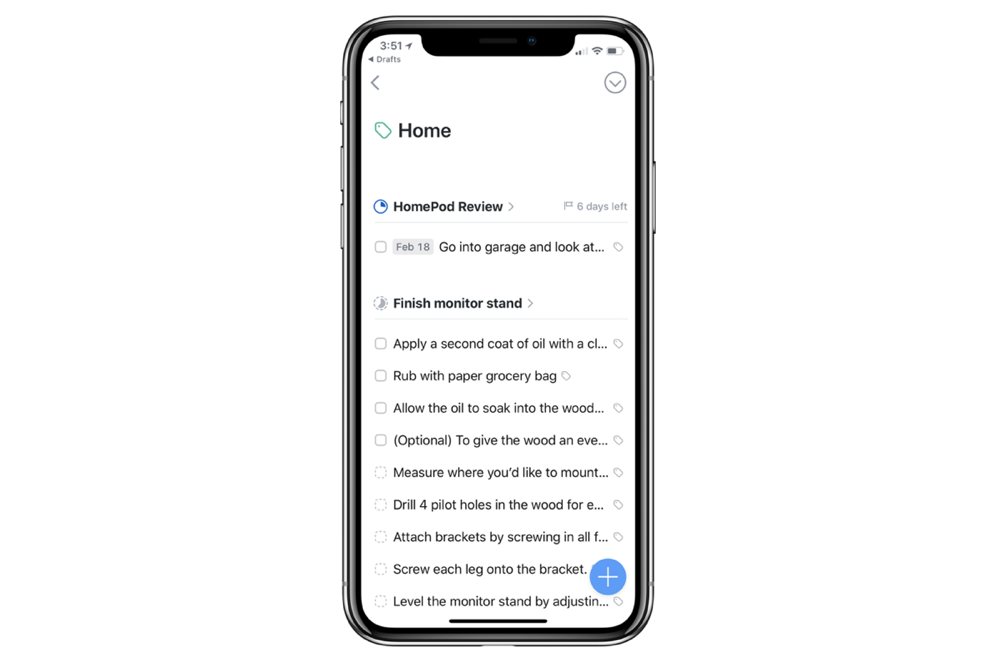
On the iPad, I also set up direct links into the project for this article, as well as my upcoming HomePod review. With a nice little touch, I used the icon for The Sweet Setup, which coincidentally looks great with the crop. This too has been handy for keeping an eye on my remaining tasks, and acting as a sort of “Favorites” projects list outside of Things itself.
Quick Links
All links are permanent in Launcher and they’re best suited for quick launching show or search links. However, they can’t use the keyboard to enter text, so the options for deep linking beyond are limited quickly.
Launch Center Pro, however, has more features that make it an excellent second option for opening bookmarks and triggering launchers to quickly build new bookmarks or adding items.
Launch Center Pro is fantastic with deep links that open into Things – “launch” is right there in the title after all. With Launch Center Pro (LCP from here on), you have 18 spaces for either single launchers or groups that hold an additional 17 launchers each, for a grand total of 306 potential spots for deep links.
Each launcher can also have custom time-based and location-based triggers. With these, Launch Center Pro will send you a notification at the right time or place, and when you tap on it the deep link will open right away and you’ll be taken into the app to execute the command. You can schedule these to go off on repeating intervals, or when you arrive or leave a location – you can even specify a time range, days of the week, the distance from your geofence or iBeacon, and suppress any duplicates if you’re there for an extended period of time.
Combining these features with Things lets you create a plethora of bookmarks into your areas, projects, or tags. You could just use the main screen and create a grid of your favorite areas and important projects. Or, you could create a group for each area, each with its own launcher and launchers for the projects within that area. You could also create a group for your areas, a group for your top projects, and a group for different subgroups of tags – whatever suits you best.
Launch Center Pro also has the ability to add prompts or use the clipboard so that while you’re launching the URL you can dynamically build the deep link. When you’re in the URL field of a Launch Center Pro action, you can tap the Prompt icon in the keyboard bar to choose a Keyboard Prompt, Number Pad, List, Dictation, or Barcode Scan – the keyboard could let you type in a title and the list could let you choose from your areas, projects, or tags to open.
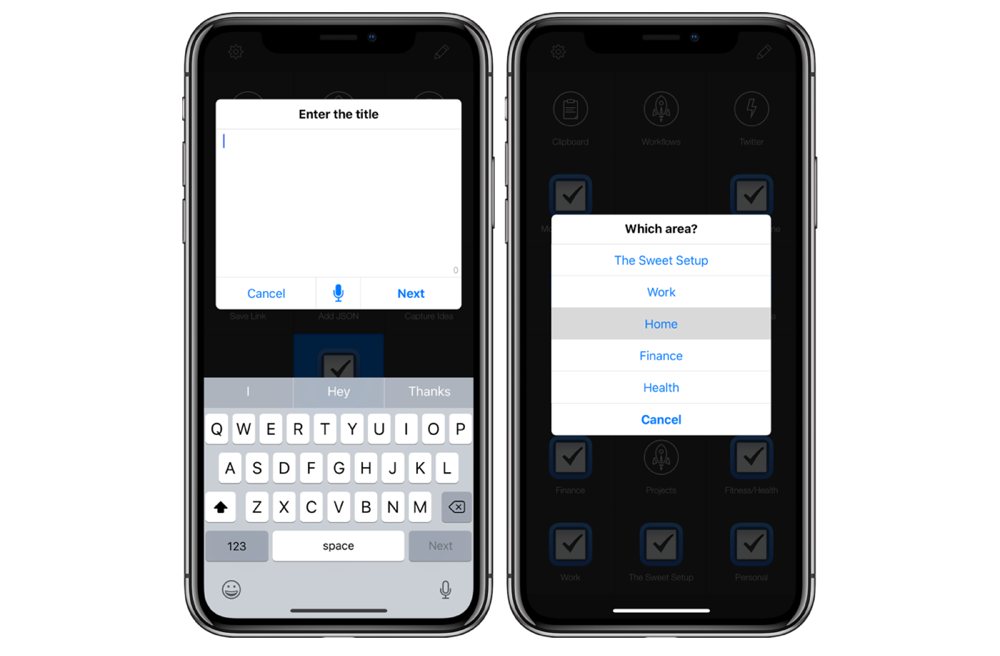
This prompt feature opens up the ability to use dynamic add and add-project commands for your Things links in Launch Center Pro too. You could set up prompts for different parameters and have it ask you to enter values at the moment you launch it instead of ahead of time. After typing in the title, the list prompt could let you pick which area to add your new project to.
Launch Center Pro also has a clipboard tool (also shown in the keyboard bar when making a new action), so you could set up actions that let you copy some text ahead of time, fill it in as the title, and add it as a task in Things.
Launch Center Pro is probably the quickest and easiest way to set up URLs for Things, letting you keep to prompts and lists to add a level of automation while maintaining a full-screen launch pad for deep linking.
Drafts
Another handy way to quickly add tasks to Things is using Drafts. This scratchpad-style app is handy to keep in your dock, ready for you to open it and start typing right away. Then, when you’re done capturing the thought, you can use Drafts actions to send the text into another app (using URL schemes) and sort it out accordingly.
Drafts is a great launching point for creating deep links because it always opens with the keyboard ready. If you’re thinking about searching Things for emails, you open Drafts and type “email”, then swipe to the sidebar to trigger an action and your draft can be used in a deep link to search your to-dos.
One handy feature of Drafts is Link Mode. When you tap the icon at the bottom of the composer, all of the links in your draft will be converted and made tappable. If you’re create deep links, this means you can just type your URL, hit Link Mode, and tap it to launch the command.
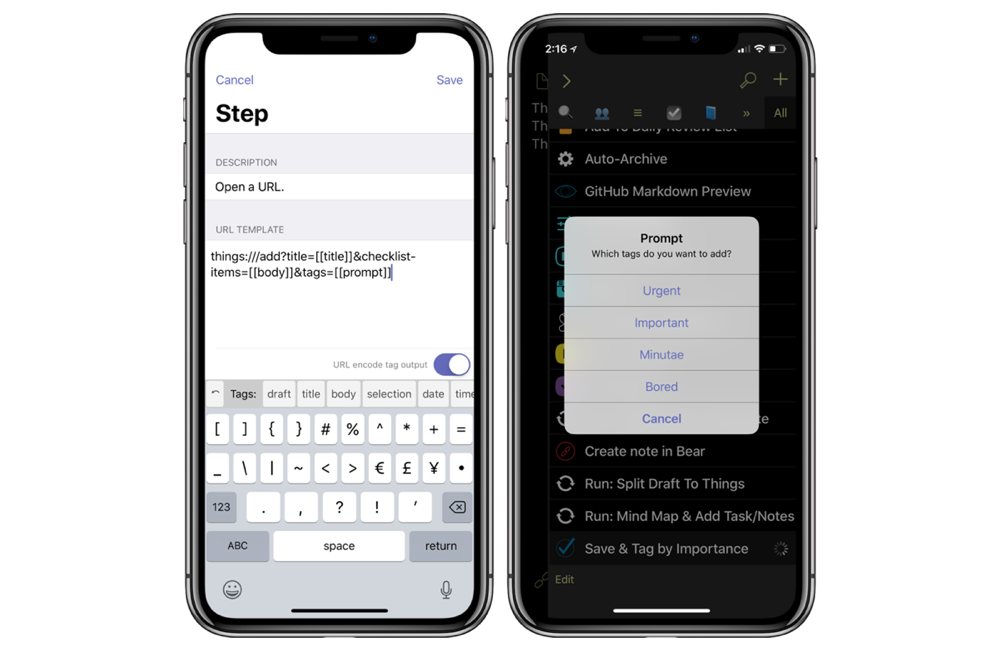
With something like things:///add?title=[[title]]&checklist-items=[[body]] you could also take advantage’s of Draft’s special [[templates]] to get the first line of your note as the title of a new task and the rest as the checklist for that task.
Drafts also includes a prompt feature, which lets you create a pop-up like Launch Center Pro’s and lets you pick from a list of choices. Here you can add in one or more prompts to pick from your chosen parameters, then fill it all into the deep link and have your task added.
You can use the list prompt in unique ways, like grouping your tags in smaller batches according to how you organize them. When you’re creating a deep link, you can use multiple prompts and subdivide the tags across each, letting you pick from only a few at a time and giving them a better organization than a massive list. You can pick from the different sub-categories, then have URL set up to add all your selections as the task’s tags.
Even more, Drafts has powerful Javascript capabilities that lets anyone familiar with the language execute scripts on their notes. With this at your disposable, people can create all types of tools to build deep links (but it does require coding knowledge).
Bonus! One more thing…
The Complete Guide to Managing Tasks in Things (Video)
If you struggle to keep up with all your tasks, we can show you some organization tips that may help you.
We put together a video that shows you everything you need to know about a task in Things:
- The difference between start dates and due dates and how to use them effectively.
- How to set up reminders so you never forget an important task again.
- How to use checklists for tasks that require more than one step.
- How to configure daily, weekly, monthly, or even annual repeating tasks.
- And more…
You don’t have to use any of these things in your tasks if you don’t want to. But knowing what they are and how they all work will help you be more organized, save time, and ensure you are using Things in the way that suits you best.
This video is something we have made available for free to our email subscriber community. You can get it right now. By joining the Sweet Setup community you’ll also get access to other guides, early previews to big new reviews and workflow articles we are working on, weekly roundups of our best content, and more.
Using Workflow to make Things links
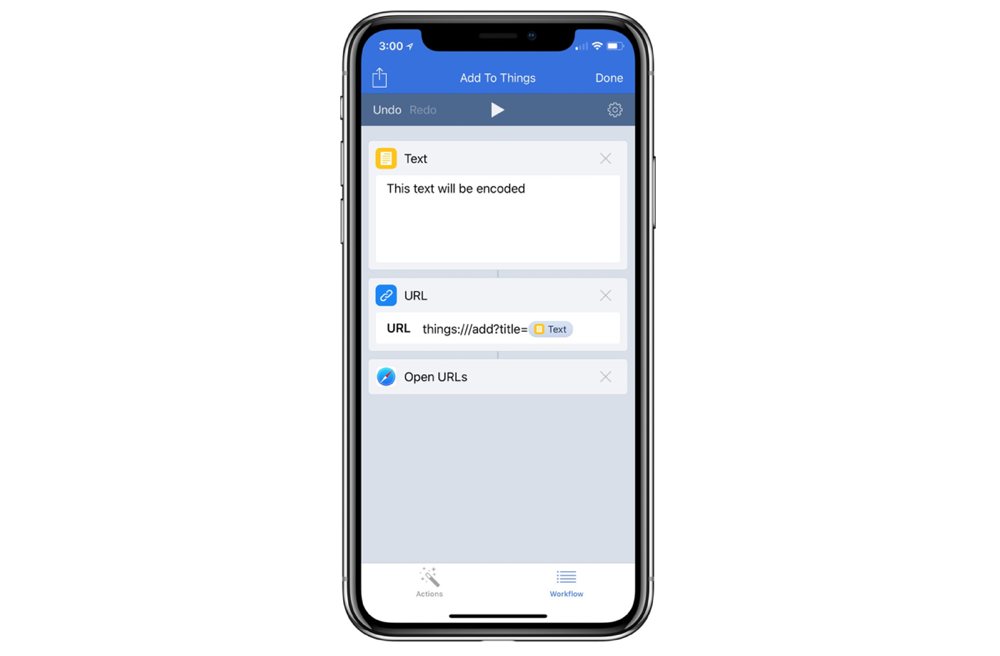
The only thing better than ease of access or quick setup is extreme utility – and with Workflow, you can create an unlimited number of automations on iOS to interlink your apps together, launch commands using deep links, and hook into your most-used services programmatically, right from your phone.
With the URL and Open URLs action in Workflow, it’s possible to construct and open a deep link for Things (or any app with deep link support). And with actions like Ask For Input, List, Choose From List, Repeat With Each, Combine Text, and more, you can put together workflows that structure a Things deep link exactly to your preferences.
Basics
It’s always helpful to start a workflow by thinking about what will start it off and what content you’ll end up with at the bottom. For the four main commands add, add-project, show, and search, you’ll want to add URL and Open URLs actions in Workflow, which sets up the deep link and launches you into it when the workflow is run.
URL, Open URLs
Entering text into the URL action in Workflow lets the workflow know it should be executed as a link, even if it doesn’t look like “http://www.google.com”. This is exactly relevant to app URL schemes, which start with the app name (things://) and could be interpreted by other programs as an incorrectly-formed website link.
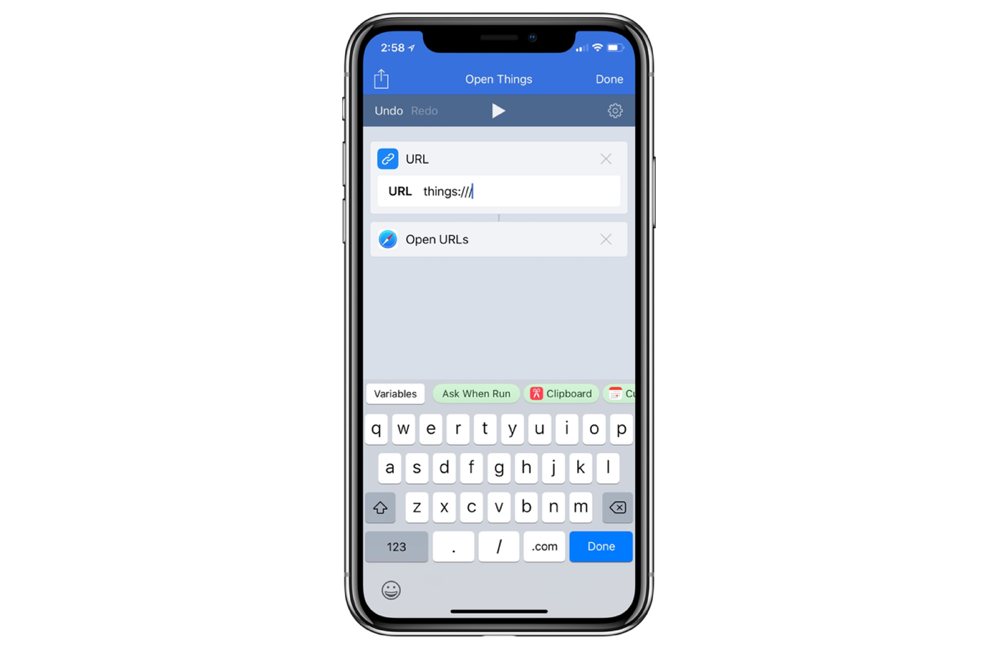
Using the Open URLs after your URL is what triggers the actual execution of the deep link in Workflow. It would normally open a website link into Safari, but any deep links passed in will be opened in their corresponding app.
If you were building a deep link to open an item, you’ll want to use the base of things:/// then pick your command (things:///show), then add parameters things:///show?query=. If you wanted to link to your Blog area, you could fill out the query parameter to equal Blog, then when you tap on things:///show?query=Blog it will open into your Blog area and highlight it, with haptic feedback on devices that support it.
Building a dynamic URL
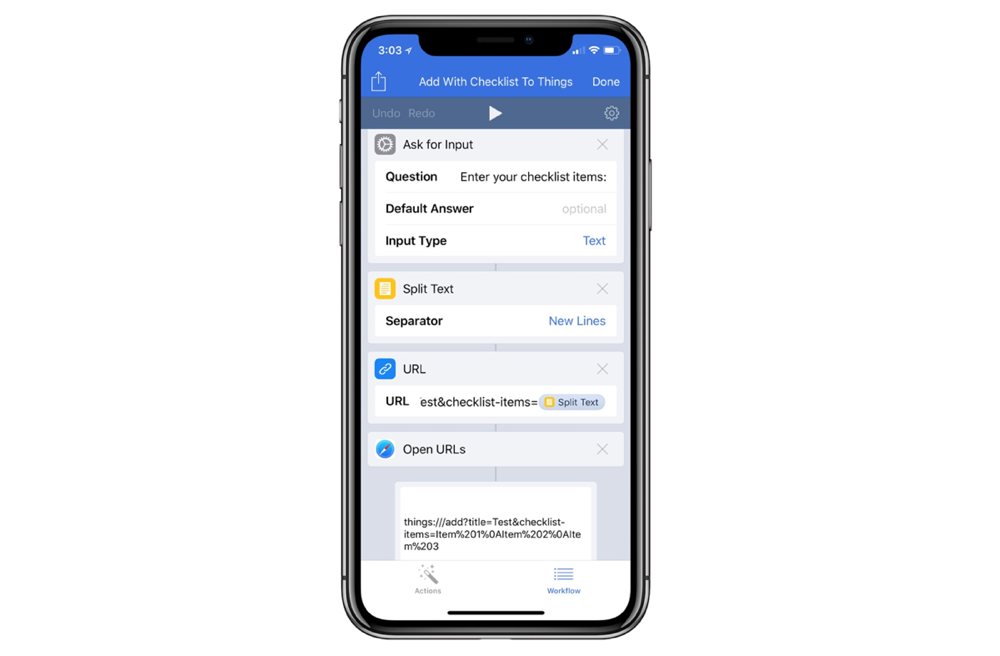
If there are areas of the URL you want to set up to change each time you run the workflow instead of having the information filled in ahead of time, you can use variables. You do this by can adding another Workflow action above everything else, then going back into the spot in the URL action and selecting a Magic Variable token to replace that portion of the link.[9] In the following example, when the workflow is run, the program will encounter that Ask For Input, give you a prompt to enter your title, and then use that entry to create things:///add?title=|YourInput|.
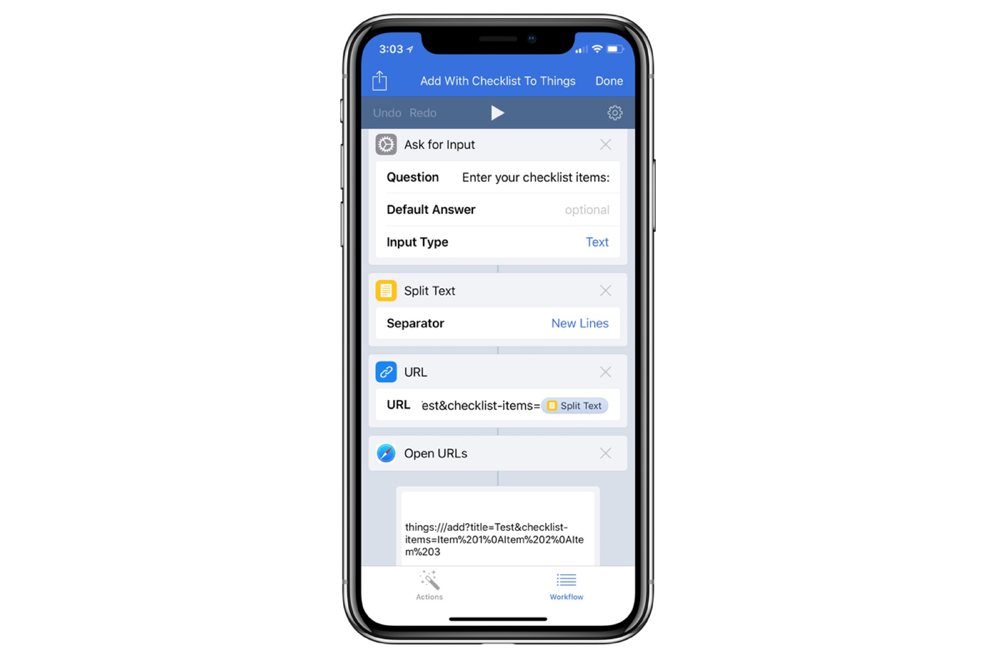
Using the URL action also means you don’t have to manually encode the text you use to construct a link. In my examples in the beginning, I typed in %20 instead of space every time, which can get annoying — but, more importantly — it requires hard-coding my data that way.[10] With Workflow, you can input a list of strings separated by line and it will automatically apply the %0A for each new line.
And, if you want to get the unique IDs back for new to-dos and projects that you create, you can use the Open X-Callback URL action instead and x-success=x-things-id will automatically be added the end of your URL[11]. This action takes care of the process of creating an additional callback link back into Workflow that Things calls once it’s done adding the task. When the task is successfully added, the x-things-id is passed back into Workflow as input into the next action[12].
Once the workflow has the new Things ID, you can create a new show Things link that you can use elsewhere. In this example, there’s another URL action added to the end, it builds a things:///show?id= link, and the workflow adds it to Ulysses.
Workflow is also fantastic at creating multiple prompts that let you enter text, choose dates, and pick from lists. You can easily add notes, pick your start dates and deadlines, and have lists of your areas, projects, and tags to choose from. And the variety of options in the 200 other actions can be used as well to aid in your link-building process.
Workflow’s ability to retrieve files means you could store a .txt file of your areas and projects in iCloud or Dropbox, then bring those in across all your workflows and have the master list always up to date. You could use Workflow’s action extension to save web pages as tasks, with the link in the notes and a ”reading” tag applied. And you could use actions like Combine Text to take multiple lines of text and add them as to-dos in a new project.
Workflow and more complex deep links
Once you’ve built a few workflows for Things links, you might want to move to even deeper levels of automation. Here are three examples, but there’s an additional 8 workflows below that you can download and test for yourself:
Checklist to Task
This workflow is designed to make a Markdown list into a project. It takes an input, either from another app or the action extension (or the clipboard if neither of those is present), then strips the formatting from the first line and makes it the title of a task. The rest is extracted, cleaned up, and uses the checklist in the body. If you enter in your list of areas or projects you can use Choose From List to pick which one, then Workflow will add the task into Things all ready to go.
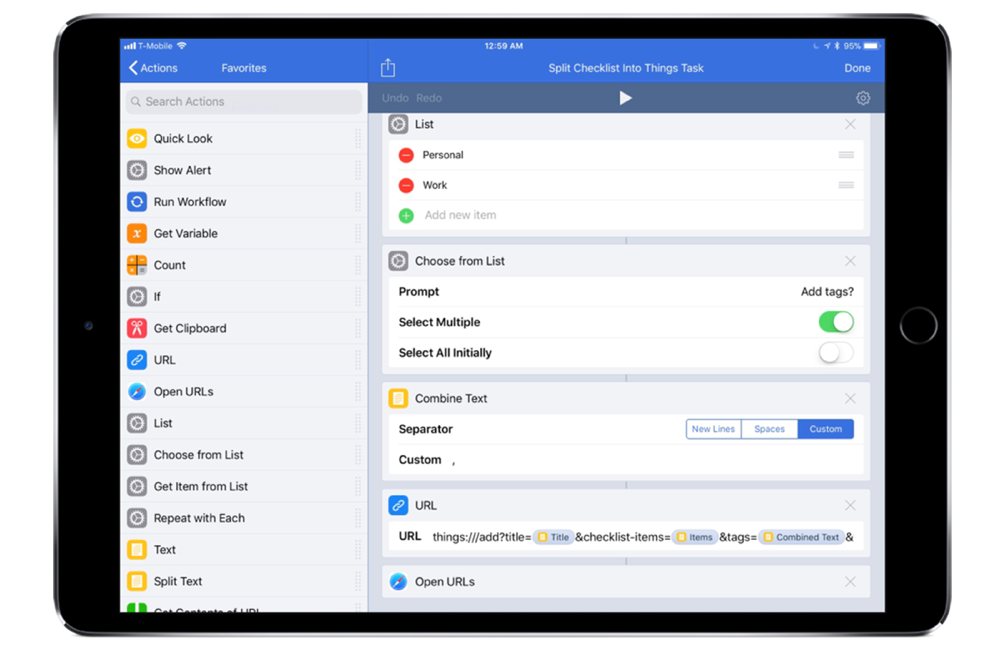
Get the workflow: https://workflow.is/workflows/cab005db968348b19e84dd07aa825c94
Checklist to Project
This next workflow does the same thing, but as a project and to-dos instead. It also asks if you want to choose “When” or a “Deadline” for the task, plus the option to add three different groups of tags. And, once it’s done adding the task, it returns to Workflow and copies the ID for the item into a new Things link and copies it to the clipboard, in case I want to throw it in Launcher or Launch Center Pro for reference.
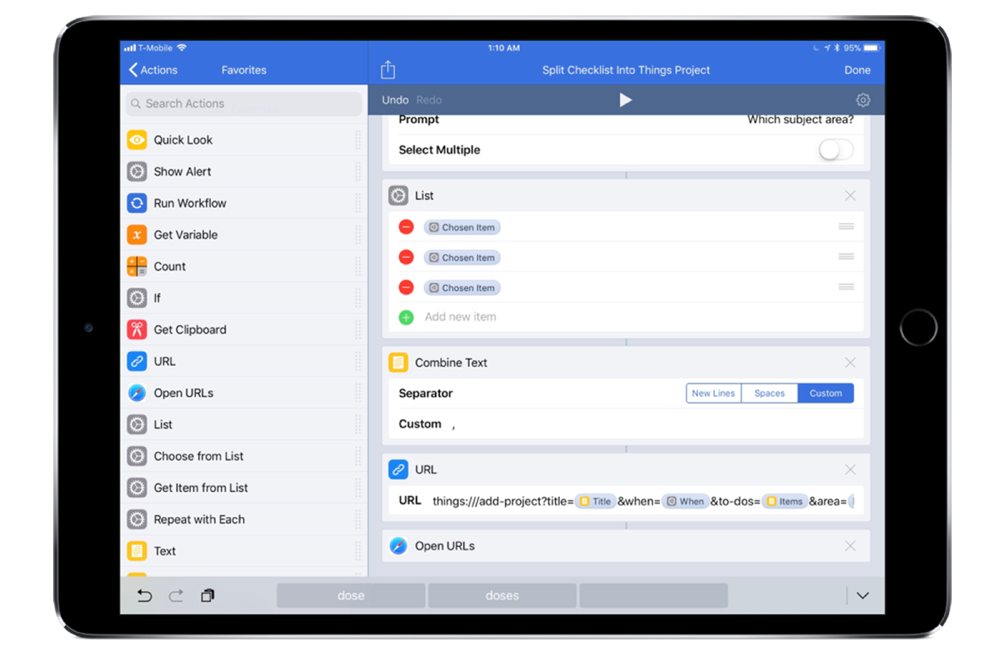
Get the workflow: https://workflow.is/workflows/b177bcf49cb6487c8b68eb9183cfe6dd
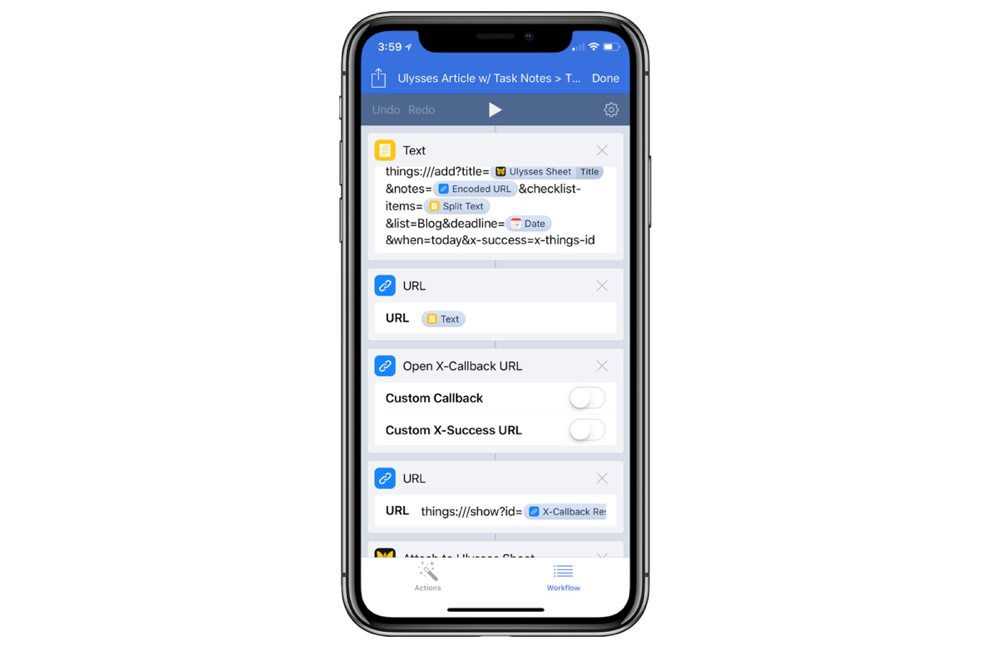
Checklist to Ulysses, Bear, and Things
The next workflow takes it a step further, combining the Things deep link with the URL scheme for Ulysses and Bear, our favorite writing app and our favorite note-taking app respectively.
First, this workflow takes a Markdown-formatted checklist with a title and to-dos and adds it to a new note in Bear. Then, it uses the title to add a new Group in Ulysses, creates new sheets for each line of the body, and then jumps into Things to add a project in Things with tasks for each sheet, including the Bear note link and Ulysses Group link in the Things Project notes.
Even more, it then goes back into Bear to paste the Things link and Ulysses group link. This iterates back and forth between the apps a few times, but with just a few taps you end up with notes, writing materials, and a project for something new that is interlinked.
Get the workflow: https://workflow.is/workflows/b72d80bd16694d44859352898ac19806.
More Workflows
The above are just a few examples. I’ve also created a handful of useful workflows for you to use, each with a short description. There are even more workflows in our course, All the Things.
- Save Link to Things: Use this to save a URL into a Things project with the web page as the title and link in the notes.
- Add to Things Project: Use to add a task to an existing project.
- Add w/o Project: Use to add a new task, but skip your Inbox. Inspired by Marco Arment on The Talk Show by John Gruber.
- Convert Project Back to Checklist: Use to take a simple project shared out of Things and convert it back into a task and checklist.
- Capture Idea: Asks you to enter an idea, then creates a note in Bear and a task in Things due this evening to flesh it out fully.
- Daily Routine: Adds a morning or evening routine, choosing which by time of day.
- Things → Ulysses → Things: Take a Things task, add it to a new/existing Ulysses sheet, then add the sheet link back to the task.
- New Bear + Task in Things: Enter a title, then create a new note in Bear and a link in Things.
Conclusion
This release from Cultured Code is the most powerful implementation of URL schemes this year. With a variety of apps supporting URL schemes and Workflow now available for free[13], it’s better than ever to build custom automations to create deep links for Things.
Building up this structure around your main productivity tool allows you to rely on a system instead of your own brain to get things done. Instead of getting distracted or filling up your inbox with tasks, you can stay on top of your to-do list and maintain flow.
Take some time to put together your own Things deep links. That way you, too, can have a system that gets out of the way, complements your efforts, and pushes you forward.
Get Even More Workflows and Tutorials for Things
We have a brand-new, in-depth training course available. In our course, All the Things, we have a series of screencast tutorials that walk through every aspect of using Things on the Mac, iPad, and iPhone. We’ve also just updated it to included additional iOS workflow examples and downloads.
Bonus! One more thing…
The Complete Guide to Managing Tasks in Things (Video)
If you struggle to keep up with all your tasks, we can show you some organization tips that may help you.
We put together a video that shows you everything you need to know about a task in Things:
- The difference between start dates and due dates and how to use them effectively.
- How to set up reminders so you never forget an important task again.
- How to use checklists for tasks that require more than one step.
- How to configure daily, weekly, monthly, or even annual repeating tasks.
- And more…
You don’t have to use any of these things in your tasks if you don’t want to. But knowing what they are and how they all work will help you be more organized, save time, and ensure you are using Things in the way that suits you best.
This video is something we have made available for free to our email subscriber community. You can get it right now. By joining the Sweet Setup community you’ll also get access to other guides, early previews to big new reviews and workflow articles we are working on, weekly roundups of our best content, and more.
-
After we got acquired by Apple, I stayed on for the transition but left after my contract expired to pursue independent work. ↩
-
Only available through JSON. ↩
-
This helps avoid a situation where someone maliciously sends a new user a deep link that fills up Things with junk. ↩
-
Things also has support for
versionasthings:///version. ↩ -
Since to-dos can be located in both Projects and Areas, it uses the generic List instead. Later with
add-projectyou can only useareato specify where to place it as projects can’t be in another project – I spoke to the developers about this and they kept it this way to avoid mistakes. ↩ -
Alternately, you can retrieve the ID of newly-created items using
x-success=x-things-idat the end of youradd,add-project, oradd-jsonlinks. ↩ -
However,
showdoes work the unique ID for a task. ↩ -
I’ve opted for the Things icon for all three out of sheer laziness, but I could easily add in any custom imagery or iconography here if I wanted. ↩
-
To add a variable, tap the magic wand icon (or tap variables then Select Magic Variable) and choose the output of the desired action you want to use. To learn more, visit https://workflow.is/docs/using-variables ↩
-
You can also use encoders/decoders for this, including Workflow’s own Encode URL action. ↩
-
Things only applies a
x-things-idon callback URLs for newly-added items where there’s a Things ID to return —searchandshow, for example, don’t have this extra parameter. ↩ -
The
action is essentially adding &x-success=worfklow://callback?result=[[output]]to the end of your link. ↩ -
Workflow has been free since it was acquired by Apple last year. ↩