Using FiLMiC Pro to Control Your iPhone or iPad Camera
I said in my last post on LumaFusion that I could upgrade the camera software on my iPhone by using FiLMiC Pro, but that I hadn’t taken the step. Of course, the very day the post was published, I was frustrated with the built-in camera app in iOS. After some searching, I found out that FiLMiC Pro had the exact feature I needed. Needless to say, I purchased FiLMiC Pro Camera kit right away and have been very happy with it ever since.
Get Our Best Photography Tips & Workflows
Transform your photos and edits from average to awesome with our in-depth, mobile photography course. It’s jam-packed with training, ideas, and lessons that can literally transform your photography overnight.
FiLMiC Pro and Remote Camera Access
Let’s start by looking at the single feature that caught my attention that fateful day: remote camera control. I was trying to setup my phone for a YouTube video and was recording demo footage to make sure I was framed properly. Next, I’d walk back around the camera and adjust based on what I saw.
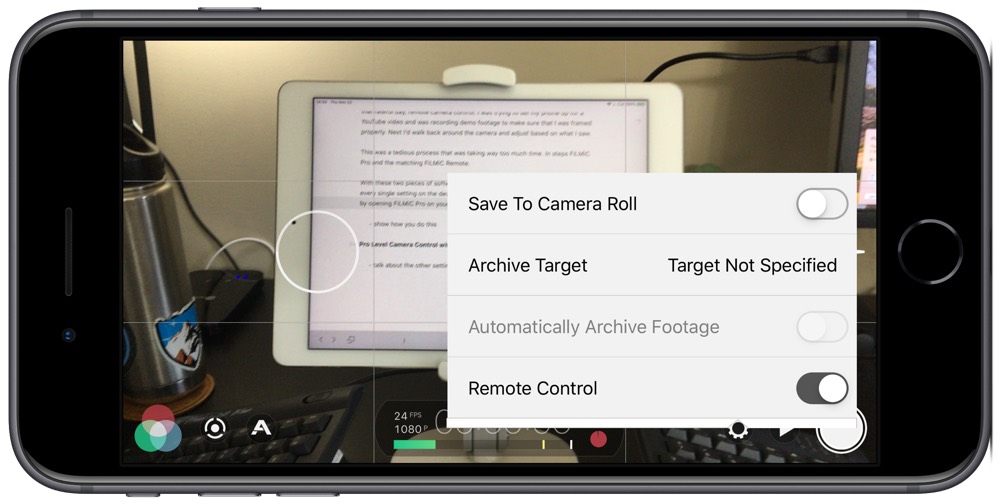
This was a tedious process that was taking way too much time. With FiLMiC Pro and the matching FiLMiC Remote (they’re available as stand alone apps or together in the FiLMiC Pro Camera Kit bundle), you can use a second iOS device to control every setting on the recording device.
To set this up, start by opening FiLMiC Pro on your recording device. Press the gear icon, then choose Devices from the menu and turn on the remote control toggle.
Next, go to your second iOS device and turn on the FiLMiC Remote app. Your iOS device should show up — select it when it does. Now you should see the exact view the iOS device sees.
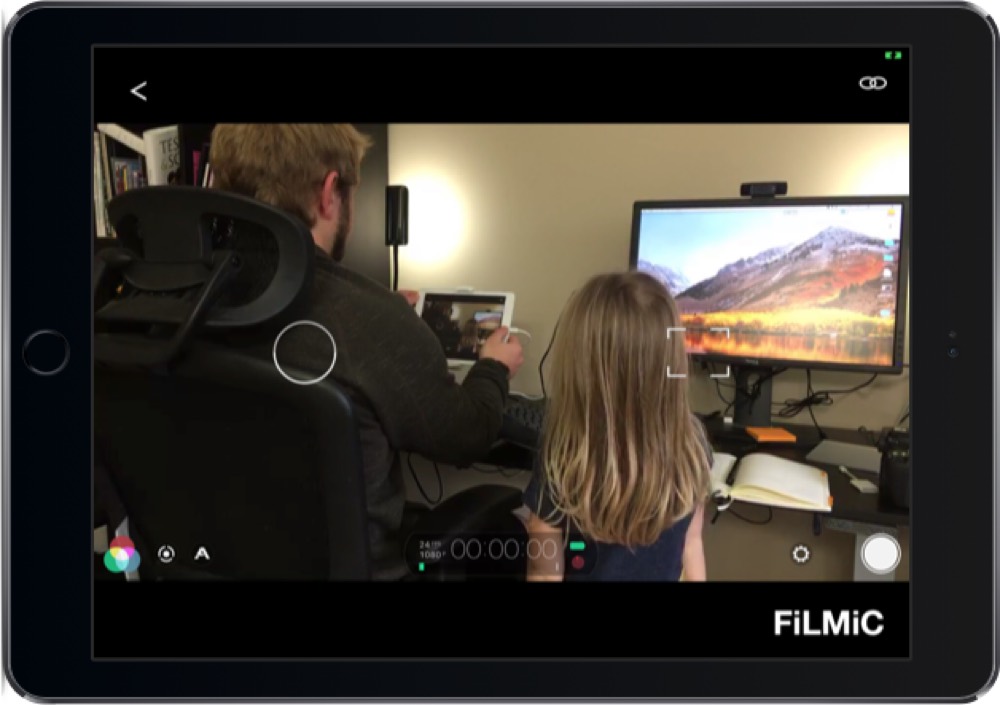
With this view on your second iOS device, you can control all of FiLMiC Pro’s settings.
Pro Level Camera Control with FiLMiC Pro
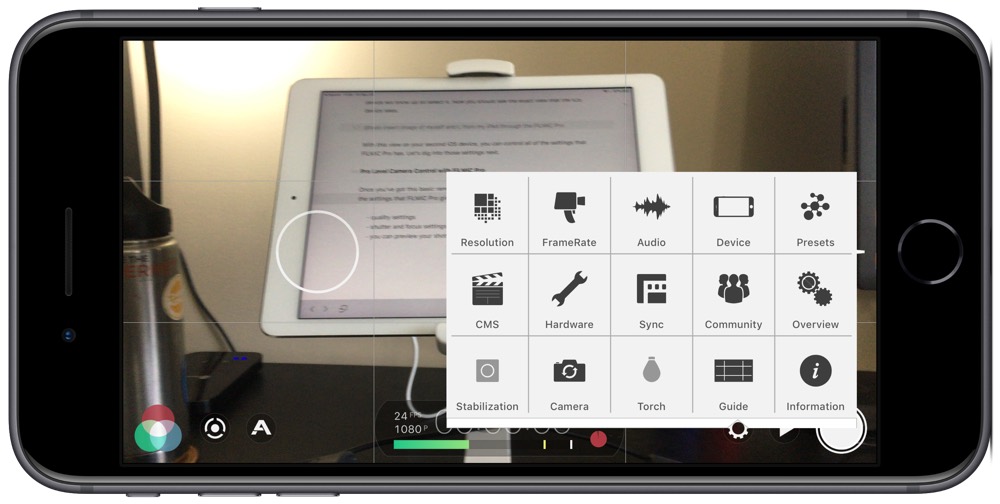
Once you’ve got this basic remote function setup, it’s time to really dive deep into FiLMiC Pro’s settings.
Let’s start under the small gear in the bottom right corner of your screen. Here you can do things like change the resolution of your video from standard definition to 4K. While FiLMiC Pro lets you set an iPhone 6S Plus to 4K, I’ve found that the video pauses and stutters, so I leave mine at 1080p. Apple says the iPhone 6S Plus can shoot 1080p, but only FiLMiC lets me push past that to something similar to 4K. Therefore, I’m not surprised the 6S Plus is struggling to handle that level of quality.
FiLMiC also lets you save in different bit rates — there’s an economy mode to save space, and a FiLMiC Extreme, which aims for 100mbs for 4K, 3K, and 2K footage, and 50mbs for 1080p footage. With these high bitrates, you’ll have so much data to use as you work to calibrate and edit your footage later.
There are still many other settings available, from different options to tell FiLMiC you’re shooting with a gimbal, to framerate settings and audio recording quality settings. The gimbal settings are particularly important: If you’re shooting action with a gimbal, the in-camera smoothing will fight the gimbal and you’ll end up with odd results and footage that you’ll have to throw away.
I’ve only touched on some of FiLMiC’s most important settings, so make sure you dive in and play with the rest of them.
While you’re shooting, FiLMiC has a number of other settings you can use to make your video look great. It has full color calibration, white balance, and even produces its own log files so that a professional video editor will have what they need to do their work.
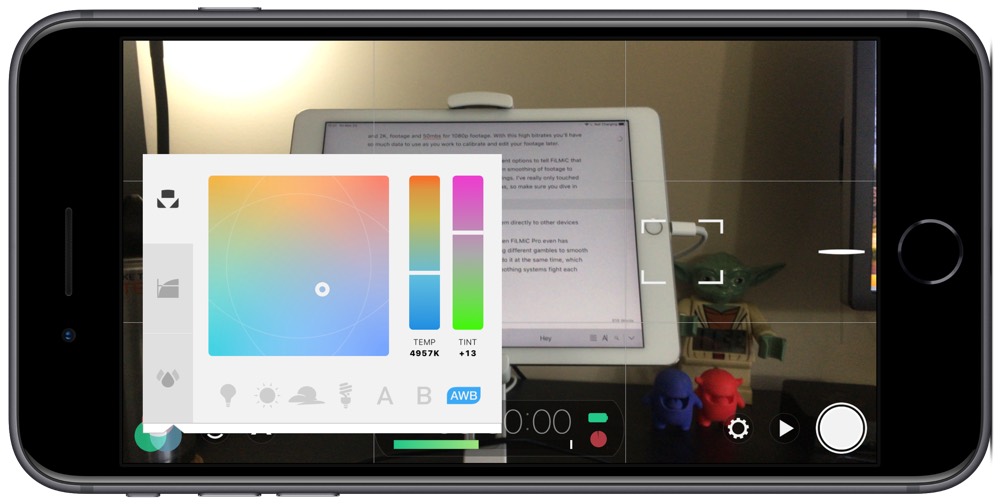
You can also turn off your iOS device’s focusing and manually focus for the shot you want. Maybe you want to focus on an item in front of your subject and your iOS device is trying to pull the person into focus; by tapping the dot with three lines around it, you can take full control of your focus.
This button also gives you full manual control over the brightness of your shot as well as three different ISO priorities. Finally, you can control the zoom directly from this view. In summary, these features allow you to have full manual control over your shot from an entirely separate device.
There are a few other settings that help you nail your shot. By pressing the “A” icon in the lower left, you can have FiLMiC Pro show you which parts of your shot are too dark or too bright (clipping). I use this feature to tune the lights on my desk so they’re a nice background light that separates from the background, all without being so bright that they overpower the image.
We’ve had fairly capable video options on iOS devices for a while now. Even my old iPhone 6S Plus can shoot up to 4K if I really want to push it. For many, that means the best video camera they have is sitting right in their pocket. All they need is a bit of knowledge and a good video application to bring out the maximum quality from their camera.
With all of FiLMiC Pro’s settings, you can take your iOS video skills to the next level. Between FiLMiC Pro and LumaFusion, you can produce high quality videos directly from your iOS devices without a huge investment in other cameras or software.
Get Our Best Photography Tips & Workflows
Transform your photos and edits from average to awesome with our in-depth, mobile photography course. It’s jam-packed with training, ideas, and lessons that can literally transform your photography overnight.