The Ultimate Guide to Apple Notes
If you were to rank all of Apple’s stock apps that receive the most number of updates on an annual basis and poll the experts, I expect you’d find Messages, Maps, and Notes coming in the top three more often than not.
Of the three, Notes is the sleeper hit — with every new iteration of iOS and macOS, Notes gains new functionality that satisfies another wide swath of users. To the degree that now, with iOS 17 in 2023, Notes has become one of the best — if not, the best — note-taking app available for all Apple devices.
How did we get here? How did the longest skeuomorphic app become one of Apple’s most widely loved stock apps? Through slow, constant growth in feature set and the inclusion of note-taking features only a built-in note-taking app can have.
Below, I’m going to dive into what makes Notes so good. I’ll provide a few simple quick tips of things I’ve built that make my Notes experience that much better. We’ll also discuss some of the latest features coming to Notes in iOS 17.
We’ll start at the bottom and work our way up the Notes features ladder.
What Can You Put Into a Note?
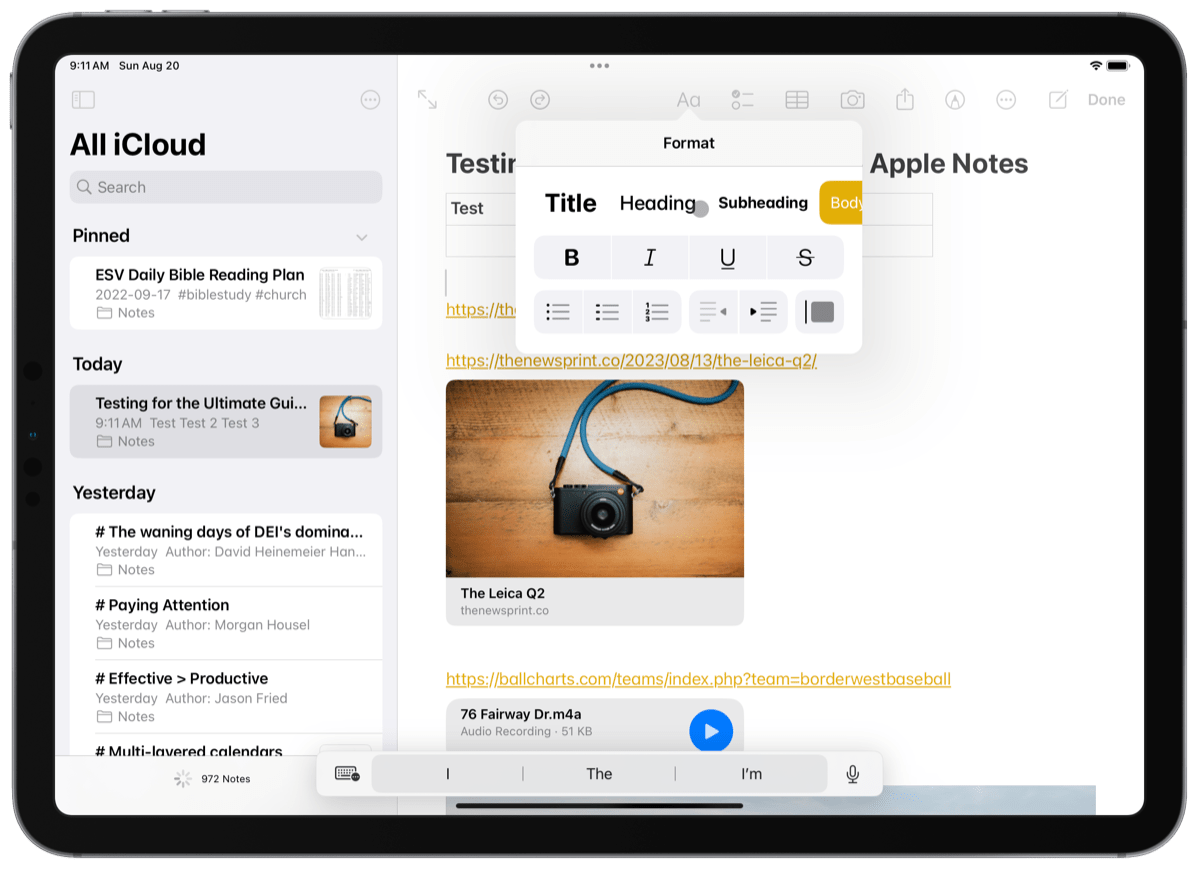
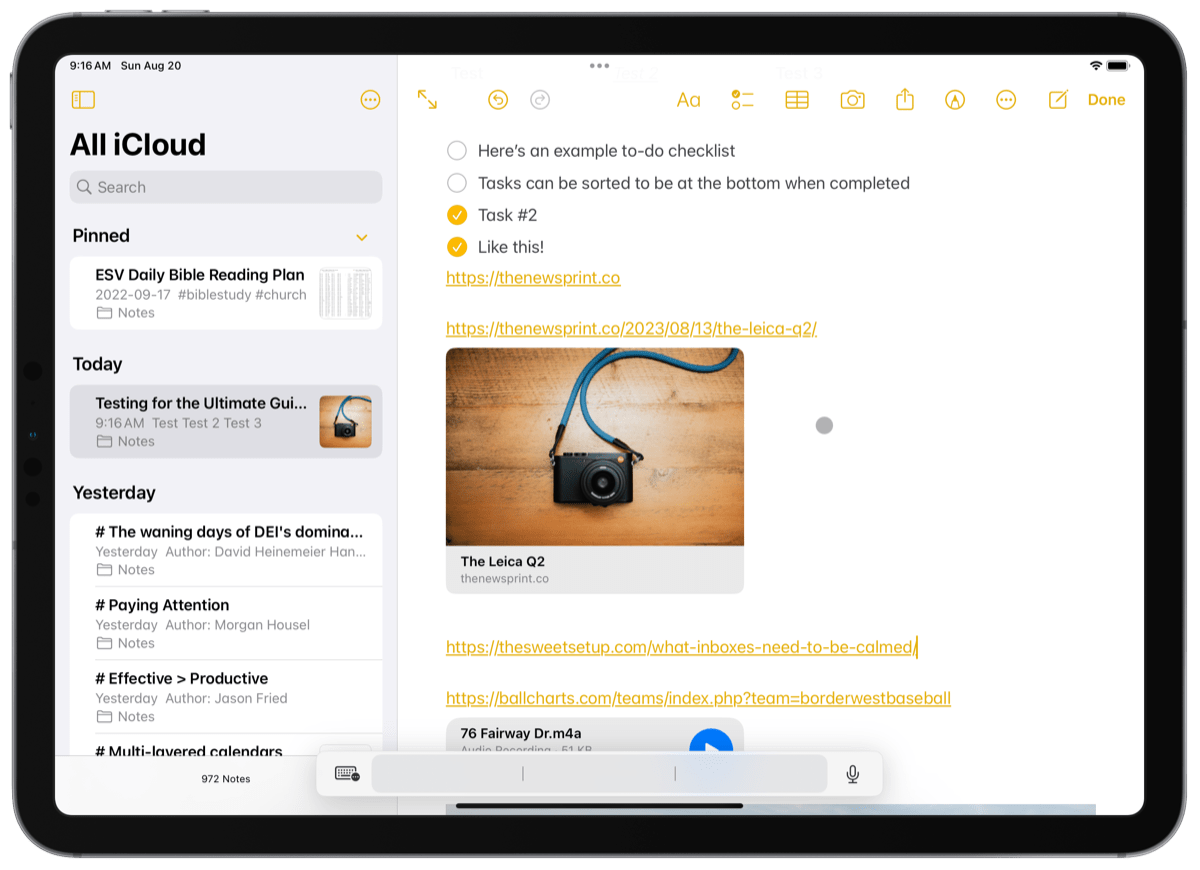
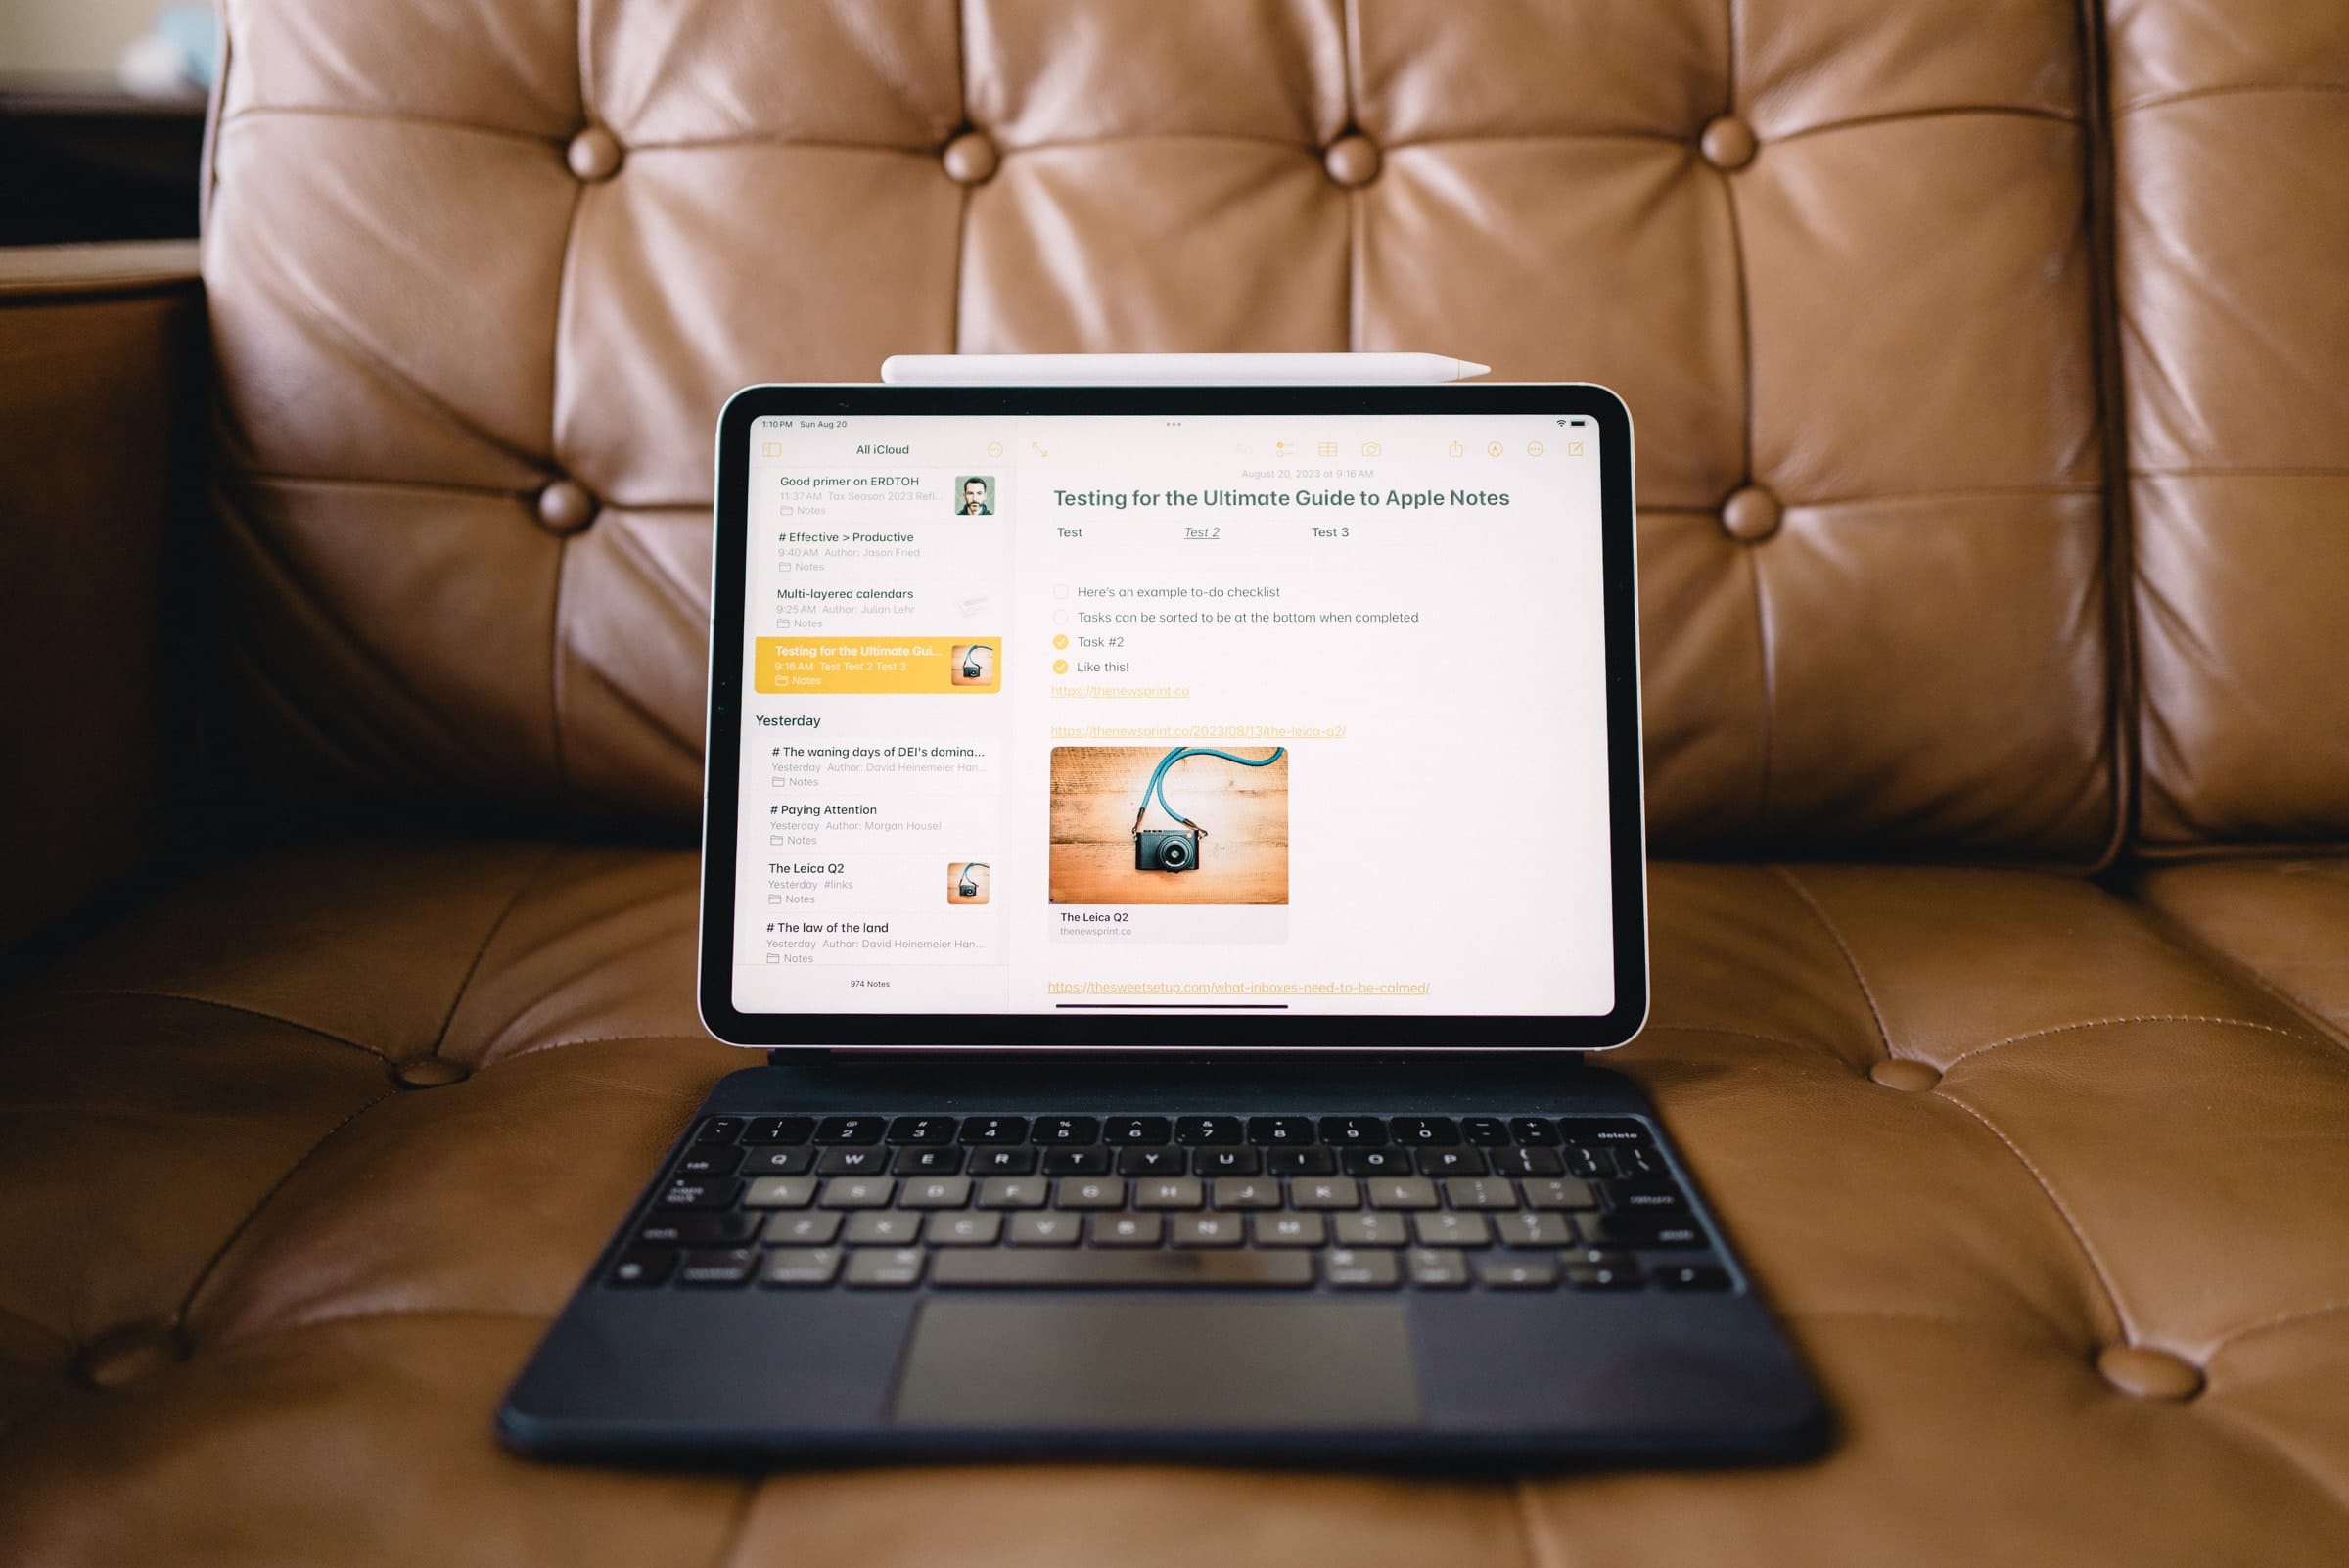
Notes in Notes can handle a wide range of formatting and media, not just text. If you’re adding just text though, you will find a vast number of formatting options in the Aa menu in the top navigation bar of each note. You can format your notes with titles, headers, subheaders, bulleted lists, dashed lists, to-do lists, and more.
Where this level of formatting is quite important is in one of Notes’ latest features in iOS 17 and macOS Sonoma: Convert to Pages. I’ll touch more on this below, but if you’ve formatted a note with proper headings and categories and need some more document-creation power, you can quickly shoot your note over to Pages directly from Notes and not lose your formatting.
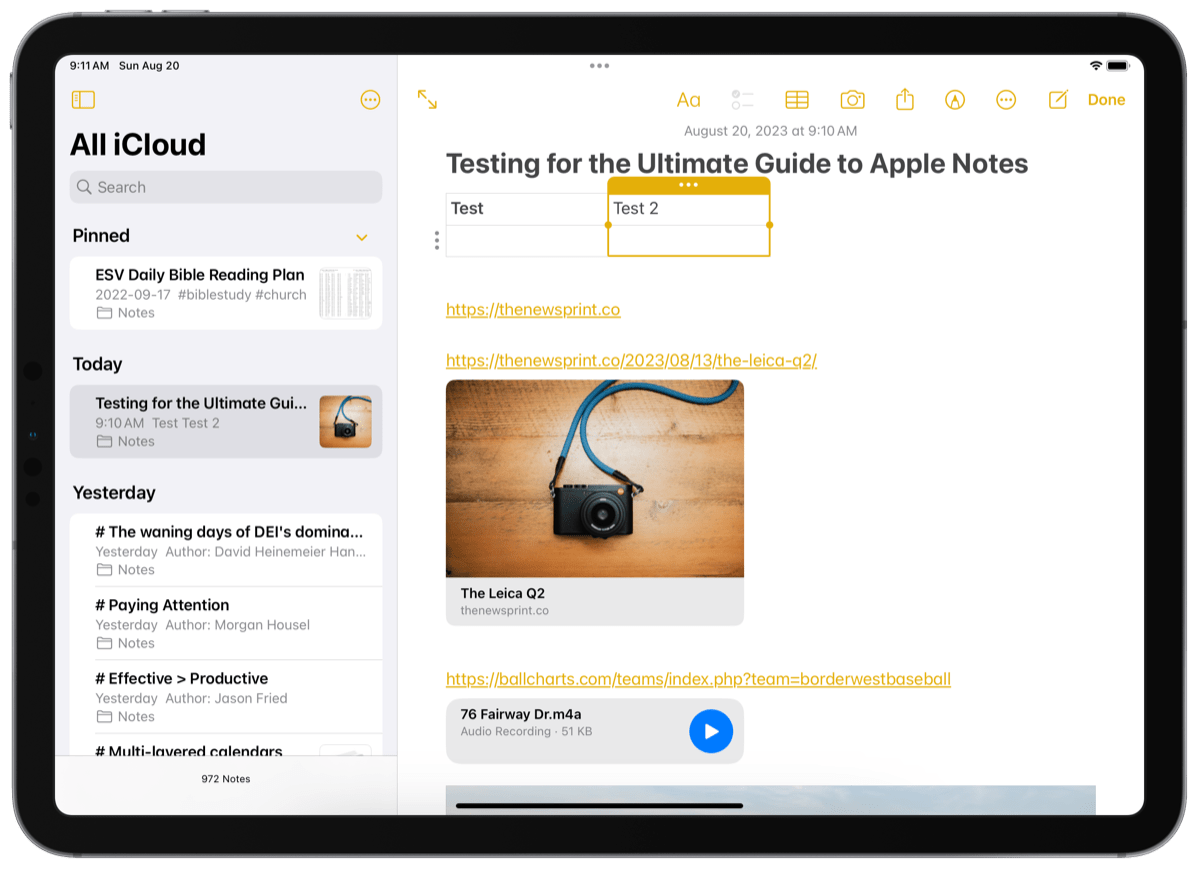
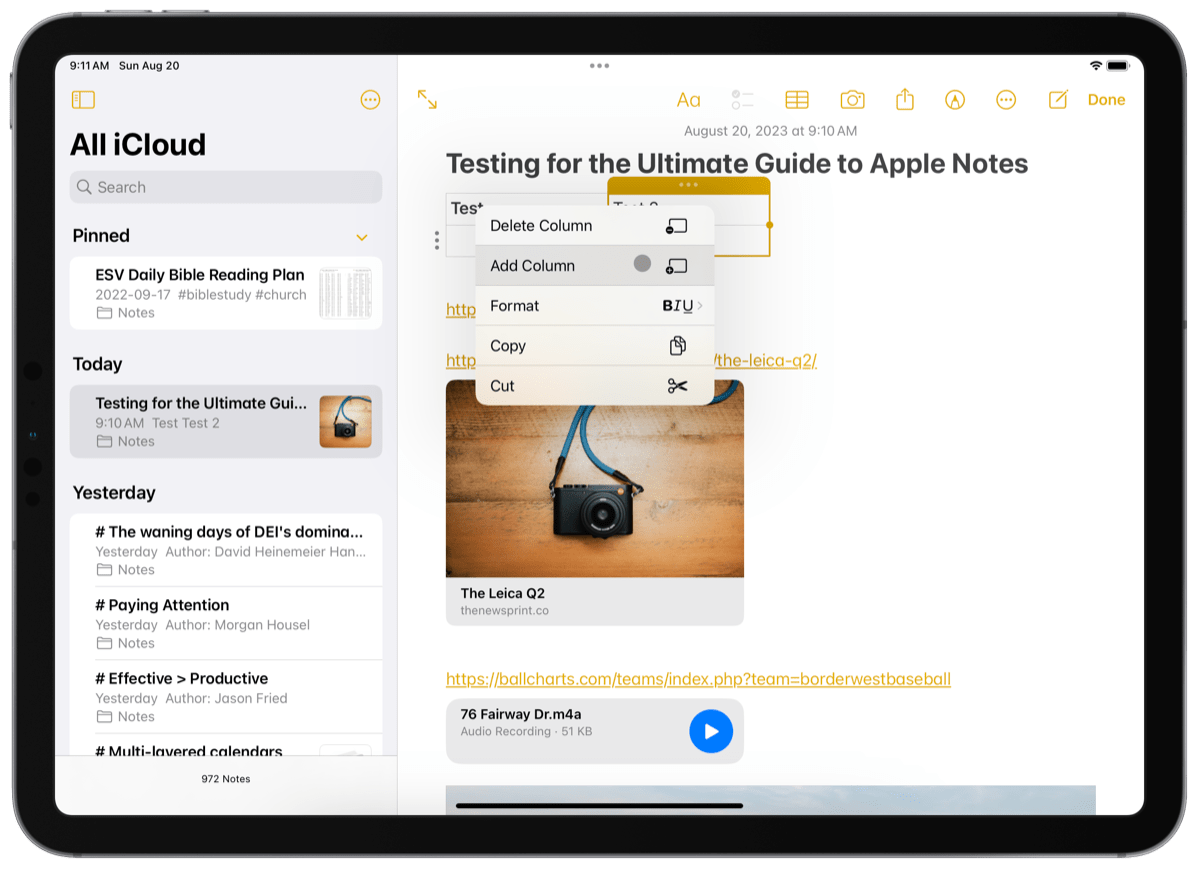
As I said, Notes handle far more than just text. In the top navigation bar of the note, you can insert a table. Each table starts out as a 4 x 4 table and can be expanded outwards and downwards as far as you need. You can even formatted text inside table cells, though not to the same extent as you can regular text in a note.
Links stored in a note show up in two different ways:
- As text, if you navigate to your note and paste the link from your clipboard.
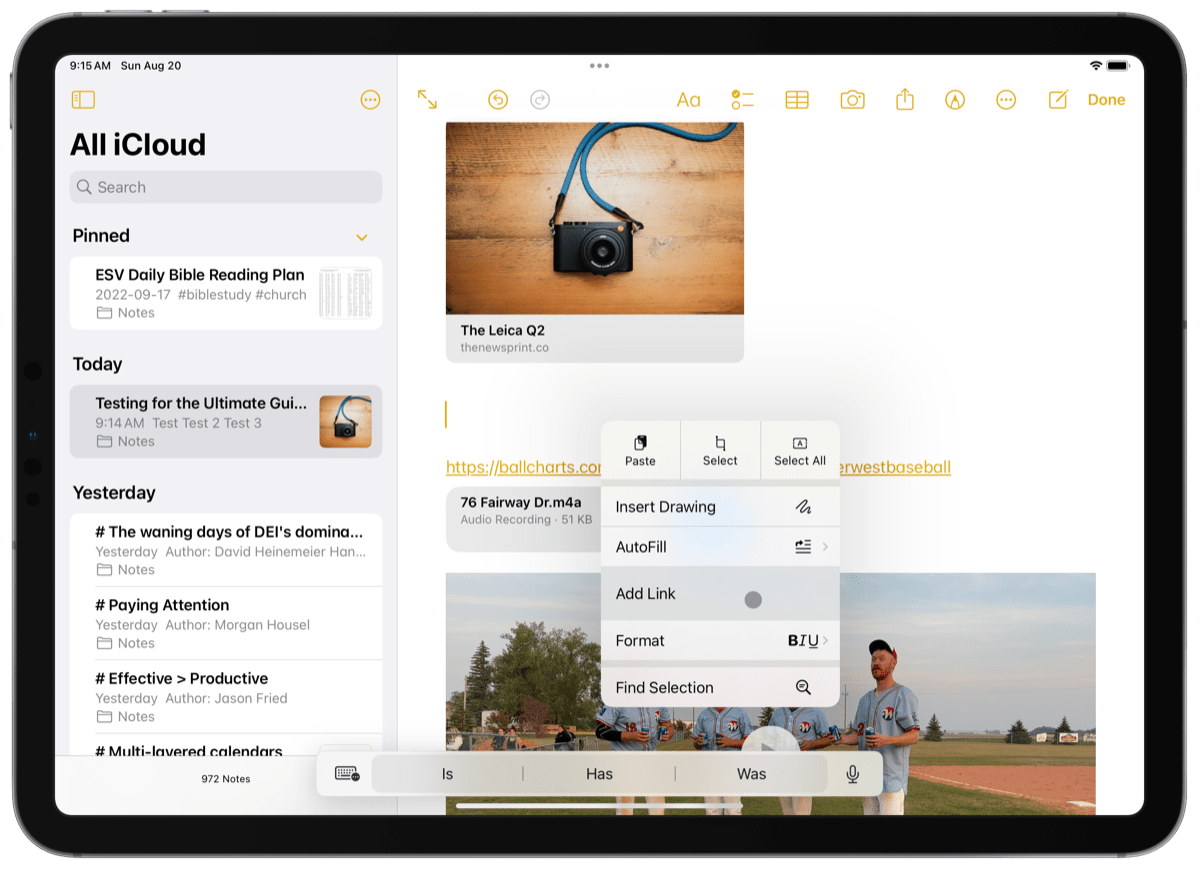
- As a rich preview, if you add the link from the link-addition button in the top navigation bar.
You may not always want rich links in a note — say, if you’re writing out something in fuller detail — so it’s nice to be able to paste a simple URL and not have to worry about that rich preview popping up right away.
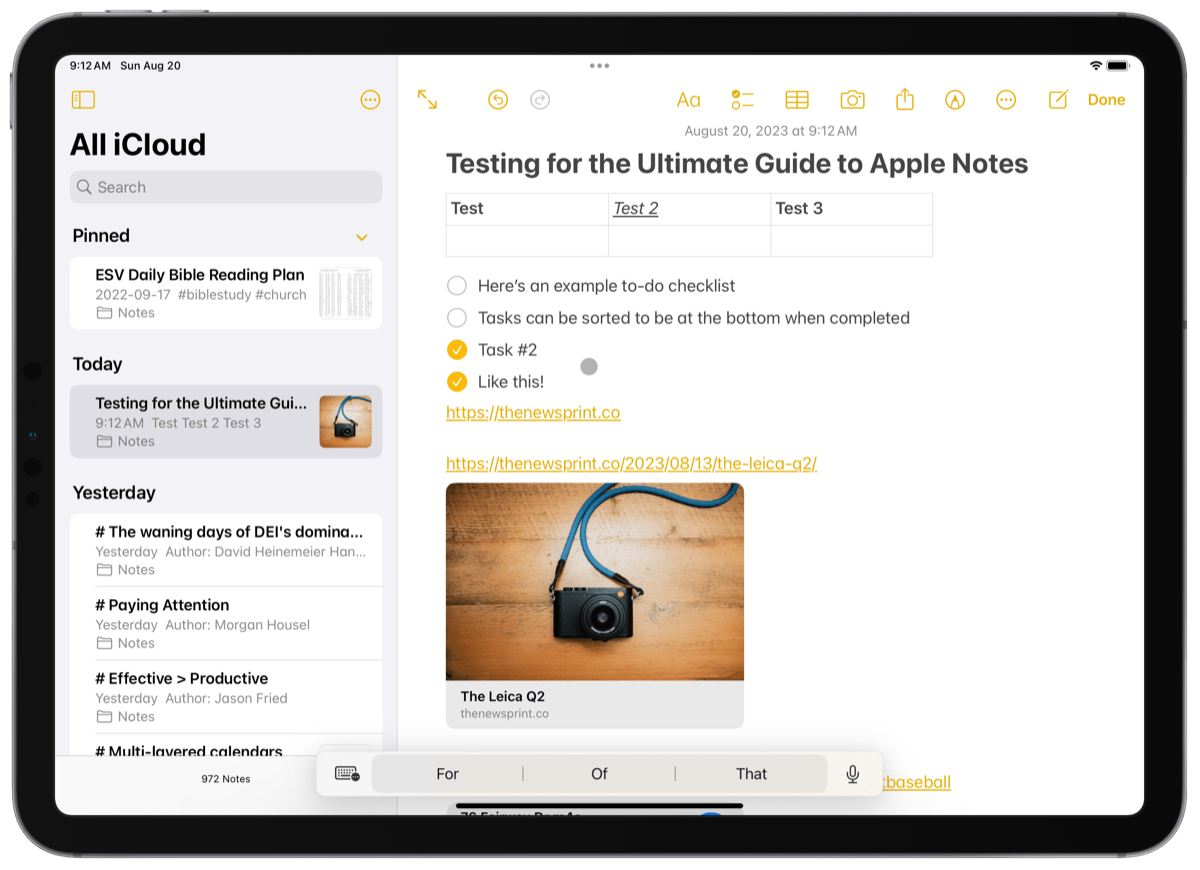
Also located in the top navigation bar is an image selection option. You can click this button (on iPhone, you can tap the camera button) to add more forms of media to your note. You can add in photos right from your Photos app or Camera Roll on your iPhone/iPad, and you can also add videos to your note. This is easiest to add on your iPhone or iPad, or by drag and drop on the Mac. If you’re not interested in either of the visual media, you can also drag and drop audio recordings into a note or use the share sheet from the Voice Memos app.
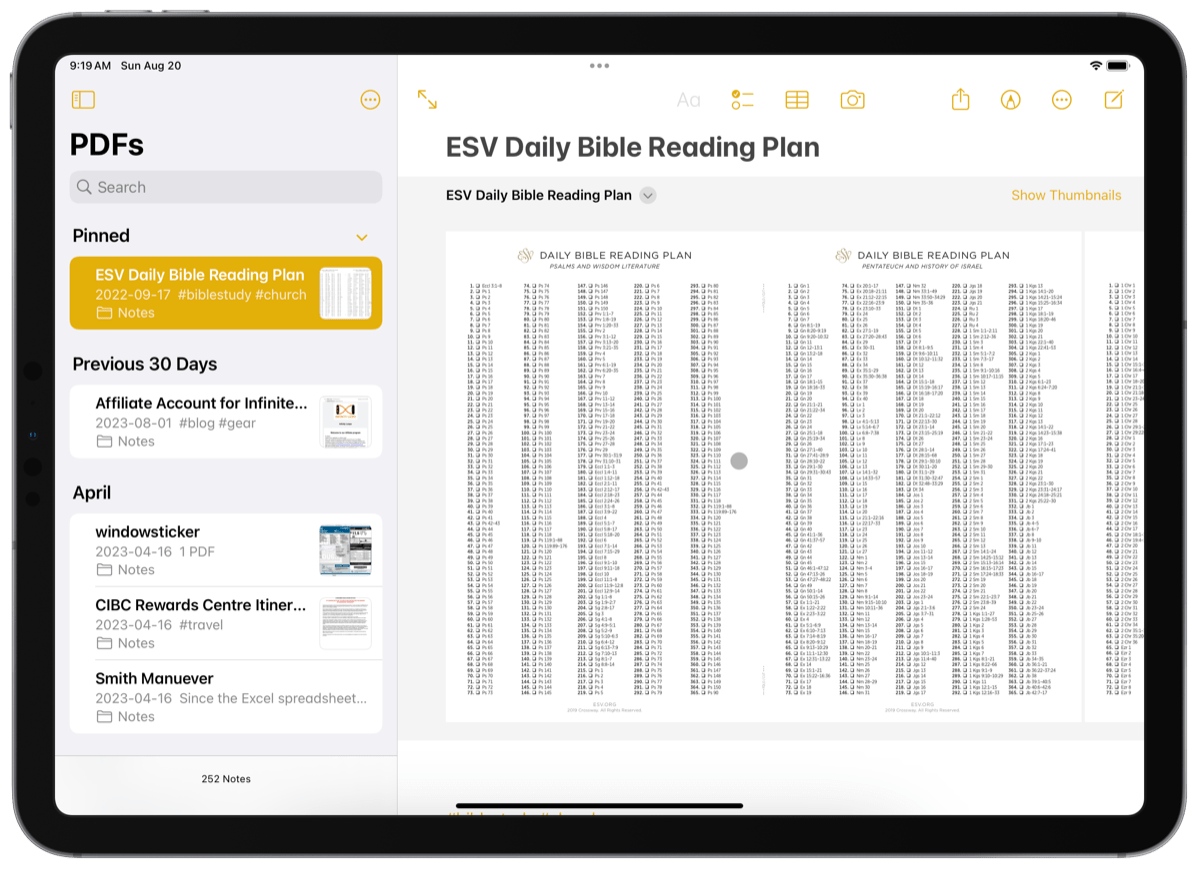
Notes can handle PDFs as well. This is especially powerful for students who may want to keep all their education material in one app on their devices and still maintain other first-party functionality, such as Apple Pencil sketches. New in iOS 17, you can even edit PDFs in a note — again, this is a killer feature for students.
Included in Notes’ PDF functionality is the ability to scan in a PDF directly using the iPhone or iPad camera. The scanner works surprisingly well and quickly, enabling you to move to an increasingly paperless world and store everything inside the Notes app.
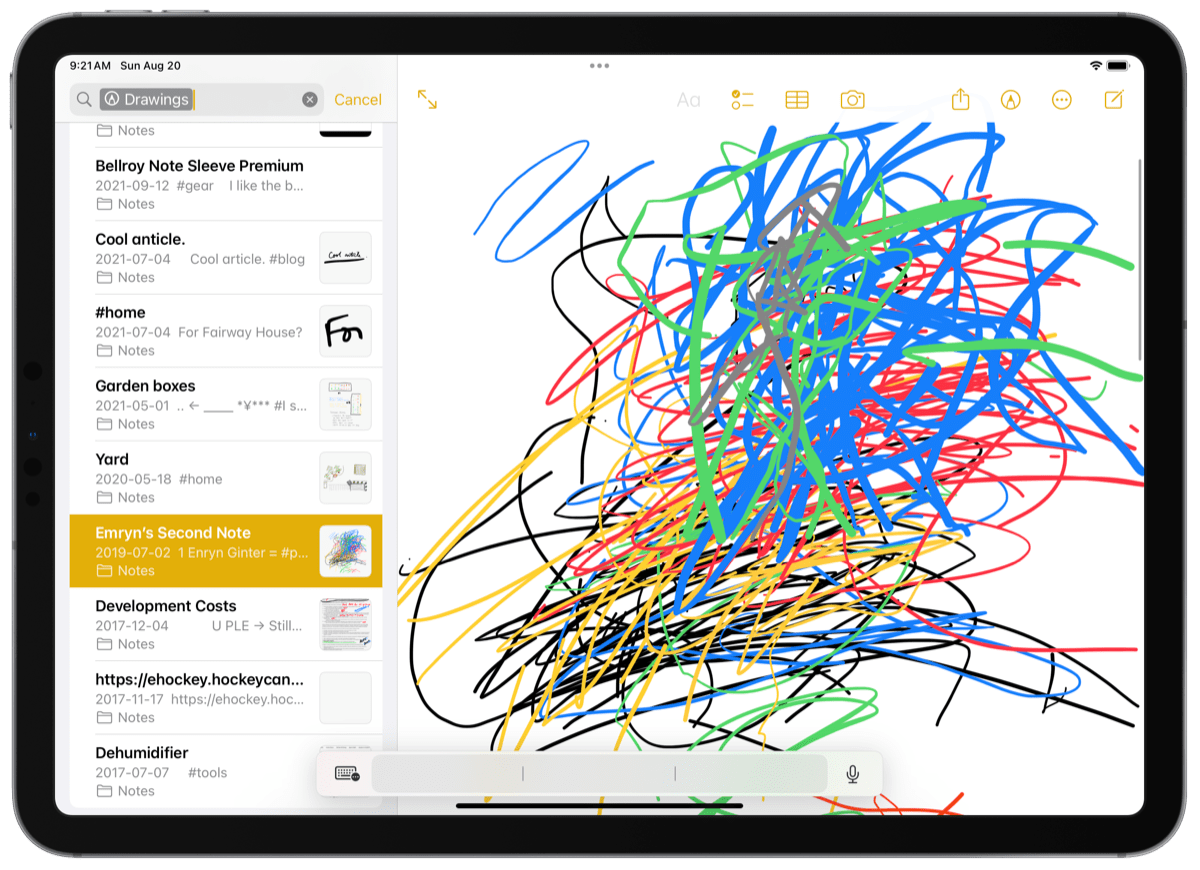
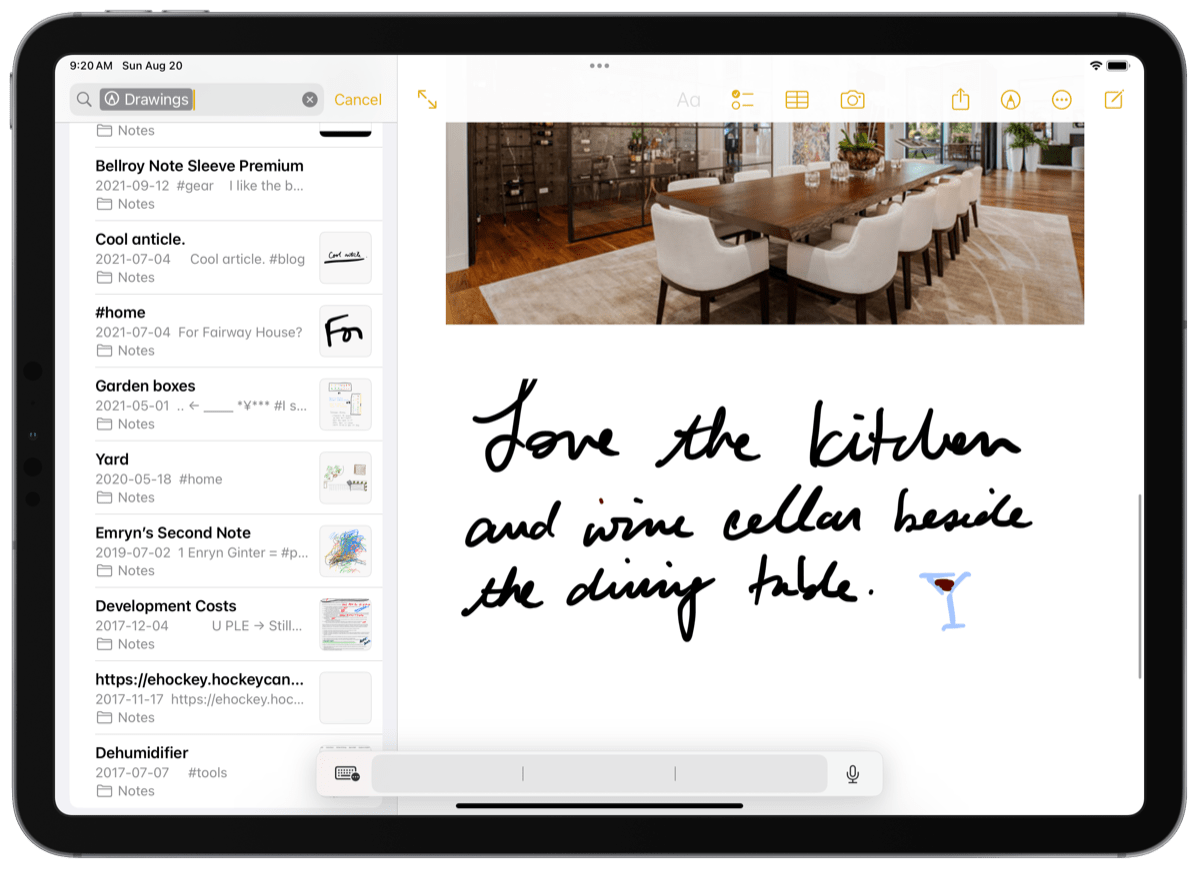
Finally, Notes can store sketches made with the Apple Pencil, third-party stylus, or your finger. Sketches can be stored in-line with any other file type or text and can be part of any document you send over to Pages in the latest versions of iOS and macOS.
Clearly, you can store a ton of material inside Notes. It can be your synced storage depot for storing scanned receipts, hand-written notes from your iPad’s home screen, screenshots and snippets you find from around the web, and even voice memos that you want to have in-line with your other work. It’s this vast array of media functionality that provides the foundation for core Apple Notes features, such as the ability to scan text from an image, Quick Notes, back-linking, and more.
First-Party Features
We know all too well there are pros and cons to Apple’s giant walled garden. Putting Messages aside, perhaps no app benefits more from this walled garden than Apple Notes. There are certain features simply no other app on the App Store can boast about and which take Apple Notes to a different level of app, especially on the iPad.
Quick Notes

My favorite first-party feature in Apple Notes is Quick Notes. Quick Notes are largely as their name suggests — you can quickly create a note from a variety of locations across iOS, iPadOS, and macOS, allowing you to capture your idea and move on with your task. Quick Notes also have special capabilities, such as the ability to pop up on a previously visited website you’ve saved to a Quick Note in the past.
To create a Quick Note:
- On Mac, use the keyboard shortcut
Globe + Q. - On Mac, using hot corners, drag your mouse to the bottom right corner of the screen.
- On iPad, with a keyboard, use the keyboard shortcut
Globe + Q. - On iPad, with the Apple Pencil, drag from the bottom right corner.
- On iPhone, use the share sheet to create a Quick Note.
- On iPhone, in Control Center, you can set the option to create a quick note by swiping down into Control Center and tapping the Quick Note button.
Quick Notes can handle all the same sorts of details and media types as a regular note. There’s even a special functionality baked-in to quickly add URLs, imagery, and more, to ensure you can quickly get back into what you were doing.
Convert to Pages
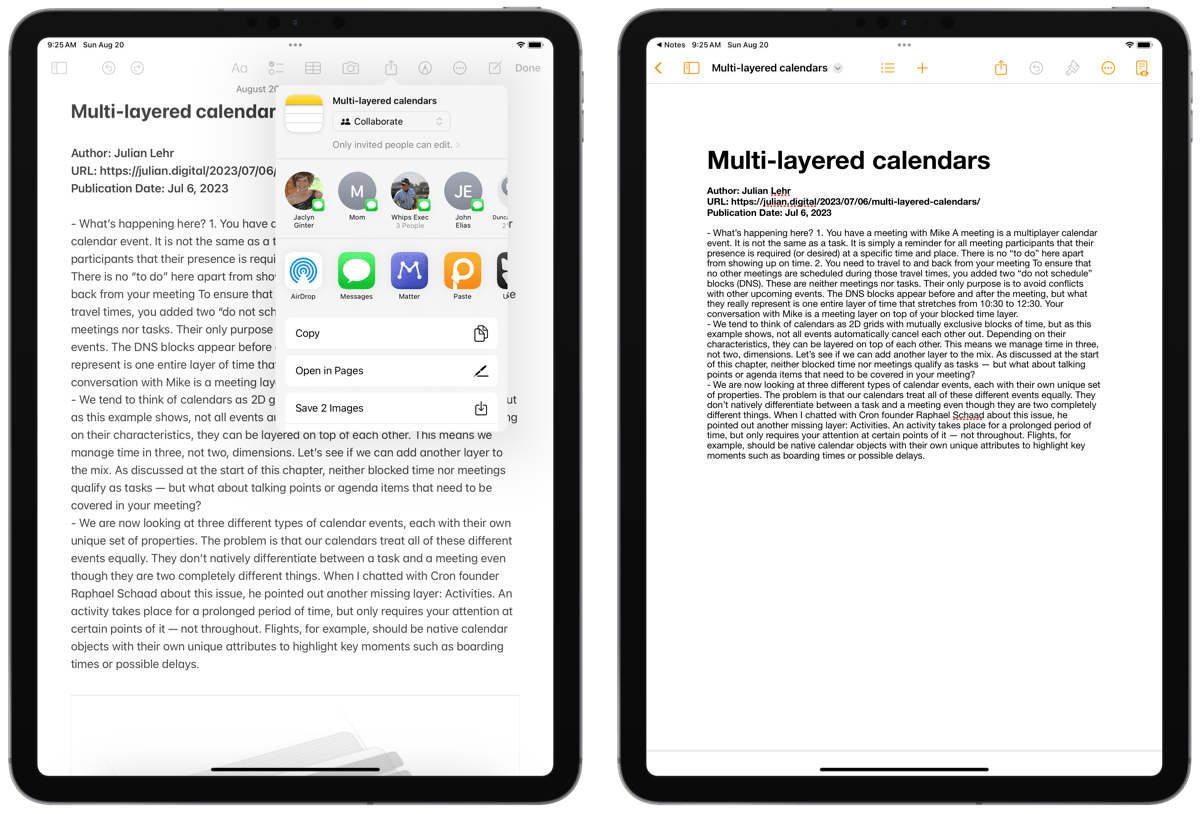
In iPadOS 17 and iOS 17, Apple has provided a way to quickly convert any note you’ve previously created into a full-fledged document inside Pages. To convert a note, navigate to your note, hit the share button, and tap +Open in Pages. Your note is immediately sent over to Pages.
Why would you want to convert to Pages, might you ask? Because Pages provides all the features you’d expect of a document processor, whereas the Notes interface is caters more to capture, storage, and quick forms of memorabilia. By converting to Pages, you gain the ability to paginate your document, provide additional formatting for print, and more.
All your formatting should carry over to Pages after conversion, but there are a few different hiccups along the way:
- Monospaced text appears differently in Pages, as there’s no grey-scale color behind the font.
- Blockquotes do not convert to Pages.
- Checklists look different in Pages than they do in the Notes app.
Text Recognition
Artificial intelligence has seemingly unlocked a new world of text recognition, but Apple has been working on text recognition far longer than the onset of AI. Notes is one of the biggest benefactors of this text recognition — Notes can recognize words and numbers in your handwritten text, can provide tappable launch links for phone numbers and addresses in photos or scanned documents, and more. These text recognition features provide Notes a seeming superpower.
For example, if you’re a student, there’s very little stopping you from lifting your iPad or iPhone up at the end of a lecture and capturing the entirety of the screen or board from the instructor in front of you. Later, when it’s time to study, you can search for terms written on that screen or board captured in a photo and you can quickly find what you’re looking for.
Same goes for captured handwritten Quick Notes. Say you’re taking a phone call while working on an iPad and you need to capture a phone number or address. You can pull up a Quick Note, jot down the number or address, and then tap on that number or address later to call or pull up the location in Maps.
Apple Pencil Home Screen Access
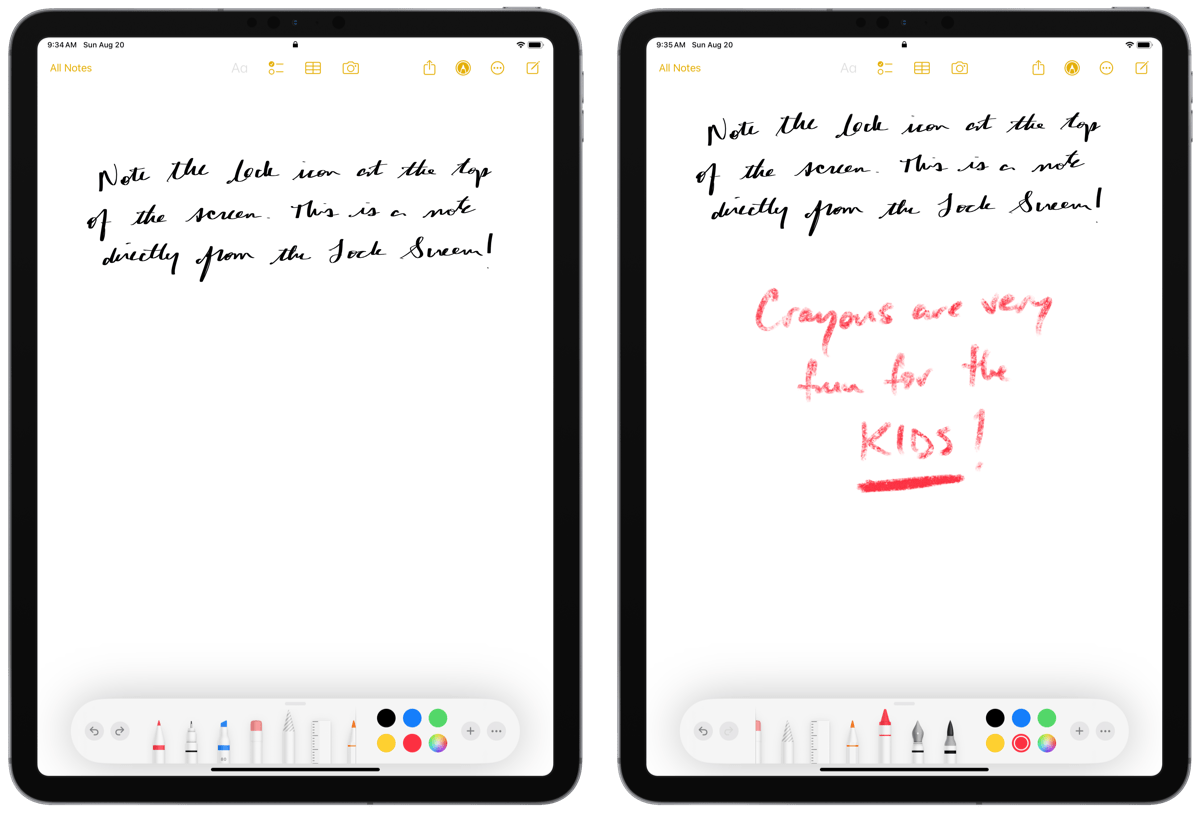
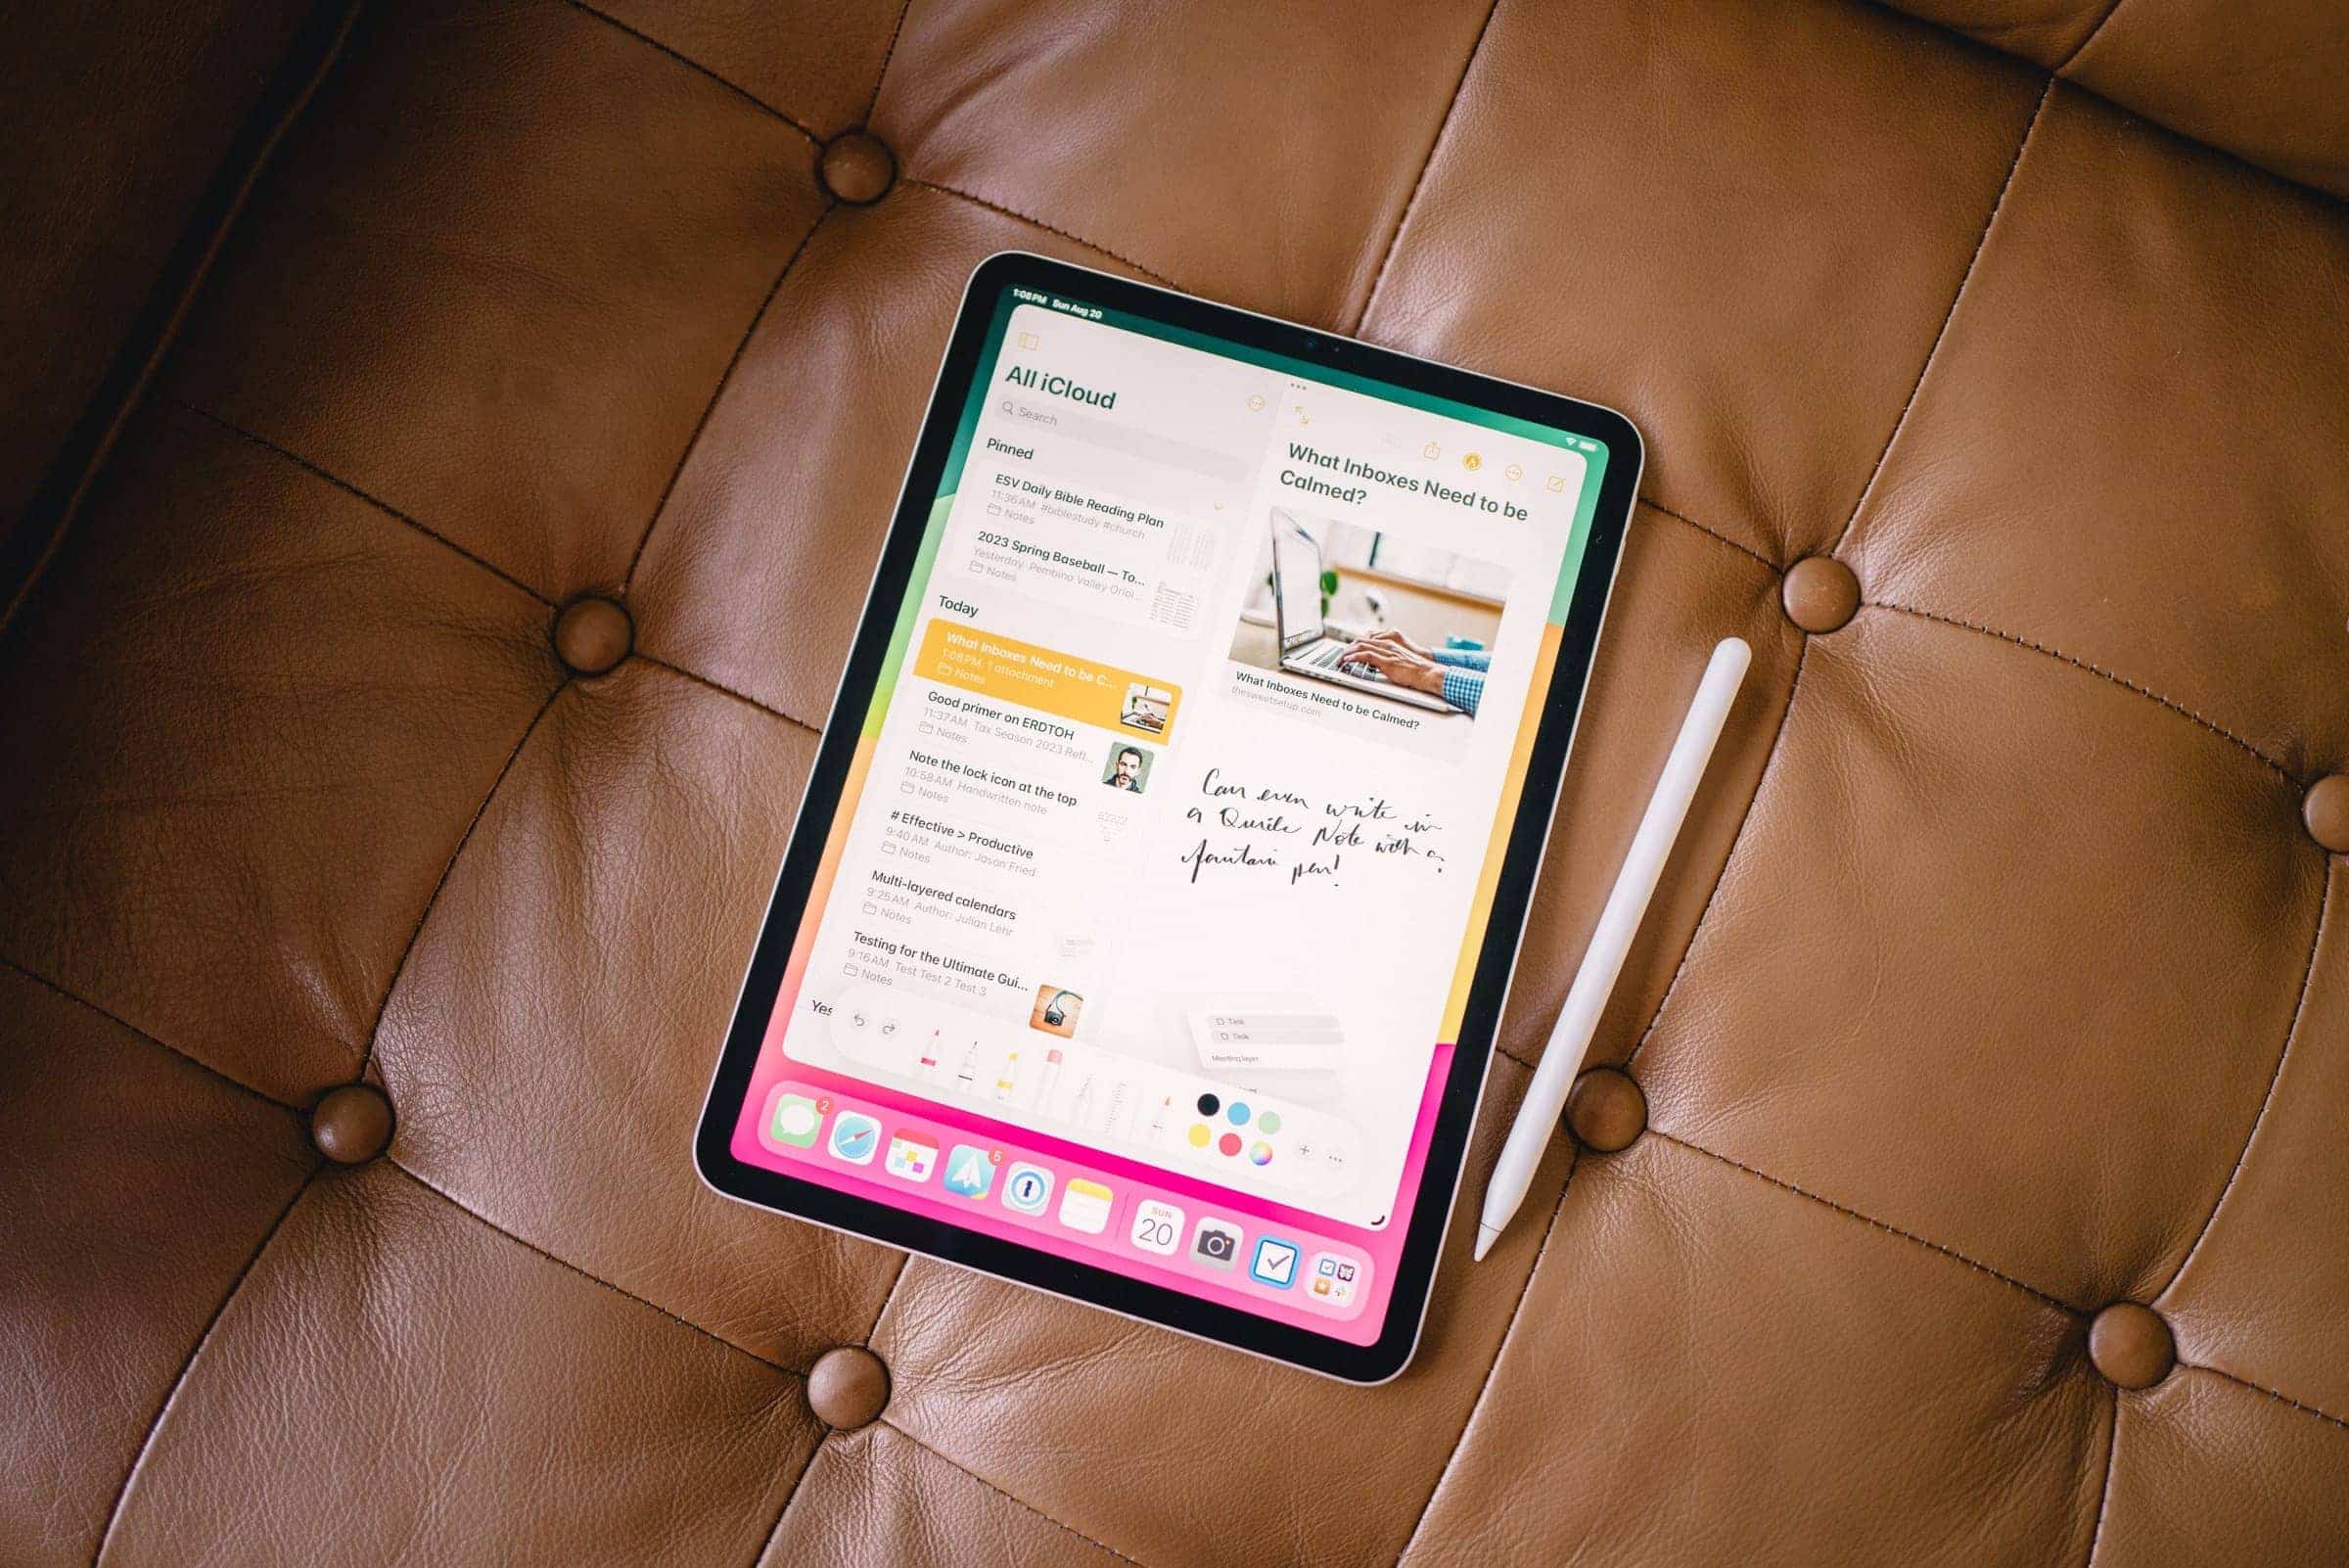
If Quick Notes weren’t quick enough for you, the iPad has the best first-party feature available for any stock app: Notes on the Home Screen. Using an Apple Pencil, you can tap a locked and sleeping iPad and immediately bring up a fresh note. You can’t navigate around the iPad or add in media without first unlocking the iPad. Instead, you get a somewhat-barebones version of a fresh note that lets you to instantly capture your inspiration.

No app benefits more from Apple’s proud intersection of hardware and software than Apple Notes. These sorts of first-party features can quickly become engrained in any workflow and make it hard to supplant. Many users will find themselves shrugging their shoulders over features other third-party apps may have simply because they can’t live without these built-in first-party features only Apple Notes provides.
Features Ripped Off from Other Apps
Apple Notes has numerous first-party features available only to Apple Notes, making it a genuine first-class citizen with special rights. These features make Apple Notes difficult to compete with. And, where a third-party app may leap ahead in one category or another, Apple often tends to “sherlock” or copy the feature in their own way.
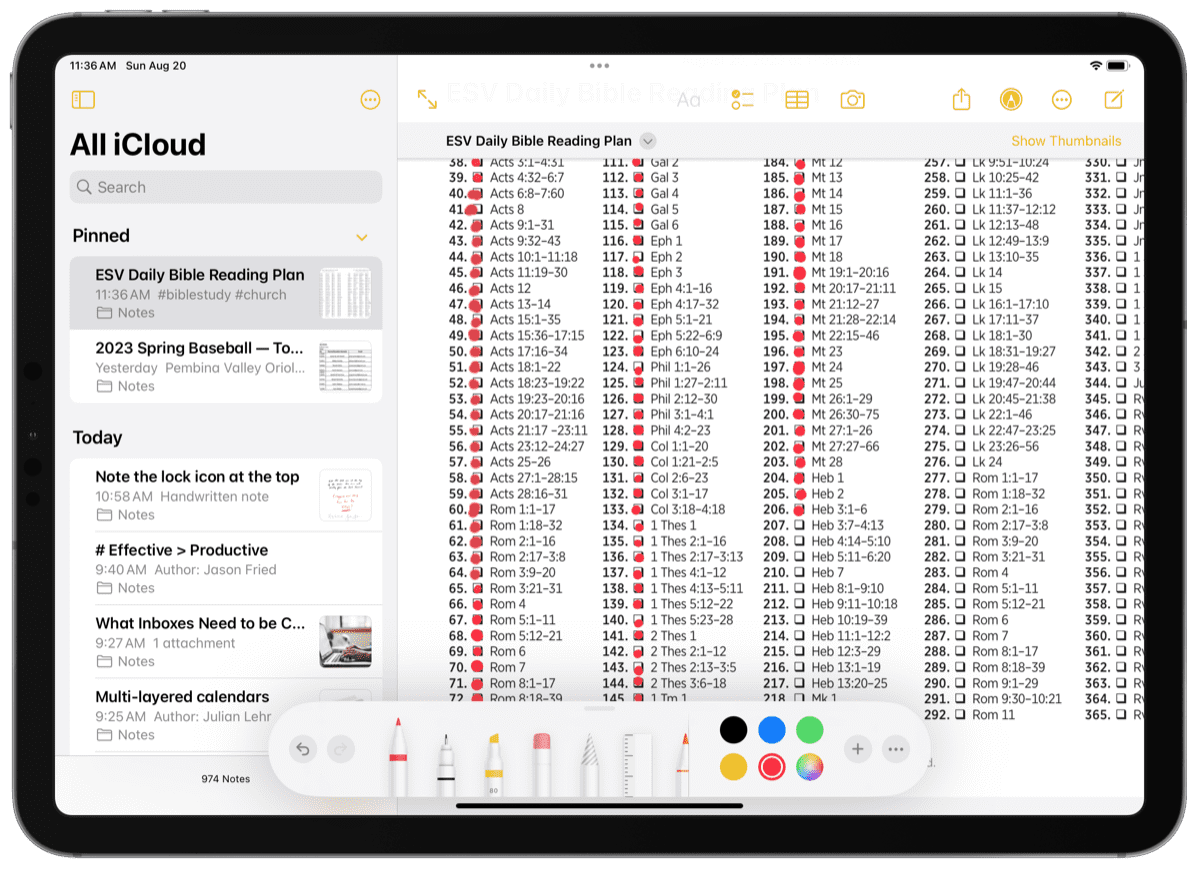
Edit PDFs
In iOS 17, macOS Sonoma, and iPadOS 17, Apple Notes gains the ability to edit PDFs right in the app. PDFs have long been editable in other apps such as Craft or any PDF editor.
To edit a PDF in Apple Notes, simply open the PDF you’ve saved to your note and tap the pencil button on the bottom toolbar. You can then use your finger or the Apple Pencil to edit the PDF. You may get a notification about a read-only document if you’re using pre-iOS 17 devices, but otherwise, the edits are live and will sync across all your devices.
Being able to edit a PDF in a note-taking app makes a ton of sense. Perhaps you’ve captured a webpage via the PDF functionality in iOS 17 with some important research and you want to mark up that PDF. Now that Notes provides PDF editing, you don’t have to navigate over to a PDF editor app and save a copy of the annotated PDF to Notes after the fact.
Backlinking
Another new feature in Notes in the latest iOS 17, iPadOS 17 and macOS Sonoma is the ability to link your notes together. This functionality has created a boon in knowledge management in other third-party apps (such as Obsidian, Roam Research, Notion, and so many other knowledge-based apps) and Apple has brought its own taste to the arena.
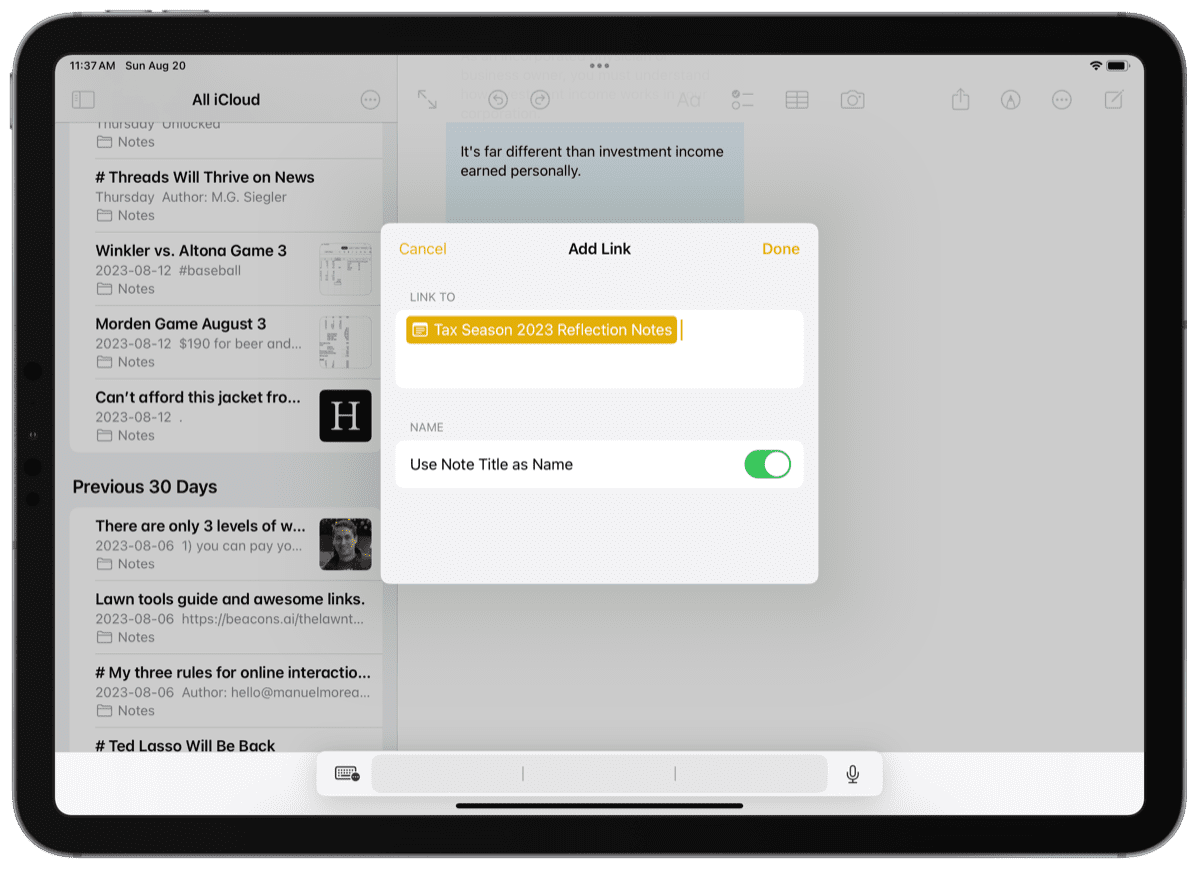
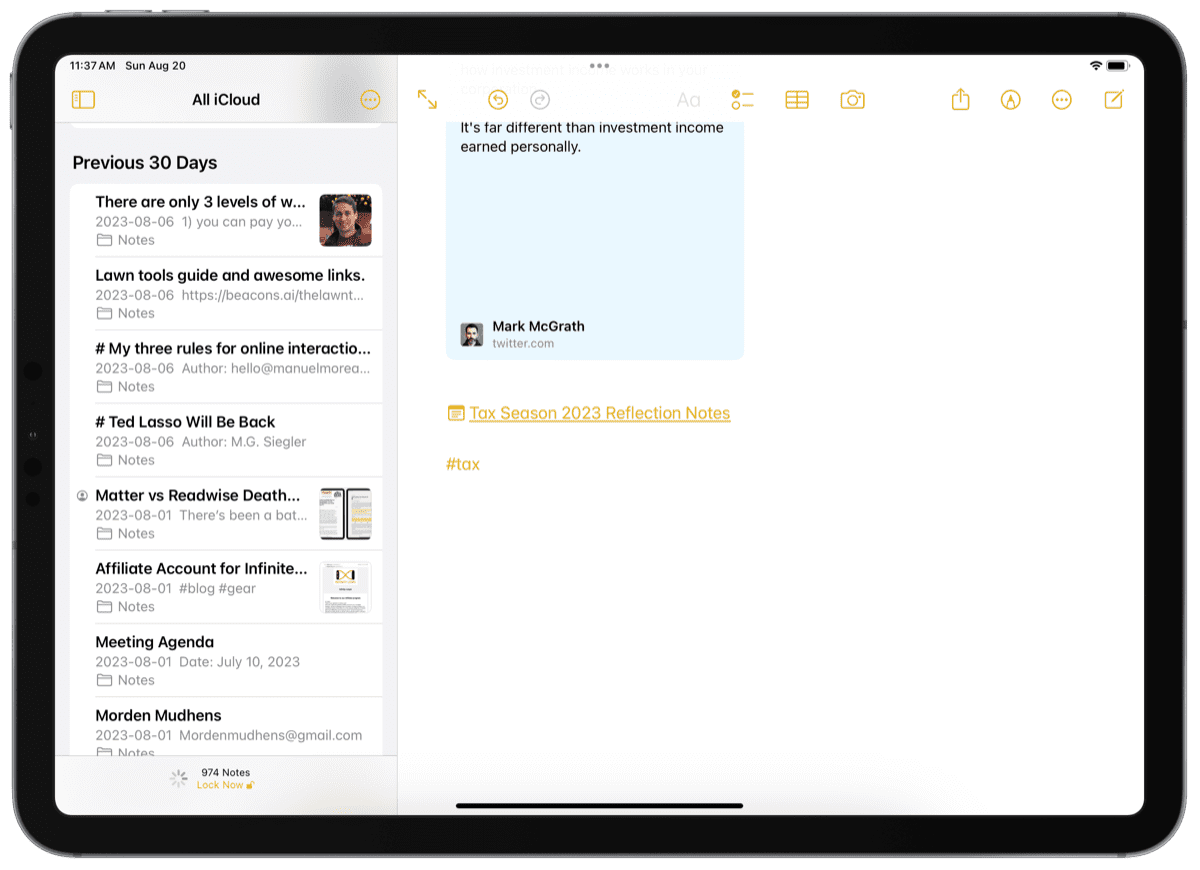
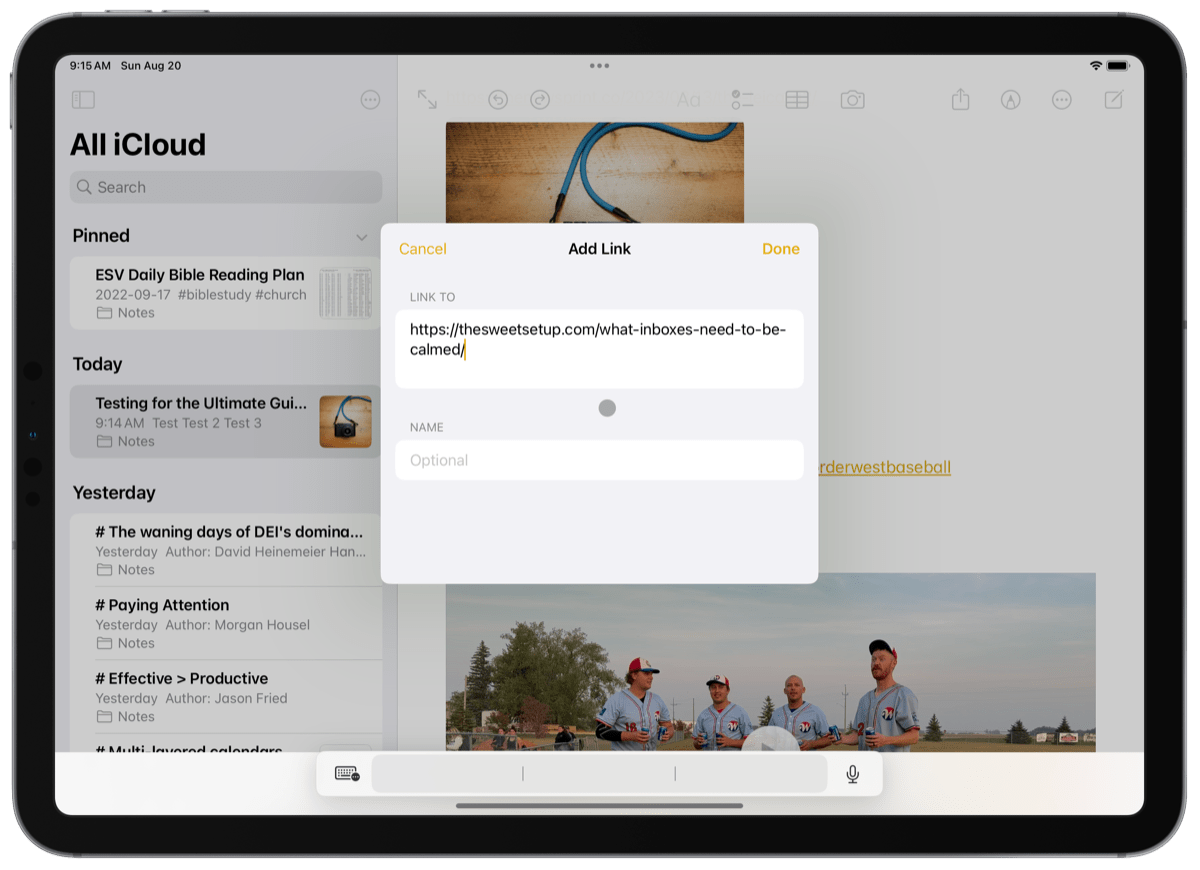
In any note, navigate to where you want to insert a link to a different note and tap a second time on the screen to bring up the contextual formatting bar. Navigate to the right a few times to where it says Add Link. In the Add Link screen, type out the title of the note you want to link to and tap the desired note. Once done, you’ll have a nicely formatted link between notes to better connect your ideas together.
Tags
Tags have been around macOS organizational workflows for a long, long time, but they weren’t an organizational feature in Notes until relatively recently. It was an app like Bear Notes that popularized tags and hashtags for managing notes. This functionality is now fully sherlocked and available in Apple Notes as well.
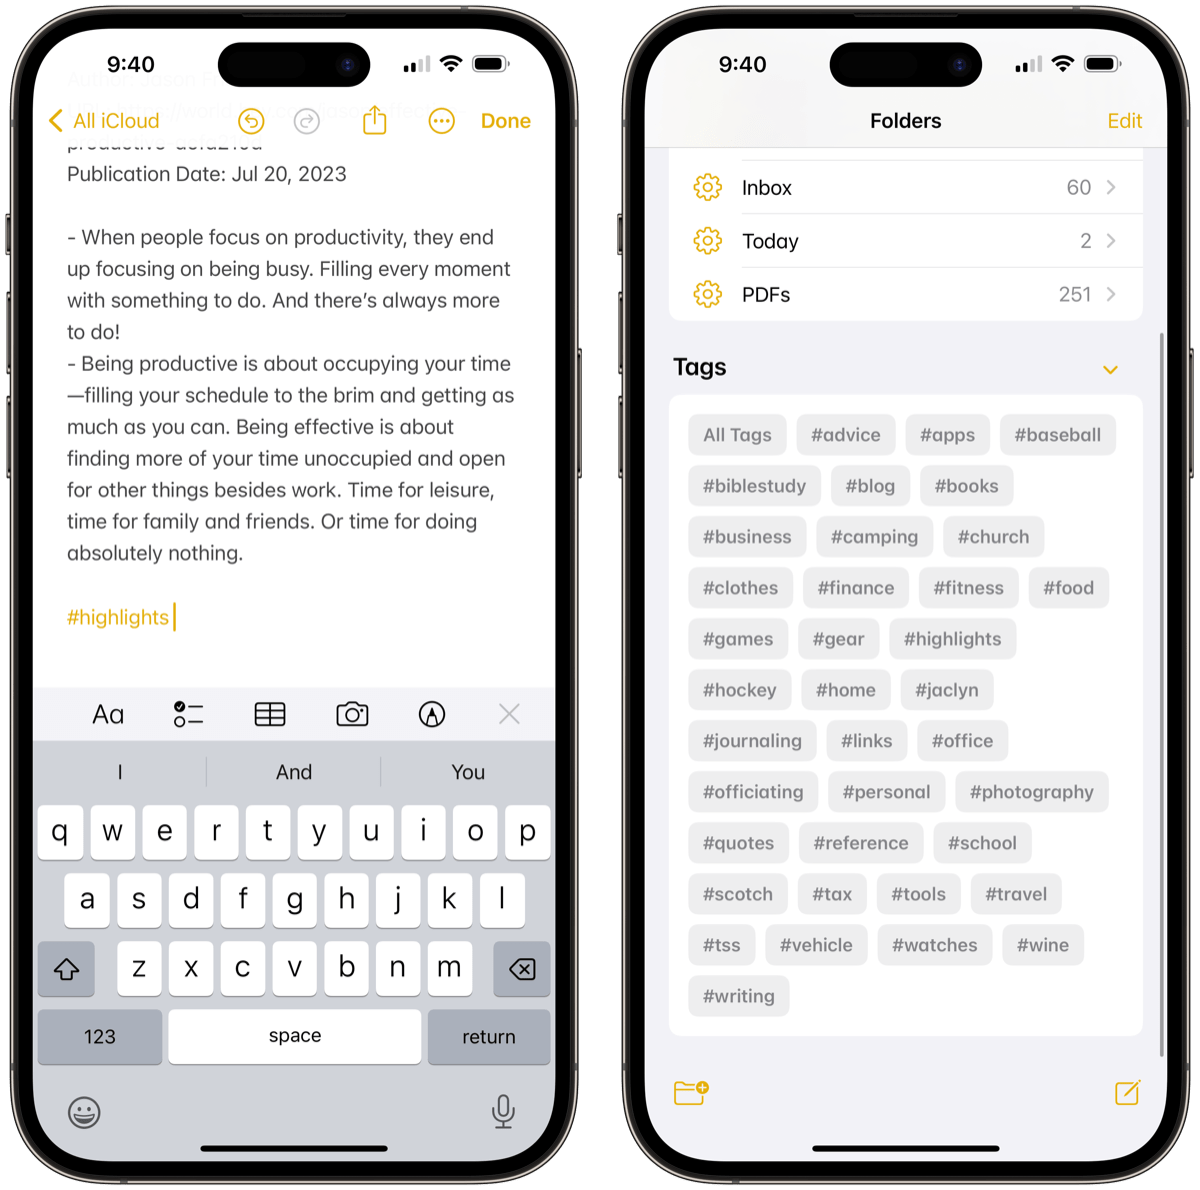
Anywhere in a note, you can use the # symbol to effectively save your note to that particular tag. Begin typing your tag name and options will appear above the keyboard. Tap the desired tag and the note will be saved to that tag category.
You can also apply tags to multiple notes at once by selecting multiple notes in the second sidebar. On Mac, this is as easy as using the Command key to select multiple notes, secondary-clicking for the contextual menu, and choosing the desired tag.
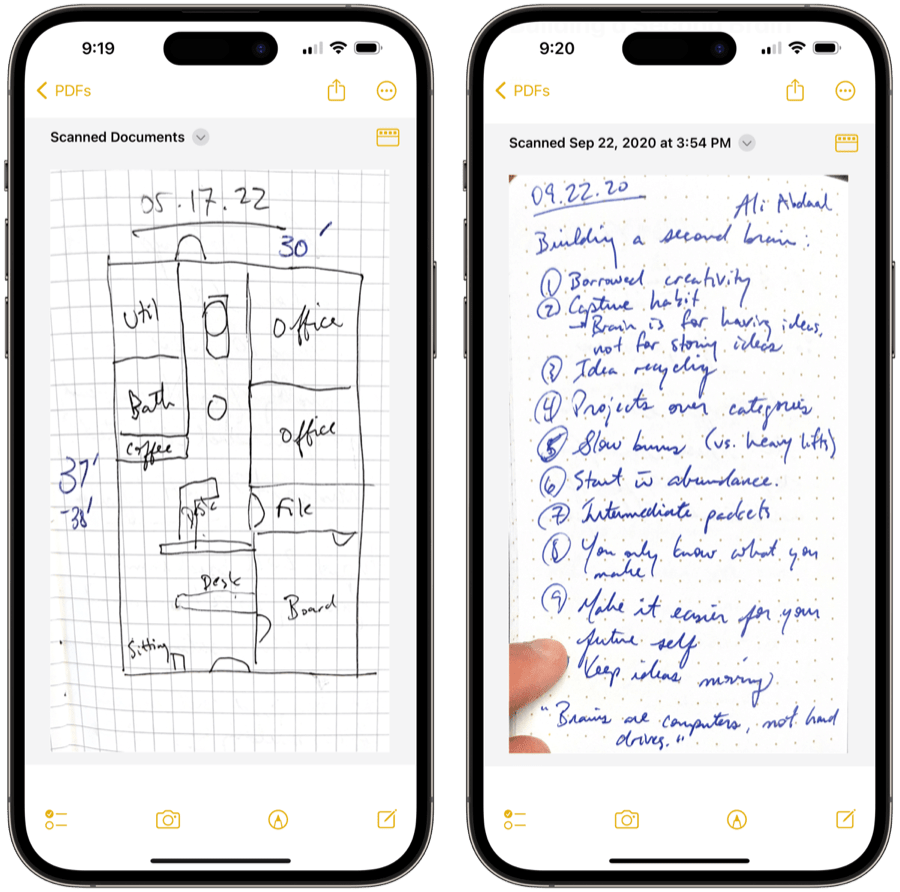
Scanning PDFs
As mentioned earlier, Apple Notes is one of the premier document scanning apps on the entire App Store. The ability to scan PDFs into a note isn’t a new feature for Apple Notes, but the combination of scanned PDFs, incredible text recognition, and editable PDFs in Apple Notes makes the PDF scanning feature basically indispensable.
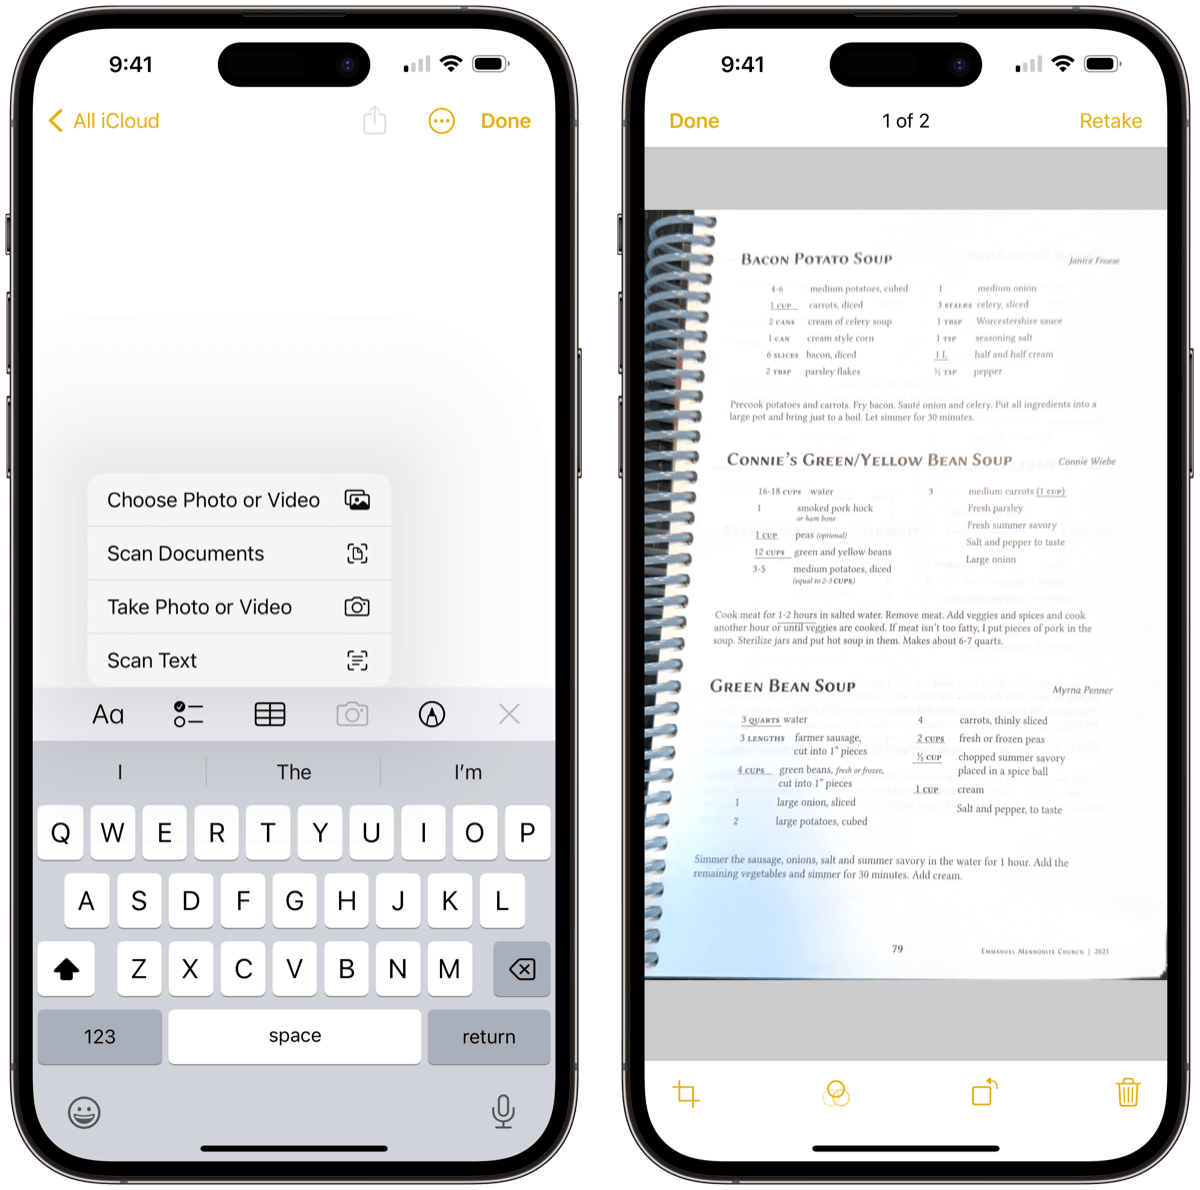
Scanning PDFs into a note is best done on an iPhone with its superior camera, though it can be done on iPad as well. To scan in a note, tap the camera button above the keyboard and tap Scan Documents. You’ll be whisked to the camera and you’ll quickly notice a yellow field applied over top of the document you’re trying to scan. The iPhone will flash and a scan will be captured, which you can crop and change later on. Keep scanning in page after page if you have multiple pages and tap Done when you’re done scanning.
Again, the ability to quickly recognize text on all these scans and the ability to edit and annotate the scanned PDF is an absolute game-changer for Apple Notes. There’s officially no receipt or paper document that can’t be digitized and marked up in a superior digital format.
Organizing Your Notes
If Apple Notes excels at quick capture through the Share Sheet, Quick Notes, and Home Screen access on the iPad, it better have good ways to organize your notes for visiting later on. In some ways, Apple is playing catch up in this regard, as Notes doesn’t have the best kind of back linking functionality available (like the idea where you can use [[ and ]] to create a quick link). In other ways, Apple Notes has great organizational features for most users.
Tags
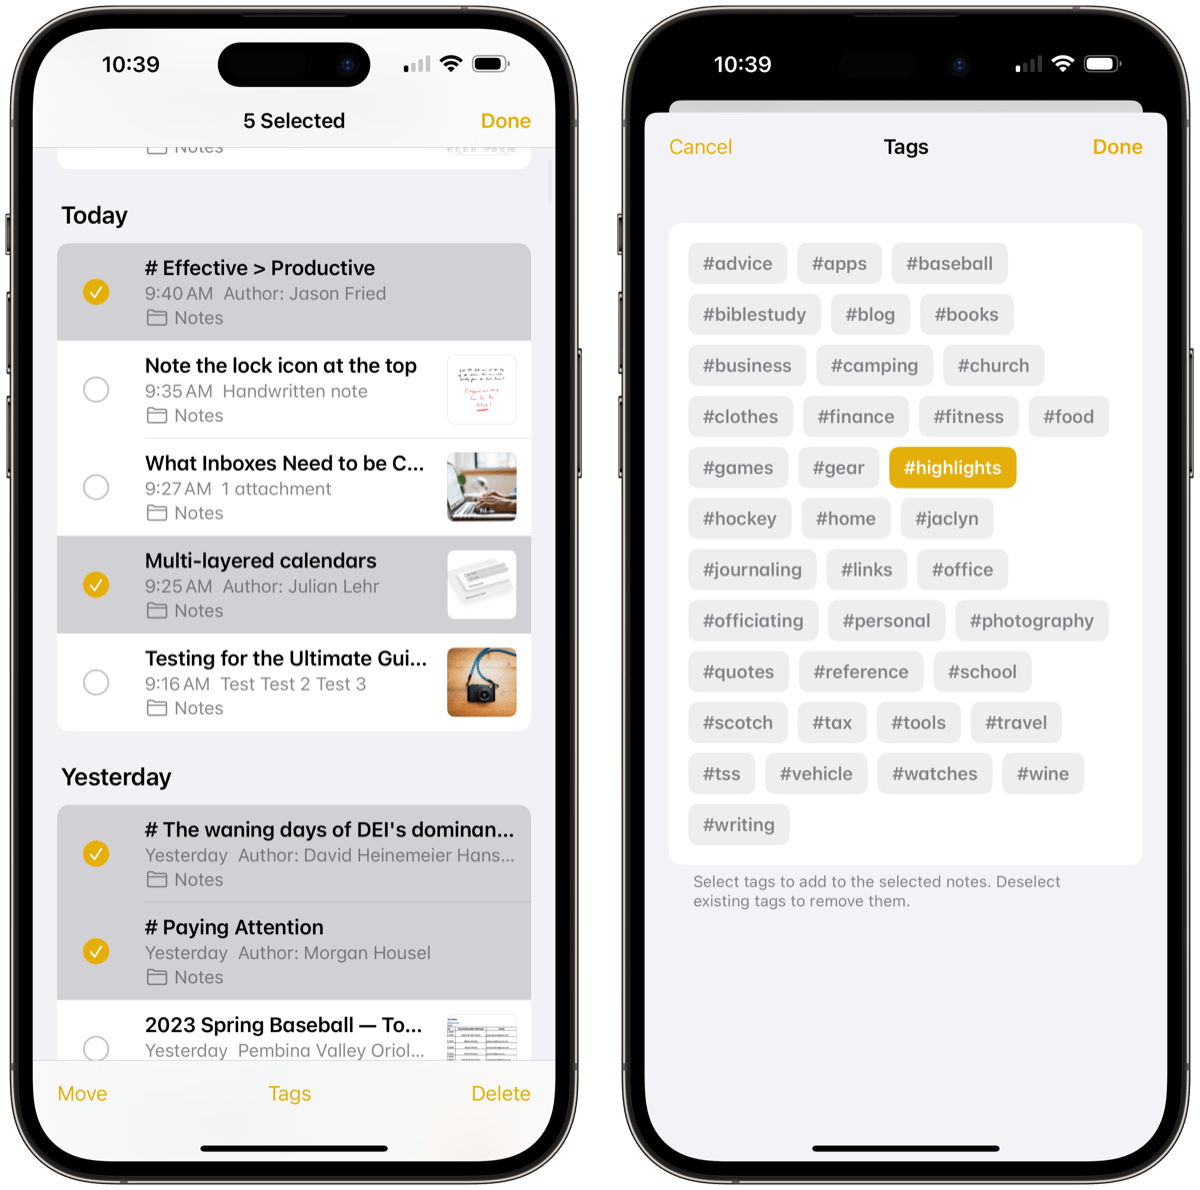
We already discussed tags, which is my preferred method for organizing notes. Wherever you’re located in a note, you can use the # key to bring up your tag selector (either above the keyboard on iPad or iPhone or in the popup menu on Mac) and select all the tags you want to apply.
The best part about tags is that you don’t have to select only one tag, whereas oftentimes you have to pick only one folder or category in other organizational systems. So if you have a particular tag setup for screenshots and another for home decor, you can save your inspirational home decor screenshot from Instagram with both tags and find that particular note later under both tag categories.
Tags can be chosen on the bottom of the left navigational sidebar to filter your note list. Again, multiple tags can be selected to filter your notes as you need.
Regular Folders
Regular organizational folders are also available in Apple Notes, as this was the original organizational system built into the Notes app. If you’ve been using Apple Notes and categorizing with regular folders for years and years, this may continue to be the preferred method for organization. Overall though, if you’re starting new in Apple Notes, regular folders are a bit limiting.
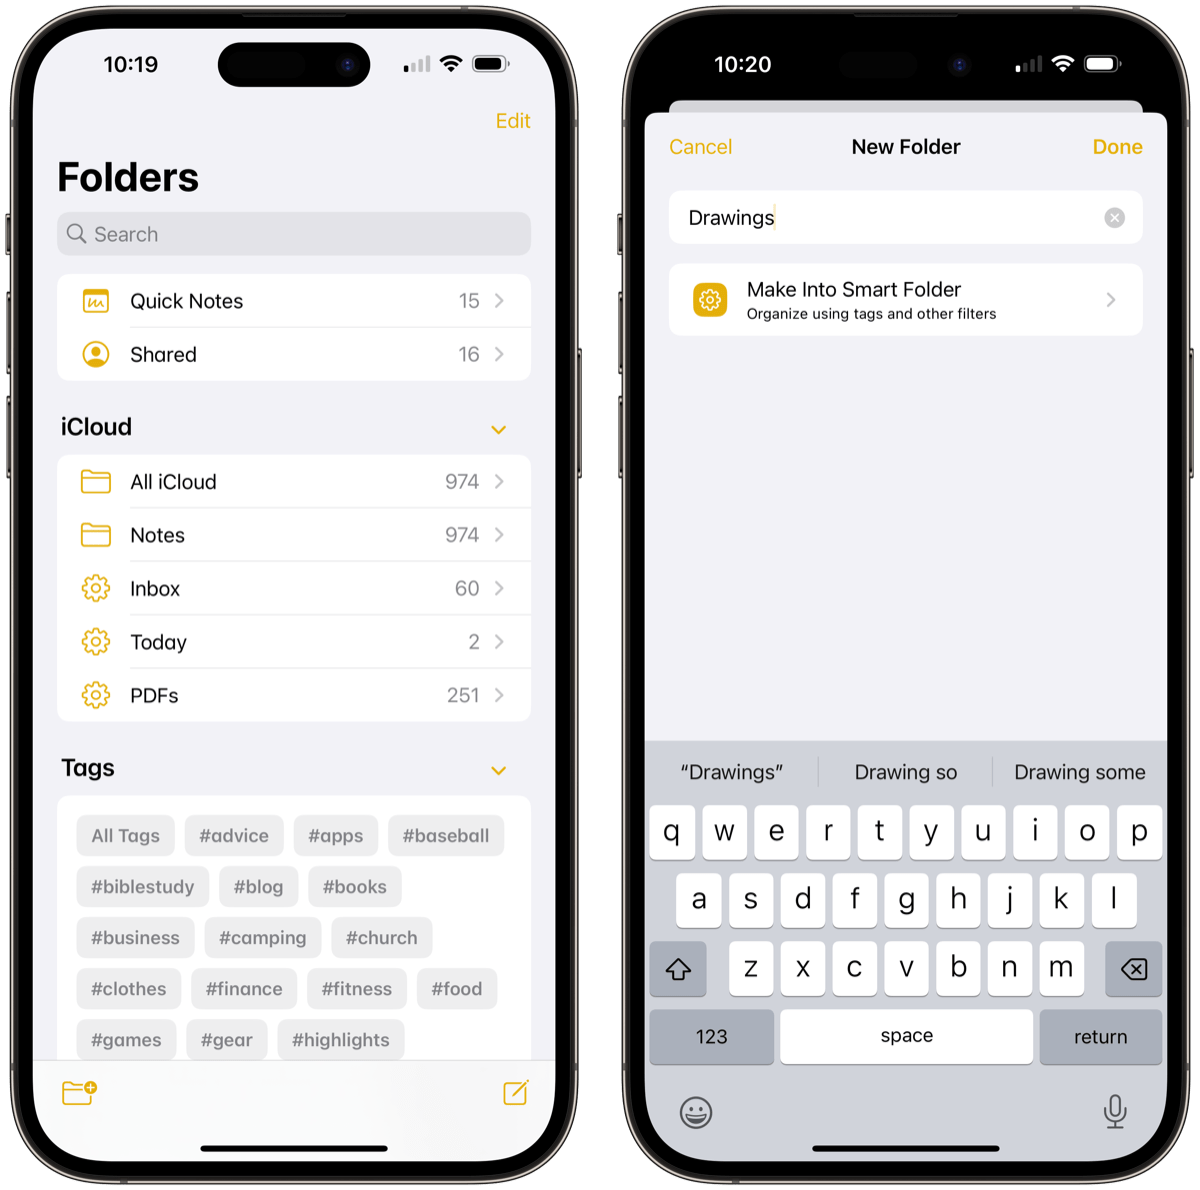
To create a new folder, simply tap Edit in the top right corner of your notes list and tap the new folder button in the bottom left corner of the screen. You can name the folder as you wish and begin moving notes or dragging and dropping notes into the folder right away.
The best new functionality for regular folders, however, is the ability to convert the regular folder into a Smart Folder. Let’s dive in.
Smart Folders
The combination of Smart Folders and Tags in Apple Notes bring the app’s note organization game to a new level. Where tags can be applied quickly and easily, Smart Folders take a little extra thought to create, but yield incredible results for unearthing stored notes later on.
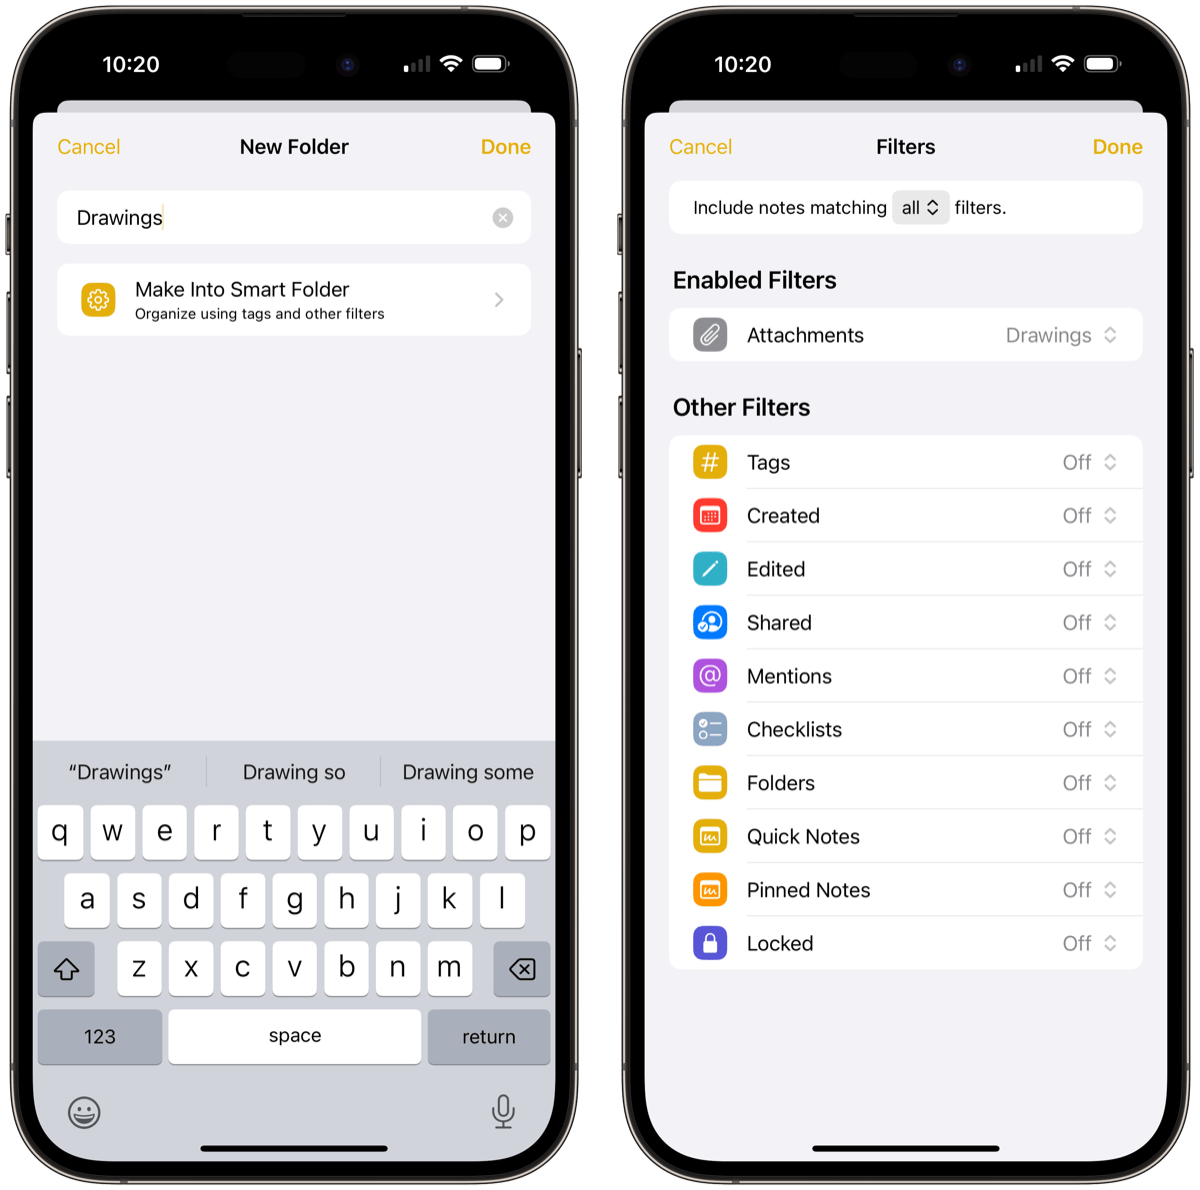
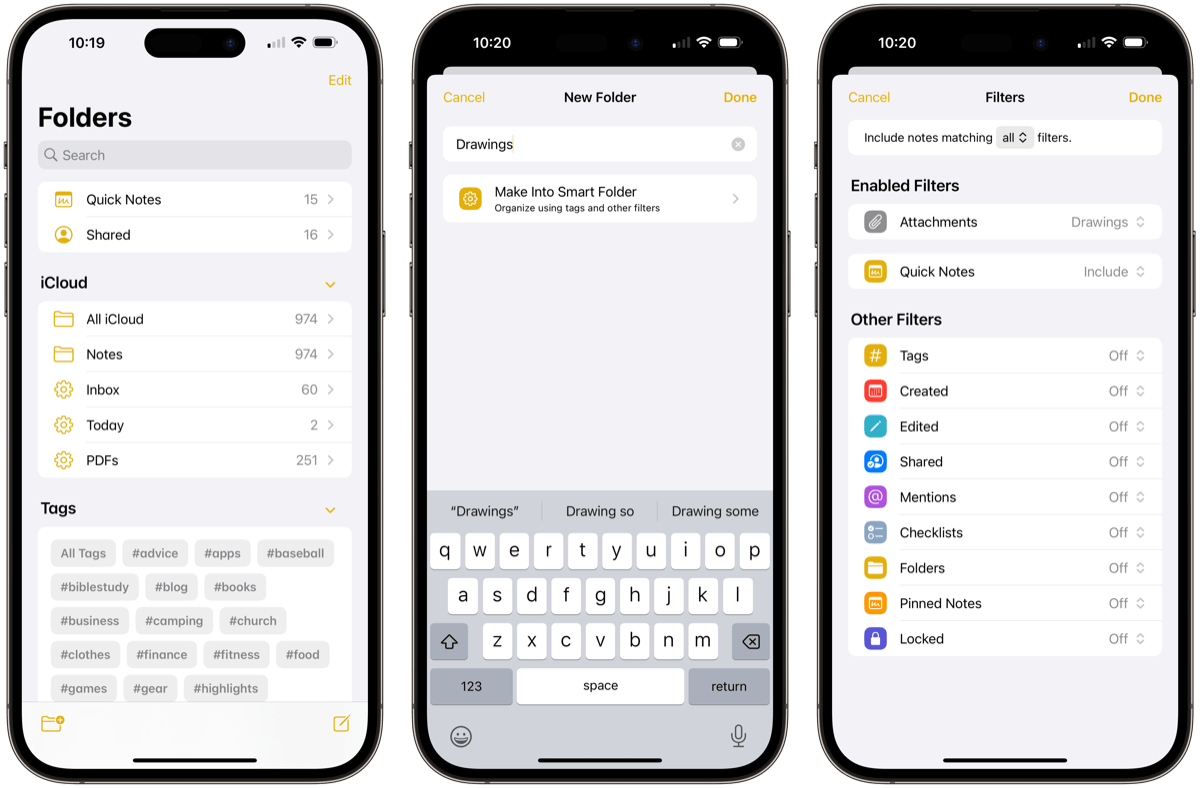
As mentioned above, to create a Smart Folder, tap the New Folder button and tap Make Into Smart Folder. You can then select which filters you want for the Smart Folder. You can have the Smart Folder filter files based on an “all” or “any” variable and then select from 1 of 11 different variables.
Here are a few examples of Smart Folders I’ve created to organize my notes:
- Inbox (more below): This Smart Folder filters any note that does not have a tag. This provides the ability to jump into a folder and tag or categorize all untagged notes, much like the inbox in a GTD system.
- Scans: This Smart Folder filters all notes for previously scanned documents.
- Today: This Smart Folder filters all notes and unearths any note created or modified on the current date. This brings all my latest notes into one spot so I don’t have to go endlessly searching.
There are other Smart Folder-like organizational features already built into Apple Notes from the start. Quick Notes are housed in one special category by default, as are any notes you’ve shared or collaborated on with others. It’d be nice if you could change some of these default options, but all in all, they are easy to work around.
Organizing your notes in Apple Notes has come a long way. This new back-linking feature is sure to kick-start Apple Notes as a personal knowledge management app, and I’m curious to see where those organizational elements go in the future.
Searching Your Notes
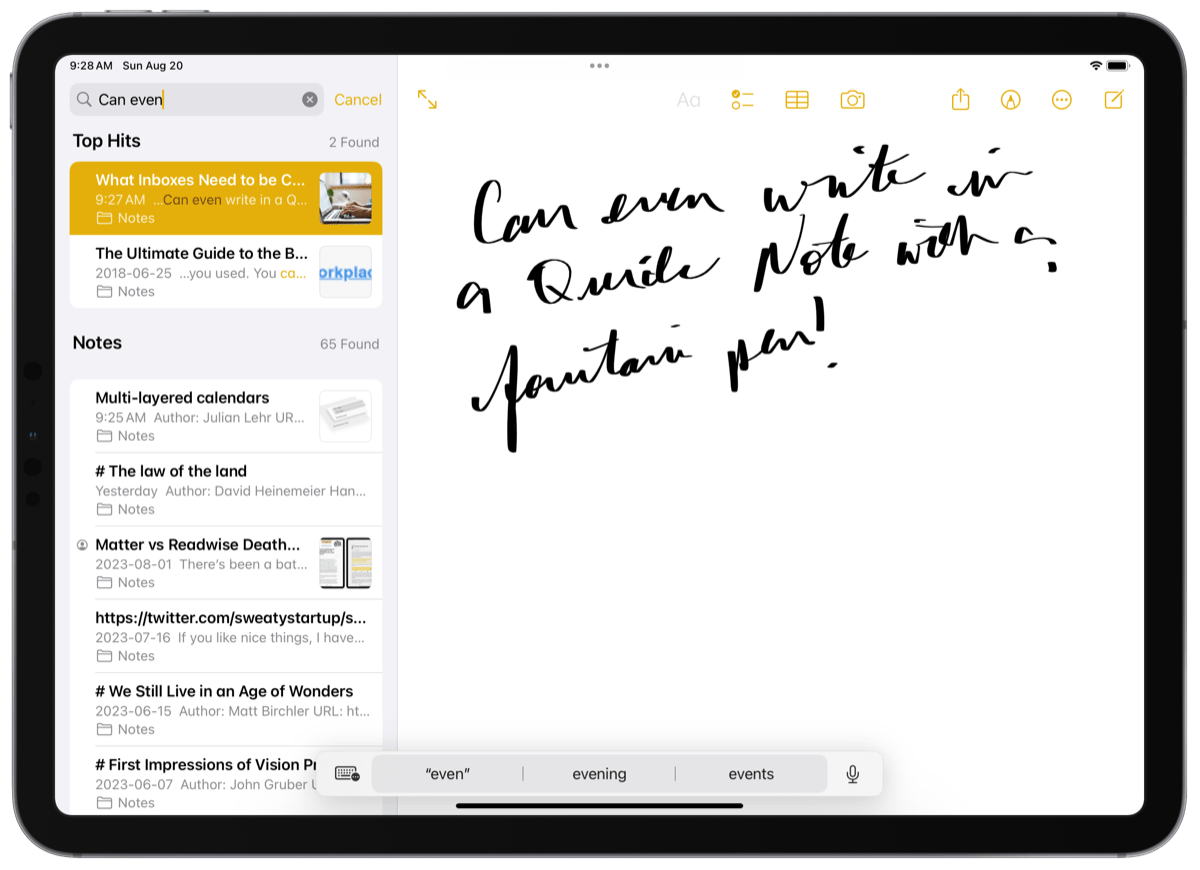
When your notes don’t yield the exact note you’re searching for, you can always search your entire notes database. Apple Notes has a strong search platform, bolstered by its excellent text recognition features.
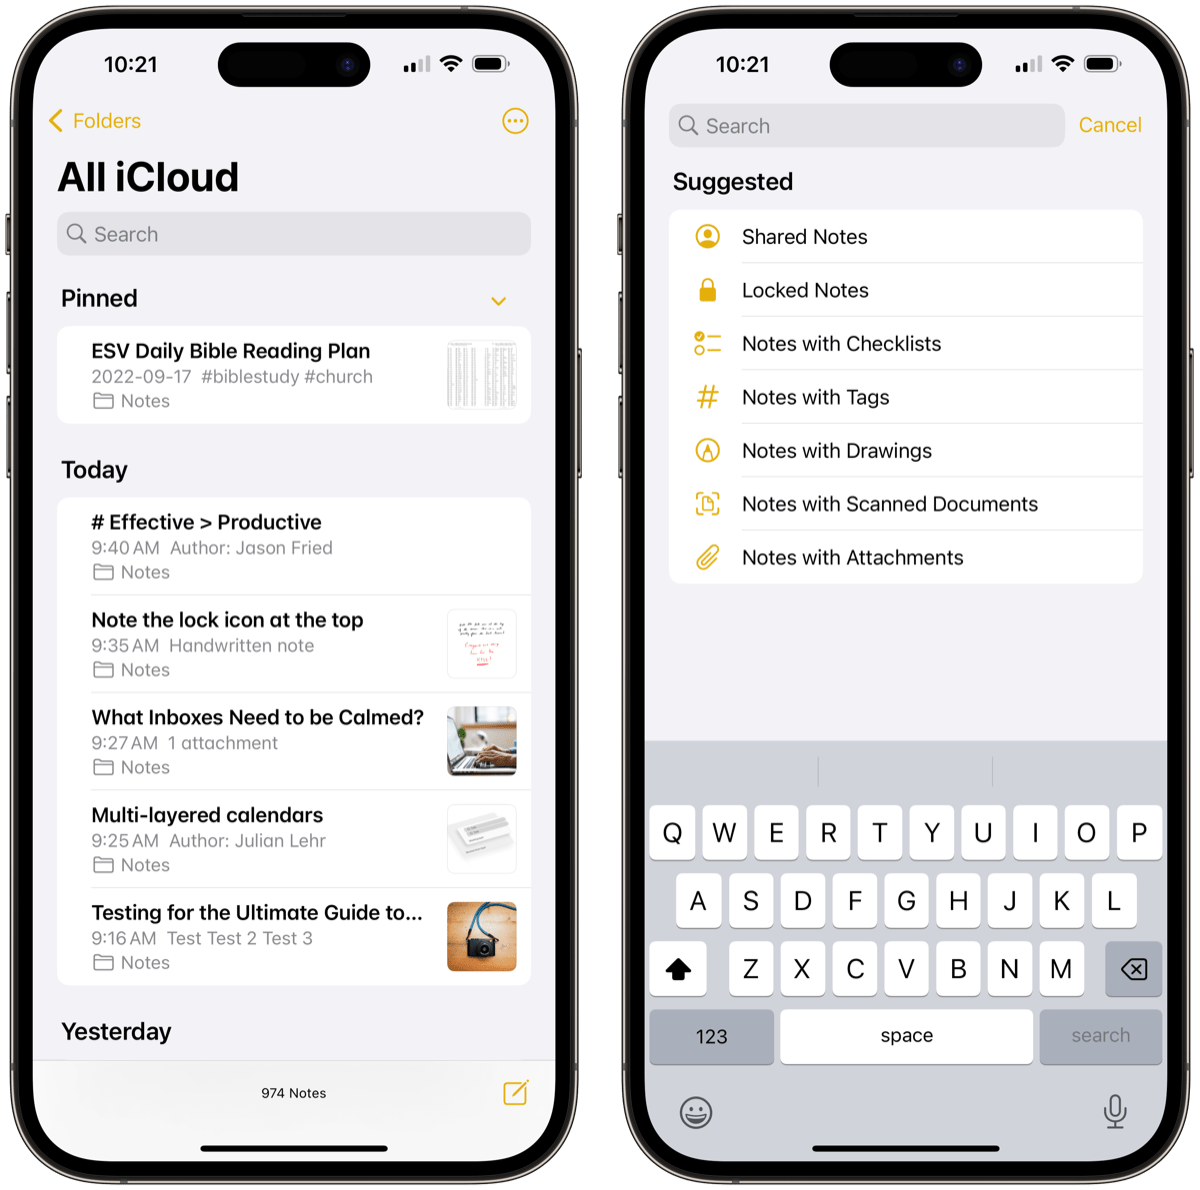
Search your notes by swiping down on your notes list to find the search query field. In the field, you can search for any of the following items:
- Tags
- Typed text
- Handwritten text
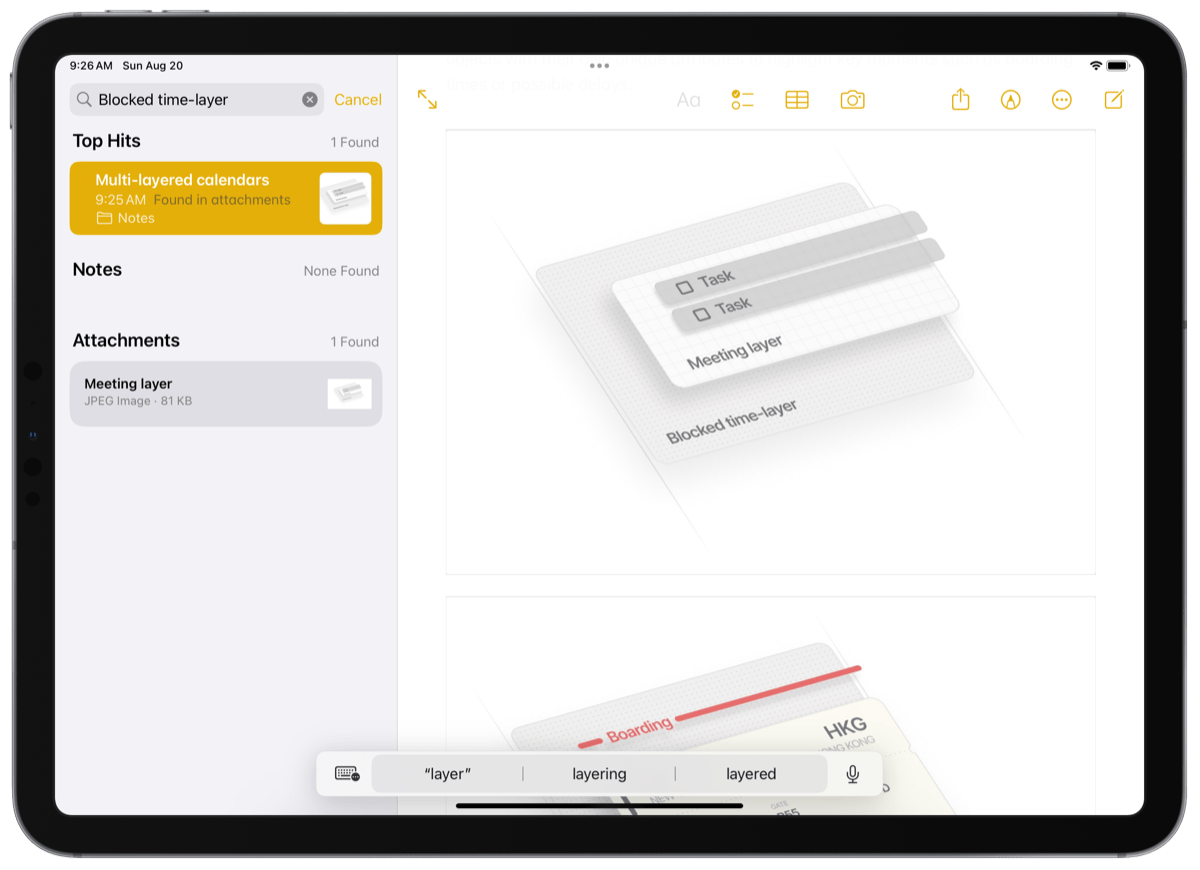
- Objects that appear in images
- Text in scanned documents

Searching for objects that appear in images is stunningly powerful. I tend to capture screenshots of inspirational things I find across the internet, which yields many screenshots from Instagram. Each of those screenshots effectively becomes searchable thanks to Apple Notes — simply searching for “office desk” yields not only all the instances where I’ve typed “office desk” into a note, but also yields all the screenshots I’ve ever saved with an office desk pictured.
You can also use the suggested search queries that pop up in the contextual menu under the search field, but these are all pretty generic and broad search queries. If you have a big database, you’ll likely find you need to be more specific in your search.
Sharing and Collaboration
A sneaky, great feature built into Apple Notes is its ability to collaborate with others on a note. The fact so many millions of other users have an iPhone, iPad, or Mac ensures there are loads of people who have access to Apple Notes. This fact makes collaborating inside one of the default options for collaboration.

Collaboration leapt forward in iOS 16, where users could view an activity log of others’ actions on a shared note. This is especially helpful when collaborating in real-time on a press release or other written material.
There are two main ways to share and collaborate on notes in Apple Notes:
- Send a copy of a note
- Collaborate on a note
Send a Copy of a Note
Sending a copy of a note is pretty easy: Open the note you want to share, tap the Share button, choose Send Copy, then choose how to send your note. If you do this through Messages, you’ll be given a dropdown in the composer field to determine if you want to send a copy or collaborate on a note. You can’t miss it.
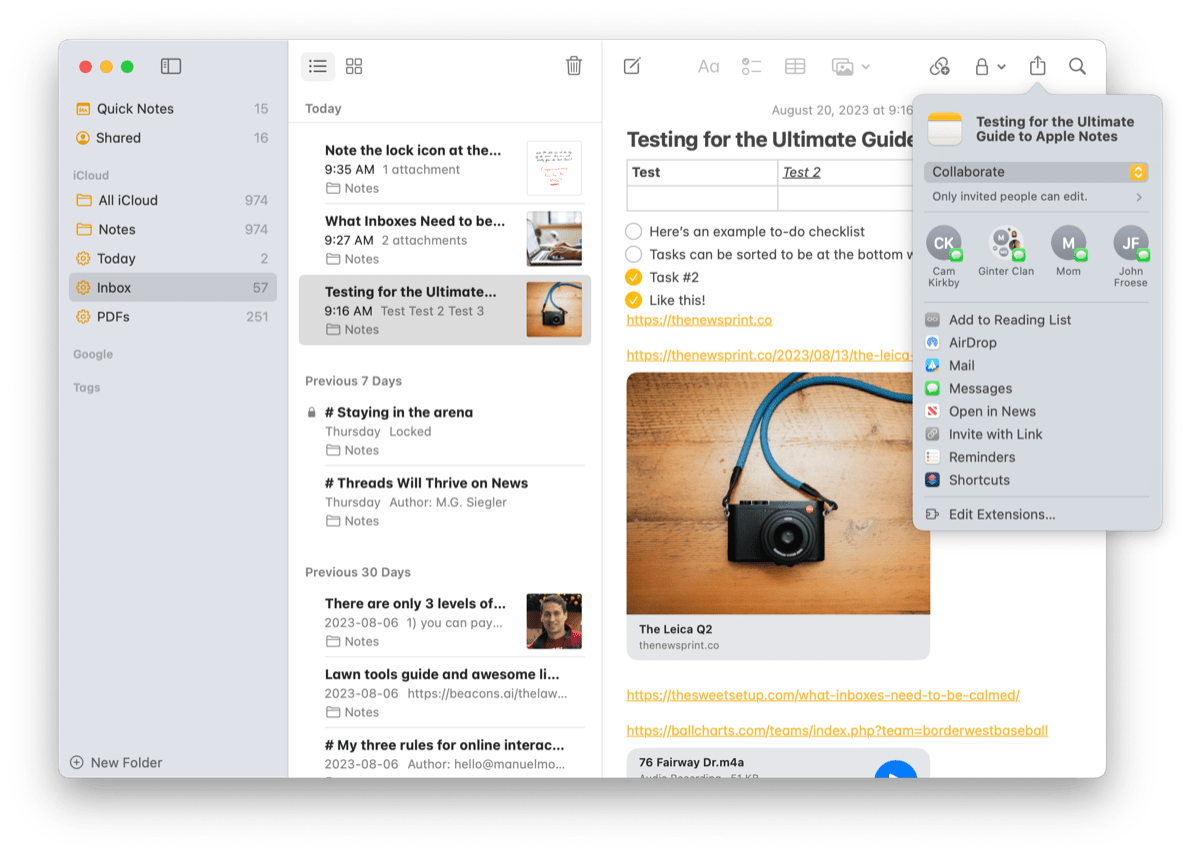
Collaborate on a Note
If you need to do more than just send a copy of a note, you can send an invitation to any iCloud user to collaborate on a note or a folder of notes in Apple Notes. Once invited, collaborators can make changes to notes, add attachments, and create subfolders, all while seeing everyone else’s changes in real-time. This makes it easy to work together on projects, share information, and keep everyone on the same page.
To collaborate on a note or folder, you can perform one of the following actions:
- In the notes list, swipe left on the note you want to share, then tap the Share Note button.
- Open the note you want to share, then tap the Share button.
- In the folder list, swipe left on the folder you want to share, then tap the Share Folder button.
- Open the folder you want to share, tap the Folder Actions button, then tap Share Folder.
Next, select Collaborate.
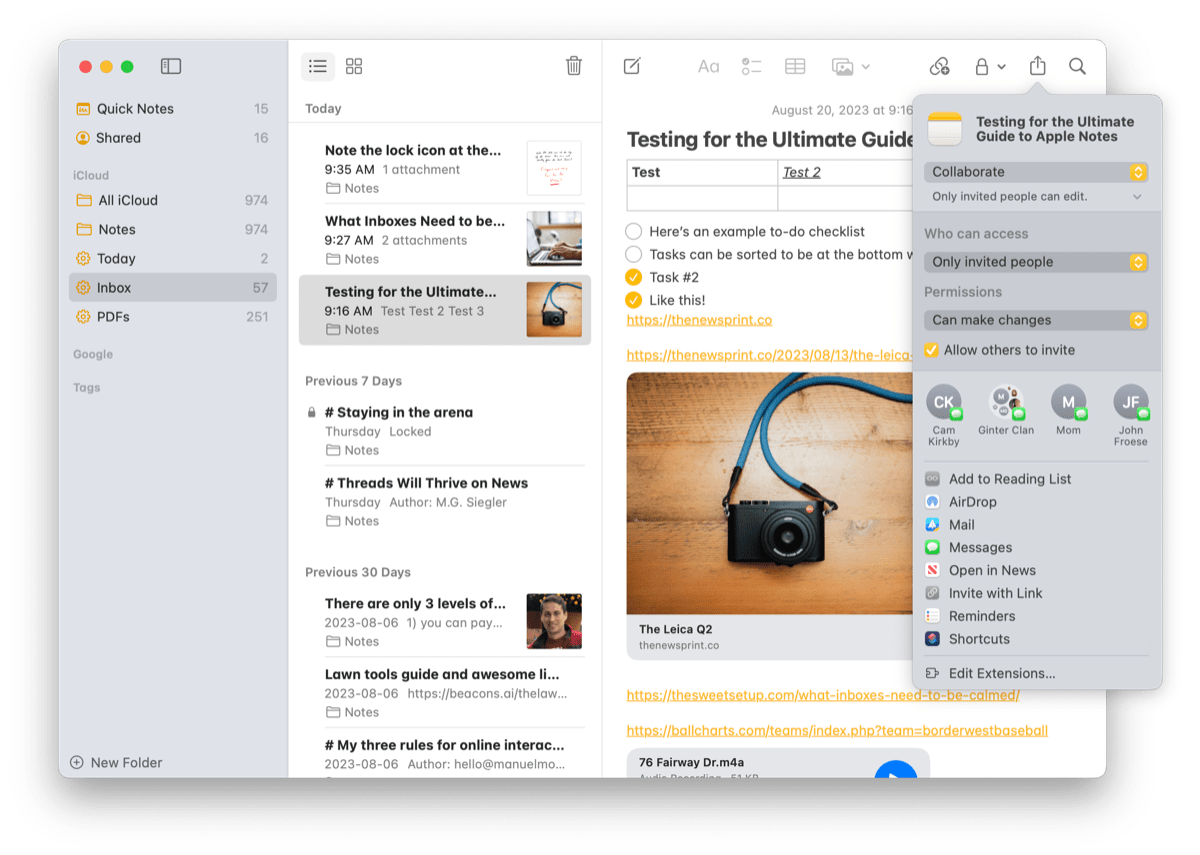
You’ll be provided options at this point to set permissions for collaborators:
- You can provide access to only those provided the link.
- Give invited collaborators the ability to make changes or view changes only.
- Allow other collaborators to invite new collaborators themselves.
Finally, you can select how to send the invitation. There are two main options: Messages or Mail. Mail is a pretty easy and default method to send the invitation. But if you send with Messages, you can actually receive activity updates in the original Messages thread. This is awesome for staying on top of who does what on a shared note.
Again, shared notes aren’t an Apple Notes-only feature. You can share notes in a variety of other third-party apps on iPhone, iPad, and Mac. However, Notes comes preinstalled on millions and millions of devices, ensuring Notes is an easy and default option for sharing and collaborating with others. It has quickly become an easy and default way for contributors here at The Sweet Setup to work on an article together in real-time.
FREE Webinar 🎉 The Focused Writer: Improve Your Workflow
If you ever find that your “Deep Work Time” is filled with distractions, procrastination, or the blank page… then join Shawn Blanc for this free class. You’ll get ideas and tips for improving your creative workflows so you can be more focused and less anxious about your writing and creative work..
+ Two big problems that many creators face (and how to get past them them starting today).
+ The 4 steps of an organized writing workflow that will remove stress and procrastination from your creative process.
+ How to organize: ideas for how to simplify and manage your notes.
Free bonus for all registrants: The Show-Up-Every-Day Worksheet (a quick-start guide that will help you be more focused and intentional with your focused work time)
Security Features
With all these excellent sharing features, it’s imperative Apple Notes can be stored safely, securely, and privately. It’s pretty easy to lock a note, unlock a note, and remove the security features from the note entirely if you no longer need to protect the note.
To lock a note, tap the … button in the top right corner of a note and choose Lock. From here, if it’s your first time locking a note, you’ll be asked for a passphrase, and then if you want to enable Face ID or Touch ID to protect your note. Enter that passphrase, and choose whether you want to allow Face ID/Touch ID for authentication to your locked note.
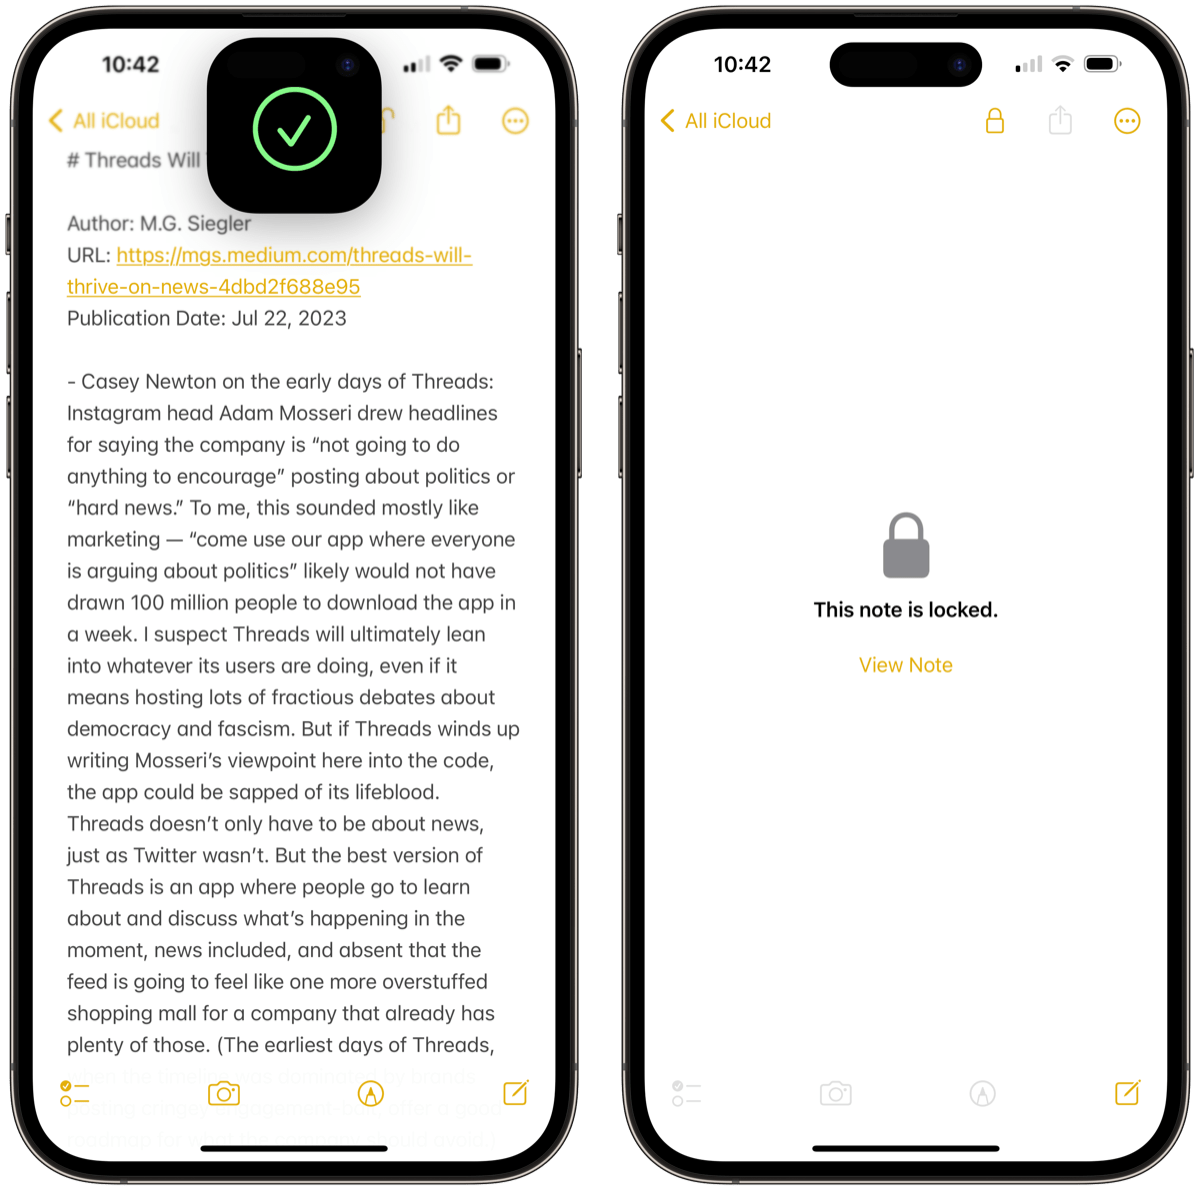
Once completed, you’ll note an unlocked lock in the upper toolbar of each note, which you can quickly tap to lock and keep hidden if you’re on public transit or somewhere else with prying eyes.
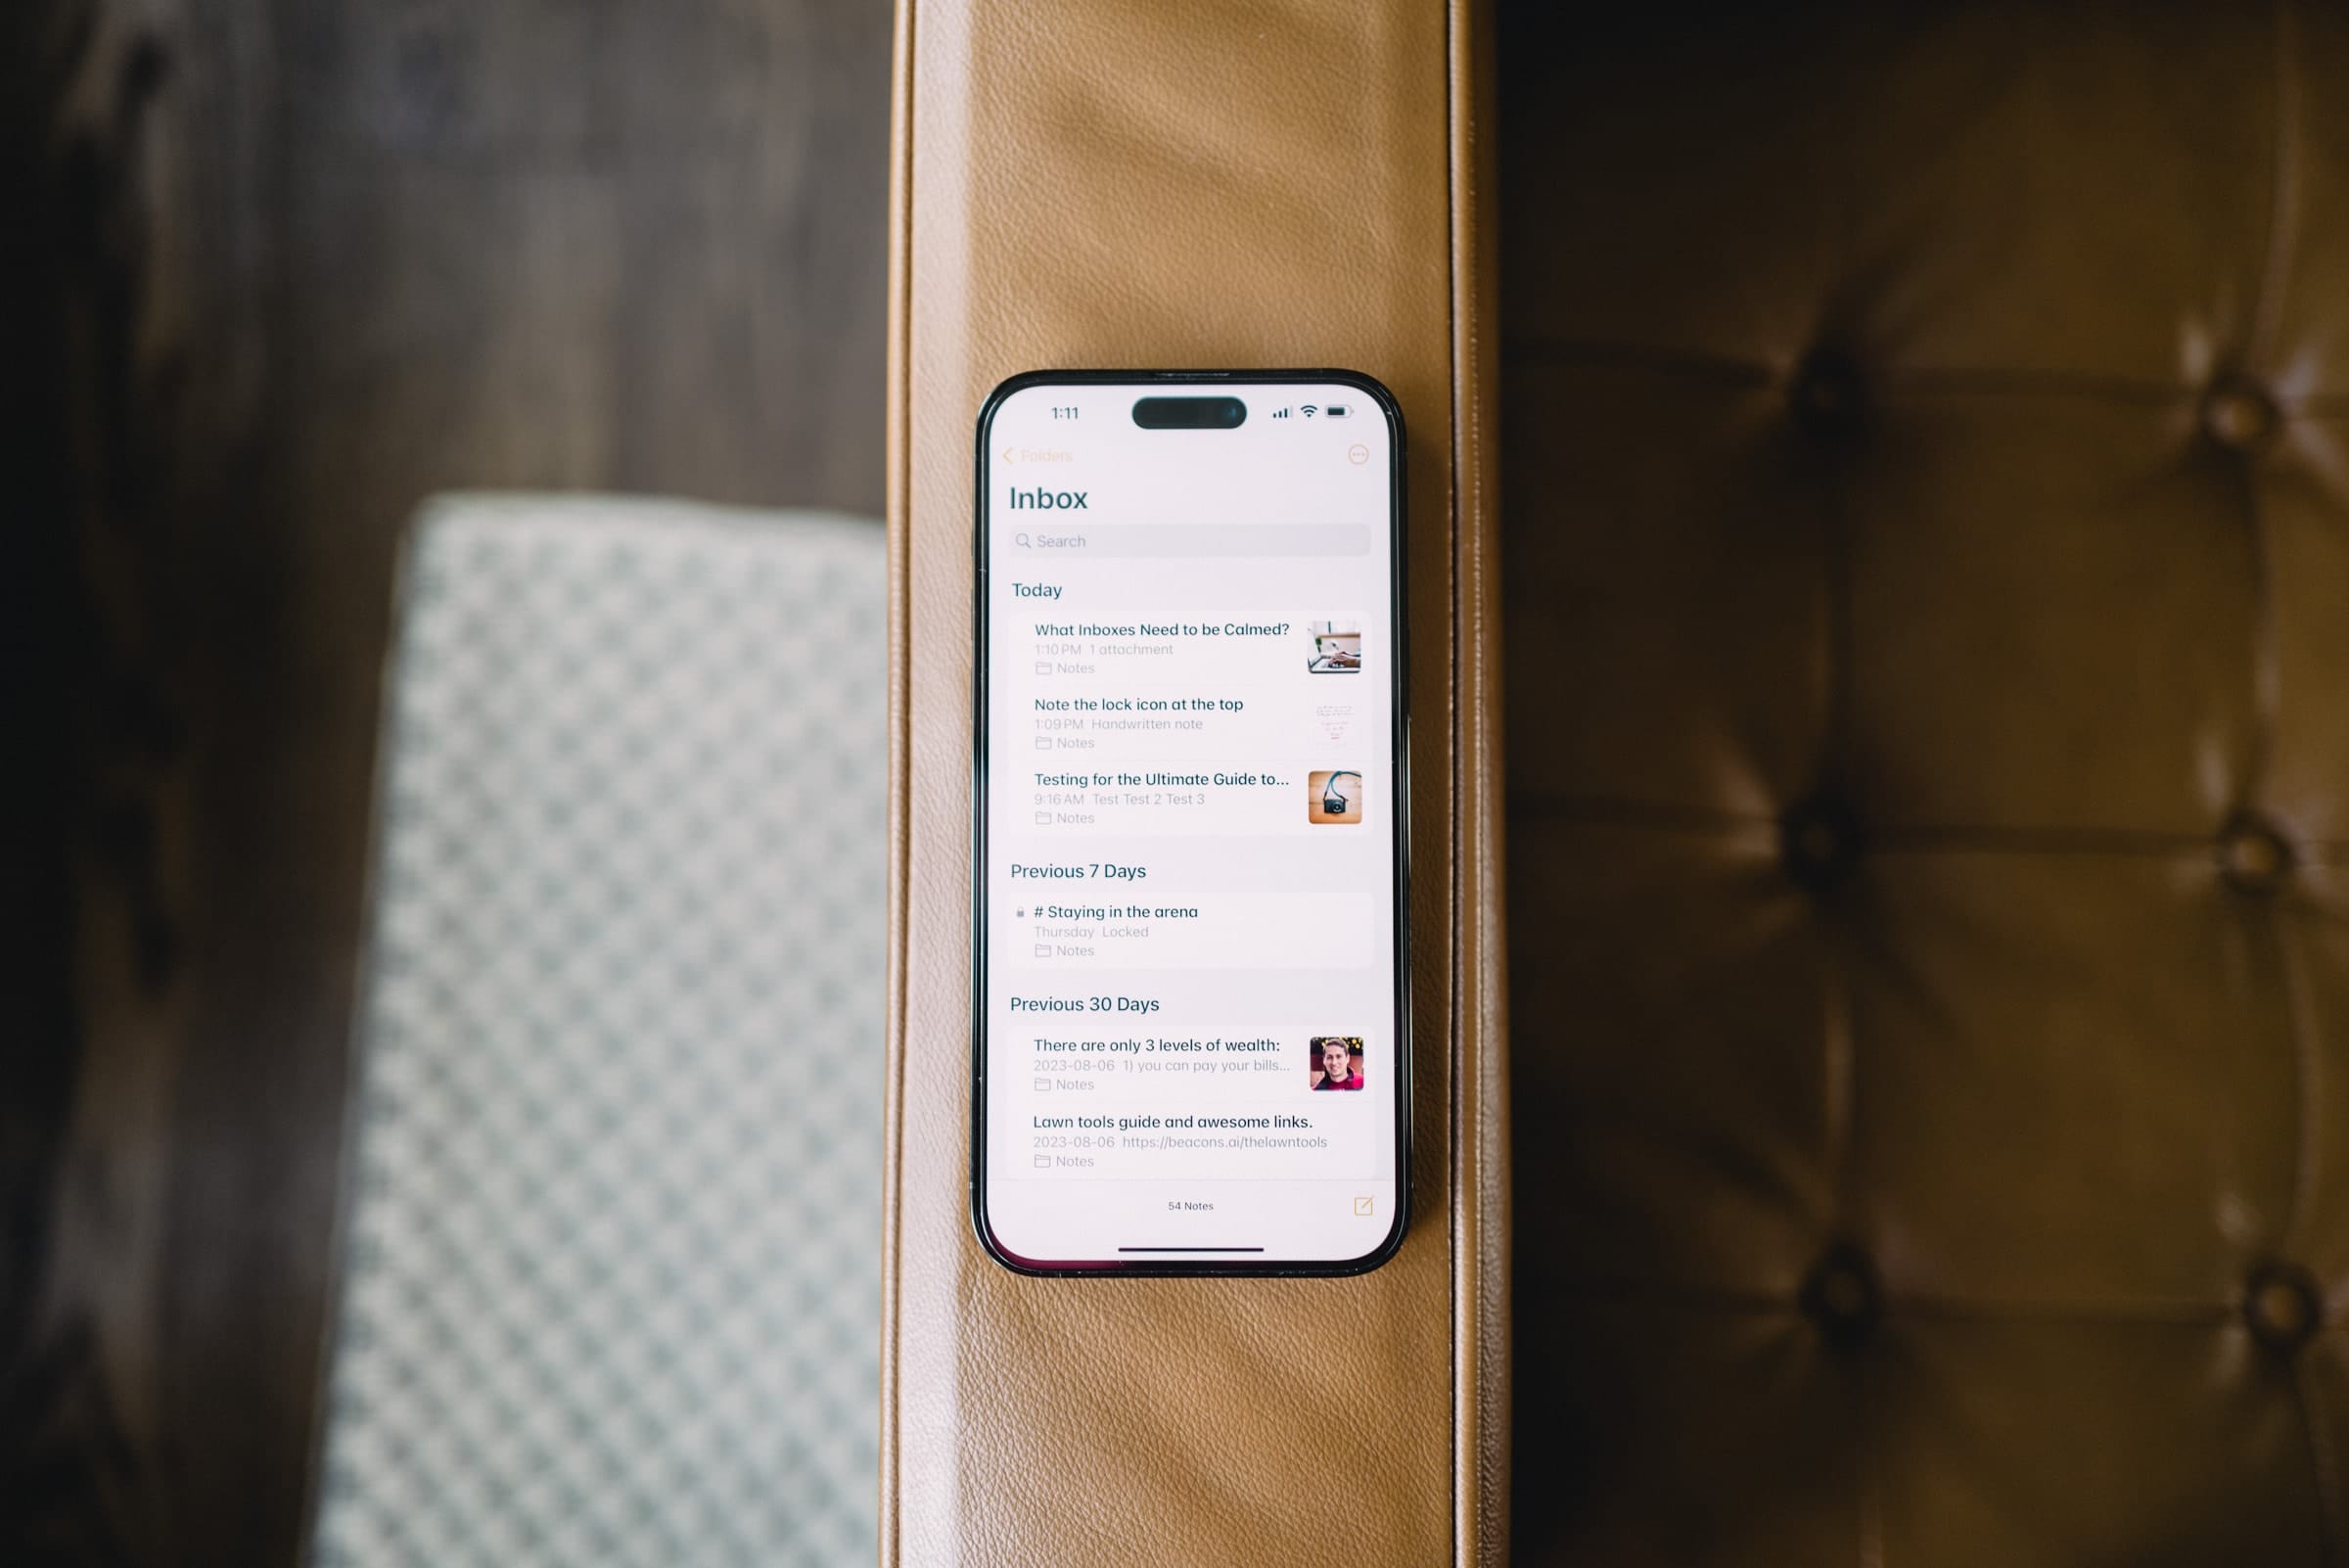
You can tap the lock icon to lock the note and go back to your notes list. In the notes list, the locked note will be denoted with a little lock icon in the far left. You can still see some information related to the locked note right in the notes list — you can see the updated date, the note’s folder, the note’s title, and whether the note is locked or unlocked. Tapping on the note will provide a relatively blank screen, simply providing you the ability to tap View Note and unlocking with Face ID or Touch ID.
On a Mac, unlocking a note requires your Mac’s login password. This is a bit unsettling — perhaps someone is able to claw their way into your Mac and learns your login password. If this happens, all your locked notes could instantly be unlocked. To avoid this, go into Apple Notes’ settings and check the box at the bottom where it says Use Touch ID. This should provide another layer of security for your locked notes.
All locked notes are end-to-end encrypted. Here’s a summary of Apple’s discussion on Notes security:
Secure notes on iOS, iPadOS, macOS, and iCloud website are end-to-end encrypted using AES-GCM with a 16-byte key derived from the user’s passphrase using PBKDF2 and SHA256. The secure session is opened with a passphrase, Face ID, or Touch ID and closed when the user taps the Lock Now button, Notes is switched to the background for more than 3 minutes (8 minutes in macOS), or the device locks. Changing the passphrase requires entering the current one, and resetting it requires the iCloud account passphrase.
Lastly, secured notes cannot be shared or collaborated on with others.
Some Fun Quick Tips
With most of the major Apple Notes features out of the way, I’d like to provide a few different quick tips and tricks I’ve implemented to make using Apple Notes smoother than ever. Your mileage may vary, of course. But perhaps there’s something in here that can make your Apple Notes life that much easier.
Inbox Smart Folder
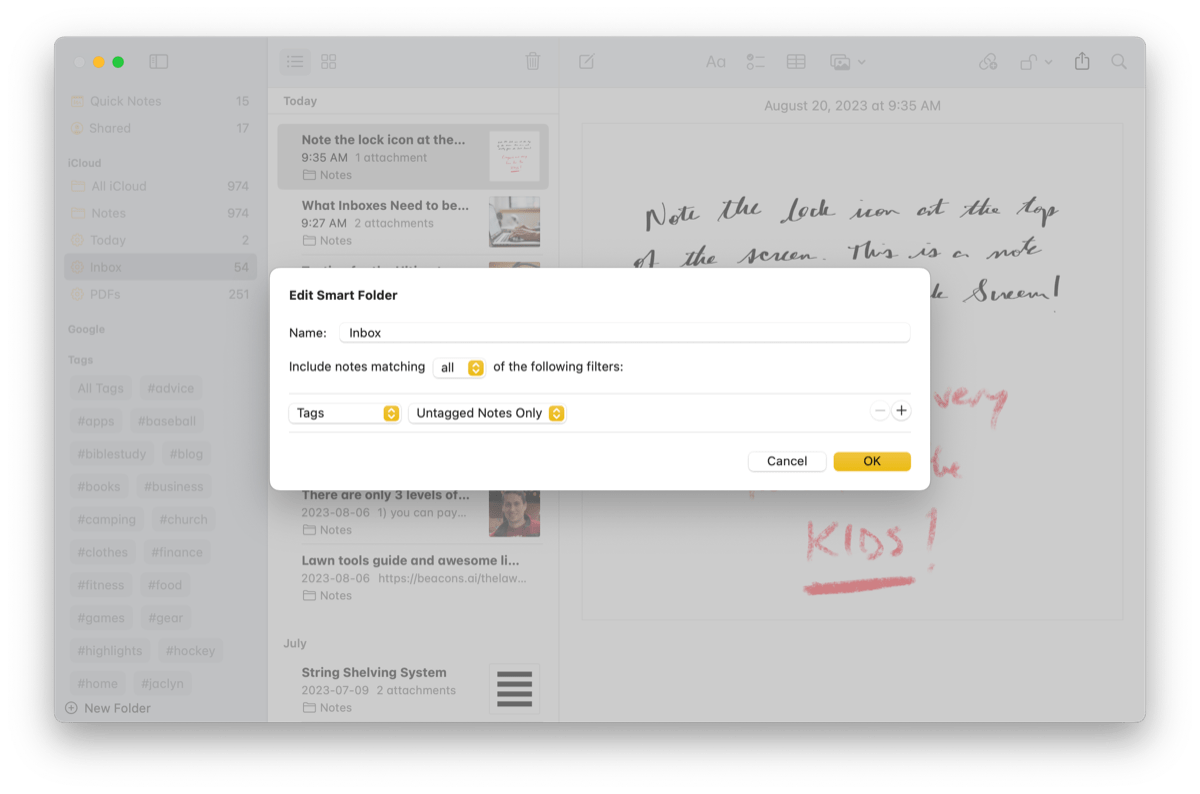
I alluded to this quick tip earlier, but the premise is simple: If you quickly capture anything into Apple Notes from across iOS/iPadOS/macOS, you’ll likely want to organize your notes at a later, more conducive time. To do this, I’ve created somewhat of an “inbox” of unorganized notes that I peck away at over time. It hinges on a Smart Folder and that’s it.
In short, the Smart Folder search for any notes that do not have a tag. Notes without a tag are stored in chronological order based on the date created in the Smart Folder, and I’ll jump in occasionally to triage as many as I can.
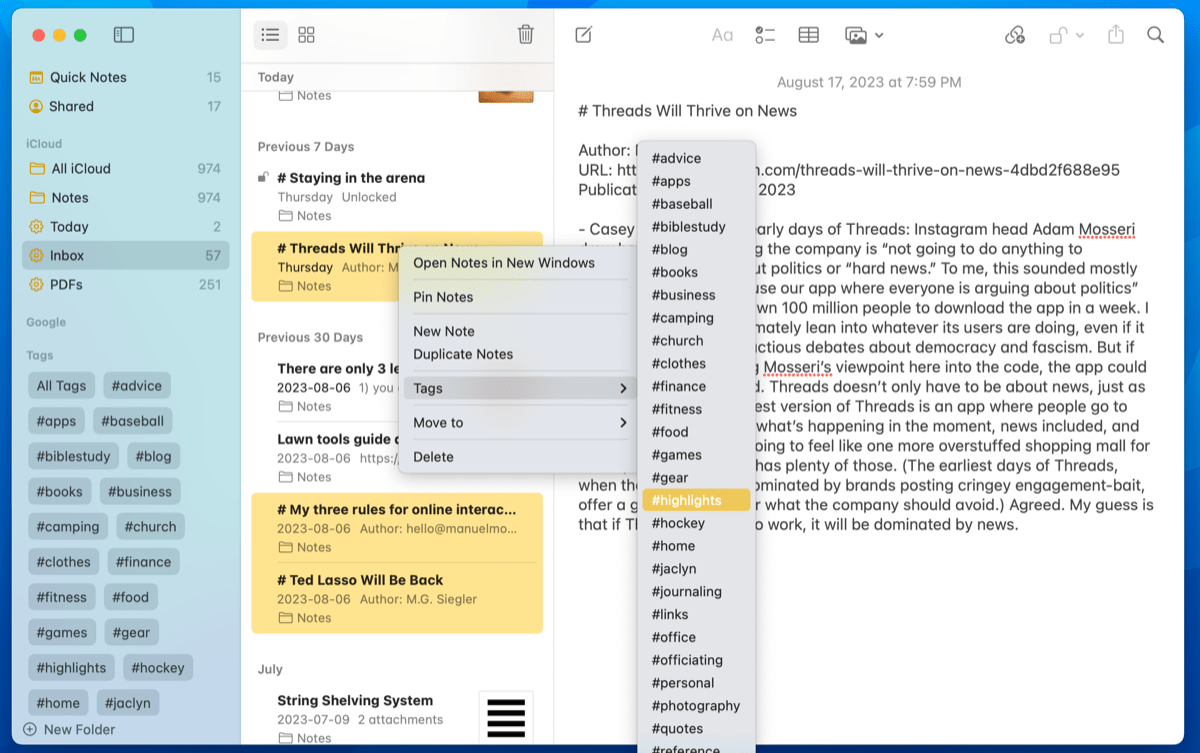
Once in the Smart Folder, it’s easy to select multiple like-notes and quickly apply a single tag. I tend to store all my Matter highlights in Apple Notes these days and all those highlights are captured in a specific way. It doesn’t take much to spot all the highlights in my notes list and quickly apply a #highlights tag to all those notes.
One hiccup here: Once a note has had a tag applied, it immediately gets removed from the Inbox Smart Folder and Notes kicks you back out to the default folder list. This means you have to navigate back into the Inbox Smart Folder to find the next note for tagging and triaging. This can be a bit of a pain if you’re hoping to organize and tag quickly.
Keyboard Shortcuts and Hot Corners for Quick Notes
I noted earlier the handy keyboard shortcuts and hot corner options for creating Quick Notes. But I want to double down on the power of Quick Notes, because they add this overarching layer across the entire operating system. Using Quick Notes, notes can effectively transcend the Notes app entirely and be available wherever you need them.
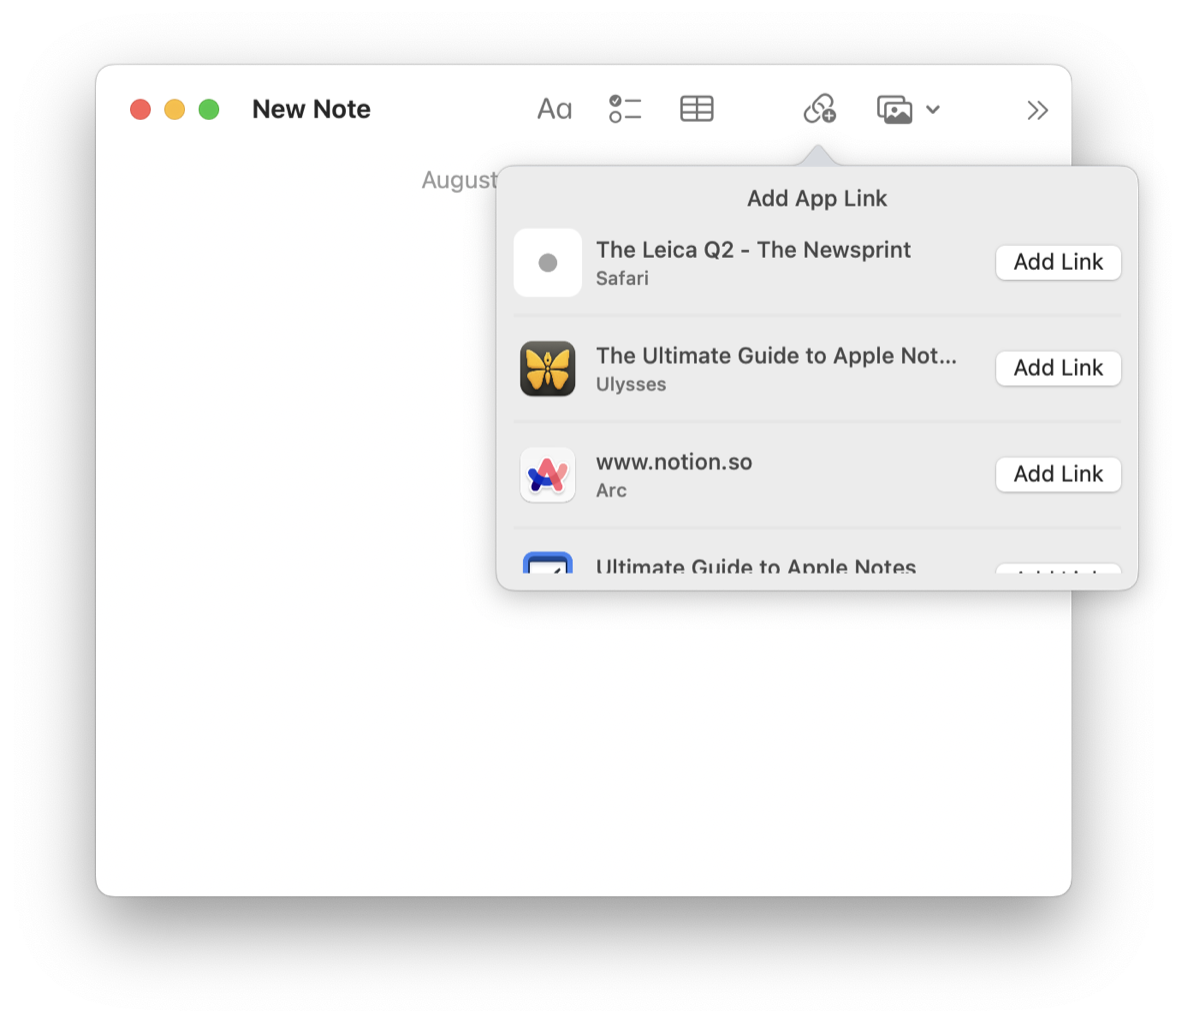
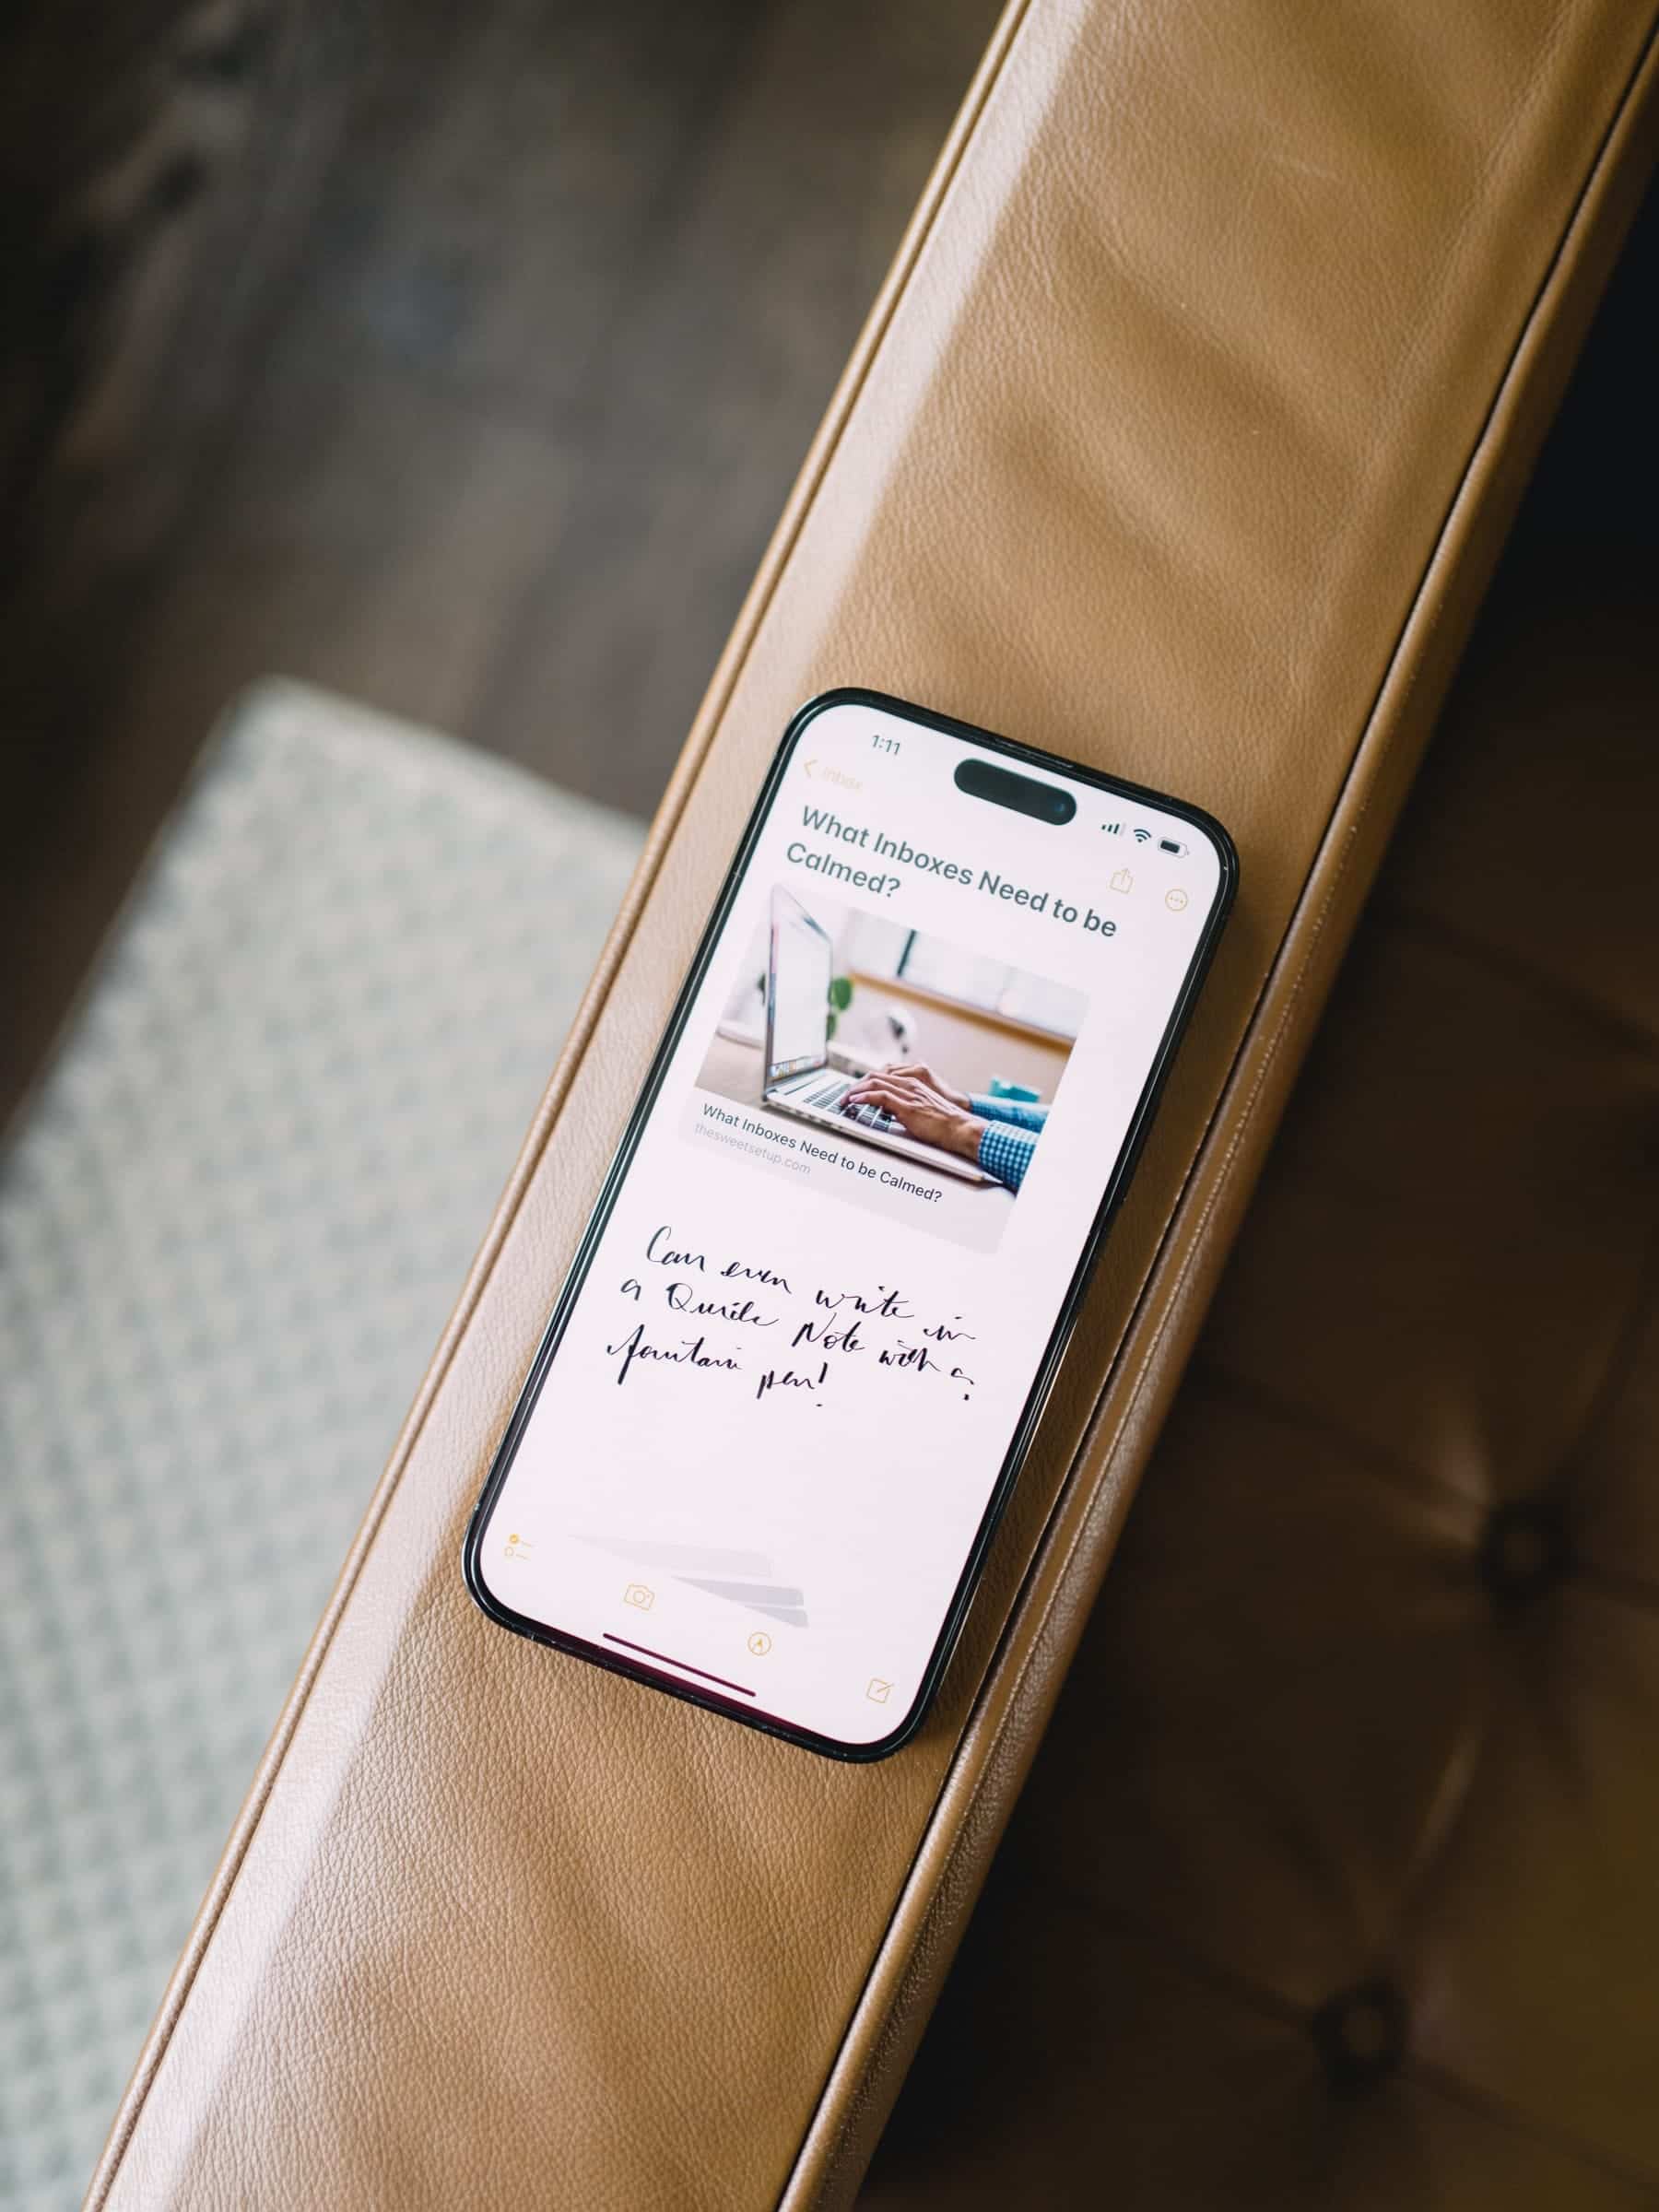
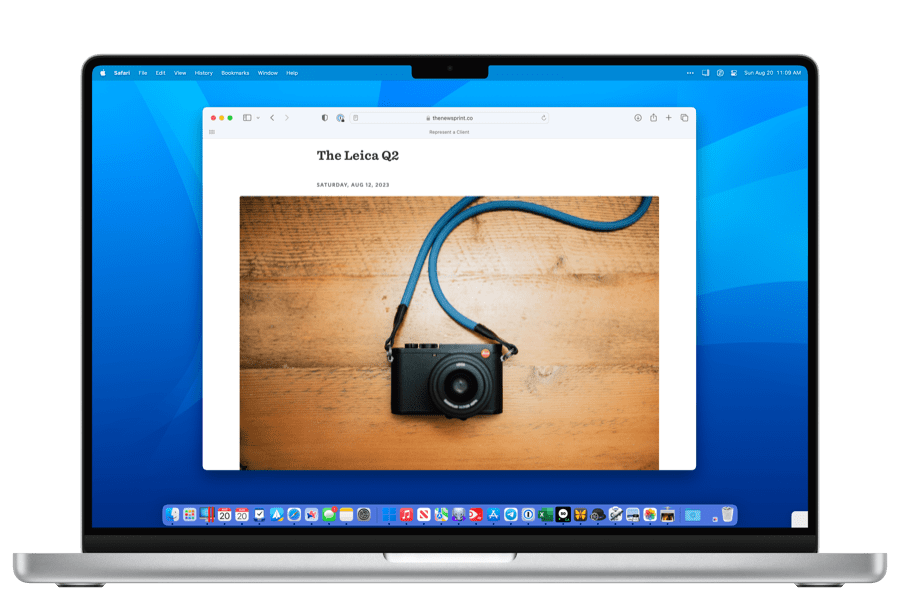
Case in point: Navigate to an article on any of your favorite blogs in Safari and create a Quick Note — either by dragging up from the bottom right corner with the Apple Pencil on the iPad or hovering in the right corner on your Mac — type in the title of the note, and click on the Add Link button in the toolbar. You can quickly add the link from the dropdown menu and add any other information you’d like to store about that article.
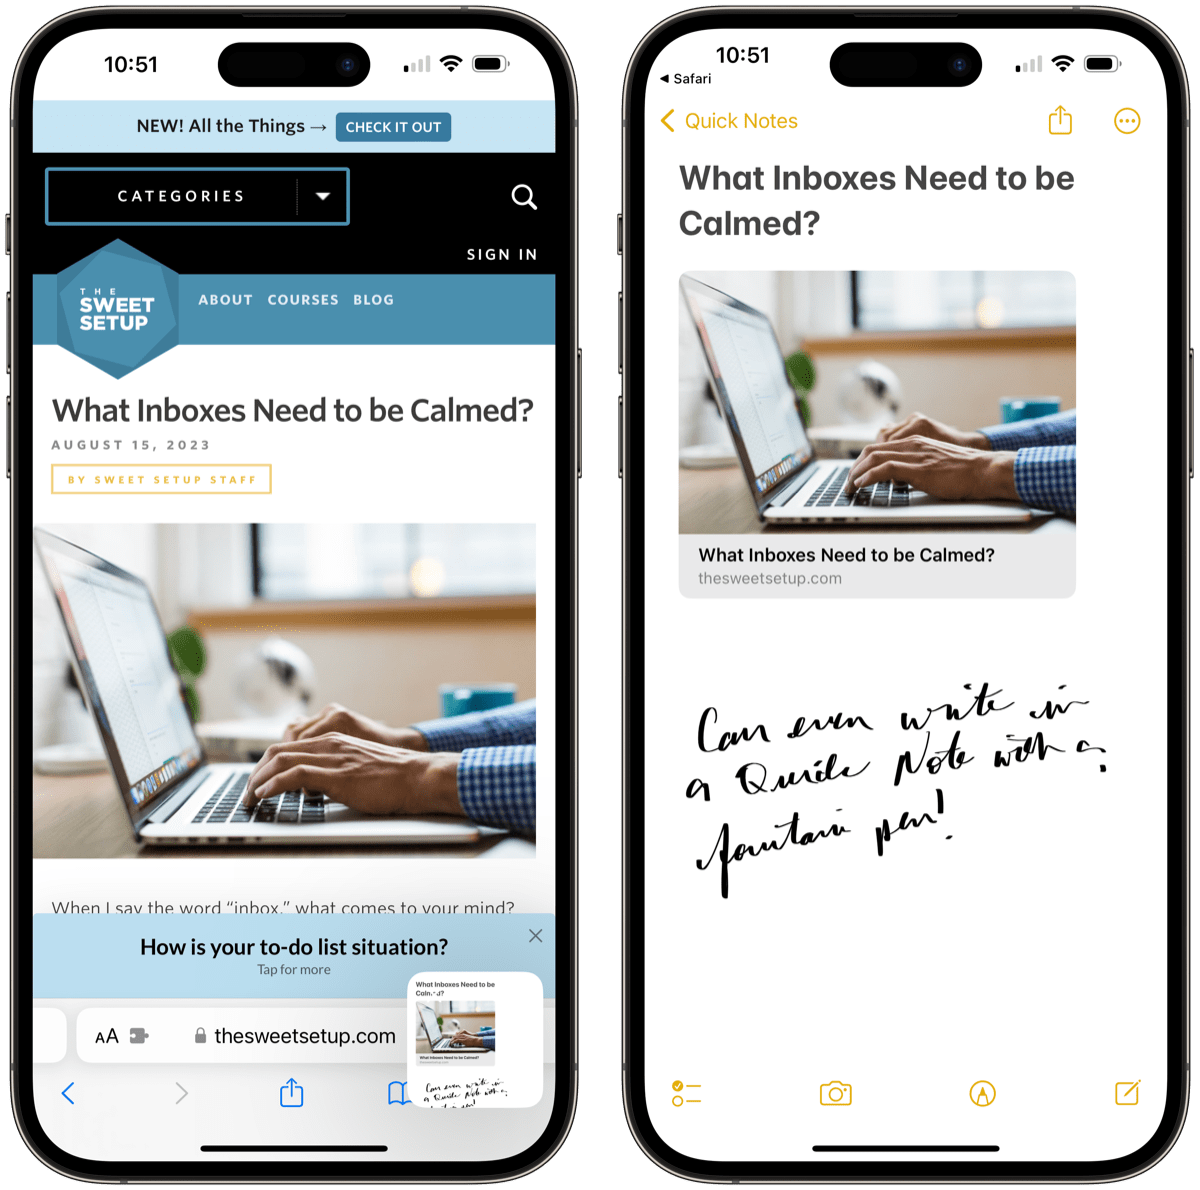
Next, jump onto one of your other devices and load up that particular URL once again. You’ll quickly note that iOS, iPadOS, and macOS provide a little popover of your Quick Note. Tap on that popover and continue editing your Quick Note on the other device.
You’ll quickly see how that Quick Note jumped beyond its boundaries in the Notes app and sprung up again where you needed it when navigating in Safari. This has the potential to unearth some incredible processes, such as deep research on an article that pops up years later when you are stumbling upon your old research.
Starting that Quick Note is as easy as Globe/Fn + Q on a keyboard or a tap of the share sheet to start a new Quick Note. There are no excuses to having notes littered across the internet for all your interests.
Use Pinned Notes to Keep Your Most-Used Notes at the Top of the List

Super simple quick tip here, but it’s going to save you countless time searching through a large notes database. Your most used notes? Pin them. End of story. Pin them to the top of your list and thank me later.
There are so many different things you can do with Notes — you can use Notes for journaling, as a to-do and task manager, as a habit tracker, as a storage depot, as a personal knowledge management system, and more. Each of these uses likely has a particular note that you come back to over and over again — perhaps an index of notes (especially now with back-linking capabilities), or a reading plan stored in a PDF, or a long logbook of completed tasks. By pinning these notes to the top of your list or the top of a folder, you can quickly find everything you need and get back to work.
For me, I’ll export an email that I have to reference over and over right into Notes and pin that note to the top of the list. For instance, I coached a tee ball team this summer and all the important information came in an email. I exported that email to Apple Notes, built out all my to-dos around that email in that note, saved the schedule to that note, and saved my practice plan to that note. Then, whenever it was time for tee ball, that pinned note was right at the top of the list.
Painless. Seemingly obvious for many. But a lifesaver if you didn’t know you could do this.
Conclusion
It’s hard to overstate how powerful Apple Notes has become over the last few years of major iOS, iPadOS, and macOS iterations. Notes has gone from a skeuomorphic nightmare to perhaps the most powerful built-in app on an iPhone or iPad in a short period of time.
You can attribute the short period of time to a number of things. Apple has certainly taken ideas made popular by third-party developers and rebranded those features as their own inside Apple Notes. Apple has also taken advantage of its integrated hardware and software and provided features no other app could ever dream of having.
This combination of features makes Apple Notes a powerful and compelling app for all sorts of users. You may find yourself looking elsewhere if you want to do more writing in Markdown or more back-linking to connect all your note-taking, but even the back-linking chip has fallen with the latest version of iOS, iPadOS, and macOS.
Each year, there’s less and less reason to look for other note-taking apps thanks to the growing power of Apple Notes. I recommend you give it another shot if you looked over the app a few years ago — I guarantee it’s changed enough to reconsider.
FREE Webinar 🎉 The Focused Writer: Improve Your Workflow
If you ever find that your “Deep Work Time” is filled with distractions, procrastination, or the blank page… then join Shawn Blanc for this free class. You’ll get ideas and tips for improving your creative workflows so you can be more focused and less anxious about your writing and creative work..
+ Two big problems that many creators face (and how to get past them them starting today).
+ The 4 steps of an organized writing workflow that will remove stress and procrastination from your creative process.
+ How to organize: ideas for how to simplify and manage your notes.
Free bonus for all registrants: The Show-Up-Every-Day Worksheet (a quick-start guide that will help you be more focused and intentional with your focused work time)