Shooting for an Edit: Capturing Steam to Add Mood
One of my favorite things to do is shoot things in motion. When I do this, the image somehow feels more real and alive. I also love freezing movement in time because it allows our eye to study stopped motion in a way we can’t in real time. Splashes, bubbles, creative blur, smoke, steam, rain, jumps, etc. will all add life and so much more visual interest to a shot.
I like shooting steam in particular, because not only can I cause and control it whenever I want, it instantly adds a cozy mood and an element of storytelling to the image I create. Nearly every time I shoot steam, it’s a planned shot with an idea in mind of how the end result will look after I edit the photograph.
The funny thing about steam is while we can see it so clearly with our eyes, sometimes, just like rain, it won’t show up in a photograph. I’ve found there are a few tricks to capturing it well.
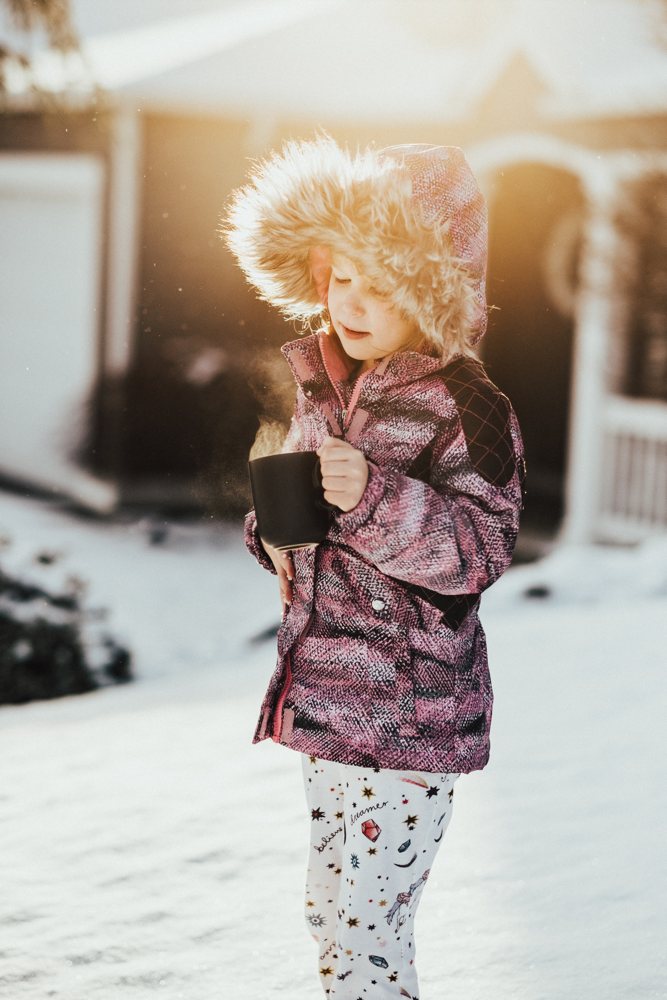
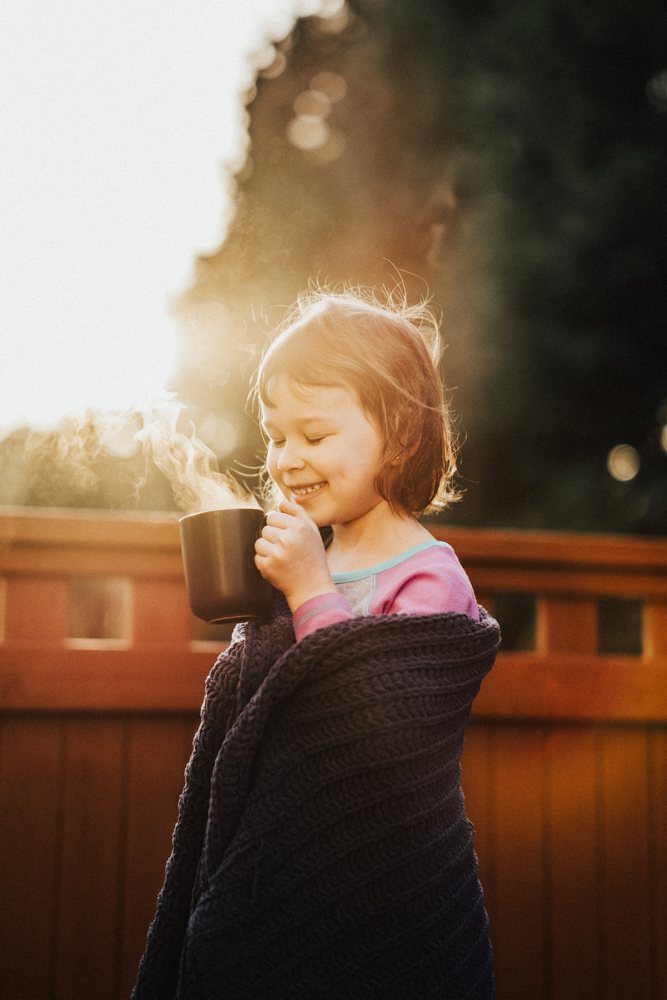
First, it’s important to create as much steam as possible so that enough of it shows up in the image. I usually use hot water, straight from the tea kettle, rather than actual cocoa, coffee, or soup (when I involve my girls in the shot, I do give them real cocoa afterward!). I pour the boiling hot water into the mug or bowl immediately before starting my shoot. The best steam will be gone within about one minute. (If I’m having my daughters hold the mug, I pour only about half an inch of water into the mug, and help them steady it before I let go and take a few quick shots so that they do not burn themselves. Sometimes, if I feel they aren’t steady enough, I’ll also dump it all out, and the hot mug itself will still let off enough steam for a few shots.) If I can, I shoot outside when it’s chilly to also help make the steam thicker in the colder air.
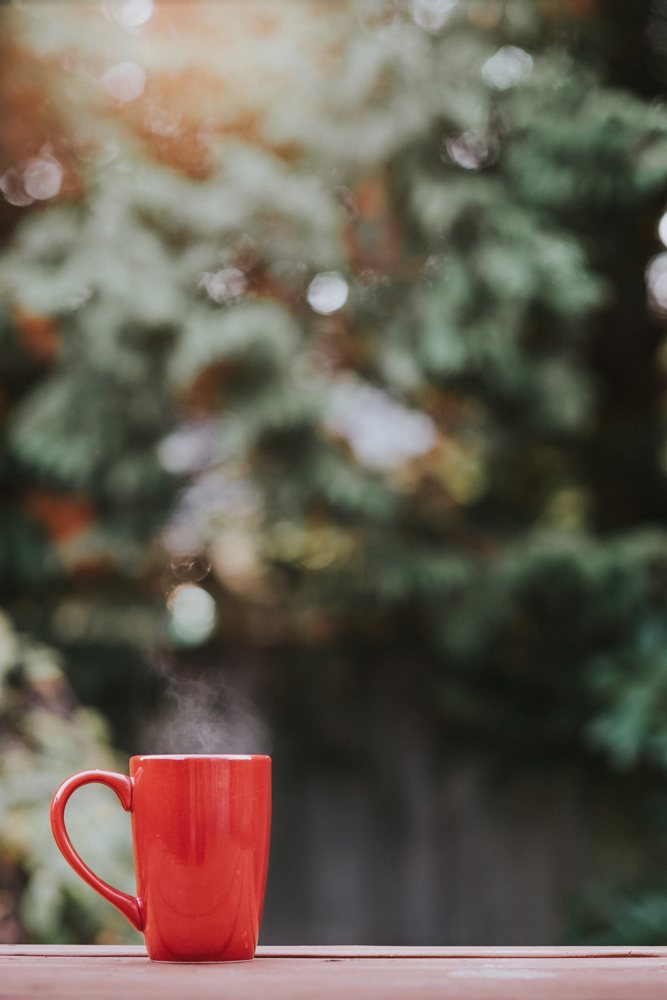
Once my steam is in place, I look for a way to backlight it. If I’m inside, I need a window behind my steaming item. If I’m outside, I place the sun behind my subject. By placing the light behind the steam, it allows the white vapor to reflect light and look thicker and more present.
The next, super-important thing is angle. The angle is crucial to actually capturing the steam in the photo itself. If the light isn’t hitting it just right, adjust yourself. Get closer, crouch lower, tilt left or right, and check your screen as you’re shooting to see whether it’s actually showing up in the images. Once you have a great angle locked in, shoot quite a few: the steam will curl and unfurl in such beautiful, unpredictable ways, and it’s nice to have a few shots from which to choose the most interesting steam pattern.
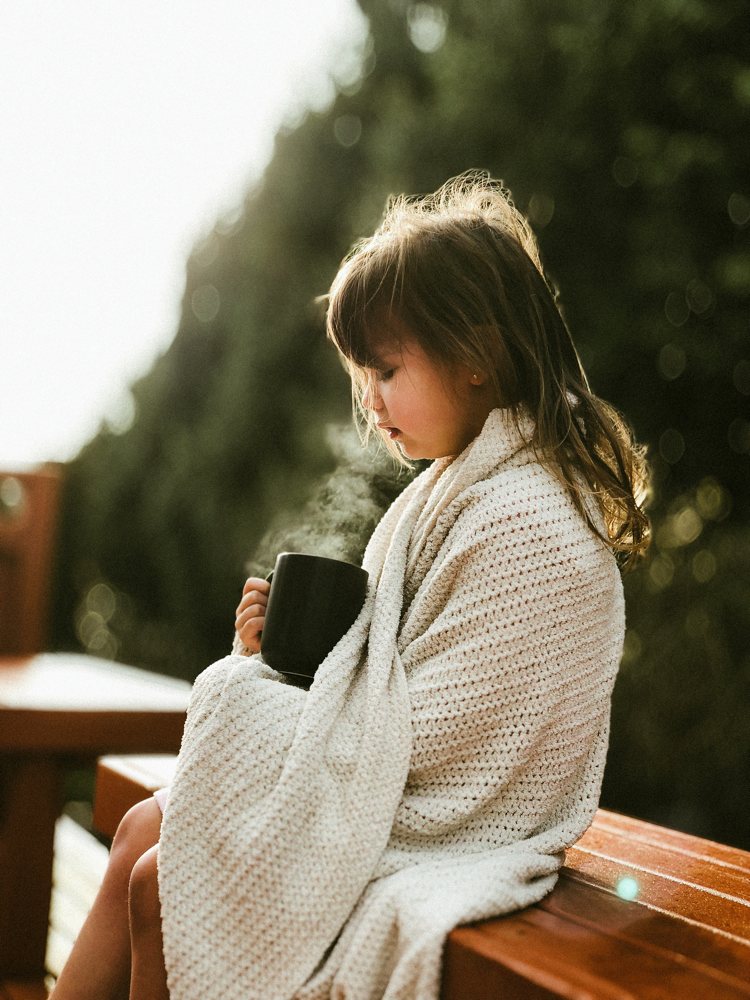
I shoot steam with both my Fujifilm XT-1 and my iPhone. In fact, the shot above with my daughter in the blanket was shot on iPhone X, but iPhone can be a bit more tricky — especially if you’re using Portrait Mode. Sometimes, Portrait Mode thinks the steam is part of the background and blurs it, so you end up with a photo of just a mug. Other times, like in the shot above, it treats the background caught up with the steam as foreground, and it just doesn’t look at clean as a steam shot with my Fuji. Be careful if you’re trying to capture steam using portrait mode. Make sure the light is right, and try a few shots with Portrait Mode turned off as well, just in case. Luckily, the selective depth feature on the newest iPhones does allow steam that’s been blurred by Portrait Mode to be “saved” a bit if you back the blur feature way off.
Here’s a video while composing a steam shot using Portrait Mode on the iPhone XS:
As you can see, it shows the many angles I move through to try and capture the best view of the steam that I possibly can. Once I get it in just the right spot, I shoot like crazy. With a mug or bowl, I usually approach it from the side, never above and not too far below, to show the steam the best.
You’ll notice as I was shooting in the video that I didn’t drag the exposure down like I usually do when I shoot with my iPhone. With steam, underexposing too much, or sometimes at all, makes the steam disappear in the shot. Occasionally, I’ll even overexpose to catch thicker looking steam.
When I was shooting in the video, I ended up moving the mug to the other size of the table, switching sides where I was positioned, and managed to catch a decent shot of the steam using portrait mode. The ones I had shot in the video in Portrait Mode didn’t turn out — even though they looked like they would — the steam was “background” and almost completely invisible.
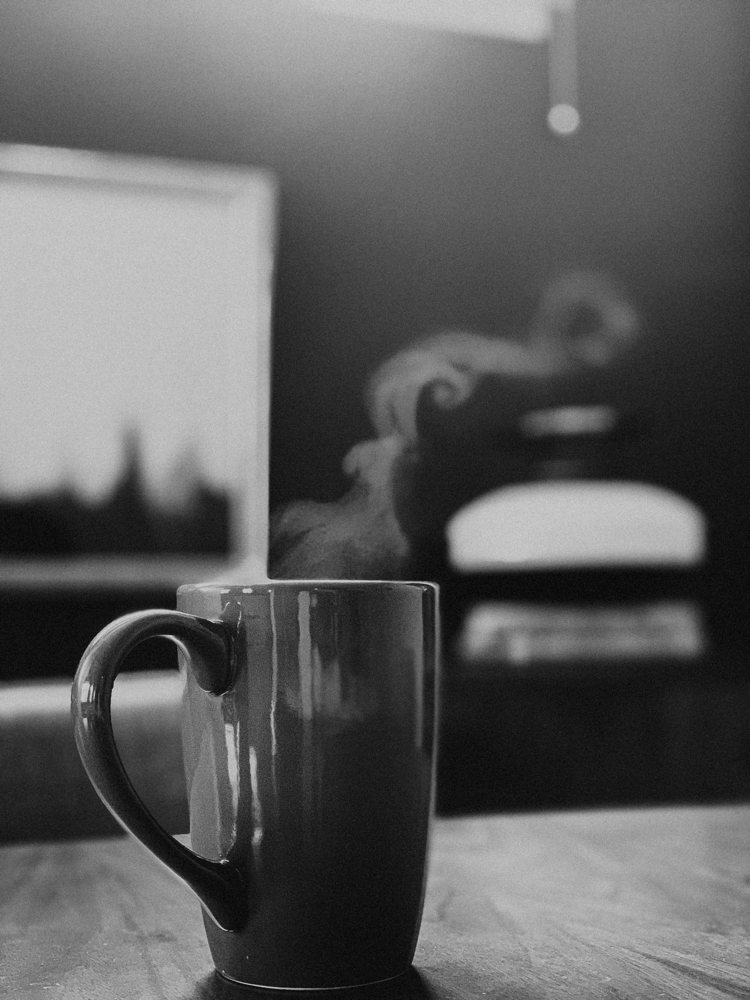
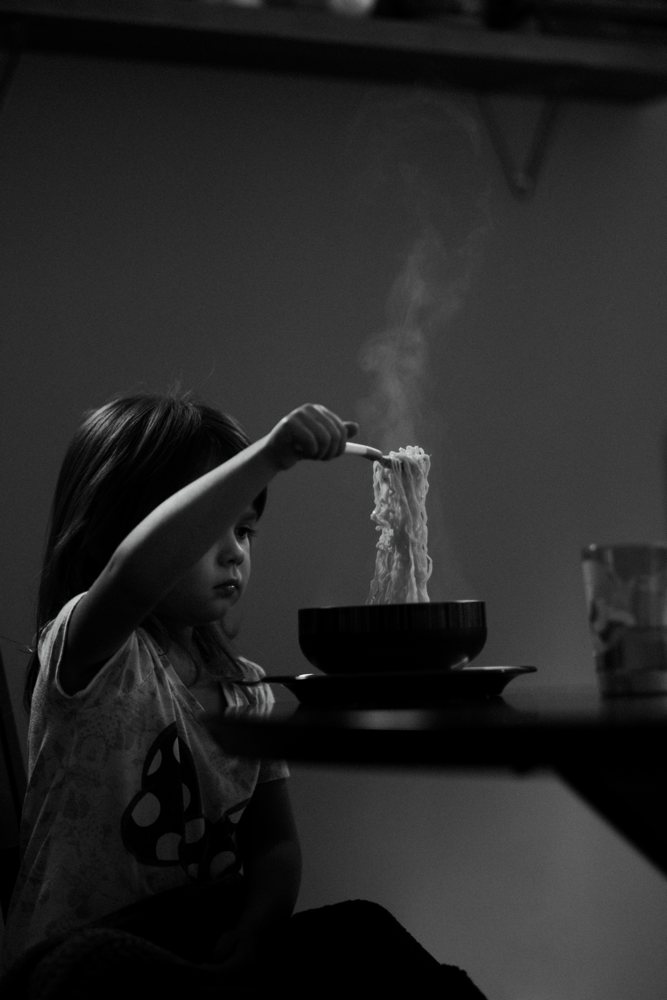
Even in the shot I did get, the steam wasn’t very thick, so I decided to do a black and white edit to enhance it a bit more. Converting to black and white is a great way to make the brightness of steam (smoke, fog, breath, snow, anything white and reflective) stand out.
A start-to-finish edit:
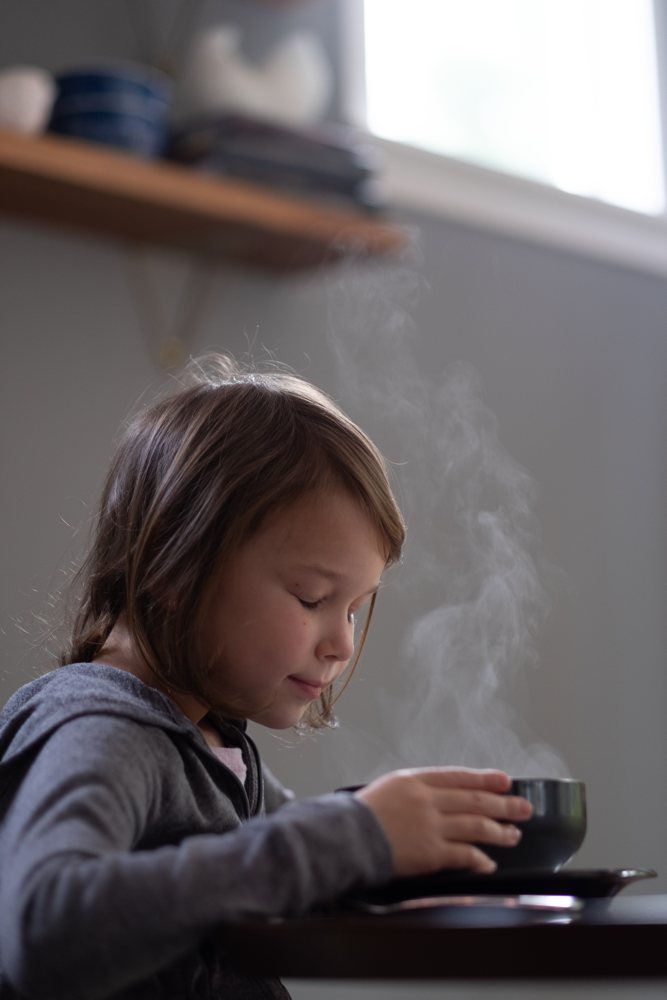
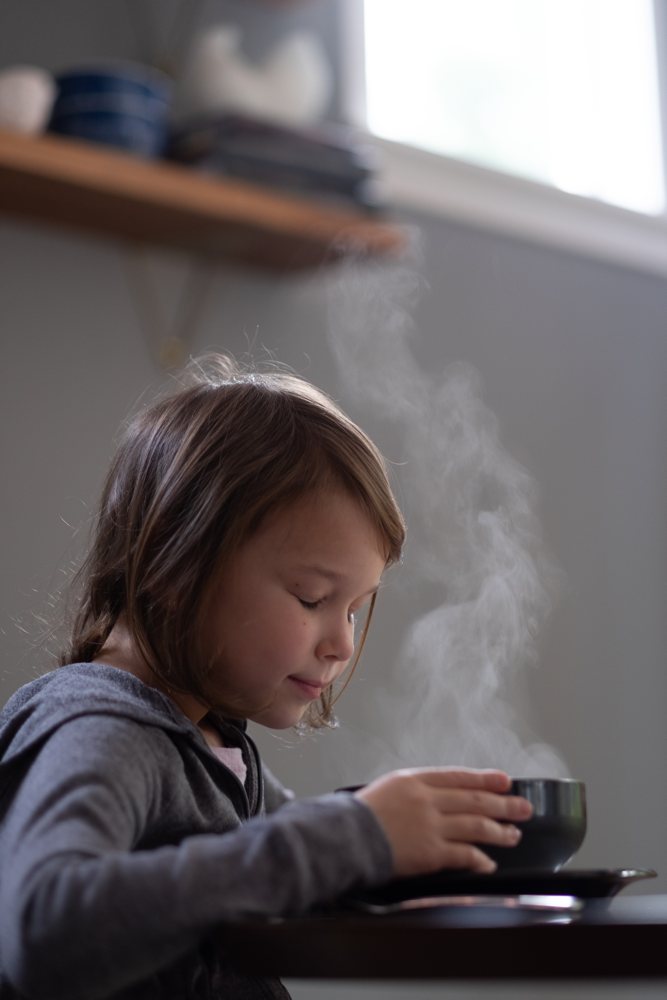
This above image is straight out of my XT-1 with no edits. I shot it with this article in mind. I knew this spot with the window in the back and knew it would illuminate steam well. My daughter was eating chicken noodle soup, and the steam looked beautiful. I asked her if she’d be willing to do a quick photo, and boiled some water in the kettle. I poured the water into a new bowl, and swapped out her real soup for it before taking a few shots of the extra steam.
I positioned her body so that she would be facing the bowl as it was backlit, and I knelt down and shot from under her in order to catch the light, because the window in that room is high. Once I had my angle locked in, I shot for about 30 seconds.
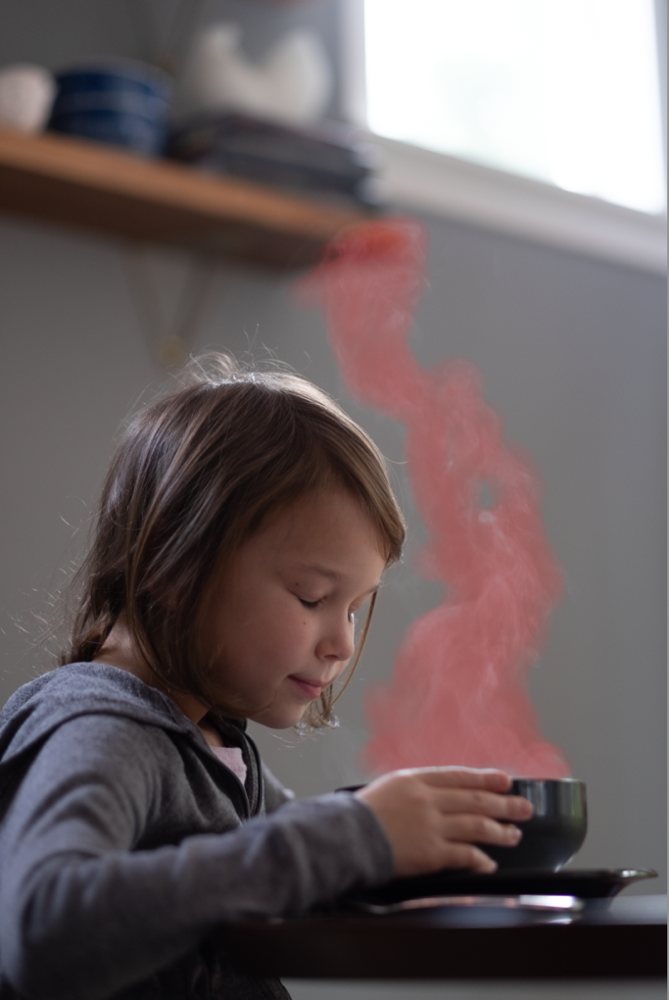
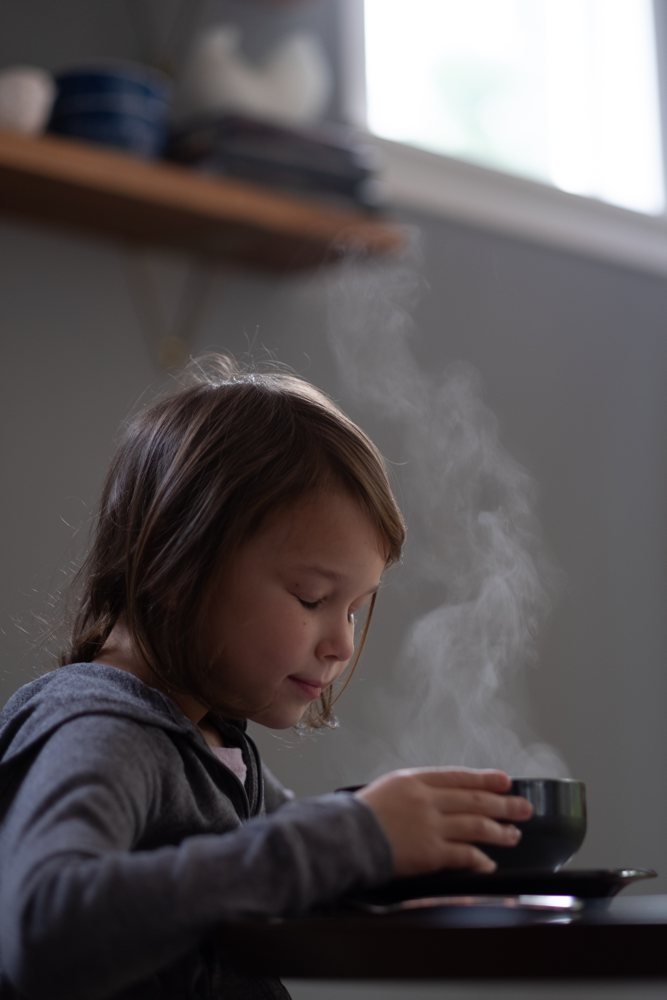
When I pulled my selected shot into Lightroom, The first thing I did was dodge the steam to make it stand out even more. This is an area where one can get carried away and go overboard. I am careful to try and keep it natural and don’t usually bring up the exposure more than about +.25 to +.50. It’s also really important to be careful at the ridge of the mug or bowl and not leave it out and create a “gap” in the steam. I also enhanced the clarity in the dodged section just a touch to highlight the tiny tendrils and swirls. You can see below, the slight difference from just doing that to the steam:
Next, I took the exposure of the overall image down by -.75. I wanted to create a darker, quieter, more solitary mood, and to enhance the focus on the steam.
Lastly, I selected a preset I love, it’s a Heck Yeah Bright pack preset I have tweaked to my own preferences. I chose it because unlike many of the popular styles that tend to flatten images a bit, these do the opposite. They take the blacks way down, the whites up, the contrast up, the shadows down, and the highlights up. These are all things you can manipulate to enhance the visibility of backlit, white, bright steam. Anything that brings up the light and the whites of the shot will help. Just again, be careful to not go overboard. Don’t blow out the steam or highlights on a face in the shot. I also added some warmth to the shot here, but kept a close eye to not let the steam veer from white to tan.
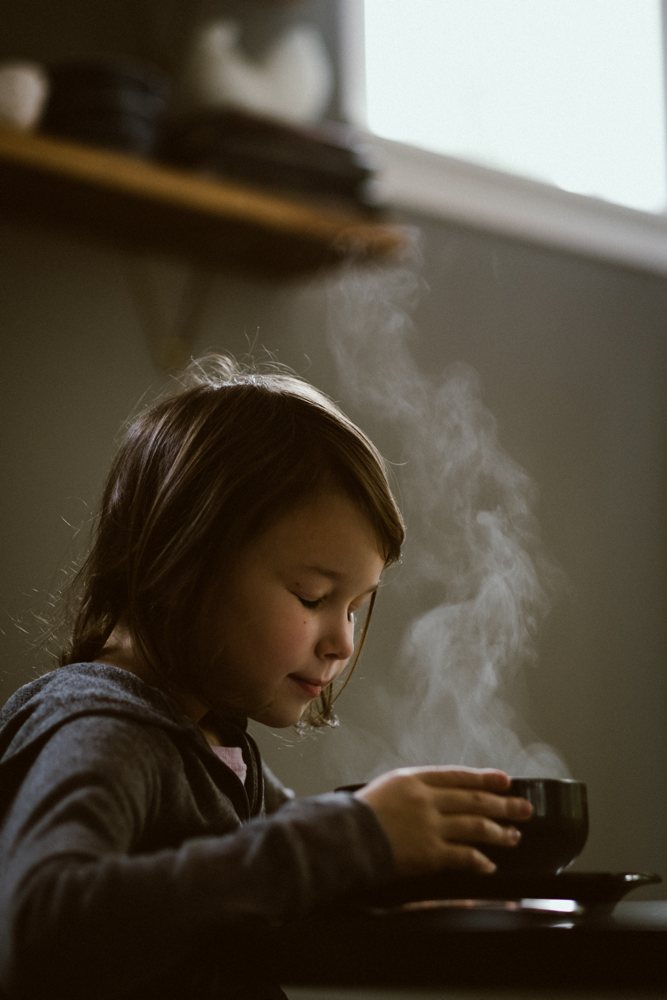
You can see that the steam here steals the show, and creates so much life and a cozy mood. It’s a great effect to play with and to enhance your skill set and storytelling abilities in your photographs, especially as we head into the colder months and holiday season.
Get Our Best Photography Tips & Workflows
Transform your photos and edits from average to awesome with our in-depth, mobile photography course. It’s jam-packed with training, ideas, and lessons that can literally transform your photography overnight.