Quick Capture with Ulysses on iOS: Using the Share Sheet and Shortcuts to Save Ideas, Notes, and More
In the modern world, you can come across countless ideas, notes, quotes, inspiration, and interesting links every day. But as a writer, you’re often focusing on your own work — how do you capture and make sense of what comes your way?
When you’re trying to observe, understand, and write about it all, having a system to help you can take the pressure off and reduce the complexity so you can focus on what matters most.
Ulysses is fantastic for all of that — and more — by allowing you to organize the “idea clutter” into something manageable and ultimately more useful.
Plus, the digital nature of Ulysses allows it to extend beyond the walls of its own app and operate within a greater workflow — especially on iOS — thanks to two features:
- The built-in Share sheet in iOS: Accessible from just about any app on your iPhone or iPad, the Ulysses action extension lets you share directly into any of your groups, plus capture any shared text.
- The native actions for Ulysses in the Shortcuts app: Thanks to the custom integrations with the Ulysses URL scheme from the Workflow era, your writing can be scripted inside custom shortcuts for powerful automations, set up just how you like.
This article covers utilizing the Ulysses action extension in the iOS Share sheet, plus expanding into Shortcuts’ action extension to utilize the Ulysses actions there. Let’s dive in.
Maximizing the Built-In Ulysses Share Sheet
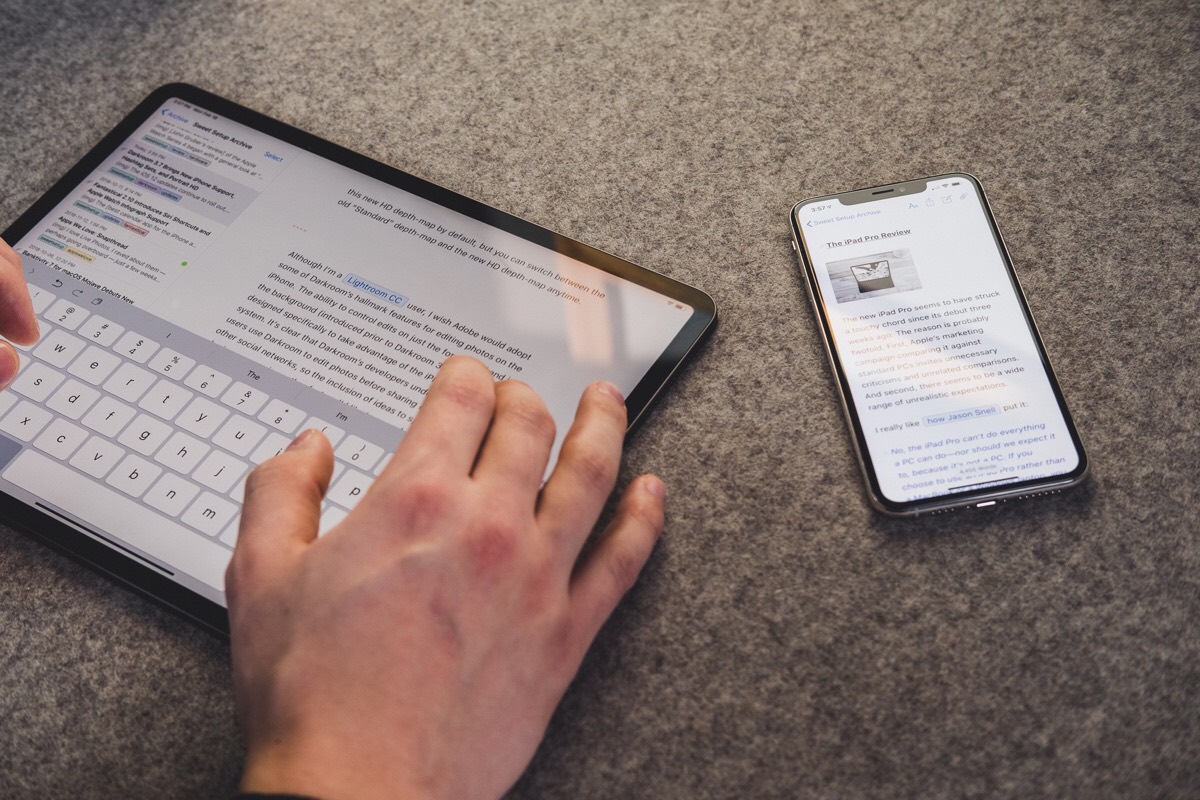
In regular usage of iPhones and iPads, people share information in and out of apps using the Share sheet built into the system. Often represented by a box with an upward arrow pointing out of it, tapping the Share button pops up a list of what are called extensions.
On the top row, Share extensions pass data out of the current application and into another app (on the bottom, action extensions “act” on the page and utilize it somehow, but do not necessarily share information).
Ulysses itself has a native extension in the Share sheet for iPhones and iPads that allows you to capture information into the app from another app.

If you have Ulysses installed and have activated the extension from the edit portion at the end of the row of share extensions, you’ll be able to share from an app, tap the Ulysses icon, and edit the shared text before sending it into Ulysses.
When sharing to the Ulysses extension, you can modify the text being shared before adding it into your library — if you’re looking at a webpage, for example, it will provide the title and the source link in Markdown.
Or, if you want to share from any text, you can select the text, tap Share in the contextual menu, and send that text into Ulysses as well.
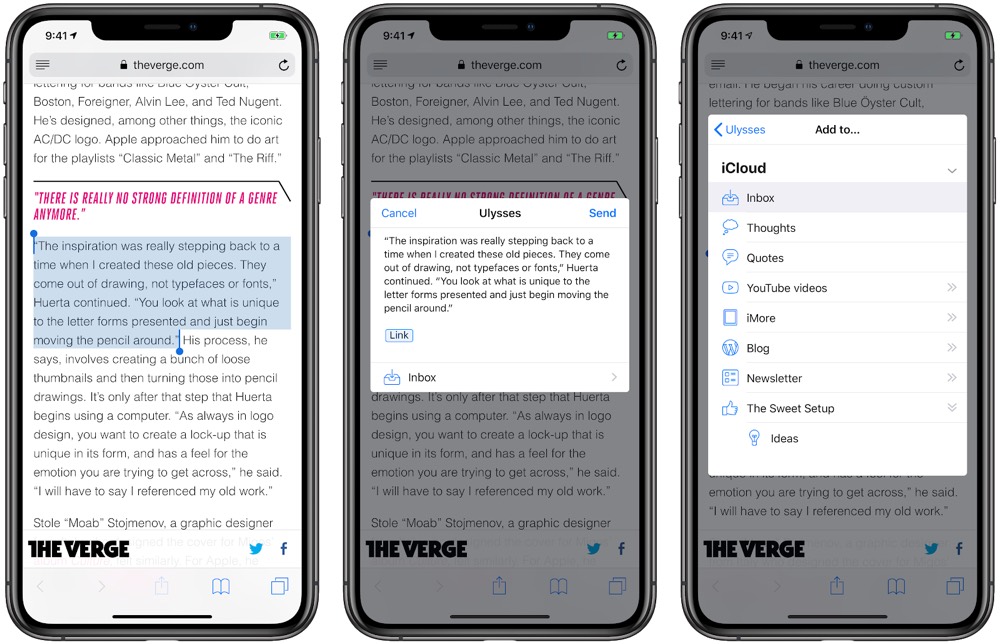
By default, Ulysses sends the Share sheet text into the Inbox, but there’s also a button on the screen that allows you to choose one of your pre-defined groups. In addition, once you use that group in the Share sheet, Ulysses will remember it in case you’re sharing the same thing over and over.
Plus, if you want to share images into Ulysses, you can select them from somewhere like Photos or Files and add them to a new sheet.
One thing to note: each app determines how the text is shared to any Share extension, so be sure to test the results. An app like Safari does different things with text depending on if you’re sharing from the Share extension or sharing from the highlighted text context menu.
If you’re looking for a faster way to collect information into Ulysses, then the Share sheet is a fantastic option. It’s miles beyond copy and paste, has some additional benefits like gathering extra metadata compared to methods like drag and drop on the iPad, and gives you access to tons of information on your device that you don’t have to rewrite on your own.
However, there’s even more possibility with Ulysses thanks to its deep and unique integrations with the new Shortcuts app from Apple. Not only can you automate advanced routines or pre-format your text just how you like it, but you can also immediately attach keywords or text to your sheets. There’s a whole world of possibilities.
Note: We’ve covered the details of how the Ulysses actions in Shortcuts work as well as how utilize the Sheet IDs and the URL schemes behind them in our Learn Ulysses course.
Stop losing your ideas and notes to multiple apps…
An online course to help you save time, organize your notes, and master the best writing app for Mac and iOS: Ulysses.
Using Shortcuts and Automation to Send Things to Ulysses
Thanks to Apple’s Shortcuts app, you can streamline and automate just about any aspect of your Quick Capture process, allowing you to grab richer information from an app you’re sharing from, format it exactly how you want it to end up in Ulysses, and define places where you send the text deep into your groups.
Plus, there are further ways to append or attach text, keywords, and images to sheets, bring information from your sheets into Shortcuts for further automation, and dive into areas of your Ulysses library quickly.
I’ve created five shortcuts that you can use to quickly capture information into Ulysses on iOS. You can add these to your own iOS Shortcuts app and begin using them as is, or modify them as much as you like.
While this may seem like a lot to add on top of a clutter-free writing experience, once you’ve built the structure for your writing, custom shortcuts can improve and speed up your quick capture process— especially when you’re in the moment of inspiration.
The Shortcuts
Here is a brief introduction to each of the shortcuts I’ve created for you that we’ll be covering in depth. Below, you can navigate through the shortcuts and read through the explanations and examples for each shortcut.
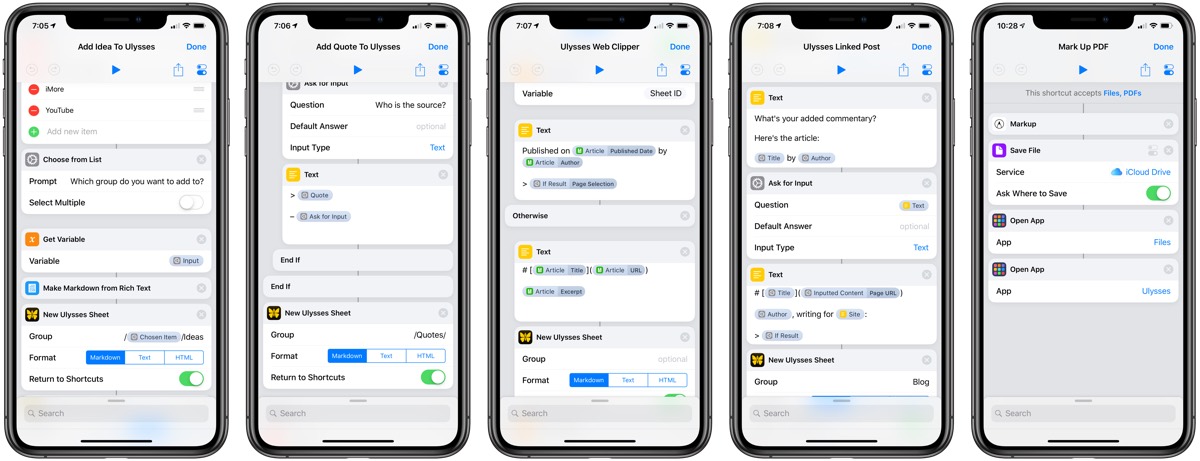
- Add Idea to Ulysses: A quick idea capture tool that lets you save new thoughts for articles into any Ulysses group.
- Save Linked Post: A way to quickly capture material for linked-post blog posts, quoting a source while adding commentary and making it readily available for posting to WordPress.
- Add Quote to Ulysses: Saves quotes for a journal of thoughts and thinkers, while also allowing you to tweak it to make it easy to log and review your quotes. A multi-tool for using Ulysses as a sort of commonplace book.
- Ulysses Web Clipper: A more advanced capture tool that provides automatic formatting of the source material, lets you choose where to place it, and attaches keywords, a note, and image to the same sheet. Basically, a fancy Evernote-style web clipper made to work with the Ulysses sheets metaphor.
- Mark Up PDF: Finally, I have an example of using Ulysses with Shortcuts for automation, but interacting with an exported PDF and marking it up with an Apple Pencil. Sometimes automation just means establishing a good workflow, not removing every level of interaction.
All together, these shortcuts provide a powerful framework around my Ulysses library that I use to streamline and improve my writing workflow.
For example, links that I come across and that I want to share on my personal blog have a higher likelihood of making it to that published stage because the capture process is painless thanks to this customized Shortcut.
It is also easier for me to keep track of the things that inspire me in a way that’s organized and archived in just the way I prefer.
Combining automation techniques like this with Ulysses allows me to be more focused and productive. I can take all my ideas, links, notes, and other tidbits of inspiration and actually do something with them in the moment without losing my concentration.
Now I can focus and just write when the feeling is right — isn’t that the enjoyable part after all? Let’s dig in.
Save All Your Ideas
We want to avoid too much complexity and start with a basis of why these automations are important, and that’s why we’ll begin with the Add Idea to Ulysses shortcut.
Ideas are the most vulnerable stage of writing and also the easiest spot for something great to die before it has a chance to grow. For me, that often comes from the disorganization of keeping track of my ideas, but Ulysses and its organizational framework for Groups within its library gives a space to save those ideas — so you can bet I’m using Shortcuts to help!
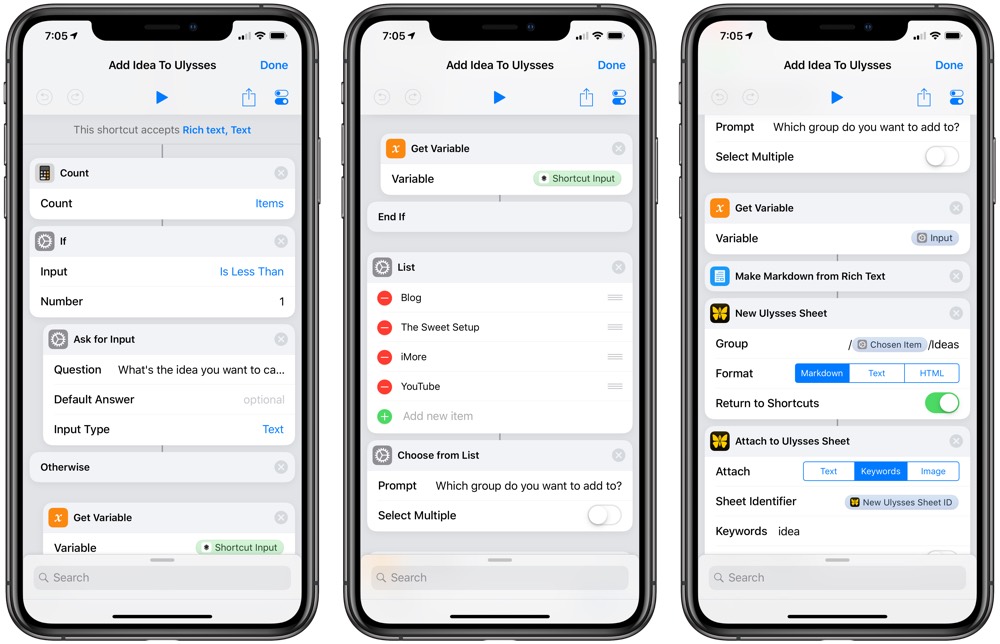
This shortcut works by asking me to enter my own text (or taking any that might be shared as input) before picking which group to add it to. This shortcut starts off immediately with the idea. If I have an idea, I want to run this shortcut and start typing right away so that inspiration doesn’t have to strike twice.1
First, here’s a quick rundown of the action steps to explain what’s happening:
- The
CountandIfactions are checking whether you’re using the Shortcuts share sheet action extension, and, if not, asks you to type in the idea. - The
ListandChoose From Listactions provide the options for your sheets and the ability to pick one when the shortcut is run. Get Variableretrieves the initial data generated from either the share sheet or what you typed in, converts it usingMake Markdown from Rich Textin case there is any formatting you applied, and passes it to the next step.New Ulysses Sheetaccepts the text from the previous step and sends it into your group (represented byChosen Item) and the subgroup of Ideas. Then, it opens Ulysses using the URL scheme, drops off the text, and returns to Shortcuts with the new Sheet ID it generated for that new sheet.- That new Sheet ID is then used in the
Attach to Ulyssesaction, which applies Idea as a keyword to the sheet so it can be filtered later across all groups.
Using this shortcut, I can come across an idea or have one myself, run this shortcut, and pump it straight into the right place.
Plus, I can take advantage of the Ulysses filters tool and look at all of my Ideas across those groups later. I set up a Smart Group (also called “Ideas”) that filters by sheets tagged with Ideas, so I open into this master group whenever I want to write a new piece and can pull from a list of ideas I’ve saved across all of my different areas of work, all in one place.
By automating where I’m putting the ideas, I now have a much stronger framework for capturing ideas and turning them into something more, but not at the expense of my brain space during each capture session. I can also capture all of my ideas in other apps like MindNode or Drafts and use this shortcut to funnel them into my system built around Ulysses.
Speeding Up Linked Posts
Once I built my method of saving ideas using Shortcuts, I moved on to more methods for capturing content I come across. The Save Linked Post shortcut lets me quickly take any links from apps or Safari web pages and create a well-formatted link post on my blog (via Ulysses).
With Shortcuts, I wanted to get a few details down immediately when I captured the link:
- The website and article title in the name of the post, hyperlinked to the original source.
- The author’s name hyperlinked to the original article as well.
- Quoted text, either shared, typed out, or pasted in by me, formatted as a quote.
- My additional commentary of why I’m sharing this link on my website.
- A large hyperlink at the end promoting the original source.
- The quote and source material attached to the sheet, in case I change things inside the post but want to reference the original later.
With some experimentation and trial-and-error, I put together a shortcut that does just that.
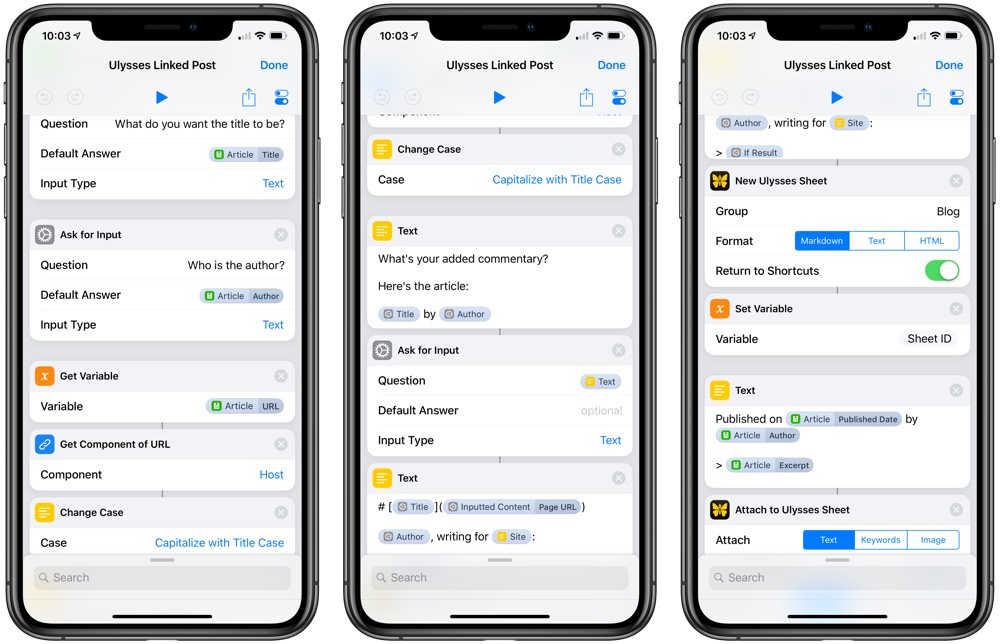
- It checks for the type of input, either taking incoming information from the Share sheet or otherwise looking for the clipboard (which I use when running this from the Shortcuts widget)
- Then, it uses
Get Typeto look at the data passed as input and passes that into theIfaction. Here, the conditions are set up to see if it was shared from Safari, which has special capabilities to capture selected text when you use the direct Share sheet inside the Safari app (not the select text and share, however, which is confusing). If it was from Safari, it gets that quoted text; otherwise, theAsk For Inputaction pops up with the text to be quoted. The copied content from earlier is used by default. - After that, the
Get VariableandGet Diffbot Article from Pageactions take that original content and extract any available article information using the Diffbot service. If so, information like the Title and Author will be captured automatically. - Two
Ask For Inputactions ask you to confirm the Title and Author. If they’re not available, you can quickly type them in one by one. Get Variable,Get Component of URL, andChange Casework together on the original link to isolate just the website name and convert it to Title Case, and then anotherAsk For Inputlets you quickly adjust it if necessary.- An additional
Textaction generates the prompt for the nextAsk For Inputaction, which asks, “What’s your commentary?” This is where I enter my comments. - The next
Textaction is where I combine all of my previousAsk For Inputdata into a fully-formatted link post. ANew Ulysses Sheetaction then sends it off to my Blog category where I share links. - The
Set Variableaction saves the Sheet ID manually, just before anotherTextaction that takes the same text information from above formats it to be attached to the same Ulysses sheet.
Overall, the Shortcut does require eight different interactions, but that’s actually a benefit, not a problem. These all occur in order without me having to think about a single step, so the entire thing flows very smoothly throughout.
Running the shortcut grabs as much information as it can for me, and I only have to poke out the few details that need to be added. Then, I can focus on what I want to say, and it’s all sent off to Ulysses for me.
From there, I can keep the linked post until it’s ready to be part of my weekly schedule of links, as well as reference the source material at any moment, and then the whole post is ready to be posted to my blog.
One thing to note: The native WordPress integration in Ulysses likes to use the first text attachment as the excerpt to your post, so you may want to remove the attached text or replace it with another before sharing.
With the shortcut, I’ve already been linking to other cool shortcuts people have built and built up a whole queue for later too.
Previously, I had a tendency to find articles, save them for later, then never really get around to sharing them. Now I’ve predefined the process and all I need to do is find good links and develop my thoughts about them before they’re ready to publish.
Make Your Own Quote Book
This next quick capture shortcut builds a way to quickly save quotes to Ulysses. Called Save Quote To Ulysses, the shortcut helps me capture important passages into Ulysses to create my own quote book of sorts.
With this shortcut, I can use Markdown formatting to display the quote nicely, plus label them with a set of keywords to give them additional context for later.2
Here’s how it works:
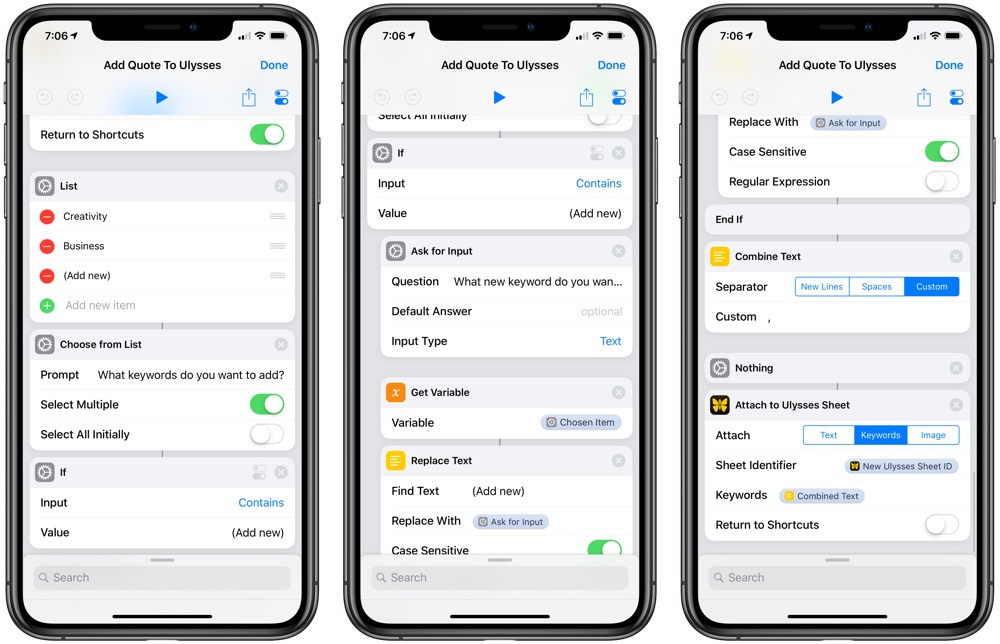
Count,If,Get Clipboard, andGet Variableperform the same check for text from other apps sent through the share extension or dragged in as input, otherwise using text copied to the clipboard.- After the
Get Typeaction, anotherIfaction does the same Safari check to look for selected text sent from Safari.Ask For Inputprompts you to enter the source of the quote manually, then appends the page URL as a Markdown link in theTextaction. - If there’s not a Safari page, the
Otherwiseaction takes over andGet Variablesbrings in the input again, checking withGet TypeandIffor a URL. If there is a URL, it uses Diffbot to retrieve more information,Ask For Inputasks you to enter the quote, and then it formats the text accordingly. - Without any URL or Safari page present, the
Otherwisesection includes twoAsk For Inputactions for you to enter the quote and then the source. This is what happens if you run the shortcut with no inputs at all. New Ulysses Sheetdrops the finalTextthat’s passed out ofEnd Ifinto Ulysses, sets Quotes as the group, then returns to Shortcuts (and the Sheet ID is automatically generated as a magic variable, which is used later).- The
List,Choose From List,If,Ask For Input,Get Variable, andReplace Textsection is where keywords are added.Listcan be pre-filled with as many keywords as you want, but the (Add new) option is there to let you enter new keywords on the fly as well. - If you select (Add new) from
Choose From List, you’ll see anotherAsk For Inputthat prompts you to enter keywords (one per line). Then,Get Variableretrieves the items that you picked earlier, andReplace Textswaps out the text from (Add new) with your new keywords). - Once you’ve chosen all your keywords and any new ones are passed out of
End Ifas a list of options,Combine Textuses a custom separator to combine them using commas (because this is how Ulysses accepts keywords in their URL scheme).3 - Finally,
Attach To Ulysses Sheettakes the Sheet ID from earlier, opens to that document, and attaches your keywords.
As with the other shortcuts, this shortcut works both as a share extension and a drag-and-drop action, but it can also use the clipboard, so this is great Shortcut that you can run from the widget or Spotlight as well. And, it also includes the same Safari logic to capture any Page Selections as the quoted text if present.
This shortcut is also great for any quotes you come across in books because you can easily format the information without thinking about it.
With this shortcut, saving different types of quotes to Ulysses as I come across them (with ranging information available) with my own tagging system applied on top is so simple and convenient.
The Ulysses Web Clipper
I’m often taking advantage of Ulysses for collection, curation, and combination while working on newsletters, blog posts, or scripts for videos. These are usually active projects where I do the work, review it, complete it, and move it out of Ulysses when I’m done. I have main groups for the places my work will end up like here on The Sweet Setup, but individual projects are in a new group that gets deleted later.
Since many of these are temporary, the pages I gather and notes I generate don’t need to find a long-term home like Evernote. But, I’ve also found that I wanted some of the features a note-taking app like Evernote or even Bear provides: webpage capture.
So, as you can guess at this point, I built a shortcut for it using many of the techniques we’ve seen so far. Here’s what my Web Clipper shortcut does:
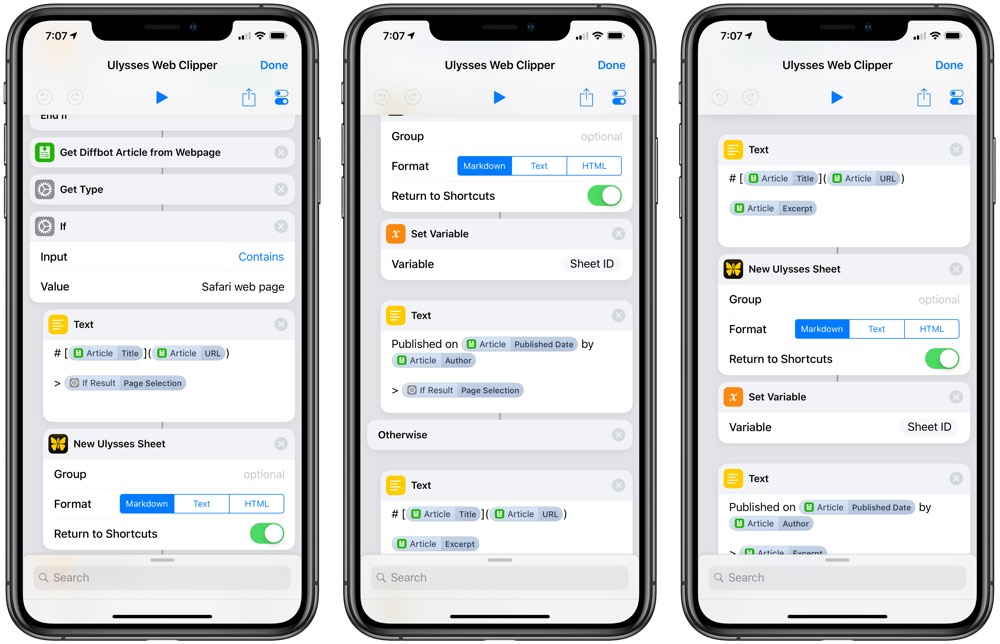
Count,If,Get Clipboard, andGet Variablehandle input capture, the same as the previous shortcuts.Get Diffbot Article from Web Page,Get Type, andIfseparate out the behavior depending on the type of input. For each condition, theTextaction formats the article data and passes it into the Ulysses inbox.Set Variableis used to store each sheet ID, and then anotherTextaction formats the metadata to later be attached to those sheets. It extracts the Published Date and Author, Page Selection/Excerpt, the number of words, and the URL.- Regardless of whether a URL or Safari Web Page is passed, the data is then passed out of
End IfintoAttach to Ulysses Sheetand utilizing that Sheet ID. - In the last section,
Get Variable,Get Details of Diffbot Article,Count, and theIfaction are set up to check whether there’s a Main Image URL, and if so, download it (if not, it does nothing). - In the
Otherwisesection,Get Variable,Contents of URL, andAttach to Ulysses Sheetdownload the image from the web and attach it to the sheet in Ulysses, which is nice if I want to utilize it on my own site and credit them later.
I’ve found that using this simplified web clipper is a nice way to capture the basic information for web pages into Ulysses alongside my writing without the need for the fully-formatted site.
If I select text and run it from Safari, that will be saved into the sheet. Otherwise, the main information I need is available attached to each sheet.
Markup and Edit
For the last shortcut, I have a different approach. While the others have focused on the stages before you’re really doing the bulk of the writing, there’s another phase that benefits from some automation: editing.
Many times, the hardest part of the writing process for me is when I’ve completed a draft, have my ideas in a good place, but often need to reorganize, sort out the voice, and make sure everything flows well.
I usually have the bulk of what I need, but molding it into something great is a different story. I need to capture that essence in the edit.
But that stage is often hard to do digitally. Ulysses actually particularly excels at this with its split function for sheets, being able to manually rearrange sections and then merge it back together. I often know somewhat what needs to be done, but the act of re-engaging in the writing is what I struggle with.
This is where Ulysses and its presence on the iPad shines, because exporting as a PDF, marking up the piece with the Apple Pencil, and using that red “ink” alongside my sheet in Ulysses has proven to be very useful.
I find it helps with getting out of writing mode and into editing, but then right back into making the corrections. Changing contexts from writing to drawing, often including pacing around with the iPad in hand, gives me more mobility, activates a different part of my brain, and can also be paired in split view afterwards to make the edits.
This doesn’t necessarily require a shortcut, but I find that exporting as a PDF, doing my markup, and jumping right back into Ulysses as one complete flow helps me avoid procrastinating.
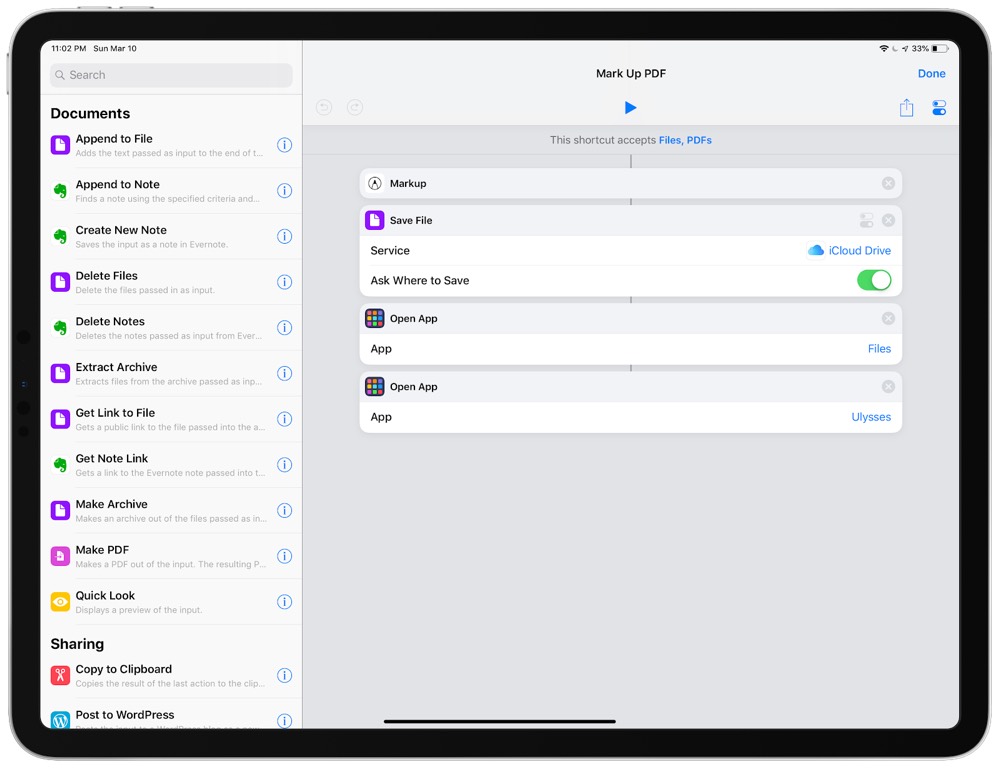
The last shortcut in our list, Mark Up PDF, does just that. It’s a share sheet shortcut, so this shortcut can be launced when you’re sharing a PDF from Ulysses.
- Before the first step, the shortcut looks for Files and PDFs being shared as input4. In Ulysses, tap the Share icon on any sheet, then the ... icon once you’re set to share the PDF, then either Open In or Send to Another App. It doesn’t actually matter which one you pick because you hit the Shortcuts share extension and then this shortcut either way.
- Once the shortcut runs, Markup will activate, which takes you into an editing environment well-suited for the iPad and Apple Pencil. This is technically usable on iPhone as well, but I don’t find it enjoyable to try and physically mark up a document on such a small screen.
- With Markup open, I go through my entire document, making edits in red on top of where I want to improve things. Especially if you’re using an iPad Pro, taking it out of the keyboard and doing this in landscape feels like a great use of the device. Once you’re finished, tap Done.
Save Filewill thenAsk Where To Save, and you can use the Files picker to save your document anywhere you please. Right now, Shortcuts is limited to manual navigation or saving into the/Shortcuts/folder in iCloud Drive, so this step can’t be automated deep into your own folder system (unless you use Dropbox).- The shortcut ends with two
Open Appactions, which will open Files, then re-open Ulysses again. This makes it super quick to bring the two apps together in split view so you can review your newly marked-up PDF or start resolving the edits right away.
I find this shortcut and the framework I’ve built with it helps me move from my first draft into review mode and then right back into correcting things, all while taking advantage of the device in a way for which it’s purpose-built.
Best of all, the Markup drawings you create on the PDFs persist within the file and can be edited multiple times. You can go back and remove markups later, as it’s not been flattened into the file.
Giving your brain a break from the keyboard, scrawling in red all over your own words, and reviewing it in a new context mid-process has been key for making some of my work go from good to great. Having a shortcut to help along the way doesn’t hurt.
Plus, if you’re an iPad or Apple Pencil user — or interested in being one — I recommend this shortcut. It does feel pretty dang cool to use.5
Get To Capturing
Hopefully these examples show how Ulysses can be used in new ways. Along with all the details about how Shortcuts works with an app like Ulysses, these ideas can help you take a similar or customized approach to your writing process.
While we don’t expect every Ulysses user to come up with an elaborate visual programming framework around their blog or book, the benefit of shared technology and ideas like this is that it may spark some ideas of your own for how you can take advantage of it for your own benefit. Plus, these are shortcuts you can download and use right away. With some of the building blocks already available, you can tweak these shortcuts to fit your own needs.
To me, tools that enable new writing opportunities are what demonstrate the value of digital writing tools like Ulysses. Not only is Ulysses a great writing environment and a pleasant tool, but the potential of its digital power lies in wait. Shortcuts is a tool that helps you unlock that potential, allowing Ulysses to graduate into another class of application — one that you can build on.
Get the shortcuts:
-
Often I won’t actually start in this shortcut, but open up into Drafts and type my text, then later run this shortcut from Drafts and share that text as input into the start of this shortcut. ↩
-
Here’s one place where Ulysses’ abstraction of Markdown links into custom features instead of raw plain text is really nice – viewing quotes is quite pleasant, especially with dark mode. ↩
-
This technique is also how you can essentially create .CSV files – comma separated-values. Use Combine Text, then use Set Name and manually input .csv in the filename, and use Open In to send it to Excel or Numbers. ↩
-
Because it’s set up this way, the shortcut won’t show up in the Shortcuts share sheet when these types of content are not being passed, so they won’t appear somewhere like the Photos share sheet. ↩
-
Show me a good flow for this on a laptop. ↩