How I Use Notion to Make My Clients Happy

Notion has fundamentally changed how I work with clients on freelance projects. Not only has it given me a way to track my progress and organize everything for myself, but it’s given me a way to share that progress with my clients in a way that always impresses and makes me look like a real pro.
And the best part? I’m not paying a penny for any of this — all of this is possible with Notion’s free plan, which makes this an all-too-rare situation where you do not have to spend money to make money.
Today I’m going to share with you my system that I use whenever I’m working with a client. This system has always impressed, and really helps me set myself apart. Most freelance jobs apparently happen 100% inside email threads, which quickly becomes unmanageable, and leads to “where was that link you mentioned before?” or “what’s the status of X?” going back and forth. With my Notion setup, those emails can go away forever, and you can work from one source of truth so that everyone is on the same page.
The Scenario
This will be easier to talk about with an example, and instead of coming up with something contrived, I’m going to use a real job I did recently to show you exactly how I did things for this client who was very happy. The names have of course changed, but the project we created is real.
I was hired to come up with a set of presentations for a company that would be delivered by their sales team. I had to create an outline for each presentation, create a slide deck for that outline, and then record myself doing the presentation. Immediately, a few things jumped out as being problems if we used an all-email structure for doing this project:
- There were going to be numerous steps for each presentation, including responsibilities going back and forth between me and the client.
- There were multiple presentations, so there were many statuses to keep track of.
- Each presentation had multiple files associated with it.
In general, there were going to be lots of moving pieces that were not going to be easy to track with emails. This was a prime candidate for Notion.
My Basic Notion Structure
First things first, I need to make a new workspace in Notion. Assuming the project isn’t super-secret, I like to make public workspaces so that I can just share a link with the client that they can use to access the project board. This means your clients don’t need to have or create a Notion account, they can just see what’s going on with ease.
If your project is in the hush-hush though, you can create a private workspace and only invite the people you need to invite. This is more secure, but will require your client to create a Notion account for themselves so they can log in. This is of course more secure, but you’re creating work for the client, so it’s a bit of a trade-off.
Once the workspace is created, I give it a name and then select a custom icon and banner image for the company I’m working with. I find this helps personalize the project for them and makes it feel like I’m giving them white glove treatment.
Finally, we need to select a way to display the workspace’s data, and I find “board” is the best option. At this point I have a project page set up with the client’s branding and some placeholder tasks on a basic Kanban board. We’re not quite ready to share this with the client, but you can get the URL by:
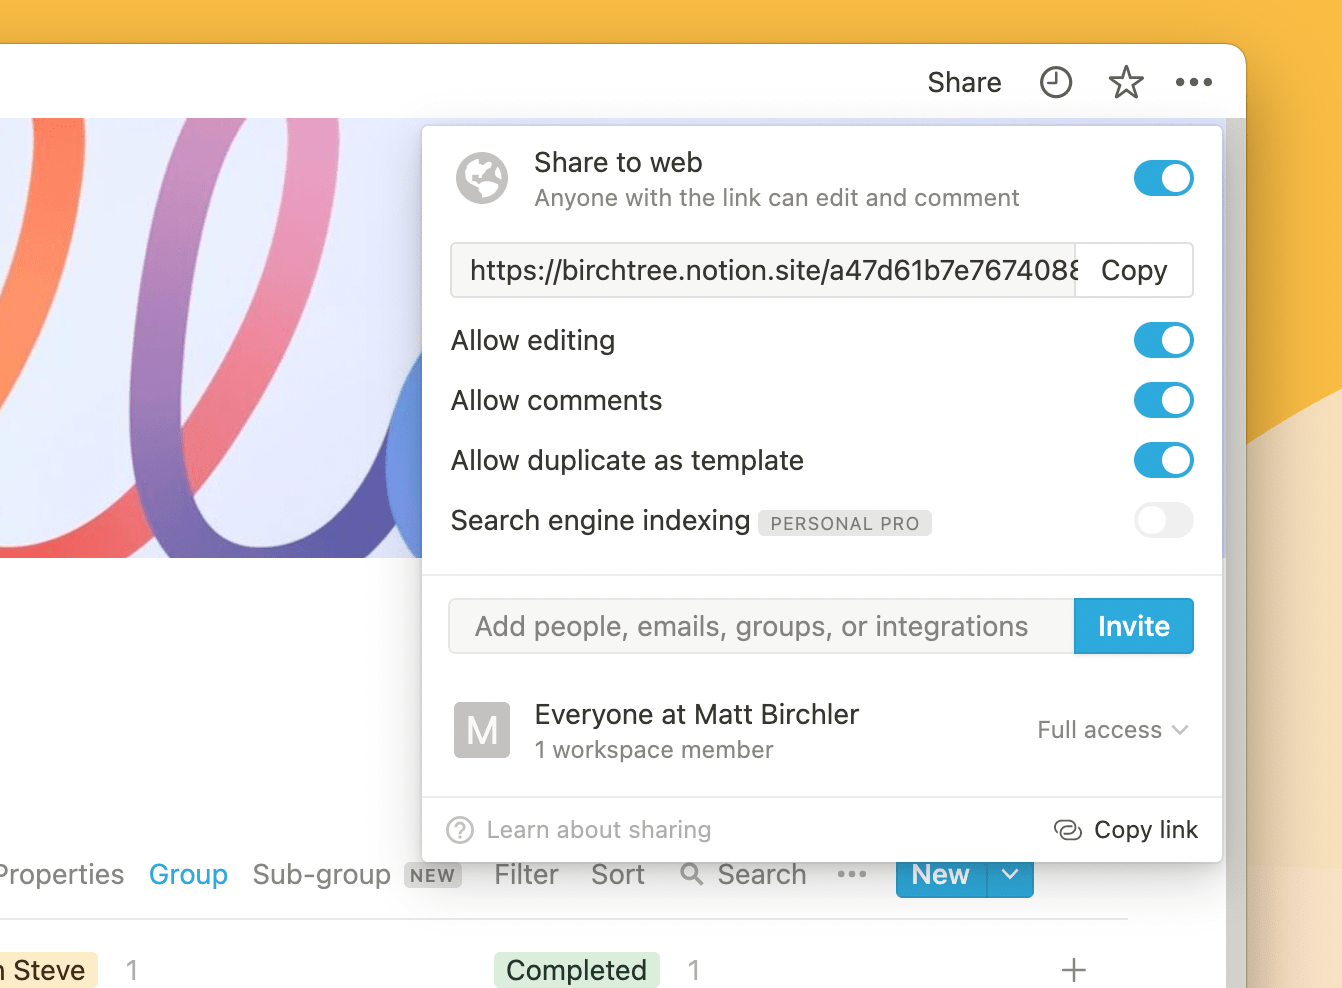
- Clicking Share in the top right of Notion.
- Turn on Share to Web.
- (Recommended) Turn on the ability to add comments.
- (Recommended) Turn on the ability to edit.
- Copy the link.
Items 3 and 4 on the list are optional, but I recommend turning them on. Both require the client to set up a Notion account, but they can still view the page without one, and if they do set up an account, it lets them leave as many comments or make modifications to tasks right in Notion, which reduces your need to do these things in email, which is the goal.
Creating Tasks for Your Project
The details of your tasks are going to be different than mine, but the beauty of Notion is that this is totally fine! You should have Card 1, 2, and 3 on your board right now, so click into one and start editing the details.
Notion has properties on each card — which are items that can be any number of things — but by default cards will have an assignee and a status. If you’re working with someone who’s not going to have a Notion account, then there’s no need for assignee, so you can delete that one right away. Let’s leave “status” for now, and start adding our custom properties.
A property is a value you want to store in Notion, and it can be a great many things. Options include:
- Text
- Number
- Select
- Multi-select
- Date
- Person
- Files
- Checkbox
- URL
- Email address
- Phone number
- Formula
- Relationship
- Created Time (and user who created)
- Edited Time (and user who edited)
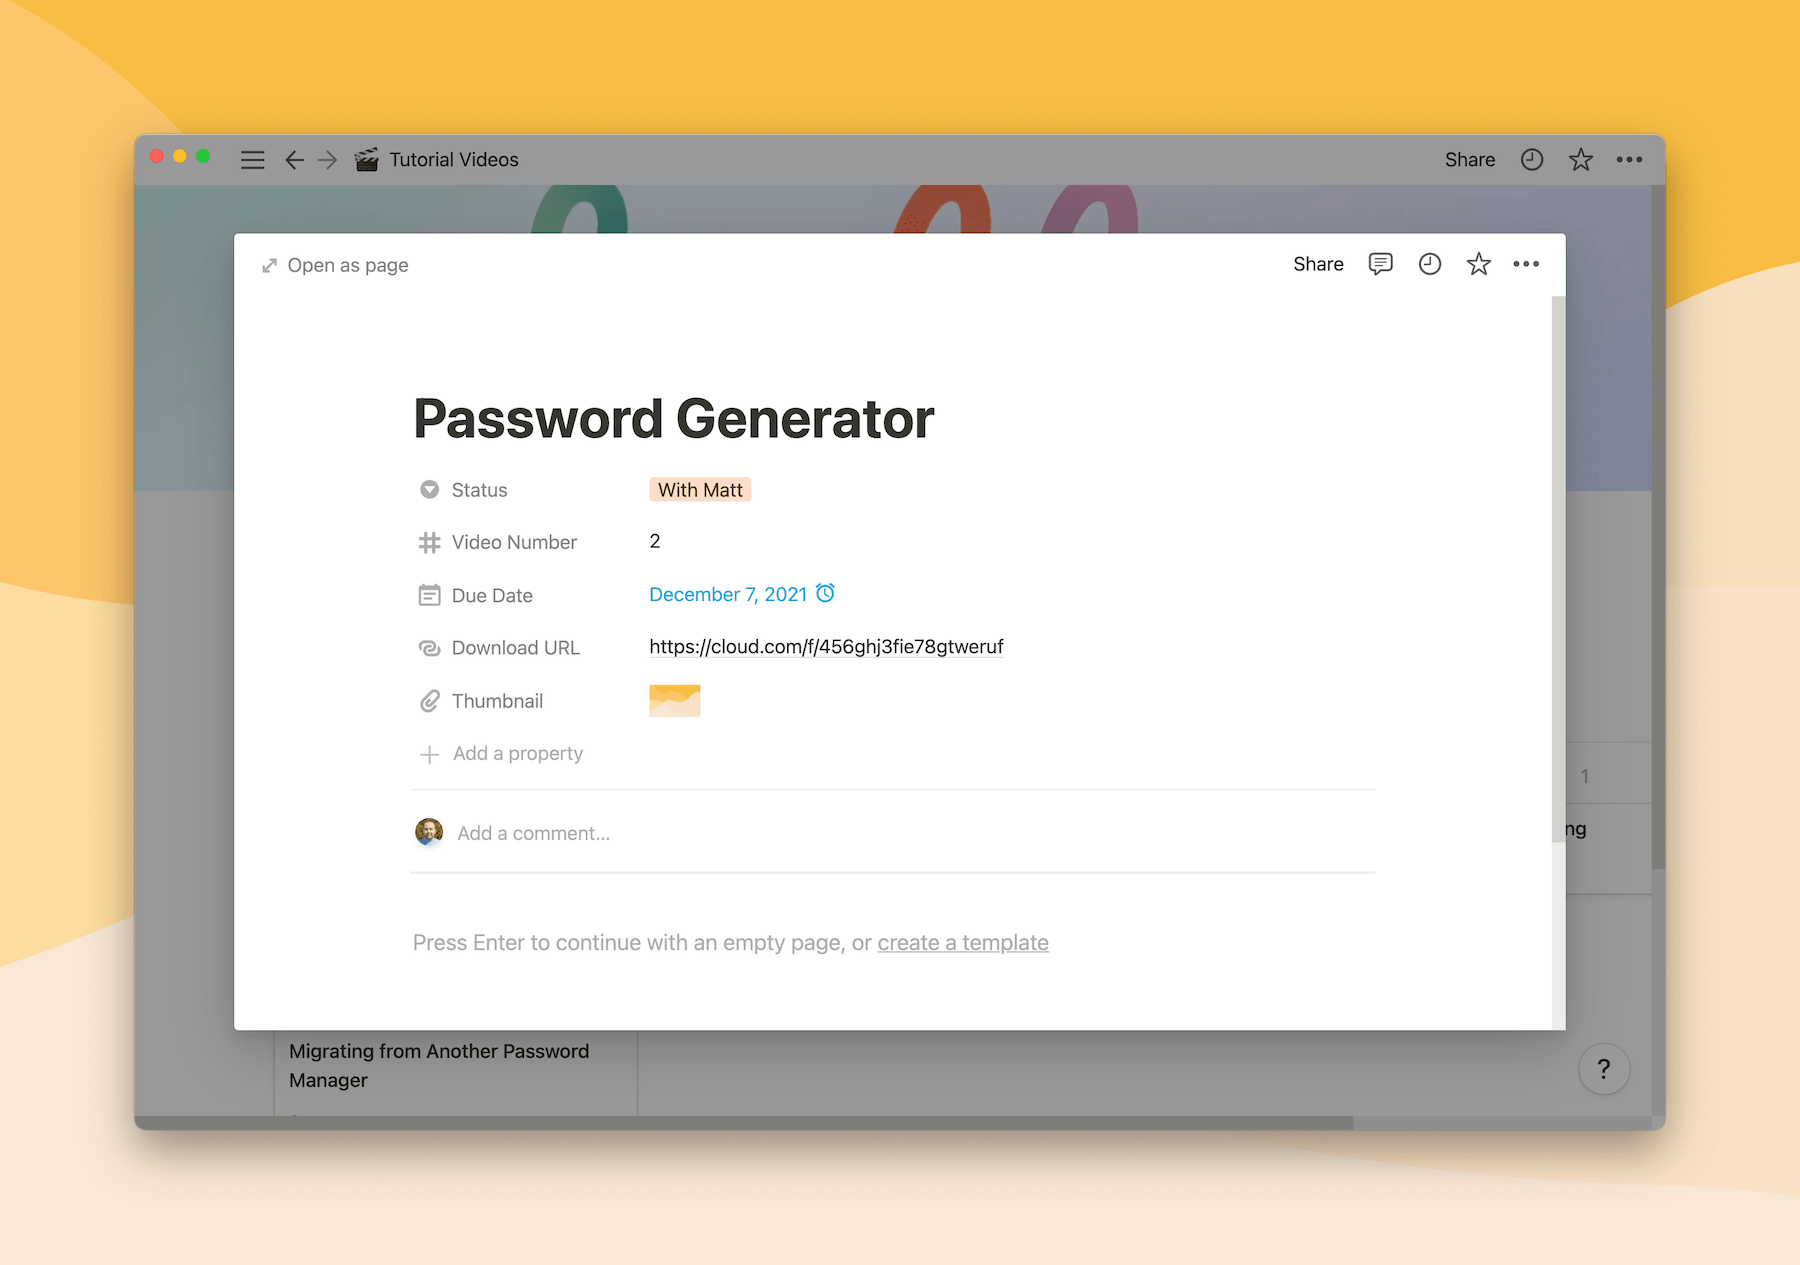
Those are tons of options, but the bold ones in the list above are the ones you’re most likely to get use from. I find it easier to talk with real examples, so here is a set of properties I used recently for a video project where I was creating videos for someone else’s YouTube channel:
- Date property with the agreed-upon due date for when I would deliver that video. Date fields also support alerts, so I was able to set an alert for the day before the video was due to remind myself to wrap everything up if I had not already.
- Number property with the number of the video in the series. We were working on 6 videos and it was good to be able to refer to “video 2” instead of “the video where you talk about X” in general communication.
- URL property with a link to OneDrive where I was storing the final versions of the videos. Notion makes URL fields clickable, so they were able to just click the link in Notion to open the download page in their web browser.
- Files property where I uploaded the thumbnail for the video. This was a simple JPG image, so nothing too fancy here.
- Text property with the title of the video I suggested they use on YouTube.
- Text property with the description I suggested they use on YouTube.
In another project, I was creating videos and slide decks for each task (card) and so I have a URL property for the video download, as well as a second URL property for the Google Slides deck that I created for them.
And in yet another project, I used a select property to create a dropdown with options for support, sales, and marketing as I was creating content for them that would be aimed at specific audiences, and marking each card for whom it was for helped the client know at a glance what the audience was supposed to be for each thing they were looking at.
Oh, and each one of these cards has a whole document you can create underneath your properties, so you can do everything from take notes to write richly-formatted articles. It’s really a free space to do what you want.
Setting Your Statuses
Now that you know what you’re going to save to each card/task in your project, you need to set some statuses. These are listed along the top of the board, and you should have Not started, In progress, and Completed there right now. Editing these is easy, and you can simply click on their name to change what they’re called, and click the three dots next to each one to change its color.
The statuses you set are super important in helping your client understand where the project stands, and the default statuses Notion sets aren’t that bad, but I’d suggest editing one and adding another to get something really solid for most situations.
So I personally always edit the In progress status to With Matt which means it is on my plate to do something. Then I’ll make a new status (scroll to the right and click Add a group) called With Steve (or whoever your client is). Drag that new status to the right of your With Matt (your name, obviously) and you’ve got yourself a pretty solid board.
- Not Started means nothing’s happened yet.
- With Matt means it’s on my plate to do something to move this forward.
- With Steve (aka your client) means it’s on the client’s end to do something, like review what you’ve done and approve it or not.
- Completed means that task is all done and nothing further needs to happen.
That’s a very basic Kanaban board, and it’s gotten the job done very nicely for many projects. It’s simple, but I find that is useful when working temporarily with someone. At my day job we have a far more complex board with way more rules and best practices, but we all work in it all the time, so we’ve internalized it. Always remember that as a freelancer you want to make your clients’ lives as easy as possible, and asking them to learn a whole new system with complicated rules is not going to make them enjoy the experience. With this, they can open the board and see if there is anything under their column. If there is, do something, and if not, they don’t need to worry about anything.
I usually end up moving cards to the right status on my own, and I’ll email the client when I move things to their column to get them to take a look and see what they need to review. If the client makes their own Notion account, then you can @-mention them in comments when you move cards to their status. It’s really nice when that happens, but it’s definitely not going to happen with every client.
Bringing It All Together
Now it’s just a matter of creating your tasks as cards on the board, and throwing them into the correct status (likely Not started right now). Fill out whatever properties you can now, but don’t worry if most of them are blank — you may be working on something where you’ll fill these out as you go.

Now just share that link you created earlier with the client, and enjoy making a great early impression as they comment on how professional your setup is. Now it’s on your to deliver for them, but you’ve got that, just go get it done.