A Closer Look at Darkroom for iPad
When Darkroom first came out, I heard it was amazing, opened it, checked out the filters, edited a few photos with it, and never opened it again. It was alright, but it didn’t do anything for me that VSCO Cam didn’t already, and it had far fewer filters. Then, more recently I heard Darkroom had been updated to include so many features that it rivals Lightroom. This piqued my interest. Lightroom Mobile is my go-to app for mobile editing. I’ve spent hours in the new, improved Darkroom, and while I think it has majorly stepped up, I still can’t get myself to commit to it.
Get Our Best Photography Tips & Workflows
Transform your photos and edits from average to awesome with our in-depth, mobile photography course. It’s jam-packed with training, ideas, and lessons that can literally transform your photography overnight.
Looking at cost alone, I see the benefit. For the pro tools and all the filters, Darkroom costs about $30, one time. Lightroom is about $10 a month. It’s a great deal for an app that does have a considerable number of features. However, it’s almost too in the middle to make sense for me. The beauty of a simple app is that it’s simple. If I want a no-stress, minute long edit, I will pick something that has filters, and maybe just a few adjustments like brightness, contrast, white balance. VSCO Cam, Filmborn, RNI Filters — all the ones I’ve used in the past before I got deeper into photography — do this. I tap a couple of times and I’m done. If I want a longer, in-depth edit, I use Lightroom Mobile because I can control everything, especially brush tools, which Darkroom lacks. This is no problem when photographing things or landscapes, but with faces, it’s tough to not be able to use a radial filter, brighten the eyes with a brush, remove any spots, adjust the skin tone, etc.
The color filters in Darkroom are particularly harsh on skin tones, and many of them make skin far too red, a few too green. There are a couple of really cool features Darkroom includes that can help there: first, the tint slider. Very few mobile editing apps offer a tint slider, and as a quibbler when it comes to skin tone, I love having that control. I also love the color tools. Being able to adjust each color individually, just as in Lightroom Mobile, is so helpful. The split tone feature is also great. These features definitely help, but often I want to be able to adjust just the face, not the entire photo, and even with all these tools, I can’t do that.
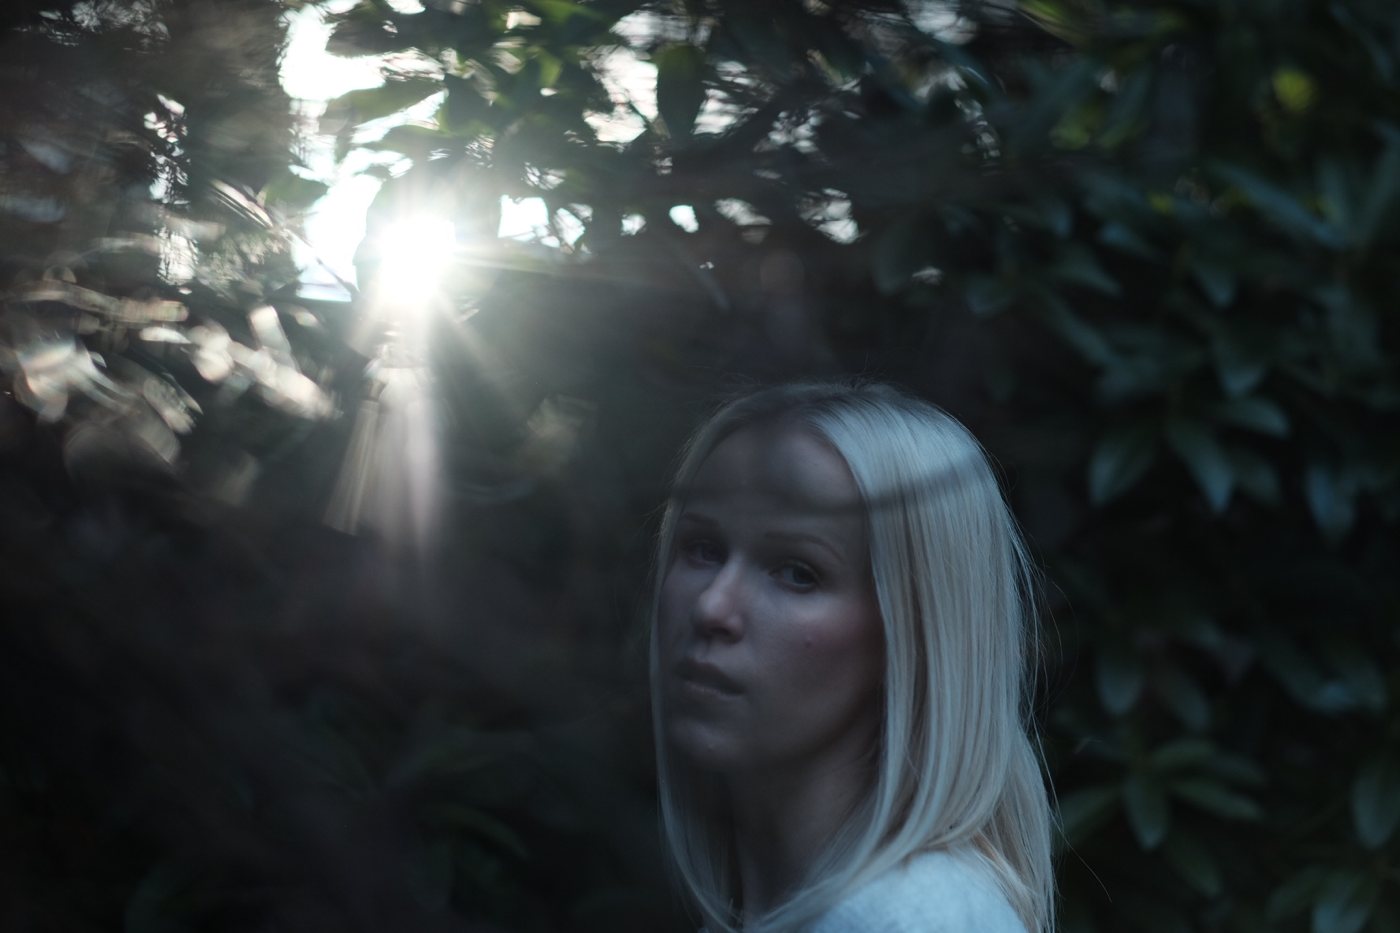
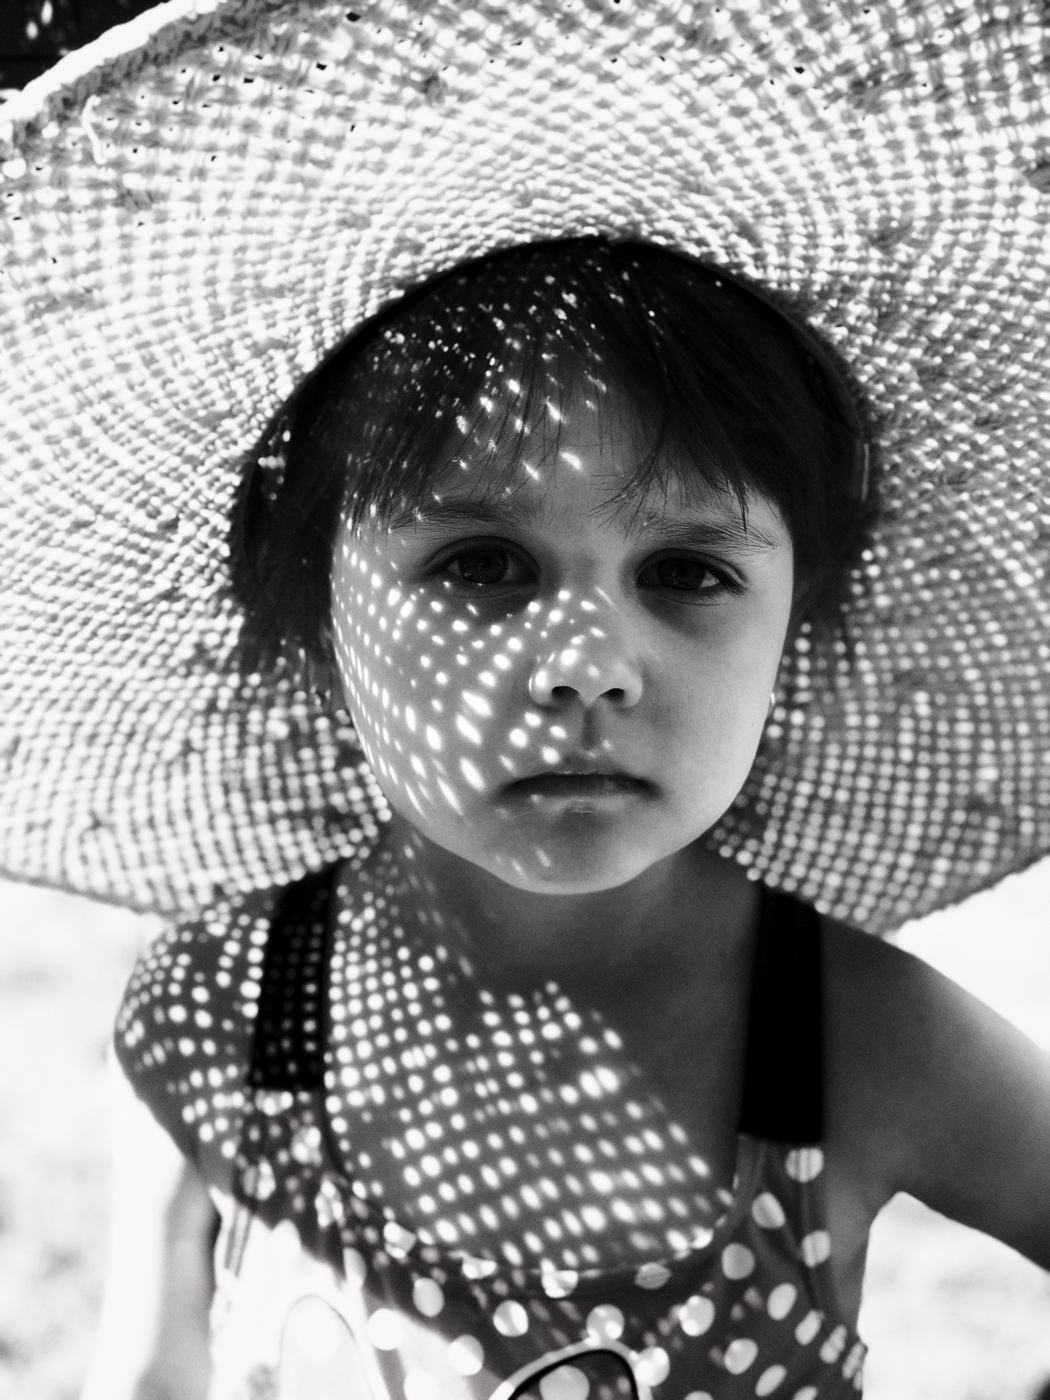
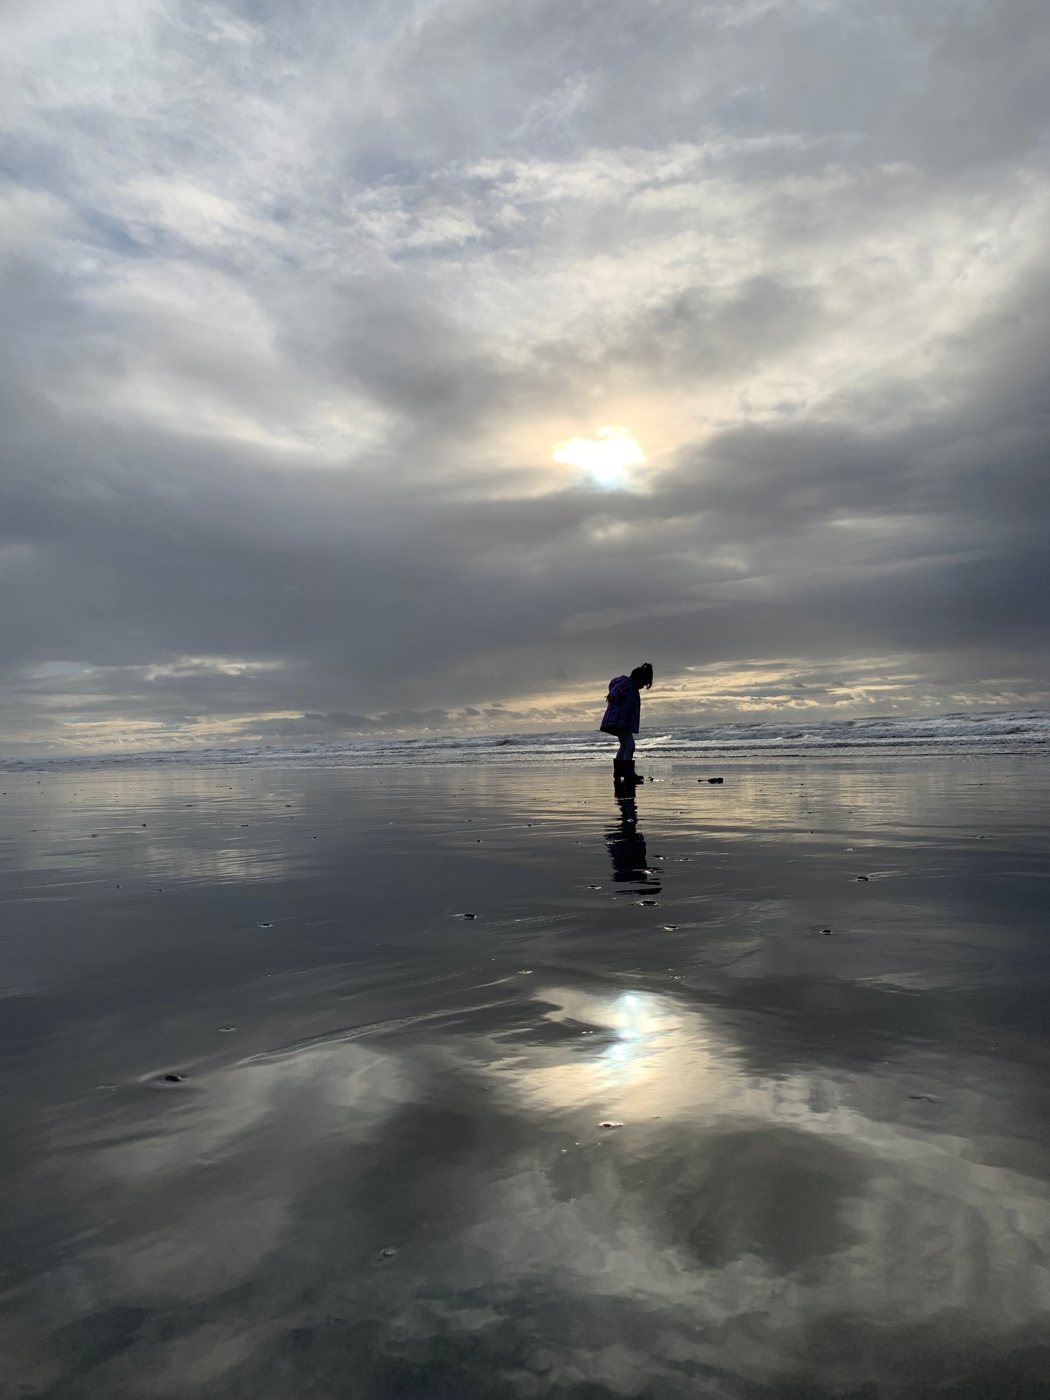
Here’s a Fujifilm XT1 self-portrait I shot. This is the RAW version straight out of the camera. It’s underexposed because of the bright light and the tone is also too cool.
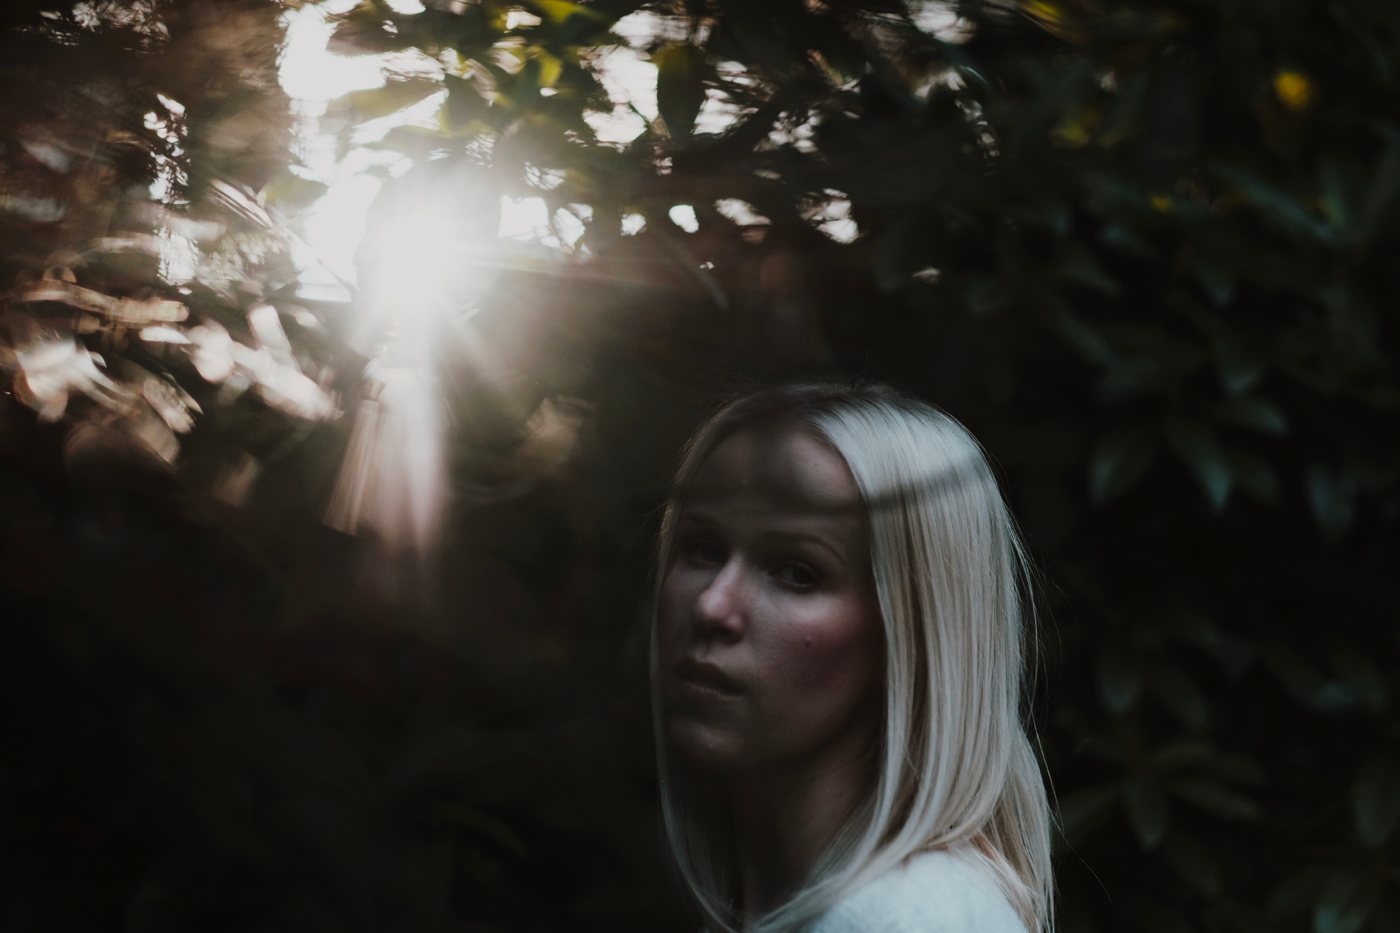
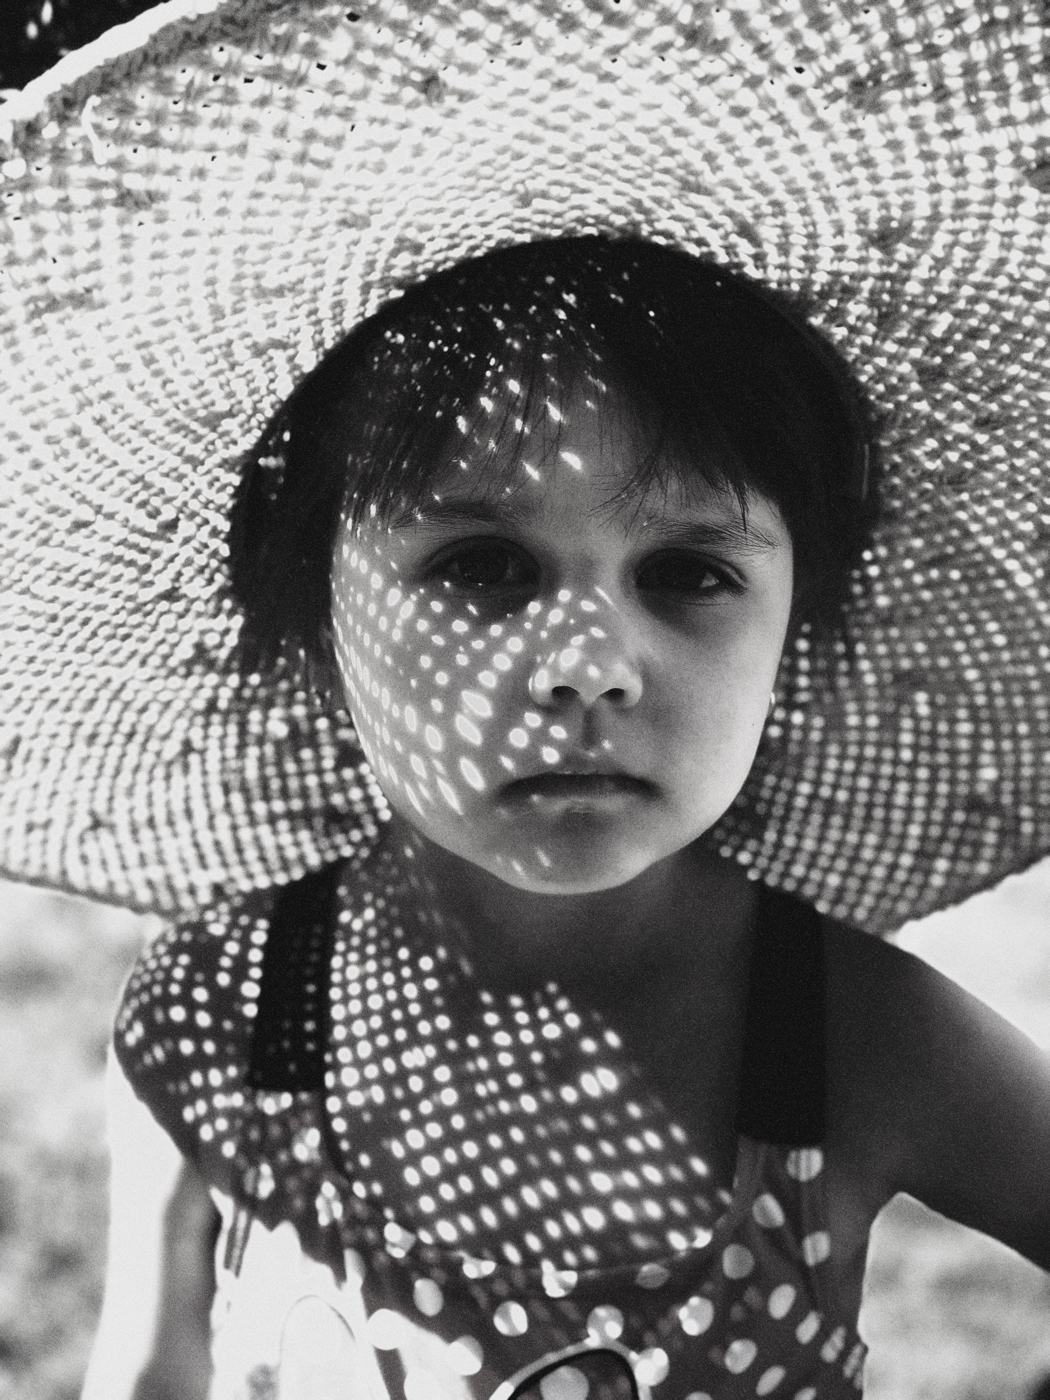
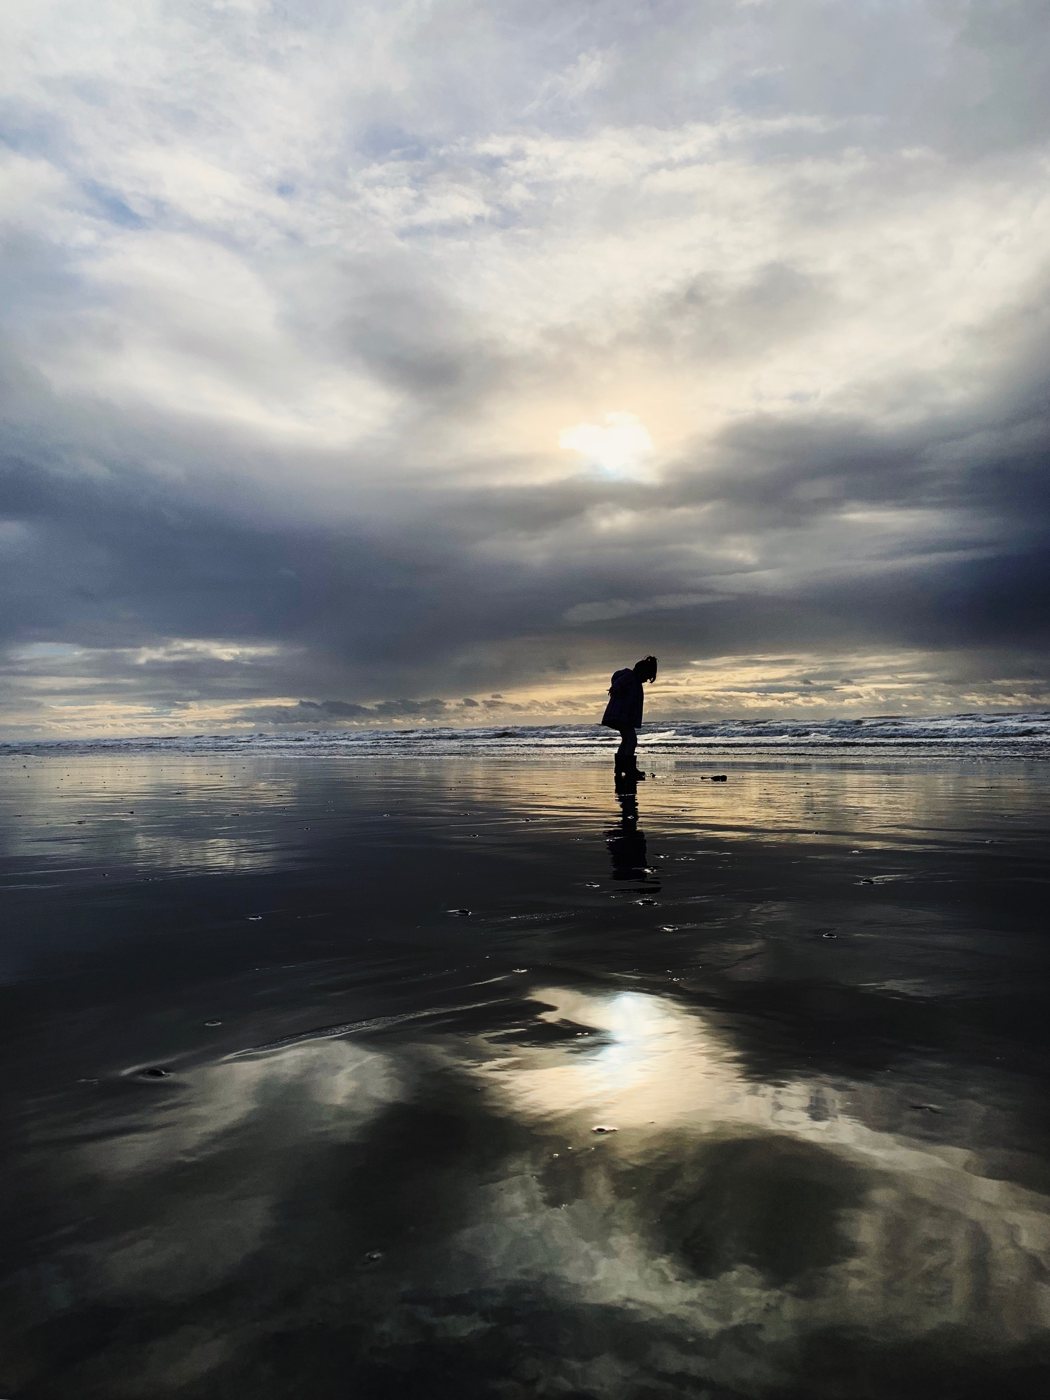
Here’s the shot edited in Darkroom with the A210 filter, as is. It did a decent start to warming it up and I loved the colors it gave my background, but my skin was red (and obviously it’s too dark because it was underexposed). The contrast of the filter is also too high. I’ve lost the definition in the leaves at the bottom left of the image.
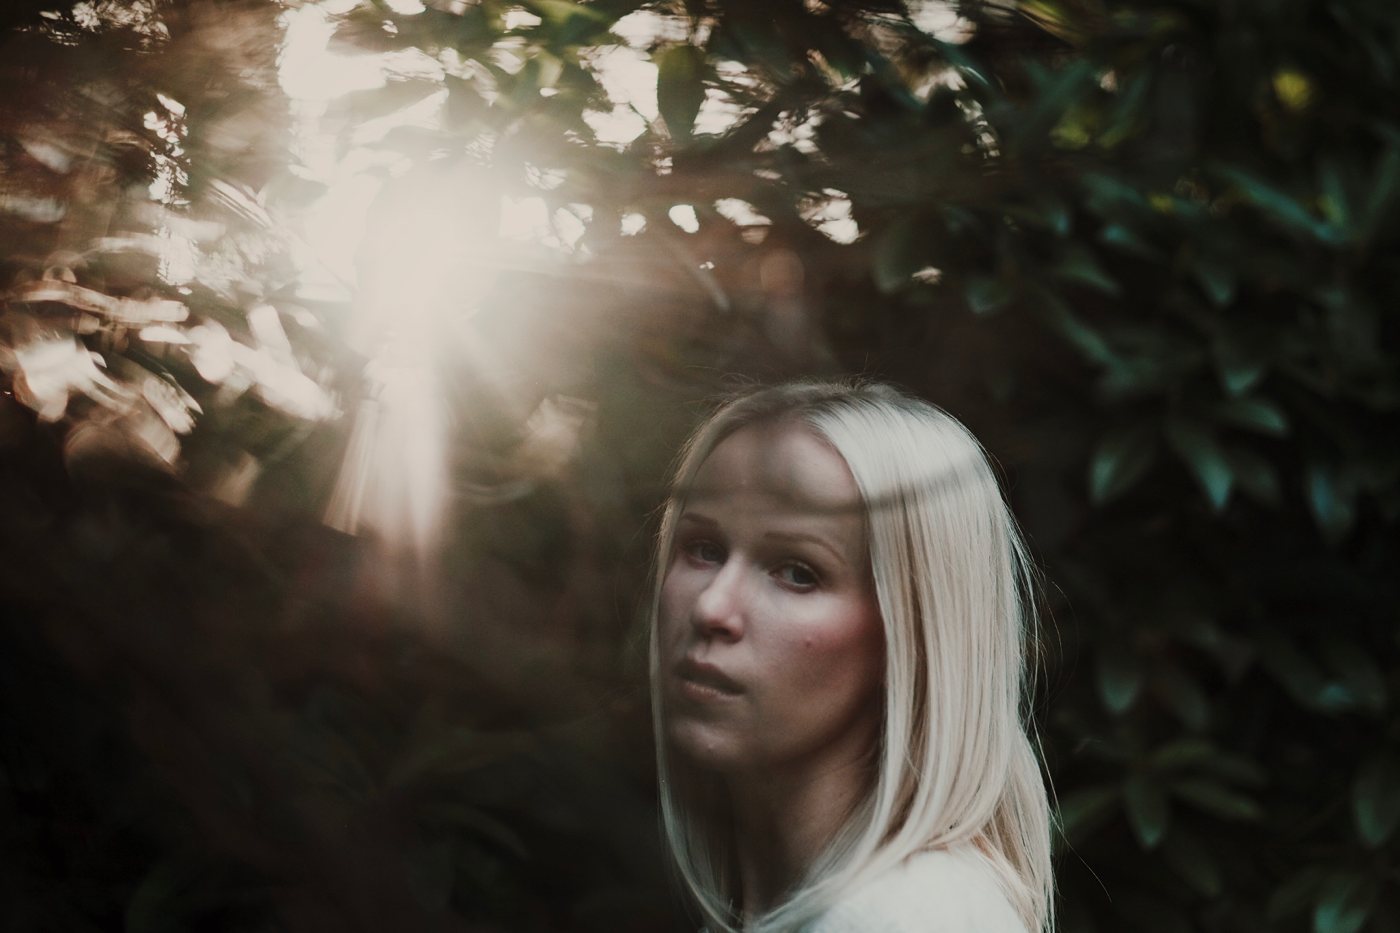
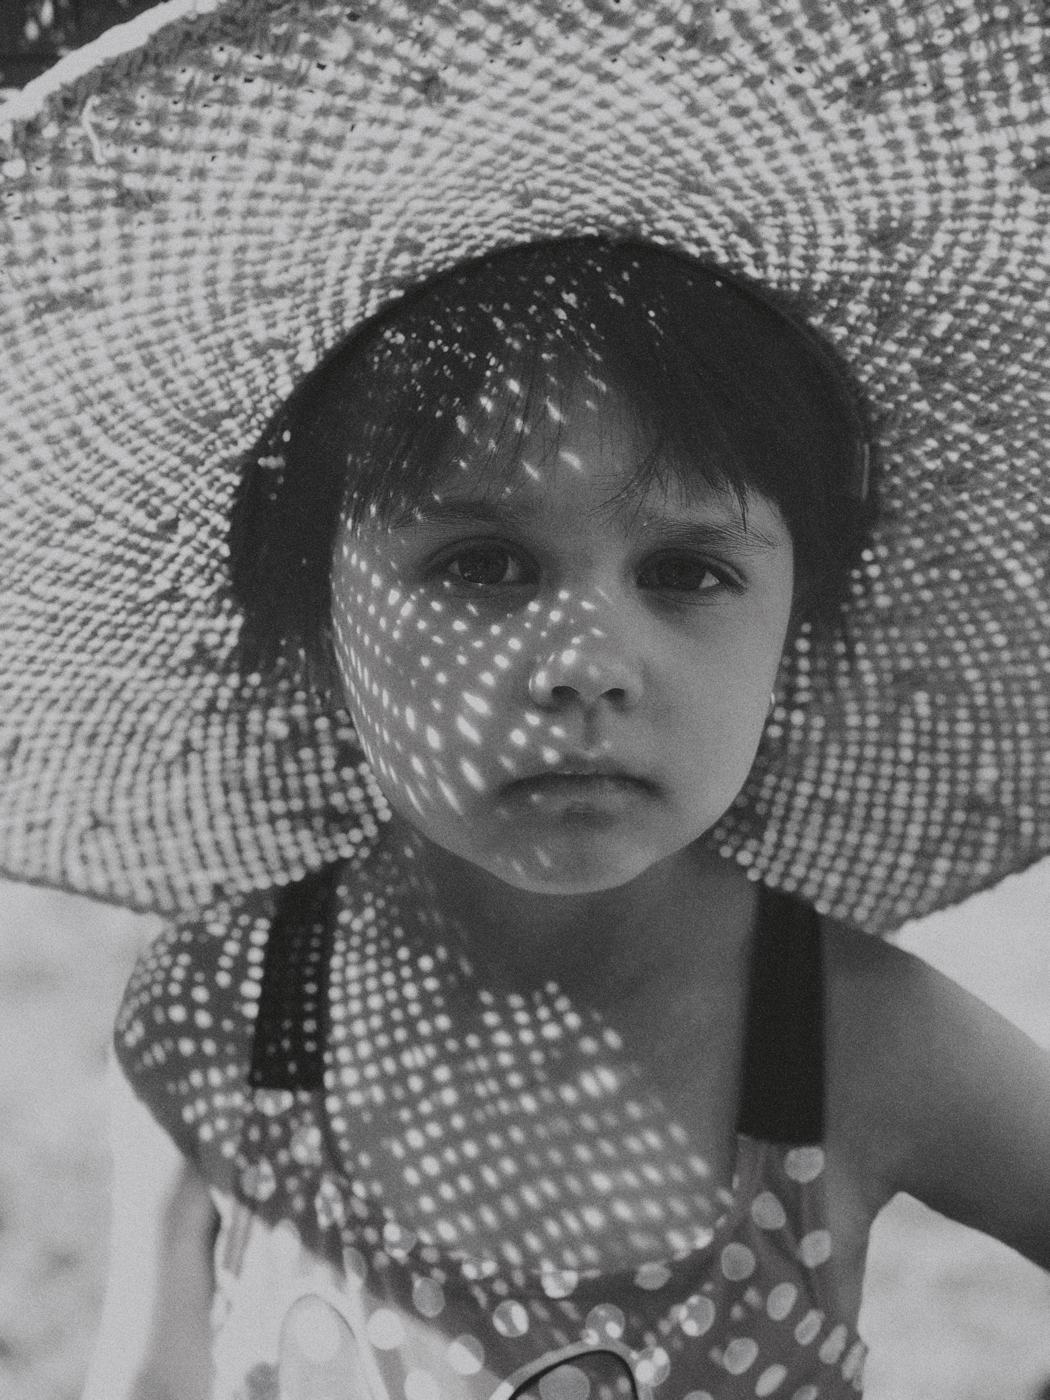
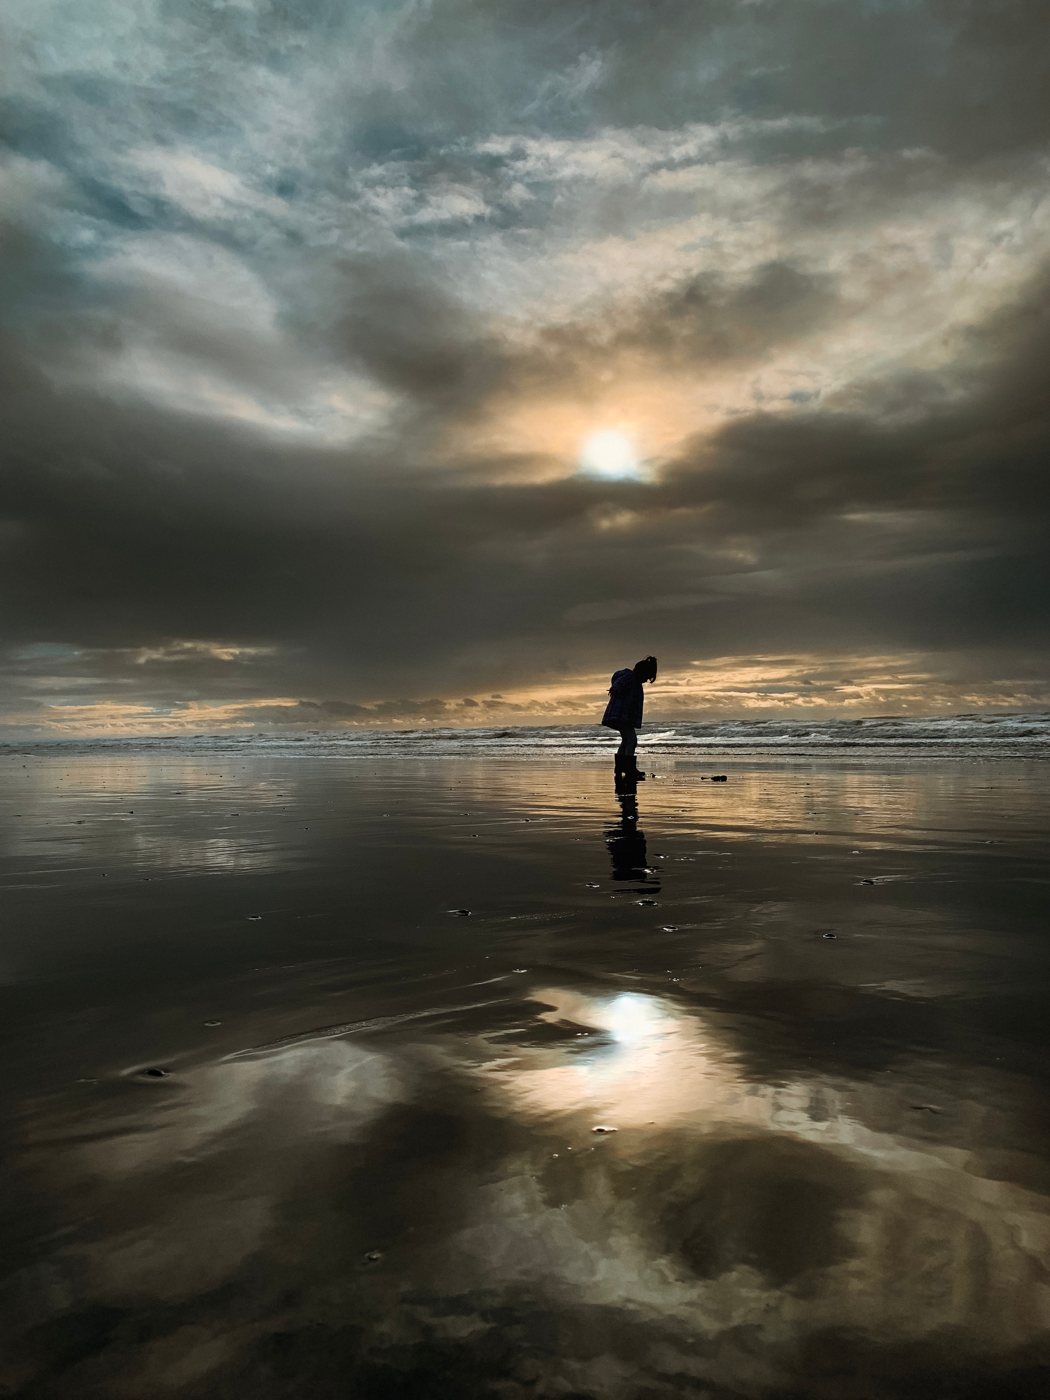
Here below is that same shot still with the A210 filter, plus adjustments: I used split toning, a strong vignette to try and keep the darker background and brighten up my face as much as possible. I took down the contrast of the filter because I felt it was too harsh (a lot of Darkroom filters have high contrast, except for the black and white conversions), I adjusted the curves (a feature I absolutely love and that few mobile editing apps include), I brought up the highlights and shadows, took the temperature way, way warmer, adjusted the tint slider a touch greener, and adjusted my colors in the colors tool, specifically the yellow, orange, green and red. I find the filters I like best in Darkroom to be yellow-heavy, as well as a bit cooler-toned than my personal preference. These adjustments made it much better, but still not perfect. I wanted my face to be brighter, but didn’t want to sacrifice the rich background. I also would have loved a spot removal feature for that little friend on my chin, and to be able to brighten up my eyes.
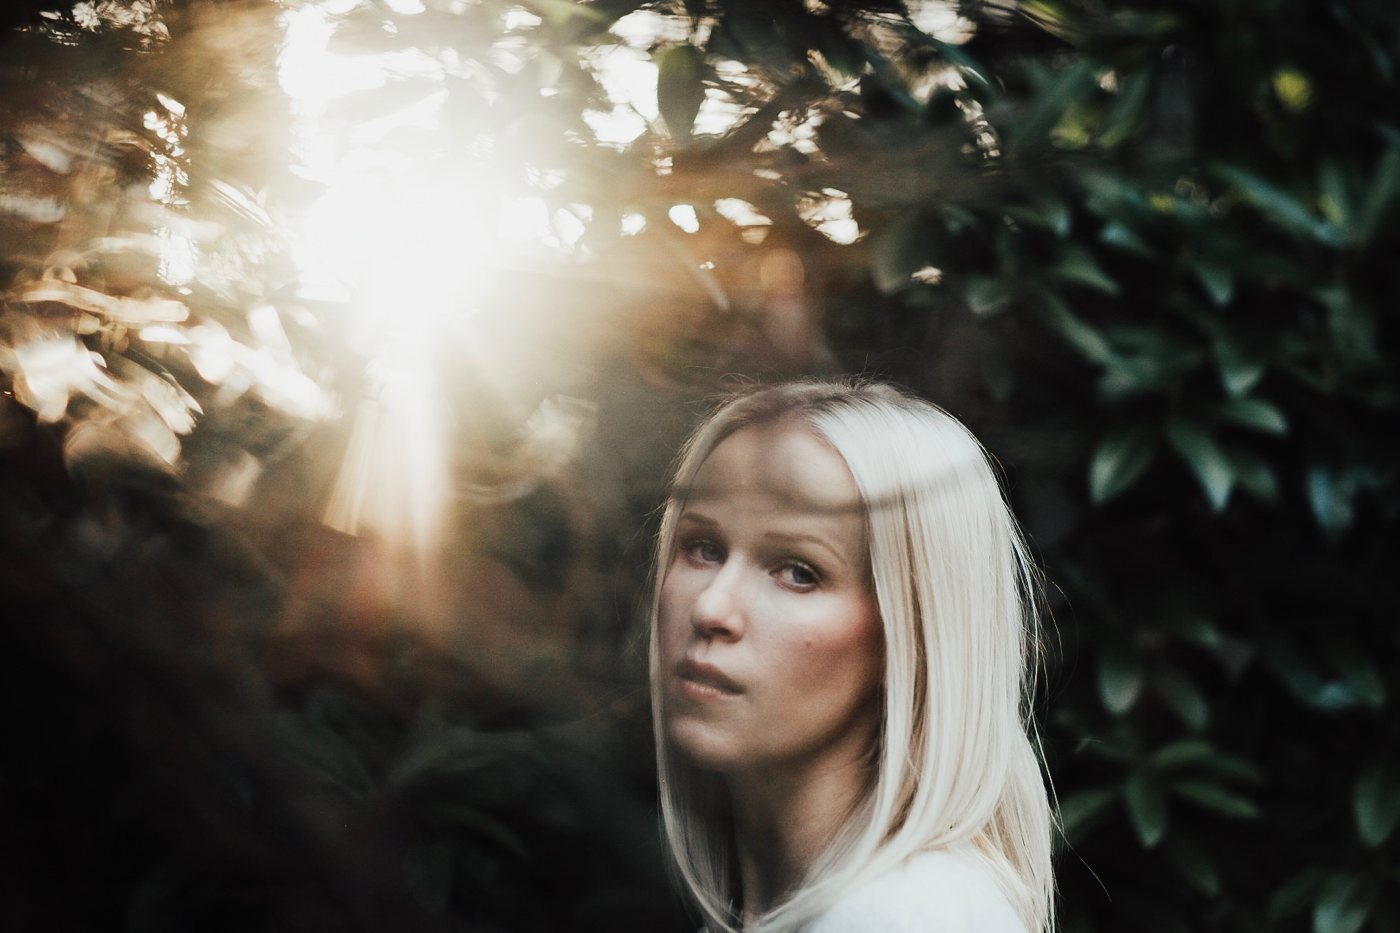
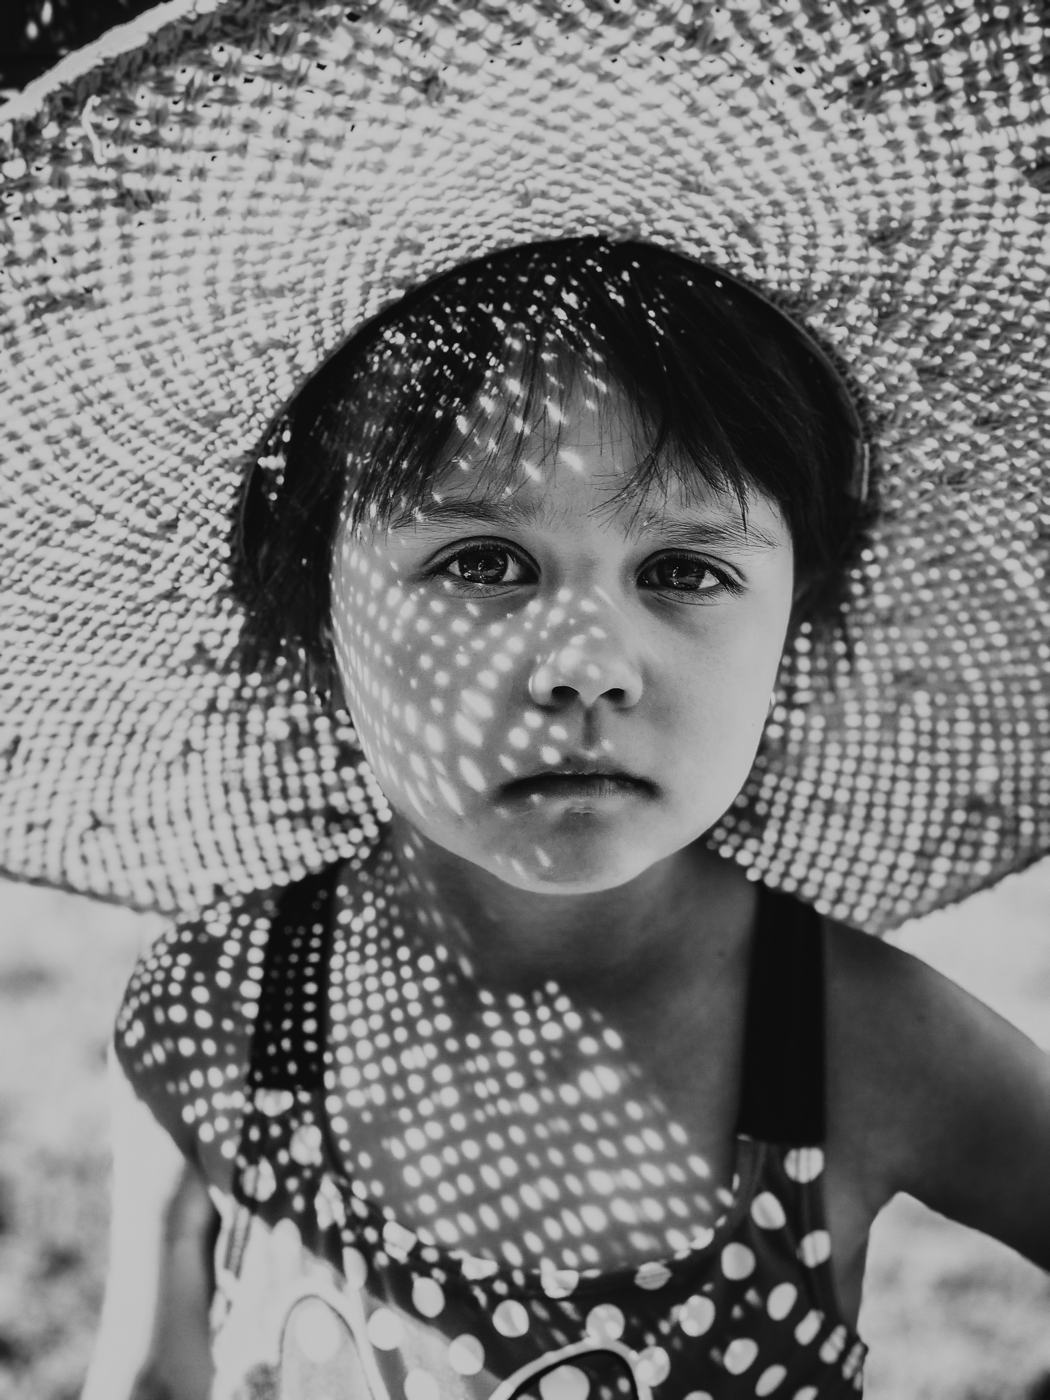
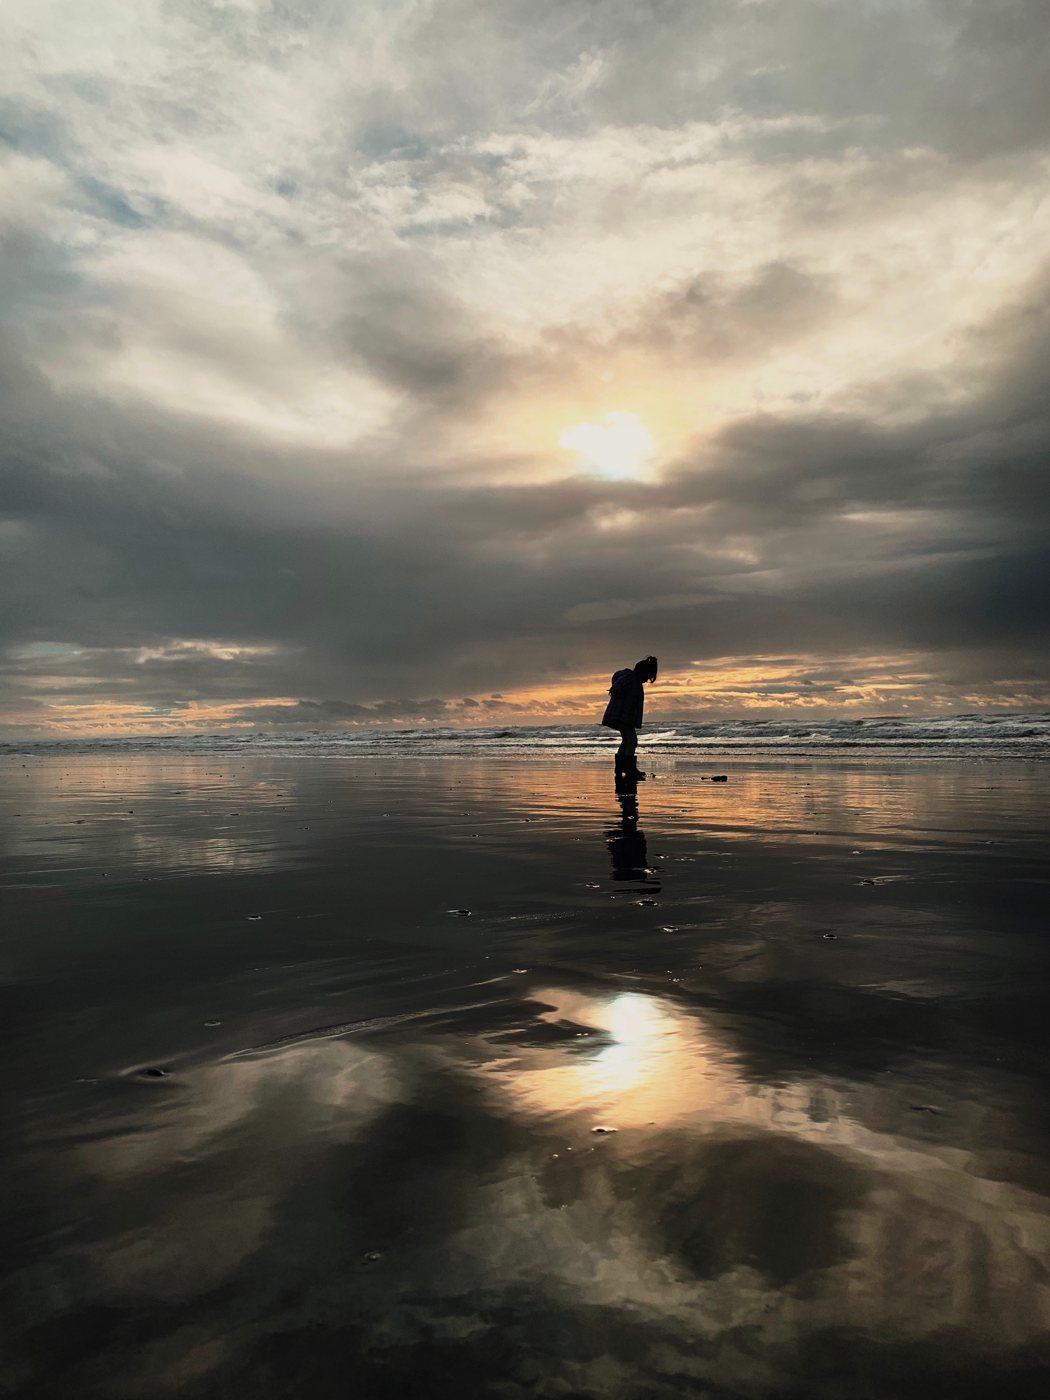
In contrast, here is the same image edited with Lightroom Mobile. Here I was able to do the things to my skin that I normally would for a portrait edit.
I do like the tones I was able to get with Darkroom, and I think if I had the brush tools I love, I may have even preferred, or at least equally liked, that edit.
There are a couple more things I do like about Darkroom. The first thing is that I don’t have to import my photos into it; I can just tap on any photo in my library and work on it. That’s a really cool feature, though not an imperative one for me. It only saves me a few seconds, and I still have to export the image when I’m done if I don’t want to permanently modify the original (I never permanently modify). I also do really love one thing the most about Darkroom, a feature that I wish Lightroom Mobile had: I can create and save my own filters! I can do that in Lightroom Mobile, but it’s more of hack of copying edits from a specific saved photo. Darkroom makes creating and using my own filters a much cleaner and easier process. Lastly, I like that with the filters there is an option to adjust the strength, since most of them are a bit heavy.
Speaking of filters, overall, Darkroom is majorly lacking there. Don’t even get me started on the Duotone options! I cannot think of a single situation where I would like or use one of those. In fact, I’m a little weirdly angry about them even being in my list of filters! Aside from the issues with the color filters mentioned above in my edit, many also have too much matte/ fade for my liking. Yes, all of these things are an easy adjustment, and this is entirely subjective, but I wish there was just a wider variety of options in general. The black and white filters selection, to be blunt, is bad. There are hardly any, they are flat, and many of them are too blue. The ability to make your own presets saved me here: In about 60 seconds, I had created 6 of my own black and white filters that I preferred.
Here’s an unedited iPhone shot that begs to be black and white. It’s not perfectly exposed, some areas are blown out due to the harsh light, but I’m going with it.
Here are a few Darkroom black and white filters on it:
Filter B100:
Filter B200:
Filter B120:
They’re OK. I think B100 is the best Darkroom has to offer for BNW. B200 isn’t bad on this shot, but I don’t like how gray it is. For black and white images, I like higher contrast and blacker blacks, and even a bit of a moodier feel, and I so wish I could brighten up her face. Here is the shot with a few of my own Darkroom filters:
BNW 3:
Moody 2:
Matte Grain:
And in contrast, what I can do with this image and a moody Lightroom Mobile edit, because of my beloved brushes, and one more super-important feature Darkroom Lacks, a clarity slider:
I also wish Darkroom had black and white slider adjustments. I know that I can adjust my curves, but sometimes I like to go below zero and really crush my blacks, but I can’t.
I’ve been hard on Darkroom when it comes to portraits, so I tested it out with a landscape shot. Here below is an iPhone shot unedited:
I hopped right to the handy “Landscape” filters in Darkroom and liked L110 the best. Here it is applied with no adjustments:
I think it looks pretty good! I like the colors a lot. Some of the filters were too strong and the colors looked fake, but this one was great at 100% strength.
Here’s the same shot with my Lightroom Mobile edit:
Again, I actually really love the Darkroom colors, maybe as much as my Lightroom edit colors, but because I didn’t have my adjustment tools like brushes and graduated filters, I couldn’t get the sky to be as dynamic in Darkroom as I could in Lightroom. I was also able to fix the sun, which was just a blown-out hot spot, with my brushes in LR Mobile.
I adjusted that same Darkroom edit with the L110 filter to get it as close as possible to the Lightroom Mobile edit, for a more fair comparison, and was able to get pretty close. I think it’s a pretty good edit, despite the sun not being fixed.
Overall, Darkroom is an app that is stuck in the middle: If you’re really utilizing all of the powerful controls it offers, It’s a bit too advanced for basic users. Yet because of the tools it lacks, it’s not quite advanced enough for pro users — at least not yet. It’s a great price, though, and if I didn’t have Lightroom Mobile, I’d use it along with Snapseed for final adjustments. (There are a couple more features I didn’t discuss, because I don’t care about them and never use them in any app, but Darkroom does offer frames, as well as the ability to directly share your image from the app, rather than export it back out.)
Editing is entirely personal and subjective, and I’m sure many people will prefer the Darkroom edits I shared here. But for me to want to reach for Darkroom over Lightroom Mobile, I’d need it to include a few things: better and more filters, the ability to remove filters I don’t like and won’t use, brush tools, a spot removal tool, black and white sliders, and clarity adjustment.
Bottom line, It’s a really good app, and I’m a harsh critic. I think it could be better. It’s best for landscapes and still life, and not as good for skin tones in portraits.
We have more useful workflow examples right here.
Get Our Best Photography Tips & Workflows
Transform your photos and edits from average to awesome with our in-depth, mobile photography course. It’s jam-packed with training, ideas, and lessons that can literally transform your photography overnight.