How to automate paperwork with Scanner Pro, Hazel, and IFTTT
I’ve long used a half-digital approach to managing my paperwork. When David Sparks published Paperless, I bought it eagerly, but only ended up adopting a few of the practices. Overall, I don’t deal with a lot of paper, so the friction has never been enough to make me take the plunge.
As such, my current setup has consisted of scanning receipts or paper mail with the excellent Scanner Pro and manually dealing with the resulting files. I finally decided it was time to get serious, and the following workflow is what I ended up with.

The Paperless Cheatsheet
Get your copy of this free quick-start guide to going paperless. From apps to scanners, discover everything you need to go paperless at home or the office.
The Tools
If you’re looking to automate your own paper processing, the following tools will help you out:
- The aforementioned Scanner Pro app from Readdle
- Hazel from Noodlesoft for macOS
- A free account from IFTTT
Again, my own paper needs are simple compared to some folks. I wanted my setup to handle the following:
- Business receipts required for filing taxes
- Receipts from healthcare practitioners for reimbursement (eye glasses, chiropractic care, massage therapy, etc.)
- Personal documents and receipts related to home maintenance and financial matters (bank/mortgage statements, investments, etc.)
Each of these categories has a few different requirements. My business receipts need to be added to a specific folder and documented in my accounting spreadsheet. The healthcare receipts need to be submitted to my healthcare coverage provider through a web page. Personal items simply need to be moved to a specific folder.
Thanks to the first two apps, Scanner Pro and Hazel, moving the files to the desired folders is a piece of cake. A couple of rules added to my iCloud Drive folder results is all Hazel needs to move files as required.

The next step
But the entire workflow requires a little more complexity to get the results I’m looking for. The business and healthcare receipts require a bit of work on my end, and, since my memory is not that great, I need a reminder.
Things 3 is my task management tool of choice, so I want this workflow to add a task that reminds me to take the last step (either updating my accounting spreadsheet or submitting a healthcare expense for reimbursement). Thanks to the workflows option in Scanner Pro and IFTTT, this is achievable.
Here’s how I do it.
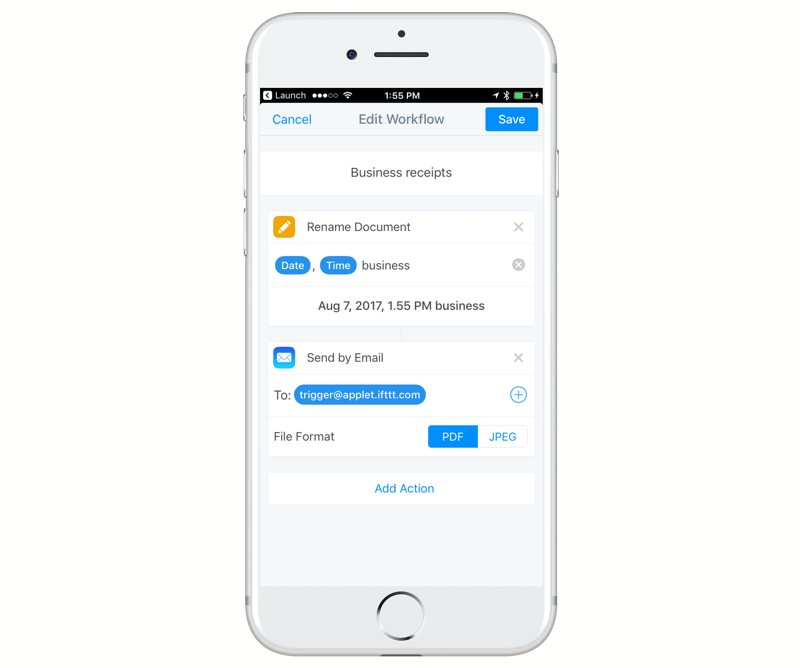
First, I use a workflow in Scanner Pro to kick off the process. After scanning a receipt (or multiple receipts), I initiate the following IFTTT workflow:

This renames the receipt and sends an email to the required email address at IFTTT. When it runs, the email draft is generated and displayed on the screen, using the scanned item’s name as the subject. My one task here is to add a pound sign in front of “business” in the subject line (to indicate to IFTTT this is a tag).
In IFTTT, I have an applet that watches this address for emails with a specific tag in the subject line. It then adds an entry to the Reminders app (to a list that is cleverly named Reminders). The IFTTT applet looks like this:

This specific list is tied to my iCloud account and is available on all my devices.
The last step is to get these reminders into Things. That is an option that exists within Things itself:

At this point, the reminders are tasks in my Things inbox, ready to be imported. They do not have a due date and are not associated with a project, but that’s fine with me as they get processed during my weekly review each Sunday.
Did you notice the last step of the Hazel rule above? After moving the file, Hazel also adds a color label. This way, when I review the folder, I can see which receipts need to be processed. Once completed, I remove the label.
There are likely dozens of alternate approaches one could take here (especially if you have some knowledge of AppleScript), but I wanted something as simple as possible using the tools I already use regularly.
The above approach allows me to scan a receipt the moment I receive it. Then I throw it in the recycle bin and go about my day with the peace of mind that I’ll process the “paperwork” as required when time allows.
We have more useful workflow examples right here.
