Ulysses on iPhone and iPad
One of the great things about Ulysses is that you can sync your sheets between your Mac and your iOS devices, allowing you to edit your text anywhere on any device.
The interface for Ulysses on iOS is laid out the same way as it is on the Mac in three panes. But on the iPhone, you don’t see them all at the same time. From the library, you select the sources and the group or filter that you want to select the sheet from. Then select the sheet you want to open and edit. You can go to the previous screen, either by tapping the link in the upper left, or by swiping from left to right.
On the iPad, you can actually see all three panes of the Ulysses interface, but you can’t interact with them all at the same time. Select the folder or filter from the sidebar to see the available sheets. Then tap on a sheet to reveal the contents. And finally, tap in the editor pane to actually edit the text itself.
The interface may look a little bit different on iOS. For example the statistics are actually on the bottom of the screen for the iPhone and the iPad, but all of the major features are still there. In fact, iOS has a couple of additional features which are worth pointing out.
Share Sheet
The first unique feature of the iOS version of Ulysses is the Share Sheet. This isn’t unique to Ulysses as many apps on iOS have a share sheet extension which allows you to quickly get things in and out, but it’s very handy for Ulysses because often your writing projects will start off as a bit of research. For example, you might find a website that you want to “clip” to Ulysses so that you can write about it later. Tap the Share button at the bottom of the bar in Ulysses to open up the Share Sheet and store this page in Ulysses for later. Now Ulysses won’t show up until you enable it, so scroll to the right in the list of apps and tap the More button. From here you can toggle on any apps that you want to show up in this list, including Ulysses. Find Ulysses in the list and toggle it on, then select Done. Ulysses is now an option, but we don’t want to scroll all the way to the right every time so tap and hold on the Ulysses icon and then drag it to the left to reorder the icons. Now tap the Ulysses icon to trigger the Share sheet, modify the text that you want to appear in the sheet, and select the specific place you want to store the sheet and tap Send. Now if we go to Ulysses, we can see the sheet in the Inbox where we saved it and we can pick up editing from here .
3D Touch
The second unique feature in the iOS version of Ulysses is the ability to use 3D Touch for quick actions and previewing. While working in Ulysses, if you want to take a quick glance at a sheet, switch to the sheet list and 3D Touch on a sheet to display a preview of its contents. If you let go, the preview will close again, but you can also swipe up on the preview to access all of the available quick actions. You can add the sheet to your favorites group, you can edit the keywords for the sheet, or you can move the sheet to a new parent group. If you hold the preview and press a little bit harder, you’ll actually open the sheet.
You can also use quick actions from the home screen by 3D Touching the Ulysses app icon. From here, you can create new sheet in your libraries inbox, or you can instantly search through all your text with quick open. You can also open your favorites group, or access the sheets you’ve been working on during the last seven days. The top-most option, share Ulysses, is a system default, and lets you share the App Store link to Ulysses, via Messages, Mail or another application using the share sheet.
X-Callback URL
The third unique feature of the iOS version of Ulysses is the workflow integration. Ulysses for iOS offers deep support of the X-Callback URL scheme, which is at the heart of its workflow integration and allows it to interact with other apps. If you really want to dive deep into automation with Ulysses, you can see the available options by going to ulyssesapp.com/kb/x-callback-url. Fortunately for those of you who aren’t interested in learning a programming language for learning automation, Ulysses also integrates with the workflow app. To use Ulysses actions inside of a workflow, search the available actions for Ulysses. Here are the options that are available to you. New Ulysses group. This option allows you to create a new group in the library. You can name the group and even optionally select a parent group you’d like the group to be nested within. Get details of Ulysses sheet. This option allows you to get specified details from a specific Ulysses sheet. Like the title, identifier, contents, keywords, notes, or name.
Attach to Ulysses sheet. This option allows you to attach text, keywords or an image to a specific Ulysses sheet. You can choose the format of the text to add as markdown, which is the default text, or html.
Open Ulysses. This action simply opens the Ulysses app on your iOS device.
New Ulysses sheet. This action creates a new sheet inside of Ulysses.
Get Ulysses sheet. This action allows you to select a specific Ulysses sheet.
Add to Ulysses sheet. This option allows you to append text to a currently existing Ulysses sheet. Here’s a basic example of a Ulysses workflow that allows you to pass the select text on and append to a specific note in Ulysses.
To start, open up workflow on your iOS device, and tap the plus icon in the upper right to create a new workflow. Select a type of workflow from the list. In this case, we’ll use a normal workflow. Swipe from left to right to reveal the suggested actions, and type in the search bar to search for Ulysses. At the bottom of the list is the action to add to a Ulysses sheet. So we’ll select this one and drag it to the right. We want to add this text to the end of the sheet so we’ll make sure that “end” is selected for the “add to” field.
Next, we need the sheet identifier of the sheet we want to add the text to. We can find this in Ulysses. So let’s switch back to Ulysses for iOS, find the sheet that we want the identifier for. Swipe from right to left to reveal the “more” option, and then select “share”. From the “share” sheet, select the “copy callback identifier” option and paste it into the workflow in the “sheet identifier” field. Make sure the format is markdown and “make new line” is toggled. You can toggle off “return to workflow”, since we don’t need to return to the workflow app once we’re done.
Once you’re done setting this up, tap the gear icon in the upper right. Tap to name the workflow. We’ll call this one “append to Ulysses”. And next let’s go ahead and add this to draft by tapping the “add to drafts” button. Select the tab you want your workflow stored in, and we’re ready to use it. Now we can switch over to drafts, type our text in. Hit the action button the upper right, before tapping to launch our new workflow, which will open Ulysses and paste the text at the bottom of the specified note.
iPad Keyboard Shortcut Cheatsheet
When using Ulysses on the iPad, you can easily reference the available keyboard shortcuts by simply holding down the CMD (COMMAND) button for 2 seconds. Then, a quick-reference sheet will pop up letting you see all the keyboard shortcuts available to you.
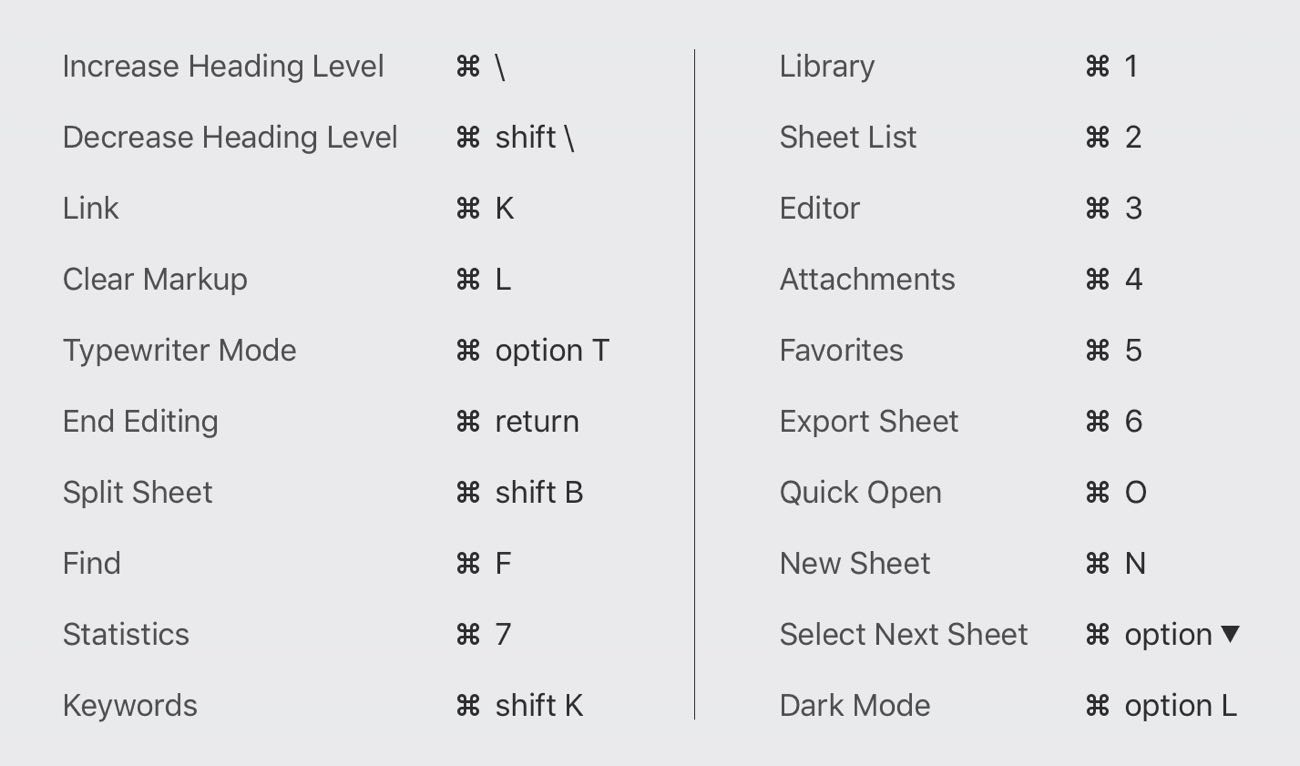
A few which I find personally helpful include the keyboard shortcuts for inserting a link, adding keywords, the quick open, and quickly switching to dark or light mode: CMD+K, CMD+O, CMD+SHIFT+K and CMD+OPT+L respectively.
